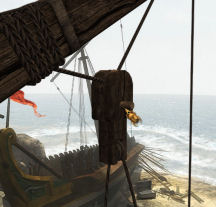
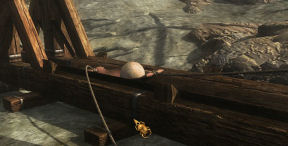
Cleopatra: Riddle of the Tomb – Cleopatra: A Queen’s Destiny (Riddle of the Tomb)
Cleopatra: A Queen’s Destiny (Riddle of
the Tomb)
by Nobilis & Kheops Studios
Walkthrough by MaGtRo September 2007
Gameplay: Cleopatra invites
you to her palace apartment in Alexandria. It is at your disposal.
There is .pdf manual installed with the game.
The options selection is at the pillar area. The
pillar has the overall volume, the globe has the rotation selection, left scroll
on the table has the subtitle selection and the scroll at right has the object
info selection.
Play selection is towards the corner table left of the
room. The table has 5 statues-avatars for your game profile selection. Click on the statue to get
a selection of the zodiac seen on the wall above the profile selection. The sign you choose will influence events in the
course of the game.
The open entryway at right to the balcony is new game.
The saved game stand is across the profile selection.
There are unlimited saves. The door to the right of the stand is the return to
the game. The load game is found under the profile selection. Select a scroll
and see the picture of a saved game. The latest saves are at the bottom.
Quit game is on the opposite side of the room towards the stairs
going out of the room. The
credits and gallery are seen on the frames on the wall right of the
quit steps. The gallery has the movies and music of the cinematic.
Right click during gameplay accesses the gameplay
menu. The left pillar’s top icon is for the main menu. The eye is the notebook and
has the thoughts of Thomas. Read it to see the progress of the game. There are
arrows at bottom to go from one page to another. The man icon has the game’s
dialogue history. The bottom of the left pillar has the selected zodiac sign and
shows that day’s horoscope.
The center of the screen has the storage for
inventory. It has 6 tabs or pages for items.
The right pillar’s top icon has the transit storage
frame. The pyramid icon has the map of Alexandria that is used to jump from one
place to another place visited . The disassemble-empty icon is the
third icon used to take an object apart or empty a recipient. The X icon is the
return button.
The ESC key or left mouse key skips dialogues and cutscenes.
Cleopatra is at war with her brother-spouse Ptolemy.
The city of Alexandria is in a bloody civil war.
You play Thomas the Chaldean, a student of astrology
and astronomy in Alexandria. Akkad is his teacher and
mentor. Iris, Akkad’s daughter is Thomas’ guiding light.
They lost contact due to her helping with a commission
that Akkad is doing for an unknown person. Thomas visits the observatory to see
if the work is nearly at end.
Note: The gameplay changes from
one player to another depending on the zodiac sign selected. The day’s events
are
affected by that day’s horoscope. It can be a good day or bad day depending on
the favor of the Gods. The puzzle
difference during gameplay is noted by a sound and brief rain on the screen.
When the game is completed 2 new signs
are opened. One, all good days and the other, all bad days.
Bloody Disappearances
Garden of the
Observatory:
On the way to the
observatory, see blood on the pavement. Turn around and click on the door to see
that it is intact.
Turn around again. Click on the earthenware
jar in front of the right sphinx. Take the strip of papyrus.
Akkad’s bronze pyramid:
Follow and click on the trail of blood. See Akkad’s pyramid ahead.Bad day: Go forward from the jar
and turn right. Take the papyrus stalk on the ground.In front of the side of the pyramid baked by the
sun, pick up half of a
broken stick (half of a scytale used to decrypt a message written on a
strip) and Iris’s writing case from the ground.Check the zodiac signs around the pyramid. Turn left and go forward.
Bad day: Look left before the
bridge going to the sphere area. Pick up another papyrus stalk from the
ground.Turn right before the bridge and go forward to the other side of the pyramid.
Eros: See the statue of
Eros missing the arrow.Observatory: Go forward to
the left corner of the building ahead. Look left and see trampled plants. Pick
up Akkad’s half crown. Turn around and pick up part of a theatrical
mask from the ground.Go right to the building’s door. See trampled plants right of
door. Knock on the door. Where could they be?Turn back and forward to the pyramid.
Go across the bridge and see the statues of Horus
and Anubis facing the mausoleum.Akkad’s Mausoleum: The
mausoleum is
across the pyramid. We cannot enter yet.Look down on the water
in front of the pyramid and see the rhinoceros heads’ overflow blocked by reeds. There’s a papyrus there also.Continue on to the bridge right of the mausoleum. Pick
up another piece of stick at right before the bridge.Closed Gate: Go forward to
the closed gate framed by 2 Hippopotamus waterfalls.Turn around and pick Iris’ precious bracelet
from the ground.Wall: Cross the bridge and
be close to the wall with scaffolding. See arrows flying outside the wall.Good day: Pick up metal hook
and pot of bitumen close to the pile of bricks.Bad day: Pick up metal hook,
pot of bitumen and leather strap from the pile of bricks.Turn around and look at the statue of Eros. This one
has an arrow.Stick – In inventory combine the 2 sticks and
the pot of bitumen to get mended stick.Then combine the mended stick and the strip of
papyrus taken from the jar. The person who ordered the divination has sent
someone to kill him.Water drain: Go back to the
papyrus in the hippo water drain in front of the mausoleum and pyramid.Use the metal hook to get the papyrus. It floats
downstream.Good day: Use the metal hook to
get the papyrus caught on plants close to shore.Bad day: The papyrus is caught on
plants
far from shore.In inventory, combine the 2 papyrus stalk with the
leather strap to make a long pole.Use the long pole to get the papyrus.
Wet papyrus: The papyrus is
unreadable and wet.Go to the sunny side of Akkad’s pyramid. Use the wet
papyrus on the sunny side of the pyramid to get dried papyrus.The papyrus is still unreadable when used with the
stick.Use the papyrus with the writing pad and then use the
readable papyrus with the stick.Iris writes: They injured my father! Go into the
observatory. If you can correctly name the arrow constellation and the 2
places it points to, then Sagittarius and Eros will open the doors for you.
The Mysterious Person Behind the Order
Sphere: Go across the
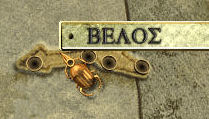
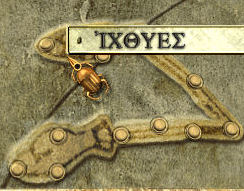
bridge left of the pyramid and see a globe covered with constellations.1. Based on Iris’ clue: Look for the Arrow
constellation. Click hold to turn the globe.Place the cursor over the Arrow constellation and
the name of the constellation can be seen at top right of the screen.2. Name the arrow constellation. Using the label of
the constellation in Greek letters, enter the letters by pressing the correct
Greek letters seen at the ring at the middle of the globe. Click-hold to turn the letter ring.Place the cursor over the letter and the name of the
letter can be seen at top right of the screen.The letters do
not repeat, so once it is pressed down, continue to look for the next letter to
be entered.
Thomas will say when the name is finished.
Enter: beta, epsilon, lambda, omicron and sigma.
See the stars in the constellation light up.
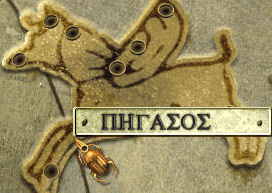
3. Name the 2 places it points to. The arrow
constellation points to Pegasus and Pisces.Enter for Pegasus: pi, eta, gamma,
alpha. Pegasus’ stars should light up together with arrow’s star.
If wrong, it will not light up or arrow’s stars will
dim.Enter for Pisces: iota (with apostrophe before the
letter), khi, theta and upsilon.
All the 3 constellation’s stars should light up.
See the Eros with no arrow move its arm and bow.
Wall: Go back to the Eros
statue by the wall of the garden.Good day: Pick up the intact
arrow in front of the pond.Bad day: Pick up the broken
arrow that nearly hit you.Eros by pyramid: Go back to
the Eros with no arrow.Bad day: In inventory, click the
broken arrow on the disassemble icon at right to get arrow tip and
arrow feathers.Combine arrow tip, arrow feathers, mended stick and
pot of bitumen to get assembled arrow.Click to position the bowstring. Place the arrow on the Eros statue.
Click on Sagittarius symbol that popped up on the pyramid. Oops,
too high.Pick up the arrow and place it back on the bow.
Position the angle of the arrow by clicking on Eros.
Click it to the middle position.Click on Sagittarius and the arrow hits the eye of
the animal on the wall of the Observatory.A door opens.
On the Trail of the Guilty Party
Observatory: Enter through the
secret door. The main door opens.
Akkad’s workshop: Take
Akkad’s notes on the shelf left of the door. Akkad needs the ancient tablets
of Enuma Anu Enlil to decipher the stars for Cleopatra.Go to the left and take the Heliolab note from
the end of the stone shelf. The heliolab is used to contact the Queen’s
emissaries by encoding the current Chaldean month.Take the tablet mold and clay from the
box on the floor.Turn around and down. Take the lighter from
the stool.Akkad’s workshop: Go
forward to the worktable. Pick up the letter from Akkad to Iris and the
small pliers from the table. The letter gives the commission: to find
out if an alliance with Caesar will enable Cleopatra defeat her brother.Look up and take the notched rod (9 notches)
beside the lamp on the shelf.Look at Akkad’s universal calendar on the wall
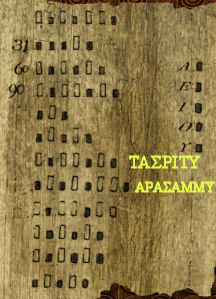
above the worktable. Today is the first day of the month of Arasammu and the
208th day of the year.Turn around. Pick up the papyrus with months
from the chair in front of the other wall scroll slots. It is a list of months
according to Chaldean calendar. The month before Arasammu (ARASAMMU) is
TASRITU.From the above clues, we know the month to encode on
the heliolab – Arasammu.Now, we should encode the heliolab.
Terrace: Move the curtain
at right and exit the workshop. The door to the reception room is locked and
the main doors are open.Climb the stairs to go to the terrace.
See Akkad’s heliolab. Take the ancient rod for
tags that has preset tags already from the heliolab.Pan left and open the chest. Take the papyrus
with codes from the chest. It shows the arrangements of the tassettes or
tags.Go forward and see Akkad’s astronomical instruments.
Take the clepsydra, a time counter by water flow.Turn around and see a sun dial. Go back down to the
workshop.Arrange the code on the heliolab rod:
Go back to the worktable.Study the arrangement of the tags on the ancient
rod. It has large, small, large, large, small, large and small.Look at the papyrus with codes. Look for the
arrangement similar to the one on the ancient rod.The arrangement below it must be the one for
Arasammu.
Bad day: Take the small board
propped on the worktable.Pick up the small tassette-tag from the
basket.In inventory, combine small board, small pliers and
small tassette-tag to get pile of tags.Place pile of tags on the empty basket.
Place the notched rod on the slot on the table.
Using the tags from the 2 bowls on the table, place
from left to right: small, large, small, large, small, large, large, small.
Pick up the newly prepared rod with tags.Send the code on the heliolab:
Go back up to the terrace.Place the rod with tags in the end of the ornate
cylinder at the bottom part of the setup.Turn the rod at the other end to wind the spring
at the center.Push the small metal plate on the ornate cylinder close to
the rod with tabs.
See the message sent. Thomas meets with Queen
Cleopatra. Akkad and Iris were taken by Ptolemy. Thomas was ordered to find
the Enuma Anu Enlil. While her soldiers are in the trail of Akkad and Iris.
A Broken Necklace
Go back to the Observatory and the workshop using
the ‘jump to’ of the map.Go to the right corner of the room.
Open the cabinet on the wall left of the scrolls.
Take the scroll that tells the Story of Enuma Anu Enlil. Learn the fate
of the tablets.Pan right and take the letter from the librarian
from the wall scroll slots. Aristion of Perganum, the librarian will
give the gathered information about the tablets to Thomas.
Library of
Alexandria: Jump to or exit through the main gate to go to the
library.
Crocodiles are in the
library grounds! Pick up the broken necklace from the bloody cloth in
front of the closest crocodile.Click on a crocodile and
realize that they are not Nile crocodile but from the Temple of Sobek.Go forward using the
right side of the pond.Good day – In
inventory, disassemble the necklace to get a papyrus.Bad day – At right side
of pond, pick up the stone. Use the stone on the broken necklace to get the
papyrus.Read the papyrus to see the clue in finding the secret
hiding place.See boxes close to the
entrance. Try to pick up the ushabti figurine or the Sobek (crocodile) statue. An old
crocodile guardian arrives. He says that the Temple of Sobek was sacked and the
priests were killed. He wants all Greeks killed. As retaliation, he and his
crocodiles came here to the library and killed everyone. He is mad.
The Crocodiles of
Sobek
The mad old crocodile
guardian is preparing for his death. He wants 2 or 3 ushabti figurines to serve
him in the afterlife. He will let you pass if you can get him 2 more aside from
the one he has on the table.Take the ushabti
figurine from the table.
Akkad’s Workshop:
Use the map to jump to Akkad’s workshop.
Make
ushabti figurines:Molds –
Get 2 clays from the box by the curtain.In inventory,
combine tablet mold, clay and ushabti figurine to make unbaked ushabti half
mold (front).Do it again –
combine tablet mold, clay and ushabti figurine to make unbaked ushabti half
mold (back).Get 2 clays
from the box by the curtain.Bake the
molds – Go to the kiln.Take dry
leaves from the floor at right and place it in the kiln.Use the
lighter on dry leaves to make a fire.Add coal taken
from the box on the floor on the fire. Do this 3-4 times or until Thomas
says enough.Place half
ushabti mold (front) on the embers.Take the kiln
tong hanging on the left and keep it ready (over the mold) to pull out the mold.Wait until
Thomas says it is ready; then use the tongs to take the baked ushabti half
mold (front).You might need
to build the fire once more. Do as above.Do the same
thing for the half ushabti mold (back) to get baked ushabti half mold (back).Figurines
from mold – In inventory, combine the baked ushabti mold (front), baked
ushabti mold (back) and clay to make unbaked ushabti figurine. Make 2
(Good day) or 3 (Bad day) figurines.Build the fire
again. Place one
unbaked ushabti figurine in the kiln at a time until you have 2 (good day)
or 3 (bad day) ushabti figurines.Before you
leave, have 2 clays in inventory to save jumping later.
Library of
Alexandria: Jump to the library and place the ushabti figurines
on the table.
Talk to the
old crocodile guardian completely. Now the old crocodile guardian wants to be
shown how to weigh his soul. This process needs 4 God statuettes.
Observatory
Garden – Mausoleum: Remember this is where Akkad’s
mausoleum is located and he prepared for the afterlife already.
Jump to the Observatory Garden. Go to the mausoleum
and look close at the door lock.
Open the
door: The door lock has 4 holes on top and 3 plugs on the
front. In between are hieroglyphs.Read the
hieroglyphs: I was born at one; at three already a
man I was; at five I was aged, past my prime; when nine shall chime the hour,
the tomb gates shall open.Pull the left
plug and see water flow out. It’s a water lock!Go to the
hippo waterfall beyond the bridge right of the mausoleum.In inventory,
disassemble the clepsydra.Use the
clepsydra on the waterfall (not on the pool water). Fill it to the 12 hour mark.Go back to the
water lock on the mausoleum door.Use clay to
plug the open hole on the right at front of the lock.From left to
right: Place one hour or 1 click of water on the left, next 3, then 5 and 9 on the
right. Fill the clepsydra when needed. The count can be checked using the bar
that rises from each hole.Bad day – One
of the plugs pops off. Use clay to plug the new hole.Statuettes:
Enter the mausoleum. It’s dark. Look down in front of the tomb and use lighter
on the oil cavity on the left.Go to the God
shaped containers on the right. Open each container and take Isis,
Thoth and Anubis statuettes.Turn over the
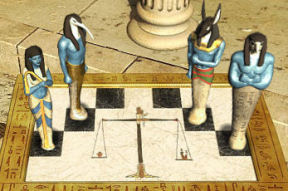
cover of the Anubis container on the floor and take the Horus statuette.Go to the opposite wall and study the soul weighing
ceremony fresco. Isis is on the left, Thoth, the scale, Anubis and Horus at right.Now, you know
how to arrange the statuettes.
Library of
Alexandria: Go to the library (either by map or exit the gate).
Crocodile
caretaker: Place the God figurines on the casket’s
black squares. From left to right: Isis, Thoth, 2 empty black squares, Anubis and
Horus at right.
The mad
crocodile caretaker makes a path to the door of the Great Library.
The
Euclid Enigma
Great
Library: Go inside the library. Turn around and pick up the grappling hook. Turn right and see crocodile eggs in a basket.Go forward to
the left side of the room. Look at the fire. Take the digging bar right
of the lamp stand.Go forward.
Look at the painting at far wall. Turn left and go forward to the corner. Take
rope beside the crocodile. Look at the destroyed wall scroll slots. In
inventory combine rope and grappling hook.At the center
of the room is a crocodile with metal bracelets on its legs and a metal collar.
Click on collar and Thomas says the necklace is resistant.Go to the sitting man.
Talk to Kordax, servant to the Ptolemeics. He’s a hunchbacked jester of sorts. He wants Thomas
to get him get away from the mad crocodile caretaker. Look at the crocodile
guarding or waiting for dinner in front of Kordax.Enter the room
beyond Kordax.Room of
rare plants – Look around. Turn right and pick up 4 piles (stacks) of 4
bowls.Look up on top
shelf and take inventory of Ingredients scroll.Review the
clue given by Aristion in his necklace’s papyrus. Aristion writes that the
clues to the location of the secret room are:1. List of plants used as diluents
or solvent by painters: in a basin of water add one handful of Lullibi flowers,
2 handfuls of Makkan seeds, 2 handfuls of Uruku roots and one handful of Amath
leaves.2. A Euclidean
inspiration: The first four prime numbers will open the door.Based on the
inventory of ingredients scroll, there are no Amath leaves.Pan right on
the right shelf and use bowl to get: Lullibi flowers, Makkan seeds, gray
nugget, red powder, gray powder, white powder, black powder and green powder.Turn around
and use bowl to get: Uruku root, Meluhkha bone, Canaan thorns, orange powder,
white powder, yellow powder, ochre powder and white nugget.Bad day – the
gray nugget is moldy and can not be taken. There will be one empty bowl in the
end.Laboratory –
Go to next room. Take and read the Diomedes reaction scroll from the wall, the
Zoilos reaction scroll on the left on top of the plank and the Prusias
properties on the table beside the empty bowl.Ah there,
Prusias scroll states that Amath leaves and Canaan thorns have the same
properties.Click a bowl
of ingredient on the holder and automatically place the bowls on the holes. All the holes
should have a bowl.Turn right and
pick up empty decanter from the shelf.Prepare the
solvent – Use big empty metal bowl on the water on the right to get filled bowl.Add one
handful of Lullibi flowers, two
handfuls of Makkan seeds, two
handfuls of Uruku roots and one handful of Canaan thorns.The solvent is
done. Use the empty decanter on the bowl of solvent to get solvent.Great
Library – Now, where to use the solvent? Go back to the Great Library.Columns
– Go to the painting of the Ptolemeics at the back wall. Look down on the right
and look close at the base of the column right of the painting. The column is
painted to look like marble.Use the
solvent on the base of the column to reveal triangle pointer, numbers and a
hole.Do this to all
the bases of the 4 columns.Look again and
Thomas says it looks like it can be turned but needs power of a colossus.Place the
digging bar on the hole. If you haven’t
done it yet, combine rope and grappling hook.Power of a
colossus? Ah, but we do have one at the center of the room.Go to the
giant crocodile with the metal bracelets and collar – Souchous. Very cute name!
Hiss!Use the rope
and grappling hook on Souchous.Aristion’s clue
stated: The first four prime numbers will open the door. The first 4
prime numbers are 2, 3, 5 and 7.Left column – Take the end of the rope and use
it on the short end (back side close to the wall) of digging bar inserted in the
first left column. The first column points to I. It should be turned once to II.Go back to
Souchous but the old caretaker states that Souchous understands only the stick.Go outside and
take Sobek’s staff beside the Sobek statue.Use the staff
on the crocodile. The column turns once and the arrow on the first column now
points to II.Second from
left column – The second column is at II. Untie rope and take bar from
previous column. Insert bar, tie rope
to the short end (back side close to the wall) of digging bar and tap Souchous once to get the column to point to III.Third from
left column – The third column points to II and needs to be moved to V.
Untie rope and take bar from previous column. Insert bar, tie rope to the short
end (back side close to the wall) of digging bar
and tap Souchous three times to get the column
to point to V.Rightmost
column – The fourth column points to I. Untie rope and take bar from
previous column. Insert bar, tie rope
to the short end (back side close to the wall) of digging bar and tap Souchous three times to get the column to point to VII.Secret
Chamber – The bottom part of the painting on the left opens to a secret
chamber. Enter the secret chamber.Take the
tablets on the chair. Sobek’s guardian realizes that he was tricked.
Escape
Find yourself
in front of Kordax. Talk to him completely. Look around and see that both of you
are cornered by the crocodiles. The guardian is in the secret room.Open the
basket on your feet. Take the Soothing balm scroll. Take fillets
of dried fish.Prepare the Sleeping draft – Go to the laboratory.
Study the
recipe in documents. Realize that you do not know which one is the Ashod resin
in nugget form and which one is the white powdered Tjekker flower.Good day –
There are 2 nuggets and there are 2 white powders.Bad day –
There is one nugget but the gray nugget is moldy. There are 2 white powders.Read the
Diomedes reactions scroll and see how to test for Tjekker flowers and Ashod
resin.Tjekker
flowers:Empty the bowl
of water by clicking it on the container on the left. Use empty bowl
on the water on the right to get filled bowl.Add 1 handful
of Mitanna gum from one of the top left containers, 2
handfuls of Arsawa powder and 1 handful of white powder 4th from left bottom row.If correct, Thomas will say: I identified one of
the constituents. The bowl will then be labeled.Ashod Resin
(Good day):Empty bowl and fill it with water. Add 1 handful
of Mitanna gum, 2
handfuls of Arsawa powder, 2
handfuls of Pitasa gum and 1 handful of grey nuggets powder.If correct, Thomas will say: I identified one of
the constituents. The bowl will then be labeled.Ashod
resin-Ataniya roots (Bad day):Read the
Prusias properties scroll that states that Ataniya roots and Ashod resin possess
similar properties. Read the Zoilos reactions scroll to identify Ataniya roots.Empty bowl and fill it with water. Add 1 handful
of Kerma powder, 2
handfuls of Arsawa powder, 2
handfuls of Pitasa gum and 1 handful of grey powder.If correct, Thomas will say: I identified one of the
constituents. The bowl will then be labeled.Sleeping
Draft:Empty bowl and fill it with water. Add 2
handfuls of gray powdered Melukhka, 2
handfuls of Ashod resin (good day) or Ataniya roots (bad day) in nugget form, 2
handfuls of green powdered Canaan thorns and 2
handfuls of white powdered Tjekker flowers.Add fillets of
dried fish to Kordax’s concoction to make soporific fish. They will turn pink.Go back to the
crocodile in front of Kordax and give it the soporific fish.
The
Cyclops
Watch the 2
escape. Kordax stayed in the Observatory. Thomas meets with Cleopatra and the tablets were
given over. Akkad and Iris are in the Isle of Pharos. There is an epidemic
there. Thomas is to be given an antidote and sent there to save
his mentor and lover.
Isle of
Pharos: Kordax’ friends dropped Thomas at the Isle of
Pharos.
Thomas can
contact them again using the horn hanging on a post beside the pier.Turn around
from the lighthouse and see a pile of sand. You might need it later.
Lighthouse of
Alexandria: Go forward to the lighthouse passing a ladder
and Cyclops-catapult-war machine.
See a light
signal on top of the lighthouse. It is similar to the heliolab. That must be
Iris and her father.Go forward to
the wall. Look at the wall that is partially destroyed by the war machines.
See sand piles close to the lighthouse wall and note the dead soldiers behind
the barricades.Cyclops –
Catapult – War machine: Go back to the war machine. It needs to be reset.Catapult
counterweight – Go to the front part of the catapult facing the lighthouse.Place the 3
sand bags from the ground in the counterweight bin. See that it still not full. If the
counterweight is not full, the shot will fall short.Make new
sand bags – Go to the galley that ran aground at the beach. Look at
the galley. There’s a beam
on the sand.Look right and
open the chest that contains the galley sails. Take needle and reel of thread
and the fraying instrument.Use the
fraying instrument on the sail inside the chest to get large section of sails.
Use the fraying instrument on the large section of sails to get small strip
of sail.Combine needle and reel of thread with small strip of
sail to make bag. Make
three bags.Go to the sand pile by the pier (or to the pile of sand close to the lighthouse wall). Use the 3
bags on the sand to get 3 sand bags.Place the 3
sand bags on the counterweight. If it is full, Thomas will say so.Winch –
Go to the back wheel part of the Cyclops-catapult.Look down and
see that the winch cable loop on the ground. Look up and see the winch to
hold it is up on the beam.Turn around
and pick up the ladder. Turn around and prop the ladder on the beam.Pick up the
winch cable loop from the ground.Climb the
ladder and attach the winch cable loop on the winch. Thomas says that it will not
hold together and needs a peg.Go down and
pick up the broken peg on the ground.Go to the
galley. Open the galley carpenter’s chest left of the beam.Take the
hammer and chisel. Use the chisel on the beam to get piece of wood.In inventory,
combine the broken peg, piece of wood, hammer and chisel to get new peg.Good day – The peg will hold.
Bad day – The peg breaks and have to make a new one
again.Climb the
ladder and place the new peg on the hole of the winch cable to hold it tight.
Load the
catapult – Climb down the ladder and return the ladder to the boulder at
other side.Go to the front part of the catapult and take the wooden frame with circular
hole in the middle and the ball of stone from the ground. The wooden frame seems to fit
around the stone.Go to the back
part of the catapult. Turn the switch below the wheel to the left position to tighten the
cable. Turn the wheel to lower the beam.Take the
catapult sling that is lowered and place it on the beam at the middle of the
base of the catapult.Place the
stone ball on the sling.
Take the
hook attached to catapult sling and use it on the ring at end of the lowered
beam.Fire the
catapult – Turn the switch below the wheel and see that it is stuck.Use the hammer
on the peg inserted on the lowered winch.See the ball
hit and makes more damage to the wall. Go to the wall and check it out. See if
you can get through the damage.Pick up the
stone ball. Go back to the catapult and click to pick up the winch cable
loop. Automatically, the catapult setup is done.