Just Adventure original
Celtica Walkthrough by Dan Kennedy
The unaltered guide: no contents list, no checkboxes, no page breaks. This is what the archive holds. Back to the reading view
Introduction
Picture a blender. Pour
in two-parts Myst, one-part Zork Nemesis, several books
on Irish history and occultism, that reference book in every adventure
game developer’s collection that contains all those zodiac and alchemy
symbols, and add a touch of the 7th Guest. Puree, pour onto
two CD-ROMs, and serve.
As you may have guessed,
there really isn’t much about Celtica that is terribly original
– not that there’s anything wrong with that. Celtica does
almost drip with its influences, Myst being the primary one,
but it’s a good quality and engaging game. The story, which takes
place on a mysteriously abandoned island off the western coast or
Ireland, is well designed and immersive. The graphics are quite evocative
(although presented in the very dated “slideshow” format), and the
sound effects / music really set a haunting mood.
The problem is, of course,
the invariable comparisons to its predecessors, and Celtica
is certainly no Myst. For all the haunting atmosphere, the
pretty green and grey locales, the mystery, Celtica essentially
asks the player to run around an island collecting pages, jewels,
and harp strings. Unlike the puzzles of Myst or Nemesis,
which are well-integrated into the story and had you working towards
some practical goal, the puzzles of Celtica are just excuses to reward
players with collectibles.
However,
the real let-down is in the puzzle design – there are a number of
poorly designed puzzles in the game that simply do not give enough
information to the player to allow them to solve it themselves.
Celtica’s outdated
game-play and Myst-iness ensured it a drubbing at the hands
of critics, and its reportedly heavy price tag assured it a short
run in retail (the game is a rarity these days, and fetches a princely
sum on E-bay). It’s pretty safe to say that if you liked Myst,
you will certainly get some enjoyment out of Celtica, and if
you hated Myst, don’t bother with the game.
A quality,
enjoyable game – just don’t expect a great deal of originality.
Tower
of Power
The game begins with a
quick description of the Otherworld myth – gods landing on an island
off the coast of Ireland and leaving several artifacts behind – the
Ascension Amulet, the Ascension Harp, and the Book of Ascension.
A group of monks pitched up on the island in the 8th century,
but were chased off by Vikings before they could find anything. The
narrator also mentions a group of artists, the “Children of Kerry”
who attempted to establish a community on the island at the end of
the 19th century, only to perish during the winter of 1899
– 1900.
Once the actual game begins,
you will find yourself at one of two locations on the island. Pan
around until you see either the base of a stone tower with a wooden
ladder leading into it, or a long bridge leading to a gazebo. If
you’ve found the tower, go ahead and enter it by clicking on the forward
pointing arrow. If you’ve found the bridge, turn to your right (the
right-pointing arrow), move forward to the tower, and enter.
If you’ve looked around
a bit, you’ve seen the pretty green and grey hills of the island.
Make sure you do spend some time looking from side to side as you
travel between locations on the island. The graphics play a big part
in creating the haunting mood of the game, and should be savoured.
Inside the tower, click
on the ladder rising up into the tower in front of you. Click again
on the opening above to climb onto the next floor. Nothing here –
continue upward, and click on the entrance to the top floor. Turn
around until you see a writing desk and a telescope. Click on the
telescope (note the “hand” icon) to get a view of a gazebo at the
end of a long bridge. Back away from the telescope view (click the
“down” arrow), and click on the sign on the wall above the desk.
The passage mentions something about collecting books, and the monks
and Vikings.
Planets,
and Alchemy, and Symbols, Oh My!
There are three items on
the desk – click on the box to the left, and note the two keyholes
on the box in the close-up view. We’ll obviously need a key to get
into the box. Next, back away and click on the book to the right
– the volume is automatically inserted into your book collection.
To access the books, press the right-hand button along the top of
the screen. Select the book you want to read using the arrow buttons
above the picture of the books, and press the button to the left of
the picture to access the text. The book is filled with all the tools
of the adventure gamers trade: planetary information, zodiac symbols,
the Greek alphabet – it’s all here.
Click away from the book
to return to the game, and click on the box on the centre of the desk.
Seven strange symbols are found along the perimeter of a circle, with
7 coloured sticks below. The symbols and circle should look familiar
– you just saw them in the book (open it up to confirm if you’ve already
forgotten).
The second page of the
book shows the exact same circle with the same symbols (the Chaldean
Order), and indicates a celestial body to go with each symbol. The
first page of the book includes information about how each celestial
body is associated with a day of the week.
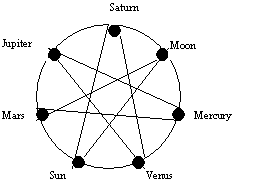
In addition, a passage
appears at the bottom of the page: “Trace magic order…starting at
the sun, the swiftest, out to the furthest and slowest”. Don’t bother
trying to figure this out – simply connect the symbols in the same
order as the days of the week
Pick up a stick from the
set at the bottom of the board (the colours are meaningless), and
connect two symbols by clicking both of the buttons of the symbols
you want to connect. Connect them in the following order:
1.
Sun to Moon (Sunday to Monday)
2.
Moon to Mars (Monday to Tuesday)
3.
Mars to Mercury (Tuesday to Wednesday)
4.
Mercury to Jupiter (Wednesday to Thursday)
5.
Jupiter to Venus (Thursday to Friday)
6.
Venus to Saturn (Friday to Saturday)
7.
Saturn to Sun (Saturday to Sunday)
The circle will dissolve
to reveal a small brass key (labelled Bernadette’s Diary Key if you
place the cursor over it), and a picture of a house. Take the key,
and back away from the board. Turn around and descend the ladder
to the second floor, and continue on to the first floor. Turn around
and exit the tower.
A
Bridge Too Complicated
Walk forward one step and
turn to your right to spot a bridge leading off to a gazebo on its
own small island. Move forward and cross the bridge, and approach
a locked gate at its end. The central panel is a picture of interwoven
gold and orange bands that must be assembled before entry is gained.
|
2 |
3 |
1 |
|
2 |
3 |
0 |
|
2 |
1 |
3 |
The panel is made up of
nine squares that each rotate 90 degrees in a counter clockwise direction
when clicked. Both the interwoven bands and the outer edge of the
panel can be used as a guide to the proper alignment of each square.
From its initial position, click each of the squares the number of
times shown in the diagram to the left to complete the picture and
open the gate.
The gates
pull back, allowing you to proceed to the gazebo.
Click on the sign located
above the entrance to the gazebo: “The mother night that ushers in
the dark half of the year begins with such a bright light, so sonorous,
so clear”. Enter the gazebo, and click on the wind chimes for a close-up
view. Four of the chimes have zodiac symbols on them. You can move
each of the chimes by clicking first the chime you want to move, and
second the chime you want to replace it with. The object here is
to arrange the chimes in some designated order. But what order?
Blowin’
In the Wind
The presence of the zodiac
symbols and the words of the sign suggest time, and since there are
twelve chimes, they must represent the 12 months (or at least 12 periods)
of the year. “Begins with a bright light” suggests that a summer
month should be placed in the first location – the most obvious choice
being the shortest chime, with the Gemini (II) symbol on it).
“Ushers in the dark half
of the year…” suggests that the chimes should get progressively longer
(the longest chime with the Sagittarius symbol – a line with an arrow
through it – should be in the seventh position), and then get progressively
shorter again – mimicking the cyclical nature of the year. I know
this explanation isn’t too convincing, but I warned you.
|
1 |
2 |
3 |
4 |
5 |
6 |
7 |
8 |
9 |
10 |
11 |
12 |
As stated above, place
the shortest chime in the first position, the second shortest in the
12th position, the third shortest in the 2nd
position, the fourth shortest in the 11th position, and
so on, alternating the sides until the longest chime ends up in the
seventh position. Note that the chimes in the 4th and
10th positions are exactly the same length – the one with
the Libra symbol (two lines, top one has a bump) should go in the
4th position, and the one with the Aries symbol (a skinny
ram’s head) should be in the 10th position.
Note that the zodiac symbols
can be used as a rough guide for placement of the chimes, but are
actually misleading. To be correctly balanced, the chime with the
Libra symbol should have had a Virgo symbol on it, and the chime with
the Aries symbol should have a Pisces symbol on it.
Once the chimes are placed
correctly, they sway slightly in the breeze, and a drawer opens at
the bottom of the frame. Click on the wire inside the drawer – this
is one of the strings of the Ascension Harp. When any part of the
three scared objects is collected, a tracking graphic appears indicating
how many of the pieces of the Harp (on the right), the Amulet (in
the centre) and the Book (at the bottom) have been collected. A small
map of the island is also present over to the left. You can access
this graphic by clicking on the centre button at the top of the screen.
Back away from the wind
chimes, and turn around to face another telescope. Click on the eyepiece
to spy a small key located on the green roof of another gazebo off
in the distance. Back away from the telescope, and move forward
towards the bridge again. Cross the bridge back to the mainland,
and turn to the right.
Monk-y
Business
Walk forward towards the
remains of the 8th century monastery. Only a small round
building remains intact – click on the brown wooden door just to your
right to enter the building. Walk forward into the room, and then
keep turn to the right past the single stained glass window until
you can see a small table with papers on it, just to the right of
the door you entered through. Click on the table to look closer,
and pick up the three rolls to the left (the cursor indicates that
these are organ rolls, and each plays a different tune). The remaining
books on the table date from the time of the monks, and are of no
concern.
Back away, and turn to
the right to see some sort of prayer area. Click forward to view
a set of three windows covered with a large red curtain. Click on
the rope to the left of the curtain to reveal the windows on the left
side. Now find the hotspot at the very top of the rope to the right
of the curtain to reveal the windows to the right. We get a close-up
of the top of the right window, with the eye of a glass swan gleaming
in the sunlight. Click on the eye – it’s a part of the Ascension
Amulet.
Back away, and wait – the
sun beam that pokes through the now empty eye of the swan is shining
on something off to the right of the screen. Turn to the right, and
note the floor tile that is slightly illuminated by the sunlight.
Click on the tile to remove it, and grab a piece of the Book of Ascension
in the cavity below. Scan through the text, but don’t expect it to
make much sense.
Back away from the hole,
turn around to face the exterior door, and click forward twice to
leave the chapel. Turn to your right, and move forward past the remains
of the monastery.
Them
Bones
You will soon arrive at
the entrance to a cemetery, with the solution to the bridge gate puzzle
conveniently shown on the entrance posts. Enter the cemetery, turn
to your right, and click on the gravestone located in the centre of
the screen: Richard Francis Cabill (1871 – 1900). Back away, turn
back to the left, and move forward again into the cemetery. Turn
to your left, and click on the gravestone on the right side of the
screen: Franklin Morris (1875 – 1900). Back away, turn back to the
right, and take another step into the cemetery.
Turn to your right, and
click on the gravestone located in the centre of the screen. This
is the grave marker of Bernadette O’Donnell (1880 to 1900), whose
diary key we already have. Something bad obviously occurred in the
year 1900. The epitaph reads “And in the oblivion east was fire and
evening was light by day by night”. Back away, turn back to the left,
and take one more step into the cemetery. The gravestone directly
in front of you appears unmarked, but there is a hotspot located at
the top of the cross. Evidently something must be placed here later
in the game.
Turn around, and move one
step back towards the entrance of the cemetery. Click on the gravestone
on the left side of the screen: Hans Otto, Seaman U-300, 1918-1940.
It sounds like this person may have been a crewman from a German U-Boat.
Interesting – back away, and move forward until you’ve exited the
cemetery.
Turn to your right, and
walk towards the green roofed gazebo (it’s an “arbour”). When close
enough, you get a view of the roof where you spotted the key in the
telescope. Pick up the key, and then enter the arbour. Turn to the
left or right until you face a telescope, which overlooks the cemetery,
with three eyepieces in a box to the left. Pick up the left-most
eyepiece and then click on the telescope to look. A blurry gravestone
appears in the viewer – obviously we’ve got the wrong powered lens.
Pick up the centre lens to change the power, and look into the telescope
again – this one gives us a clear view of Bernadette’s gravestone.
The third lens on the right gives an even blurrier picture than the
first.
The
High Road
From the telescope, turn
to the right and move forward. Keep going forward, and let the path
take you back past the cemetery, the monastery, and the bridge to
the island gazebo. Once you’ve reached the tower where you started
the game from, enter it and climb the ladder to the top floor. Turn
around and click on the box on the left side of the desk. Pick up
the arbour key from your inventory, and click on the left and right
keyholes to open the box. Click on the book inside to collect another
part of the Book of Ascension.
Quickly read the passage,
back away, turn around, and descend to the base of the tower. Turn
around and exit the tower door. It’s time to return to the arbour,
so move keep forward (remember to turn left at the cemetery entrance)
until you reach the green-roofed arbour. Inside, move directly forward
without turning – this new path winds its way through some low hills
to a windmill. Keep moving forward until you stand in front of the
windmill’s door.
Enter the windmill and
have a look around. The main view of interest contains an organ to
the left, and the windmill’s turning mechanism to the right. Click
on the plaque on the wall between the organ and the mechanism – something
about the wind being music, or possibly playing music with the wind.
Back away and click on the organ – the close-up view has an on/off
knob to the left, and a slot to hold the paper rolls in the centre.
Clicking the knob does little – clearly the organ is not receiving
power.
Back away, and click forward
towards the turning mechanism. We get an upward view of the central
shaft, which is not presently turning. Back away from the view, and
click on the lever sticking out of the ground to the right of the
yellow panel. The lever pushes forward, and the mechanism seems to
spring to life. Try moving forward again – the central shaft is now
turning.
Gearing
Up
Click on the yellow panel,
and in the close-up view, click on the handle to the left of the panel
to open the cover doors. The panel contains several horizontal shafts,
5 metal gears located in six small shelves above and below the shafts,
and a number of pegs on which the gears can be placed. The gears
must be properly placed so as to connect the windmill’s power to the
organ, which is presumably connected to the lowest shaft, located
in the bottom right corner of the panel.
Begin by clicking on the
gear in the lower right shelf, and placing it on the wooden peg located
between the two horizontal shafts in the top right corner of the panel.
Next, grab the large gear in the top-central shelf, and place it on
the peg in the middle of the panel (this is the only peg that the
large gear can fit on). Next, click on the gear in the top-left shelf,
and place it immediately to the left of the lower shaft (the one in
the bottom right corner of the panel) – the peg is to the left, and
a bit below, the end of the shaft. Now take the other small gear
and place it on another peg located immediately up and to the left
of the gear you just inserted. Finally, click on the gear in the
bottom left shelf, and place it to the left of the two small gears
– when placed correctly, you should only see the edge of the gear.
Astute game players will
notice the one empty shelf on the panel and the empty peg for a sixth
gear located below the second horizontal shaft, to the left of the
big gear. So it won’t be a total disappointment to see that only
the very first gear placed in the panel is turning when the panel
is shut again. Click on the left door of the panel to shut the doors.
We’ve got a missing gear, and until we find it, we won’t be able to
make the organ play. Take a last look around the windmill, turn around
to face the doorway, and exit the structure. Move forward until you’ve
entered the arbour again.
Death
Gate
Inside the arbour, turn
to your left twice, and move forward. Keep moving forward, and follow
the path ahead as it cuts through the lovely scenery. Note the large
house that becomes visible off in the distance. The path eventually
approaches a closed gate between two hills. As you get close, read
the sign posted to the left of the gate: “From east, south, west and
north; of air, fire, water and earth; at dawn, noon, evening and night;
be law, love, life and light”.
Back away, and click on
the gate itself for a close-up view. The lock mechanism has four
wheels that join in the centre to display one word from each of the
four groups of words on the sign. Each of the four wheels can be
turned by clicking on the side of the wheel furthest from the centre
of the gate.
Which words to we choose
to select from each group? Think of the locations on the island where
we’ve seen text – one in particular was highlighted for us with a
telescope. Bernadette’s epitaph contained the words “east”, ”fire”,
“evening”, and “light”. Turn the wheels so that these four terms
are displayed in the central area, and the gate will open.
A glitch in the game allows
one to travel right through the gate without entering the four terms
simply by clicking on the “forward” arrow directly above the wheel
lock. Oh well.
Light
Table
Move forward until you
approach the front of the large house at the end of this trail. On
the front patio, turn to your left to find the front door, and click
there to enter. Inside the front room, turn to your left, and approach
the table with the gramophone on it. Click on the gramophone to watch
it wind up and play some blather about touching something.
Turn around and step back
to the door, and then turn to the left to face away from the front
entrance. Move two steps into the room, turn to the left, and move
forward – here is someone’s pewter solar system model. Turn around,
move forward a step, and click on the grey object on the table straight
ahead.
The close-up of the table’s
surface shows a light source in the top left corner, 4 glass prisms
located in various positions, and a grey object in the centre (with
a little metal doo-dad in the top right corner). The object here
is to use the prisms to reflect the beam of light into the centre
of the grey mass. All four prisms can be rotated in place (use the
double green arrow cursor found somewhere near each prism), and three
of the four prisms can be move between locations (the largest one
to the right cannot be moved, but can be rotated). There’s also a
funny little switch right below the grey mass that may come into play
as well.
Start by placing the largest
of the three moveable prisms in the bottom-left location on the table.
To move the prisms, click on the one you want to move, and then click
on its new location. Now rotate this prism until two beams of light
can be seen in it – the longest flat edge of the prism should be pointing
upward. Next, rotate the prism located just above the bottom left
one until a single beam of light can be seen in it (again, the longest
flat edge of the prism should be pointed upward).
Click on the metal switch
just below the grey mass so that it is aligned horizontally. Next,
rotate the big prism on the right until two beams of light are visible
– the longest flat edge of the prism should be pointing to the left.
Finally, rotate the final small prism in the centre so that the longest
flat edge points down. A glowing object appears in the centre of
the grey mass. Click on it to be rewarded with a piece of the amulet.
Musical
Memory
At this point we’ll take
a detour up to the second floor, so back away from the light table,
turn to your right, move forward a step, and then turn to the left
or right to face either the left or right staircase to the second
floor. Follow the staircase up, around, and enter the doors at the
top of the double staircase.
You enter a music room
that contains several musical instruments including a piano and a
cello. Turn to your right, and click on the small box on a table
against the wall. Once the box opens, click forward to look closer.
This is a double-sided music box that will play a tune by clicking
on either of the handles on the left and right sides of the box.
You should hopefully notice
a slight difference between the tune played from the left side from
that of the right side. Since we only have access to the sliding
buttons that play the song on the left side of the box, we must adjust
the sliders here so that the two songs are identical. Each note of
the song is represented by one of the sliders. The metal arm swings
across the sliders, sounding the notes of the song.
The game randomly supplies
the song to be played, but never makes this task harder than having
to exchange the horizontal location of two of the sliders. Listen
closely to the two songs to determine the two notes that are out of
sequence, and make the switch, leaving the other sliders alone.
Here are
the three possible songs that can be encountered during gameplay,
with the incorrect slider positions noted in red:
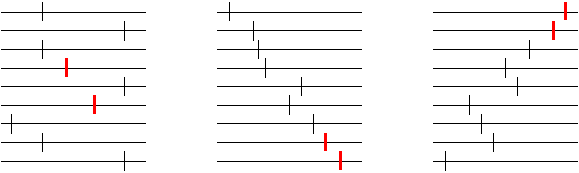 |
The corrected
songs are shown below:.
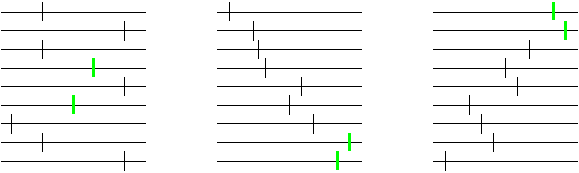
In order to have any note
play earlier in the song, move its slider closer to the left side
of the box. To have a note play later, move the slider to the right.
Moving the slider to the left is accomplished by clicking on the metal
arm itself, while clicking at the right end of the slider groove moves
the sliders to the right. To locate each individual slider’s hotspots,
make sure that the top of the hand cursor is even with the slider
that you want to move.
Once you’ve made the correct
adjustments, the right side of the music box opens, revealing something
taped to the bottom of the lid. Click to see a close-up view, and
take the metal “piano” key.
Bedroom
Eye
Fully back away from the
music box, and proceed past the table containing the box through the
doorway straight ahead. This room is a very bare artist’s studio.
Wander around the room, but don’t be too disappointed when you don’t
find anything.
Exit the studio, and cross
the music room to the other side. At the doorway straight across
from the studio, turn to your right, and use the piano key from your
inventory on the keyboard cover of the piano to unlock it. Click
on the piece of paper resting on the piano keys. The close-up shows
a picture of the Kerry House gardens, with an Ascension Harp string
lying on top of the primitive photograph. Once the harp string is
entered into the graphic, back away from the picture, turn back to
the left, and enter the doorway ahead of you.
Walk one step into the
bedroom and turn to your left. Now walk two steps past the bed and
fireplace, and then turn to the right. A small table with some curious
shapes on it stands here. Click to go forward towards the table.
Four pieces must be assembled into a four-sided pyramid. Use the
following steps to properly assemble the shape (if you get the pieces
messed up, just back away from the table, and move forward again to
restart):
·
Click on the closest block to you
first, placing it onto the table’s central triangle
·
Click on the next closest block to
you to place it on the first, then find the rotational cursor beside
the block and click on it to rotate the block once
·
Click on the left one of the two remaining
blocks to place it on the pyramid
·
Click on the last block to place it
on the pyramid
The newly
formed pyramid will light up and spin, and an image appears on the
side facing you – the unmarked gravestone in the cemetery (the one
with the hotspot on it) – obviously an important clue.
Back away, return to the
room’s doorway, and enter the music room again. Find the door to
the stairs (step forward and turn to your right), and exit the music
room. Descend the stairs to the left or right, and then turn towards
the set of double doors facing away from the entrance to the house.
Walk forward through these doors.
Library
Cards
You’ve entered the parlour
of Kerry House – be sure to look around this room at the lovely paintings
and furnishings. From the entrance, turn to your right, and proceed
through the doorway straight ahead. You enter the dining room, which
contains some nice place settings, but nothing to examine. A door
to your right takes you into a very bare kitchen, again with very
little to examine. Re-enter the dining room, and walk back into the
parlour.
From the dining room doorway,
take two steps forward, turn to your left, and enter the library.
Walk forward to the room’s desk, and click on the papers on its surface.
One of four portions of a poem will appear in the close-up view.
Keep backing away and clicking on the papers again to see the entire
poem, but it really isn’t necessary to do this.
Facing the desk, turn to
your right, move forward, turn to your left, and click on the three
stacks of cards on the table in front of you. Click on each of the
piles in order from left to right, and watch the three-card hand that
is dealt to you. Once your hand is dealt, click all three piles again
to deal another hand. There are four different ladies who appear
on the cards, and the cards’ numbers always get larger from left to
right. In fact, the left card is always a single digit from 3 to
9, the middle card is always a “low value” double-digit number, and
the right card is always a higher double-digit number.
Back away from the cards,
and click on the framed picture hanging on the wall above the card
table. The picture covers up a combination safe – click on the safe
to get a close-up view. The safe requires a three-digit number combination
to open. You can change the number showing by clicking on any of
the three red knobs. Once the right combination is entered, click
on the wheel below to open the safe.
Fourth
in a Series
If you’re guessing that
the combination is somehow related to the cards, you’ve at least got
that right. With any of the three-card hands dealt, a fourth card
in the series (if there was one) would probably be a three-digit number
– a perfect combination for the safe. (Of course, the developers should
have really supplied a better hint than this for players to solve
the puzzle – perhaps an empty spot for where the fourth card should
have been?)
Now we have to figure out
the series of numbers in order to calculate what should come next.
Let’s take the series (6, 21, 66) for example. In order to get from 6 to
21, you must multiply the 6 by 3, and then add 3; in other words (6 x 3) + 3 = 21. In order to get from 21 to 66, you again must
multiply the 21 by 3, and then add 3; in other words (21 x 3) + 3 = 66. To get the value of the fourth card, just repeat
the pattern: (66 x 3) + 3 =
201.
If the (6, 21, 66) cards
are showing below, you would then back away, click on the picture
to uncover the safe, click for a closer view, and punch in 2 0 1 as the combination, followed by a click of
the wheel. Here are the other possible fourth card values:
|
First Card |
Second Card |
Third Card |
Fourth Card & Safe Combination |
|
3 |
12 |
39 |
120 |
|
4 |
15 |
48 |
147 |
|
5 |
18 |
57 |
174 |
|
6 |
21 |
66 |
201 |
|
7 |
24 |
75 |
228 |
|
8 |
27 |
84 |
255 |
|
9 |
30 |
93 |
282 |
Slider
Spoils
Once the safe door is open,
a box with a dreaded slider puzzle built into its top awaits you.
It isn’t a particularly tough slider to solve, but for those out there
who will be at their wits end, here’s a quick 28-move solution to
the slider.
|
1 |
2 |
3 |
|
4 |
5 |
6 |
|
7 |
8 |
9 |
28 moves
(click on the tile corresponding to the number shown at left):
2 – 1
– 4 – 7 – 8 – 5 – 4 – 7 – 8 – 5 – 6 – 3 – 2 – 1
4 – 5
– 8 – 7 – 4 – 5 – 8 – 9 – 6 – 5 – 4 – 7 – 8 – 9
When the box opens, pick
up the scroll lying inside the box, and read its message. The passage
mentions something about creating a cloudless mixture to turns metals
into gold. Back away from the scroll and click on the book that is
left in the box. If you have obtained Bernadette’s Diary Key, the
book will automatically be accessible to you.
The diary entries span
a six-month period during the latter half of 1899, when the “Children
of Kerry” tried to make a go of it on the island. The diary chronicles
the love between Bernadette and her betrothed Dominic, and how Dominic’s
obsession with the mysteries of the island lead to the group’s downfall.
Although a lot of the material is superfluous to the story, it’s a
light read, and helps to fill in some of the story’s plot, which has
been somewhat lacking to this point.
Two important
items to note:
·
Franklin, Dominic’s rival for Bernadette’s
love, is buried in the cemetery – in fact, his gravestone is one of
the ones we were able to read; and
·
One of the gears from the windmill’s
organ power system is missing (stolen from Franklin), so don’t worry
that we haven’t been able to get the organ working yet.
Both of
these text items are available in your book collection, so you can
refer to them again if you wish to.
Greekhouse
Back away from the open
safe, turn around, and move forward to the door. Reenter the parlour,
turn to your left, and walk through the door straight ahead into the
greenhouse. Walk forwards until you’ve reached some sort of mixing
equipment at the far end of the room. Examine the posters on either
side of the mixer by clicking on them. The one to the left simply
tells us to “harmonize liquids”, while the one on the right gives
us a number of planetary symbols and their corresponding metals.
This seems to be what the scroll from the safe was referring to.
There are three cloudy
beakers along the base of the mixer, and five liquid dispensers hanging
above. At any given time, three of the dispensers are situated above
the three cloudy beakers. The dispensers are labelled with Greek
letters, including a (alpha), b (beta), g (gamma), d (delta), and c
(chi).
The two
arrow buttons along the top of the mixer rotate the dispensers to
the left or right, and the three round buttons place a drop of liquid
into the left, middle or right beakers from whatever dispenser is
above it at the time.
I can find no hints at
all in the game that point you to the proper solution to this puzzle
(feel free to e-mail me at the above address if you find one). The
only solution I was able to come up with was lifted from the only
other walkthrough available on the internet: place 2 drops of alpha
(a) liquid in the left beaker, 1 drop
of alpha (a) liquid in the middle
beaker, and 5 drops of alpha (a) liquid in the
right beaker. A golden key should precipitate itself into the centre
beaker, which should be placed into your inventory.
If, by
chance, you’ve fiddled with this apparatus on your own already, and
this solution doesn’t work for you, my advice is to start adding alpha
(a) liquid to each beaker one at a time (left,
then middle, then right, then repeat) until the key appears. This
worked for me. If all else fails, go back to a saved game where you
haven’t yet fiddled with the apparatus, and the original solution
should work.
Month
to Month
Turn around, and walk forward
until you’ve re-entered the parlour. Walk forward a step, turn to
your left, and walk forward two steps through the French doors and
out to the Kerry House gardens. Move forward past the large circular
equipment to your left towards the small building ahead, and then
click on the sign to the right of the small building’s entrance.
The sign reads “By this month’s zodiac and sign align the planets
all in a line”.
Click to move into the
small building, and find yourself staring at a busy set of ropes,
dials and weights. There is a set of 8 cylindrical weights, with small
planetary symbols above them, hanging from the top of the apparatus.
Pressing on the 8 symbols along the top, and on the 8 symbols through
the centre, of the apparatus moves these weights up or down. The
planetary symbol for each weight can be horizontally aligned with
any of 12 numbers along the left side of the apparatus.
In addition, there are
two horizontally rotating dials in the centre of the apparatus, with
each dial rotated using corresponding buttons to the left or right
of the dial. The top dial always shows two upper case letters at
all times, and the lower dial shows any one of twelve zodiac symbols.
Taking the sign as a literal
clue, what month is it right now in the game? We’ve encountered no
information anywhere that would place our journey to the island in
a particular time or date. In fact, we’ve received no information
about ourselves at all – the faceless, timeless explorer. So, if
we’ve got no set day or time, we have no solution to the puzzle.
Except that there is one
date that is applicable – whatever date you, the player, are playing
the game. In fact, the game very cleverly consults with your computer
to determine today’s date. So, if you are sitting in a humid cottage
near Kingston, Ontario in late July (like I am), you take the following
steps to determine the proper placement of the dials and weights:
·
Figure out today’s date (when on vacation,
that can be harder than it sounds)
o
July 29th – so July, the
seventh month of the year, is my month
·
Use the following zodiac chart to
determine which sign is applicable to you
o
July 29th places me within
Leo’s date range
|
Zodiac Sign |
Date Range |
|
Capricorn |
December 22 to January 19 |
|
Aquarius |
January 20 to February 18 |
|
Pisces |
February 19 to March 20 |
|
Aries |
March 21 to April 19 |
|
Taurus |
April 20 to May 20 |
|
Gemini |
May 21 to June 21 |
|
Cancer |
June 22 to July 22 |
|
Leo |
July 23 to August 22 |
|
Virgo |
August 23 to September 22 |
|
Libra |
September 23 to October 23 |
|
Scorpio |
October 24 to November 21 |
|
Sagittarius |
November 22 to December 21 |
·
Consult the book filled with zodiac
/ planet / Greek information, flip to one of the pages at the back,
where the 12 zodiac symbols are illustrated, and find your symbol.
o
The Leo symbol is a shaped like a
little sperm, with its head to the left.
·
Set the top dial by displaying the
first initials of the two months that your zodiac symbol spans.
o
Leo spans July and August, so I rotate the top dial
until “J A” is visible.
·
Set the bottom dial by displaying
the proper zodiac symbol.
o
I rotate the bottom dial until the
Leo symbol appears.
·
Lower the weights so that the planetary
symbol on top of each weight lines up with the number of your current
month over to the left.
o
I lower all eight weights so that
the round symbols at the top align with the roman numeral XII or 7,
corresponding to July, the 7th month.
Key
Moments
Once the correct settings
have been entered, pull the switch to the right of the apparatus.
You will see the large garden decoration (visible to your right) rotate
around in some fashion. Click forward to exit the small building,
turn around, walk one step closer to Kerry House, and turn to the
right. The garden decoration has aligned itself with the Sagittarius
symbol. Find the new hotspot located just in front of the Sagittarius
symbol here. A close-up view allows you to see a key that has been
placed on the concrete edge. Pick up the key, and back away.
Turn to the right, and
walk forward a few steps past the small building to a door in the
back garden wall. There are twelve keyholes in the centre of the
door, one for each zodiac symbol. Find the one that you used to solve
the preceding puzzle (for example, for me it would be Leo), and insert
the “Zodiac” key (the one you just grabbed) into that symbol’s keyhole.
The centre of the door morphs and reveals a hidden portion of the
Book of Ascension.
Once you’ve grabbed the
book, grab the “Golden” key from your inventory, and click on the
main keyhole, situated beside the doorknob on the left side of the
door. The door opens to reveal a path through some well-placed stones.
Move forward through the passageway until it stops, and turn to the
right. A glowing light beckons you forward – click on it.
Across
Space and Time
You suddenly find yourself
staring across a short walkway towards more green hills. Turn around
– it appears that you are on a promontory of land next to a short
round building of some kind. From your initial position, turn to
the right to face the doorway into the building. Click on the door
once to jiggle it, twice to jostle it, and a third time to rattle
a key loose. Hit the “down” arrow to look down at the ground in front
of the door. Click on the key found here to gain access to the building.
There are several maps
on the walls in here, but noting that can really be examined. Turn
to your right, approach the desk here, and click forward once more
to view the map on the desk. The map appears to chart the island,
and some notations made in German (including “Amulett”). Clearly
the Germans must have had some sort of installation on the island
during the Second World War (remember the gravestone in the cemetery?).
Back away from the map and then the desk, turn to your right, and
exit the building.
Once outside, turn to your
right and move forward a step. Turn again to your right and click
on the building’s small window – this allows you a peek into the building.
Back away, turn back to your left, and move forward. Keep moving
forward until you arrive at the tall tower in the distance.
Swan
Shoot
Enter the tower by clicking
on the doorway at the top of the ladder. Inside, turn to your right,
click on the metal stairs to go up, and again on the hole above to
get up to the next level. Now turn around and click on the gun that
has been set up in front of the window. Click on the ammunition clip
beside to gun to pick it up, and place it into your inventory.
Click on the gun’s sight
to look through it. The top of a distant tower can be seen in the
sight. Click in the centre of the sight to hear the empty gun fire.
Back away, but don’t bother trying to insert the ammo clip into the
gun – it won’t go in yet. Instead, back away from the gun, turn around,
click on the stairs to go up, and on the hole above to climb to the
next level.
Turn around and face another
telescope – click on it for a close-up view. There are 3 eyepieces
that can be rotated on the front to the telescope. To look through
the telescope, you must click on the bottom left eyepiece. Click
there now to see a very distant view of a tower. Back away from the
view and click on the top eyepiece to rotate the set of eyepieces
one position. Click on the bottom left eyepiece again to see a closer
view of the tower. Back away, click on the top eyepiece again, and
click on the bottom left one again to see a clear view of the tower,
with a swan weather-vane complete with sparkling eye attached to the
top.
Back away from the view
and the telescope, turn around, and click down on the stairs to descend
to the floor with the gun. Turn around, approach the gun, grab the
ammo clip from your inventory, and click just to the left of the trigger
area to insert the clip into the gun. Now click on the gun’s sight,
position the cursor over the swan weathervane and fire the gun by
clicking your mouse. The vane will slightly sway. Try firing several
other shots – the vane will rock back and forth, and spin around.
Keep firing until you’ve knocked it off of the tower.
Back away
from the gun slight and the gun, turn around, descend the stairs,
turn to your left, and exit the tower.
Chime
After Chime
Outside the tower, turn
to your left and start walking forward. Move across a bridge, and
take one step forward after completely crossing it. Turn to your
left, and spot a familiar sight – a gazebo on an island connected
via a bridge. Walk forward towards the bridge, and cross it. As
you approach the gazebo, click on the sign above the entrance to read
these wise words:
“When
the pale dusk falters and the day has all but died, the thin black
veil is draw back and we cross to the other side.”
Back away, walk forward
into the gazebo and turn to your left to see another set of wind chimes
hanging here. Click on the chimes to get a closer look. Each has
a black and white symbol at its end. The chimes can be re-ordered
in the same way as the first chime puzzle (i.e. click on the chime
you want to move, and again where you want to move it to.)
The object here is to order
the chimes based on the written message and the symbols. Look to
the message for a clue as to which symbol should be first. “Dusk”
is probably best represented by the symbol with a bit of white to
the left (the day), and a lot of black to the right (the night).
The rest of the chimes should be placed to form some symmetry across
the entire wind chime, as opposed to matching what the message says.
Yes, this is a lame explanation. Try the following:

After the chimes sway and
ring, a hidden compartment opens, revealing a “Sacred Key” and a harp
string for the Ascension Harp. Pick up both objects, back away, turn
to the left, and exit the gazebo. Walk back across the bridge, take
one step forward beyond the end of the bridge, and turn to your left.
War
Crimes
Walk towards the stone
building ahead, and click on the door to enter. Inside, click on
the desk with the communications equipment on it. In the close-up
view, click on what looks like a German passport in the top left corner
of the screen. This book is actually a journal kept by a German sailor,
Karl Schramm, who served on several U-boats during World War II.
He journal explains that
there was a listening post on this deserted island, and that his submarine
came here badly damaged near the end of the war. His captain, not
a nice guy at the best of times, found the Ascension Amulet, grew
obsessed with it, and eventually killed the other soldiers, only to
be crucified by the Otherworld gods for trying to take the amulet
away. The journal is an interesting read, and gets inserted into
your roving library of texts.
After finishing the journal,
click on the scrolled paper below the journal’s location to read several
messages sent (or received) by the listening post. Back away from
the paper and the desk, turn to your right, and click on the control
panel to the left of the large locked green door. The only items
that can be manipulated on the panel are the two levers on the pipes
to the right. First, click on the bottom lever so that both are in
the vertical position. Next, click on the top lever to cause the
level to rise in the “Wasserkasten” (the water cave?) gauge. Finally,
click on the bottom lever again to lower the Wasserkasten level back
down but raise the “Aufzug” level gauge.
Back away from the panel
and click on the green door to access an elevator that takes you down
a short distance. Outside the elevator, turn to your left to see
a shelf holding a lantern, some matches and a hatchet. Click on the
matches to light one, and click again with the match on the lantern
to light it. Click on the lantern to grab it, and then click again
to collect the hatchet and a match. Turn to the right, and move forward
along the corridor.
Rock
God
Move forward until you
come out onto the dock beside the U-boat submarine. Turn to your
left, take a step forward, and turn to your left again. Move forward
towards the crates in front of you – the close-up view shows a barrel
with a locked top. Take out the hatchet from your inventory and click
on the lock three times until it breaks and falls off the lid. The
open barrel looks like it has some kind of liquid in it. Find the
hotspot at the bottom of the barrel on its left side, and with the
hatchet knock a hole in the side.
The liquid drains out,
allowing you to click on the open barrel. You pull out a chest that
contains a shiny amulet – the Ascension Amulet of course. Pick it
up, back away from the barrels, and turn back to the right. Move
a step forward, turn to your left, and move forward along the corridor
ahead.
The corridor leads to a
natural cavern that someone has set up like a chapel. Walk forward
until you face the ornate gate, and turn to your left. Click on the
candle stand, and in the close-up view, find the candle with the hotspot
(it’s the 5th from the left). Take out your match and click on the
candle – you’ve now got a lit candle to place into your inventory
(good thing you picked up those asbestos pants). Back away from the
candle stand, and return to your position in front of the ornate gate.
Take out the Sacred Key and click on the central panel on the gate
– this opens the way to move forward.
Move forward two spots,
turn to the right, and enter the room here. Walk forward towards
the crates at the back of the room until you are staring at the top
of one of the boxes. Click on the compass found here – your cursor
now becomes the compass, which you can rather awkwardly move around
the top of the box. Note that the compass needle ranges from North
to East as you move it around the top of the box. I’m not sure why,
but you want the needle to point directly to the East. Move the compass
over to the very right side of the box, on the top half of the screen.
Click to drop it there, and then click off to the right of the box
top.
Hidden behind the box is
a metal gear (for the windmill I presume) and another organ roll –
this one is labelled “Evening Light”. Place both objects into your
inventory, back away from the box, turn around, and walk forward to
exit the room. Turn to the right, walk two steps forward, turn to
the left, and enter another room with the sound of running water in
your ears. Walk forward along the stepping stones for two steps,
and then turn to the right to see a strange rock altar. Move forward,
and then click the mineral crystals in the centre of the screen –
a piece of the Book of Ascension is hidden behind the crystals.
Back away, turn to the
right, and move forward until you have exited the room. Turn to the
left, and move forward along the tunnel until the passageway turns
to the left. Turn to the left, step forward, and turn to the right.
You watch some sort of reddish fountain of otherworldness spraying
around. Hot lava? Evil miasma? God flatulence? Who knows. Once
you have been returned to your view of the tunnel, walk forward several
steps (there are three windows to see the spray) and continue until
you emerge back outside. Turn to your left, and follow the stone
tunnel until it ends. Turn to your right to spot another one of these
teleporting lights. Click on it to be transported to another location.
Done
With Mirrors
You find yourself in an
old stone structure with a doorway in front of you. Walk forward
through the doorway and turn to the left. Take one step forward,
turn to the left, and admire some green stone blocks. Turn to your
right, and move forward several times until you emerge back out into
the rolling hills. Take a step forward and turn back to check out
the little underground stone dwelling you were in – pretty neat.
Turn around again, and continue forward until a large tree can be
seen in front of you, just a little left-of-centre.
Turn to your left to see
a large plate mounted on a circular track atop a pedestal. Move forward
past the pedestal, and then click on the plate from behind. You now
can control the position of the plate with the mouse. The object
here is to set it so that it is reflecting light from another plate
located just to the left of the tower you see in the distance. When
the plate is positioned correctly, you will see a shimmering light
from the other plate in the distance. Once the distant light is shimmering,
click the mouse to lock the plate into that position.
Click back to return to
the view facing the front of the plate and pedestal. You should see
an image reflected in the plate – it’s actually a mirror. Turn around
(two clicks to the left or right) to see a third mirror reflecting
the light. Click towards this third mirror – the light is being directed
at something in the distance. Keep moving forward, and click on the
small wooden structure with the hanging items when you get closer.
These hanging items are Viking runes – click on the three bathed in
light to place them in your inventory (the other two remain there).
Back away, turn around,
and walk forward until you are back on the main path in front of the
first mirror. Turn to your right, and move forward up the hill until
you are facing the stone tower.
Dead
Flowers
Click on the doorway to
enter the tower, again on the stairs to go up, and once more on the
hole above to get to the next floor. Turn around to face a desk with
several items on it. Click on the flower and the set of bottles on
the left side of the desk first. The flower looks quite old and fragile.
Try clicking on each of the small bottles to learn about their contents
– four are the “results” of experiments with Swan Powder (except for
Experiment 4, involving Flower Petal), and the others contain strange
substances like Gas Compound, Astronomical Compound and Passion Powder.
This isn’t a really difficult
puzzle, since you only need to pour one of the bottles onto the old
flower, and two of them have “flower" written on their labels.
Pick up the Experiment 4 (Flower Petal) bottle (it’s the second one
standing up from the left) and click on the flower to bring it back
to life. The vial is placed into your inventory.
Back away, and click on
the piece of paper located to the right of the flower. It contains
some useful information such as an altitude (30 degrees), an azimuth
(293 degrees), and some text labels (The Harp, The Eagle, Eye of the
Swan, Garnet). Four compass point readings are listed at the bottom,
corresponding to 4 yearly dates (270 degrees – south wall – December
21; 90 degrees – north wall, June 21; 0 degrees – east wall – March
21; and 180 degrees – west wall – September 21).
Back away from the paper,
and click on the tube located to its right. This is a kaleidoscope
that shows some recognizable images – a swan, the harp?, etc.). Back
away, and click on the book on the right side of the desk to pick
it up. Consult your handy dandy library to see what it contains –
more compass directions and labels similar to those on the paper you
just found.
Star
Power
Turn around and click on
the stairs (and the hole above) to go up to the next level. There
isn’t anything on this floor, so click on the stairs again. The view
up into the next floor is a little different – note the lever located
to the right of the hole leading upward. Click on the lever, and
then on the hole to go to the next floor.
You face a telescope located
in the centre of a domed room. Currently the dome is closed – the
inner ceiling surface seems to be covered in constellations and other
star chartings. Walk forward to the telescope, and click on the dial
located on the telescope’s lower support. The compass reading should
display something around 290 degrees in the centre of the reading
window. Click on the knob to the right to advance the reading to
293 degrees (as per the paper downstairs). The 293 should appear
at the very centre of the window – if you’ve gone too far, move the
reading back by right-clicking the mouse.
Back away, and click on
the small box on one of the support arms for the telescope (this is
up and to the left of the dial. The box should read around 25 degrees
or so. Click the box until 30 degrees is showing (as per the paper
downstairs). Again, right-click if you’ve gone too far. Back away
again, and click on the eyepiece located on the side of the telescope
(not the one at the bottom end). A shining, rotating star should
be in the centre of the view – click on it to receive another piece
of the Ascension Amulet.
Back away from the view
and from the telescope, and then turn to the right. Click on the
small piece of equipment here. The close-up view shows that it’s
a control panel for the dome. The lever to the right doesn’t seem
to work, so try turning the compass direction by clicking on the knob
to the left. There really isn’t any way to solve this except for
trial and error, but the dome won’t open until the reading is close
to 270 degrees (an important point for later). Once 270 is showing,
pull the lever to the right, and listen to the dome open behind you.
Back away from the panel,
and click on the lower eyepiece of the telescope (at the bottom end).
We see a short movie of an eagle flying through the air, and landing
on a round structure along the side of a stone walkway. Back away
from the lens and the telescope, and then click forward to move towards
the opening of the dome. Click on the opening to walk outside, and
turn to your left. Move forward up the short ladder to the weather
vane, which has a familiar shape to it. Click on the Ascension Harp
to place it into your treasure graphic.
Back away from the vane,
turn to your left and move forward to reenter the dome. Walk forward
one step, and then click on the hole on the floor to descend the ladder.
Make your way to the ground floor of the tower, and click on the wooden
door behind the stairs to exit out the other side of the tower building.
Stone
Free
Walk forward – you should
recognize the stone walkway stretching out in front of you from the
movie of the eagle. Remember that it landed on a circular platform
on the water side of the wall. Walk forward onto the walkway, take
one step forward, and turn to your right. The eagle’s nest is right
in front of you, complete with a harp string in its centre. Pick
up the harp string, turn back to the left, and continue moving forward
along the stone walkway.
The walkway eventually
ends, but continue moving forward across the green hills – someone
has conveniently placed marker stones to the left and right to guide
your way. Eventually you’ll spot several rounded stone structures
in the distance off to the right a bit. Walk forward until you cannot
see the structures any more, and then turn to the right. A stone
dwelling should be present straight ahead. Walk forward and enter
the building.
Before you are 13 stone
heads arranged in a circular pattern. Click on the boxy stone item
in the upper left corner of the screen (a “capstone”), and then click
on the scrolled paper in the upper right corner of the screen. The
paper contains a diagram of one of the heads, and a circular pattern
with six straight lines crossing it. Back away from the paper, and
click on the heads for a closer look.
The 13 heads are numbered
0 through 12, and clicking on the “0” head in the centre resets the
heads to their original positions. The only heads that can be moved
are the inner odd-numbered ones. Each of the six heads can be moved
one-half position clockwise or counter clockwise. The heads are moved
by first clicking on the head, and then clicking in whichever direction
you want to move it.
The trick here is to align
the inner heads with the ones along the outside circle, thereby recreating
the pattern shown on the scrolled paper. The only problem is that
only some of the heads can be moved at any given time, and only some
sequences of moves will provide a correct solution. You can either
tinker with this puzzle until you get it right (there are several
solutions), or use the following solution:
·
Move Head
# 11 counter-clockwise
·
Move Head
# 1 counterclockwise
·
Move Head
# 3 counterclockwise
·
Move Head
# 5 counterclockwise
·
Move Head
# 9 counterclockwise
·
Move Head
# 7 counterclockwise
Once the correct pattern
is formed, the centre head disappears. Click on the spot where the
head was, and get a close-up view of a pile of ashes. Take out the
vial of flower power and click on the ashes – the liquid reforms the
ashes back into a part of the Book of Ascension. Read the passage,
and then back away from the close-up view. There are now two Viking
runes lying on a small plate in the centre of the stone heads. Pick
up the runes, and back away out of the building.
Deposit
Required
Turn to your left, and
move forward until a stone wall appears on your left. Follow the
wall until it ends at another locked gate. Click on the panel on
the wall to the right of the gate for a close-up of the access control.
Two slots flank two concentric dials, with a wider slot below. To
change the settings on the dials, insert one of the Viking runes into
either of the two upper slots. Placing a rune in the left slot turns
the outer dial counterclockwise, and runes placed in the right slot
do the same for the inner dial. Click the centre of the dials to
have the runes come back out the bottom slot.
You have 5 runes in your
possession. The marks should indicate the value of each rune, but
if you are unsure, toss it into one of the slots, and count how many
ticks the needle moves. The 5 runes have values of 3, 5, 7, 8 and
10. But how to distribute them into the slot machine?
The solution is pretty
obscure, so I’ll walk you through it. Remember the last time we
wanted to open something up? The dome in the tower. How did we do
it? Set the controls to 270 degrees. What else do we know about
270 degrees? From the paper on the second floor of the tower, 270
degrees represents the “south wall”, and December 21st,
the Winter Solstice. How can we use this information? Set the outside
dial to “12” (i.e. the 12th month), and the inner dial
to “21” (the 21st day). Oh boy.
Divide the runes into two
piles – the first should have a total value of 12 (how about the 5
and the 7?), and the second should have a total value to 21 (the 3,
8 and 10). Place the 5 and the 7 into the left slot, and then the
other three runes into the right slot. The gate will open, allowing
you beyond.
Walk forward through the
gate, and forward several steps until you spot a piece of the Book
of Ascension on the rocks ahead (I guess they ran out of puzzles).
Pick up the book, read the passage, and continue forward until the
passage ends. Turn to the right, and step into the light.
The
End is the Beginning is the End
You are zipped back to
where you started – well, pretty close anyway. You stand at the entrance
to the cemetery. Walk forward several times and approach the large
gravestone at the far end of the cemetery. There was a hotspot here
that we have yet to access. Take out the capstone from your inventory,
and place it on top of the cross on the stone. The final piece of
the Book of Ascension morphs out of the base of the grave marker.
Click on it to complete the Book, and read the final passage.
Back away from the book,
turn around, and walk forward until you have exited the cemetery.
Keep walking forward until you have climbed the hill, and are facing
the entrance to the first tower. Instead of entering the tower, turn
around to face the opposite direction. The weather vane shot down
with the German gun lies before you. Click on the swan’s glimmering
eye to complete the Ascension Amulet.
Walk forward towards the
monastery again, turn to the left at the entrance to the cemetery,
and walk into the arbour. Keep walking forward until you have reached
the entrance to the windmill (it’s a shorter trip this time). Enter
the windmill, click on the yellow control panel, and click on the
handle to the left to open it up. Take out the missing gear from
your inventory, and place it on the wooden peg directly below the
second horizontal shaft (to the left of the biggest gear).
Click on the left panel
door to close it, and note the wheezing sound and turning gears that
indicate that the mechanism is working. Back away, click on the organ,
and place any of the organ rolls into the open slot. Now click on
the switch to the left to play the roll (boy, that was a quick song).
Shadow Dancing, Ode to Cygnus, and Sun Tears are nice, but you should
really hear Evening Light. Play this last song, and then click on
the roll after the song has finished. A secret compartment opens
behind the slot, revealing a love letter from Franklin to Bernadette,
and the last remaining string for the Ascension Harp. Read the letter,
then grab the harp string.
Where
the Demons Dwell
Time to explore that model
of Stonehenge. Back away from the organ, turn to your left twice,
and exit the windmill. After returning to the arbour, turn twice
to the left, and walk forward to Kerry house. Enter the house, walk
straight through into the parlour, and continue out into the garden.
Continue walking forward until you’ve passed through the small door
in the very back corner of the garden.
Walk along the corridor
of stones until it ends, and then continue forward into Dominic’s
model of Stonehenge. Click on the short square stone in the centre
of the circle to open up the bridge between the island and the Otherworld.
Screenshots