Broken Sword: The Angel of Death Walkthrough by Freaky Hobbit
THE VATICAN
~~~~~~~~~~~~~~~~~~~~~~~~~~~~~~~~~~~~~~
STREET
This is the place from the PHOTO OF ANNA MARIA DRESSED AS A NUN. Follow the road up & left, until you see the door to the convent on the right. Look at the door, and try to open the door to enter the convent – the guards stop you. Use the doorbell to the left of the door. Sister Serena answers – ask about the photo of Anna Maria as a nun.
Look at the window next to the door – it looks into a small office. Look at Sister Angelica, the nun sitting at the desk in the office. Talk to her and work through all the conversation topics. Look at the schedule on the desk. Try to take the schedule, but Sister Angelica scolds you. Step away from the office window.
Walk left a few steps, so you can see the guards. Look at the gold plaque on the wall of the Monastery – it reads ‘Monastery Of The Order Of St Michael’. Look at the large Monastery doors behind the guards, and try to open the doors. Hmm, I guess there’s no way in through the front door. There must be another way to get inside.
Go back to the office window, and ask Sister Angelica about the Holy Order Of St Michael. Apparently, it’s been around for 100s of years. Ring the bell next to the convent door, talk to Sister Serena and work through the conversation topics with her.
That’s all you can do here at the moment. Head down and walk right, to the Map.
MAP
Go back to Anna Maria’s apartment.
~~~~~~~~~~~~~~~~~~~~~~~~~~~~~~~~~~~~~~
ANNA MARIA’S APARTMENT
~~~~~~~~~~~~~~~~~~~~~~~~~~~~~~~~~~~~~~
LIVING ROOM
You need to find a way into that convent, if you want to find answers about Anna Maria. Maybe you could hack into their computer system. Use your PDA, and select the following options.
– Connect
– Vatican Server
Time for one of those puzzles again. Place the diverters like so.

Click on ‘OK’ to get the number for the wafer factory that Sister Serena mentioned. Now go through door on the right to leave the apartment.
~~~~~~~~~~~~~~~~~~~~~~~~~~~~~~~~~~~~~~
APARTMENT BLOCK
~~~~~~~~~~~~~~~~~~~~~~~~~~~~~~~~~~~~~~
STAIRS AND HALLWAY
Head right along the hallway, and climb down the stairs.
STREET
You’re out in the street again. Walk up to the top of the street, past the bollards, and onto the Map.
MAP
Go to The Vatican.
~~~~~~~~~~~~~~~~~~~~~~~~~~~~~~~~~~~~~~
THE VATICAN
~~~~~~~~~~~~~~~~~~~~~~~~~~~~~~~~~~~~~~
STREET
Head up to the office window, but make sure you’re not standing directly outside the office window. Now use your PDA, and selection the following options.
– Phone
– Wafer Factory
Sister Serena answers the call. Ask her about Sister Angelica. Sister Angelica is called away to answer your phone call, thus, leaving the office empty.
Quickly, look in the office window to see the office. Pick up the schedule from Sister Angelica’s desk. Hmm, the Health Inspector is due for a visit. You could use that information to your advantage. When Sister Angelica returns, talk to her and work through the conversation topics with her, and pretend that you are the Health Inspector. She’s rather startled, since she’s not expecting you until tomorrow. However, she does let you inside the wafer factory.
WAFER FACTORY
Watch the cut scene as Sister Serena gives you the grand tour. When the tour is over, talk to her and work through all the conversation topics. Look at the mixing vat, and try to use the mixing vat.

You seem to enjoy making things awkward for poor Sister Serena. Look at the ovens, and try to use the ovens.

Explore the factory as much as you like. Work your way up to the tables in the top right corner.
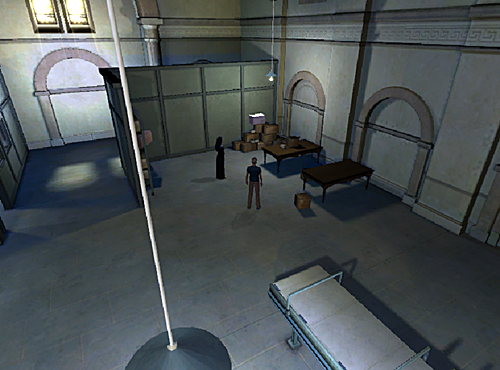
Look at the box of Communion wafers on the table, touch the box of Communion wafers, and have a chat with Sister Serena about it. Look at the top-most box in the corner to realise that it’s precariously balanced. Push the box onto the floor, then insist that Sister Serena clean it up. While she is busy, place your MOULDY BREAD into the box of Communion wafers. You’re being so nasty to poor Sister Serena! However, since she has to take care of things here, you’re left to explore the wafer factory on your own. Walk left a few steps, to the shelves.

Look at the box on the shelf, and try to open it. It’s firmly taped down. Use your PASHA PALACE KNIFE with the box to cut it open, then take the MINITURE BOTTLE OF RED WINE from the box. Now leave this area, and head over to the metal stairs.

Climb up the stairs, and follow the walkway along to the end. Look at the hatch on the side of the mixing vat nearest you (not the hatch on top).

Open the hatch – a fresh batch of dough is being mixed. Pour MINITURE BOTTLE OF RED WINE into the opened hatch. Head back along the walkway, climb down the metal stairs, and watch the cut scene. Now you’re being a jerk to Sister Serena AND Sister Angelica! Leave the area, and head up to the door to Sister Angelica’s office.

Look a the door, and try to open the door, but it’s locked. Head up, and follow the path round to the rear door. Open the rear door and head outside.
MONASTERY GARDEN
You need to get into the Monastery, which is the door at the far end of the garden. But you need to avoid the Monks, or they‘ll call for the guards. Walk up into the centre of the garden.
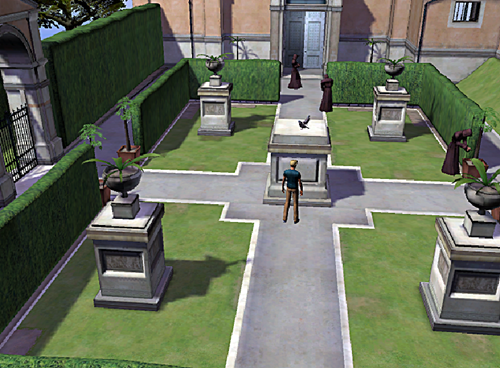
When the Monk nearest the door isn’t walking past the gap at the top, head over to the stone pillar at the top right. Remember, the Monk on the right mustn’t see you. Now throw some MOULDY BREAD into the shrub on top of the pillar at the top right. Quickly walk over to the pillar at the top left. The birds will flock to the pillar at the top right, so they can get the bread, attracting the attention of the monk at the gap at the top. Again, wait for the Monk nearest the door to walk past, then head up to the Monastery door, open it, and enter the Monastery.
MONASTERY – GROUND FLOOR FOYER
Walk forward a few steps, and look at the trapdoor in the floor. That thing is sealed shut! Walk left a few steps. Climb up the stairs and go through the arch to the 1st Floor Foyer.
MONASTERY – 1ST FLOOR FOYER & PASSAGE
Head up the passage, to the end. Open the door on the left, and enter an office.
CARDINAL’S OFFICE
Explore the office. Look at all 4 bookcases. Look at the painting on the wall, then examine it to get a close up. Look at all the different sections of the painting:
– Angel on the bottom left corner
– Angel on the bottom right corner
– Temple block
– Men debating
– Woman with baby
– Men carrying corpse
Step away from the painting. Now walk behind the desk, and open the top right drawer. Look carefully, to see a file with Anna Maria’s name written on it. It’s hard to spot, but it’s there.

Pick up the file. The Cardinal walk in, and catches you snooping. Watch the cut scene. You learn more about Anna Maria. Father Gregor gives you GREGOR’S BUSINESS CARD. After the cut scene, you automatically return to Anna Maria’s apartment.
~~~~~~~~~~~~~~~~~~~~~~~~~~~~~~~~~~~~~~
ANNA MARIA’S APARTMENT
~~~~~~~~~~~~~~~~~~~~~~~~~~~~~~~~~~~~~~
LIVING ROOM
There’s nothing you can do here at the moment. Leave the apartment through the door on the right.
~~~~~~~~~~~~~~~~~~~~~~~~~~~~~~~~~~~~~~
APARTMENT BLOCK
~~~~~~~~~~~~~~~~~~~~~~~~~~~~~~~~~~~~~~
STAIRS AND HALLWAY
Walk down the hallway, to Brother Mark’s apartment. Knock on his door. Talk to him and work through the conversation topics. Show him GREGOR’S BUSINESS CARD to trick him into believing that you are in fact Father Gregor. Talk to Brother Mark again, and ask about Anna Maria’s package. Since he now thinks you’re with the Vatican, he gives you PACKAGE ADDRESSED TO ANNA MARIA. Open the PACKAGE ADDRESSED TO ANNA MARIA in your Inventory, to find the UNMARKED DVD. I wonder what’s on it? Walk back up the hallway, and enter Anna Maria’s apartment.
~~~~~~~~~~~~~~~~~~~~~~~~~~~~~~~~~~~~~~
ANNA MARIA’S APARTMENT
~~~~~~~~~~~~~~~~~~~~~~~~~~~~~~~~~~~~~~
LIVING ROOM
Look at the computer on the table, and use the UNMARKED DVD with the computer. Watch the report about a new kind of gold, called monatomic gold, that’s been discovered in Phoenix. Nico decides to travel to Phoenix to find out more about it, while you remain in Rome to find more clues leading to Anna Maria’s whereabouts. When you’re ready, leave the apartment through the door on the right.
~~~~~~~~~~~~~~~~~~~~~~~~~~~~~~~~~~~~~~
APARTMENT BLOCK
~~~~~~~~~~~~~~~~~~~~~~~~~~~~~~~~~~~~~~
STAIRS AND HALLWAY
Walk down the hallway, to Brother Mark’s apartment. Look at PEN FROM HOTEL ROOM to see that it has a logo of a black cat on it. Knock on Brother Mark’s door again, and this time, show him PEN FROM HOTEL ROOM. Brother Mark tells you about the Black Cat Club. Talk to him, and ask him about the Black Cat Club 2 times, to learn it’s address. When you’re ready, head right along the hallway, and climb down the stairs.
STREET
Walk up to the top of the street, past the bollards, and onto the Map.
MAP
Go to the Black Cat Club.
~~~~~~~~~~~~~~~~~~~~~~~~~~~~~~~~~~~~~~
BLACK CAT MASSAGE PARLOUR CLUB
~~~~~~~~~~~~~~~~~~~~~~~~~~~~~~~~~~~~~~
STREET
Walk up a few steps, until you see the Doorman at the top of some stairs. Talk to the Doorman and work through the conversation topics with him. He won’t let you into the club, unless you are a member. But he won’t let you become a member. Oh… problems, problems! Head back up the street, and go to the Map.
MAP
Go to Anna Maria’s Apartment.
~~~~~~~~~~~~~~~~~~~~~~~~~~~~~~~~~~~~~~
ANNA MARIA’S APARTMENT
~~~~~~~~~~~~~~~~~~~~~~~~~~~~~~~~~~~~~~
LIVING ROOM
Leave the apartment through the door on the right.
~~~~~~~~~~~~~~~~~~~~~~~~~~~~~~~~~~~~~~
APARTMENT BLOCK
~~~~~~~~~~~~~~~~~~~~~~~~~~~~~~~~~~~~~~
STAIRS AND HALLWAY
Walk down the hallway, to Brother Mark’s apartment. Knock on his door. Talk to him, and ask him about the Black Cat Card a few times. He refuses to give you his Membership Card. There must be a way you could persuade him? Show him your PHOTOGRAPH OF FILM STAR LUCY CHU. He’s a huge fan of Lucy Chu, but he wants something a bit more personal. Walk up a few steps, and wait until Mark closes his front door. Now in your Inventory, use BLACK CAT PEN with PHOTOGRAPH OF FILM STAR LUCY CHU to sign it, so it becomes FORGED SIGNED PHOTO OF LUCY CHU. You can pretend it’s been autographed by Lucy herself.
Knock on Brother Mark’s door again, and give him FORGED SIGNED PHOTO OF LUCY CHU. He’s fooled by the signed photo, and gives you his BLACK CAT CARD. Head right along the hallway, and climb down the stairs.
STREET
Walk up to the top of the street, past the bollards, and onto the Map.
MAP
Go to the Black Cat Club.
~~~~~~~~~~~~~~~~~~~~~~~~~~~~~~~~~~~~~~
BLACK CAT MASSAGE PARLOUR CLUB
~~~~~~~~~~~~~~~~~~~~~~~~~~~~~~~~~~~~~~
STREET
Walk up a few steps, until you see the Doorman at the top of some stairs. Show BLACK CAT CARD to the Doorman. He finally allows you to enter, so climb down the stairs, into the club.
ENTRANCE ROOM
Walk forward a few steps, talk to the Receptionist. He tells you to change, before entering the Steam Room. Head up through the doorway on the left, into the Shower Room.
SHOWER ROOM
Look around the locker room area, and notice that Locker #17 (the only locker you can interact with) is empty. Head up into the shower area.
One of the showers is occupied. Walk up to the far end of this shower, and try to take the towel that’s hanging on the wall next to the shower, but the guest in the shower stops you. Leave the shower area, and go down to the locker room area.
Walk down to the far end of the locker room area. Look at the plastic plant in the corner, and move the plastic plant. You can now see the hot water valve in the wall, next to the lockers. Turn the hot water valve on. Ahh… hot water, at last! Return to the shower area.
It’s all steamy in here now. Walk up to the occupied shower, and walk round to the far side. Take the towel that’s hanging on the wall, next to the shower. Since it’s so steamy now, the guest doesn’t see you. You automatically wrap yourself in the towel, leaving all your other belongings in Locker #17.
Leave the Shower Room.
ENTRANCE ROOM
Walk down a few steps, and talk to the Receptionist in his reception cubicle 2 times. Work through all the conversation topics with him. When conversation is over, head up through the door next to him, into the hallway.
HALLWAY
Head up the corridor, and follow it round, until you see an opened door on the left. Enter through the door, into the Steam Room.
STEAM ROOM
Follow the corridor up & right, into the actual Steam Room itself.
Explore the room, and find your old pal Duane Henderson – the American tourist who thinks he’s in the CIA. Talk to him and work through the conversation topics. When you’re ready, head through the door on the right. Watch the cut scene with Mr Spallacci, as you are taken prisoner, and tied to a chair. As you are being interrogated, you hear Nico on the phone… then you hear gunshots!
PRISONER
After being beaten unconscious, you finally come round, still tied to the chair. Look at the power switch in the wall, and kick it with your feet to activate it. Watch the amusing cut scene. Afterwards, you end up holding a long hook.
Look at the metal box on the left, and talk to the metal box – there’s someone in there! Look at the harness hanging from the ceiling, on the right. Use the harness 2 times. Well, that doesn’t really do anything. Look at the bottle of baby oil on the table, and click on it to knock it over with your hook. It spills onto the floor, making the floor all slippery, so now you can slide on it. Kick the power switch in the wall again, and watch the cut scene as you free yourself from the chair.
Now, how do you get out of here? Look at the dark red curtain, and open the dark curtain, then watch the cut scene with Mr Spallacci. Did they really kill Nico? Look carefully at the left side of the window, to notice a small button.

Look at the button, and press the button. A door opens. Go through the door.
STEAM ROOM
You’re back in the corridor of the Steam Room. You hear a ‘Pssst’. Head right, into the Steam Room itself.
Climb down into the steam seating area in the centre of the room. You hear Duane talking to you from the drain! Talk to Duane in the drain, and work through the conversation topics. He has a key to the Laundry Room, and tells you that you can escape through there, but he can’t get his hand through the drain to give it to you. Damn! Climb up the stairs, and leave the Steam Room.
Leave the corridor through the door on the left.
HALLWAY
Follow the hallway up & left, and along to the end. Go through the opened doorway, into the Entrance Room.
ENTRANCE ROOM
Walk across to the other side of the room, and enter through the opened doorway, into the Shower Room.
SHOWER ROOM
Open Locker #17 (near the door) to get dressed, and get all your things back. Now remember Duane, and how he has the key to the Laundry Room? In your Inventory, combine ROSARY with PAPER CLIP to create ROSARY WITH CLIP. Leave the Shower Room.
ENTRANCE ROOM
Walk over to the door at the other side of the room, and enter the Hallway. Ignore the Receptionist’s request to change.
HALLWAY
Head up the corridor, and follow it round, until you see an opened door on the left. Enter through the door, into the Steam Room.
STEAM ROOM
Follow the corridor up & right, into the actual Steam Room itself.
As before, climb down into the steam seating area in the centre of the room. Duane’s still down in the drain. Use ROSARY WITH CLIP with the drain. Duane attaches his key, so it’s now ROSARY WITH KEY. In your Inventory, disassemble ROSARY WITH KEY, so you have 3 separate items – ROSARY, LAUNDRY ROOM KEY, PAPER CLIP. Fantastic! Climb up the stairs, and leave the Steam Room.
Leave the corridor through the door on the left.
HALLWAY
Follow the hallway up & left.
Look at the 1st door on the right, that‘s marked ‘Personnel Only‘, and use LAUNDRY ROOM KEY on this door to unlock it. Now open the door, and enter the Laundry Room.
LAUNDRY ROOM
Climb up the stairs, open the door at the top of the stairs, and head outside.
STREET
Walk forward, along the street, until the realisation of Nico’s death hits you. You need a drink! Watch the cut scene, as Brother Mark tells you that Gasmen have repaired the gas leak in Anna Maria’s apartment. Wait a minute… Anna Maria doesn’t have gas in her apartment!
~~~~~~~~~~~~~~~~~~~~~~~~~~~~~~~~~~~~~~
ANNA MARIA’S APARTMENT
~~~~~~~~~~~~~~~~~~~~~~~~~~~~~~~~~~~~~~
KITCHEN
Watch the cut scene as you and Brother Mark discover a bomb in the kitchen. SAVE YOUR GAME HERE. You have 10 minutes to diffuse the bomb! But you don’t know how to diffuse a bomb – maybe the Military would have that sort of information. In your Inventory, look at the PDA, and select the following options.
– Connect
– US Military Field Notes
It’s time for another one of those diverter puzzles. Note that this one is a lot more complicated than the previous ones, and that double-sided diverters have to be placed in 2 points, as shown below.

Place the diverters like so.

Bomb diffusion notes have been downloaded to your PDA. Quickly scroll down to the bottom of the notes, and click through the following text. Don’t bother to actually read them – you don’t have the time. Just scroll through them.
– US Military Bomb Defusal Field Notes
– Self Protection
– Back Arrow (bottom right of the PDA)
– Defusal
– Part 2
– Part 3
Okay, now you know how to diffuse a bomb, so let‘s get started. SAVE YOUR GAME HERE. You can’t touch the bomb with your bare hands. Talk to Brother Mark, and ask him for his RUBBER GLOVES. He gives them to you. Now interact with the bomb on the table, to get a close-up of it.

Now diffuse the bomb like so.
– Use PAPER CLIP with the blue wire at the bottom left.
– Select ‘Live Trigger Wire’ from the options at the bottom
– Use PASHA PALACE KNIFE on the blue wire at the top
YOU DID IT!!! You diffused the bomb! Congratulations! Now watch the cut scene with… WITH NICO! SHE’S ALIVE!!!
============================================================
PART 4
PHOENIX
(PLAYING AS NICO)
============================================================
~~~~~~~~~~~~~~~~~~~~~~~~~~~~~~~~~~~~~~
COMPOUND
~~~~~~~~~~~~~~~~~~~~~~~~~~~~~~~~~~~~~~
OUTSIDE THE COMPOUND
This is where we find out what Nico was up to, when she went to Phoenix.
Look at the gate in front of you – it’s locked with a sturdy padlock. The whole place seems to be deserted, though. Try to open the gate – it won’t budge. Search the jeep on the right to find a JACK HANDLE. Use the JACK HANDLE on the gate to force it open. Now walk through the gate, into the compound.
THE COMPOUND GROUNDS
Walk up the path for a few steps, until you see a gap in the wall on the right. Walk into this gap. Look at the dumpster against the wall, and try to move it, but it won’t budge. Okay, notice the 2 crates on the ground, next to the dump. Move both crates out of the way, so you have access to the brake on the side of the dumpster.

Release the brake, then push the dumpster to the left. Notice the gap in the guttering above the dumpster. It’s too high for you to climb. Move one of the crates, over to this part of the wall, and climb up onto the crate.

Climb up the wall, onto the level above, so you‘re on the 1st Floor. Walk right a few steps, to the metal platform in the wall.

Climb up onto the platform. Now jump up to the pipe above you, so you are hanging from the pipe. Shimmy left to the next platform, and climb up onto the platform. Jump left, over the gap, and onto the next platform. Climb up onto the next platform. Follow this platform left, and round the corner. Now at the end of this platform, there is a gap in the barbed wire on the wall on the right. Climb up the wall, through the gap in the barbed wire, and onto the roof.
ROOF
Explore the roof carefully.

Look at the red lever on the ladder on the building opposite. Look at the RUBBLE on the ground, and pick up some RUBBLE. Look at the satellite dish holder (minus the satellite) on the pole in the centre of the roof. Turn the satellite dish holder round, to the position in the screenshot. It looks like a catapult now. Use RUBBLE with the satellite dish holder – it really does act like a catapult, flinging the rubble across, and hitting the lever on the building opposite. Now the ladder for that building has been lowered. Walk right, climb down off the roof, and onto the metal platform.
Work your way right, back along the platforms, they way you came, and back down to the ground.
THE COMPOUND GROUNDS
Opposite the area with the dumpster and crates, you can now see a ladder on the left.

Climb up the ladder, onto the roof of the building.
ROOF
Look at the rusty pipe on the roof. Try to move the pipe, but there’s stuff in the way. Look at the wooden box next to the pipe, and push it down the hole – that hole is pretty deep. Now that the box is out of the way, push the rusty pipe, so that it acts as a bridge over the gap. Crawl through the rusty pipe, along to the other side of the gap.
Walk right a few steps, and look at the hole in the roof. But how deep is this hole? Pick up the rubble that’s lying on the ground next to the hole, and throw it down into the hole. Hmm, it’s not that deep. Climb down the hole, into the office.
OFFICE
Explore the office. Look at the long window, overlooking the loading bay. Look at the door in the corner, and try to open it – it’s locked. Look at the secretary’s wedding photo on the desk nearest the door. Look at the poster on the wall. Look at the gun display case. Look at the computer on the desk on the right – it’s password-protected. Time for some more hacking. Look at your PDA in your Inventory, and select the following options.
– Connect
– c.jenkins_office1
Place the diverters like so.

The readable files are downloaded to your PDA. Scroll down to the bottom of the PDA Notepad, and click on ‘Files’ to read the emails. Some of the emails mentions changing the codes, and reversing the dates. Hmm, that’s something to keep in mind. Look at the wedding photo on the desk nearest the door again, and notice the date – 12\08\91. If you reverse that date, it becomes 91\08\12. Go back to the door in the corner. Use the code lock next to the door, and select the following option.
– 91 08 12 (Wedding Date Reversed)
Now go through the door, into the Loading Bay.
LOADING BAY
Walk left along the Walkway, jump over the gap, and walk left a few more steps. In the next gap, climb down onto the scaffolding below. Shimmy left as far as you can, so you’re over the wooden crates. Now drop down, onto the wooden crates. Jump down, off the crates, onto the floor.
Look at the large crack in the floor on the left. Look at the hopper in the floor on the right. Look carefully at the edge of the hopper, to see a KEY CARD.

Pick up the KEY CARD. You fall down, through the hopper, into what appears to be a Lift Room.
LIFT ROOM
There’s nothing you can do in here. Walk right, and go through the door to leave the room.
CORRIDOR
Go through the door on the right, into the Kitchen.
KITCHEN
Someone’s been cooking fish here, recently. Walk right a few steps, and take the HOOK that’s hanging above the sink. Look at the cubby holes on the wall on the right. There’s something on top of the cubby holes, but it’s out of your reach. Move the dining table along, climb on top of it, then take PIECE OF GUM from on top of the cubby holes. Now walk left, and leave the Kitchen.
CORRIDOR
Walk down a few steps, so you see more of the corridor. Go through the open door on the right, into the Men’s Locker Room.
MEN’S LOCKER ROOM
Oh dear! Someone locks you in here! Explore the room. Look at the row of lockers on the right, and notice that one of the lockers has a bent door. Try to open it, but you can’t get a proper grip with your bare hands. Use the HOOK with the locker to pry it open, then take the can of ENGINE OIL from inside the locker. Now walk back over to the door, and look at the electronic lock next to the door. Let’s hack the lock. Use your PDA, and select the following options.
– Connect
– admin.pc_office7
Place the diverters as so.

All doors are now unlocked. Open the door, and head up into the corridor.
CORRIDOR
Open the door at the end of the corridor, and head up into the stairwell.
STAIRWELL
Climb down the stairs to the level below. Open the door, and go up into the corridor.
CORRIDOR
You automatically try to open the door on the left, only to find that it’s locked with an old fashioned lock, so you can’t hack it. Try to open the door on the right, but that’s locked as well. Walk down a few steps, and enter through the open door on the right. Someone closes the door behind you. Try top open the door, but it’s now locked. Watch the cut scene as you are cornered by Mr Spallacci’s goon. But don’t worry, Maynard comes to your rescue. Now we know that the gunshots George heard over the phone, weren’t Nico being shot. Maynard is the man who discovered Monatomic gold, and he’s rather… eccentric! He takes you to his Safe Room.
SAFE ROOM
It seems that Maynard hates Anna Maria as much as you do – he believes that she was making a fortune from his Monatomic gold. Look at the safe, and try to open the safe – you don’t know the code. Talk to Maynard and work through all the conversation topics. When conversation is over, climb up onto the desk on the right, then climb up through the hole in the ceiling.
CENTRIFUGE ROOM
Look at the rollers on the floor. Walk left a few steps, and look at the Centrifuge Chamber. Look at the Control Panel in the wall opposite the Chamber. It controls the pulley system hanging overhead. Try to use the Control Panel, to learn that the chain has rusted in place. Look at the chain hanging above the hole in the floor – it’s very rusty.

Use ENGINE OIL with the chain to grease it. Now use the Control Panel again, and select the following options.
– Right
– Down
The pulley is now in the Safe Room below. Climb down the hole in the floor, down into the Safe Room.
SAFE ROOM
The pulley is hanging above the safe. Use your HOOK with the pulley to attach it to the safe. Climb back up the hole in the ceiling, into the Centrifuge Room.
CENTRIFUGE ROOM
Go back over to the Control Panel on the left. Use the Control Panel, and select the following options.
– Up
– Left
The safe is now on the rollers. Walk right a few steps, too see that Maynard has climbed up through the hole, into this room, as well.
Walk right, and make your way to the other side of the room. Look at the large Control Panel, sitting on the platform, to learn that it controls the rollers. Use the Control Panel – the system is dead. Look carefully at the front of the Control Panel to see that the wires are loose. Use your PIECE OF GUM with the wires in the front of the Control Panel to re-attach the wires. Try to use the Control Panel again – it still doesn’t work. Walk left a few steps, and talk to Maynard. Ask him about the Control Panel. He goes over to fix the panel – all it takes is one swift kick!
Make your way back right, and head to the large Control Panel on the platform. The roller system works now… partially. You need to navigate the safe into the Centrifuge Chamber. Select the following options.
– Left
– Left
– Down
– Right
– Right
– Up
– Up
– Left
– Down
– Down
– Left
– Up
– Up
– Up
– Up
Walk over to the safe, and try to push it into the Centrifuge Chamber. You can’t shift it on your own. Talk to Maynard and ask about the safe. Now walk back over to the safe, and push it. Watch the cut scene. When you get the chance, push the button on the Control Panel. Watch another cut scene. Sadly, Maynard is trapped inside the chamber, and can’t get out in time. All you can do, is watch, as he is vaporised! R.I.P. Maynard!
Enter the Centrifuge Chamber.
Walk into the centre of the Chamber. Pick up the PLASTIC FOLDER and pick up MAYNARD’S KEYS from the floor. In your Inventory, look at the PLASTIC FOLDER to find a BANK STATEMENT. Read the BANK STATEMENT in your Inventory to learn that the factory has received a large about of money. Hmm, interesting! Watch another cut scene. Now you have to get out of here, before the thugs find you. Leave the Chamber.
Walk left a few steps, and look at the blast door. Try to open it, but it’s locked. Use MAYNARD’S KEYS with the blast door to unlock it. Now go through the door.
STAIRWELL
You find yourself back in the Stairwell. Climb up the stairs, to the level above. Open the door, then watch the short cut scene, as the Boss orders Vito to stay by the Lift door. But notice that Vito uses the doorstop at the bottom of the door to keep the door open.
Look at the light switch in the wall, and flip the light switch, so that it’s dark. Use ENGINE OIL with the doorstop to make it all slippery. Now unhook the doorstop, so the door closes again. Quickly hide in the shadows on the left. Vito comes out to investigate why it’s suddenly got dark. He slips on the oil and bangs his head, knocking himself unconscious. Turn the lights back on again. Head up through the door, into the corridor.
CORRIDOR
Quickly head down the corridor, and go through the 2nd door on the right, into the Lift Room.
LIFT ROOM
Close the door, and use MAYNARD’S KEYS with the door to lock it. That should buy you some time. Now walk right a few steps, and simply use the Lift to get up to the Loading Bay.
LOADING BAY
Head left along the Walkway, and go through the door. Watch the cut scenes, as you make your escape, and return to Rome.
============================================================
View this guide raw, exactly as the archive holds it