Just Adventure original
Black Mirror III: Final Fear – A Game Guide
Chapter IV
Darren’s recollection of young Angelina’s fall into the hole keeps evolving. In this recovered memory, he rejoins his twin sister at the bottom of a brick shaft to find her standing before what appears to be a portal — her face corrupted by evil. When he wakes in Dr. Winterbottom’s office, he’ll suggest Angelina must have been taken over by Mordred at an early age.
Spooning
You can’t just run off to check on the rock in the woods. The doctor receives a phone call summoning you to a meeting with Spooner at the cafe. You won’t be able to leave Willow Creek until you attend …
Odds & ends: … and there really aren’t any detailed distractions in other locations. You can visit the police station and find the constable over by the copy machine and the darts back in Samuel Gordon’s photo. The grocery is open for the first time since Chapter I — the better to serve Darren later in the chapter. (Abaya is still scared witless.) And two tourists are checking out the lighthouse display in the museum. (A little down the road, you’ll be able to talk to them.)
Enter the cafe as Denise leaves with a rather forlorn “Hi, Adrian.” (We’ll sort out the forlornness later in the chapter.) Spooner’s at the back. Talk to him. He’ll fill in the gap after Tom’s punch. And he seems to be softening: Spooner asks for Darren’s help on the Phil situation and the two remove automatically to the old morgue.
The Morgue
The house is now locked — it wasn’t if Darren visited earlier on his own — so use Phil’s keyring on the front door and the two automatically enter to find the secret stash of torture videos has been cleaned out, but that the one Darren played in Chapter II remains in the VCR.
Odds & ends: In the morgue interior, use the “Space Attack” disc on the computer to elicit a unique line from Spooner.
Lead Spooner downstairs to find that Phil’s body is now missing — and that the inspector as a result is more suspicious of Darren. Happily, the corpse Darren had to climb over earlier is still on a stretcher in the cold compartments in the rear wall. Pull out the “Chilled compartment with corpse” drawer to show Spooner and he’s convinced. The two automatically return upstairs en route to the police station and walk straight into Tom. Spooked, Tom flees the building — they call that “consciousness of guilt” — with the inspector in hot pursuit and you can finally head to the southwestern woods to inspect Darren’s handiwork at the stone circle.
Odds & ends:But you don’t have to go there directly. You can also:
– place your Chapter IV phone call to Madame Fortuna , who advises Darren to “stay away from heights.”
– revisit the swamp. Something’s changed. Right in the middle of the scene is a little pile of stones where there were no stones before. Wedged between the stones, an envelope addressed to“Adrian Gordon.” Within, another nebulous note — this one on the virtue of hope — with no clues (beyond its location, which will soon blossom).
Read the note twice to unlock picture #17 — a promotional shot of Darren being dragged into the Black Mirror.
– Finally, the whole business with Phil and Tom invites some reflection. It would seem that the two used the old Hermann place as a hub for various criminal activities.
On Ralph: Check the diary. Phil found the videos of the sadistic experiments conducted at the asylum by Hermann and Robert Gordon and, unlikely as it sounds, decided to keep it going — making poor Ralph a victim all over again.
On the necklace: No hard info until Chapter VI. But in context with BM2, it appears Tom was behind the Ipswich burglary referenced in the newspaper article in Murray’s cache of blackmail material. (In BM2, Tom was revealed as a burglar.) If the claimed “deposit” does’t hold water, a logical inference is that Phil was holding the necklace either to fence or simply for protection should Tom get nabbed.
On the mouldering body in the morgue drawer: It’s never made clear what was going on here — beyond producing convenient exculpatory evidence for Darren. (The body dates from the period when he was behind bars.)
Phil’s body: Ditto.
Who killed Phil? Is this Mordred’s work? No. Mordred rants and raves a lot in BM3 but, compared to his antics in the original TBM, he’s short on action. It’s far more likely that Tom went looking for his necklace, got into a dispute with the recovered Phil and did Phil in himself. (Tom has rage issues.)
And Matt? Inconclusive. He’s probably just off-stage at the moment. That “flotsam?” scene in the river was a vision. These seem to have little connection to reality and fall more into the category of “dark imaginings.” (Then again, Matt was staying with Tom, Tom wasn’t happy about it and Tom has a demonstrated tendency to fall back on violence when he’s unhappy.)
Following Up
You’ll arrive at the stone circle to find the rock split in two. Beneath, stairs leading down to a portal. However, a deep chasm prevents Darren from getting close enough to inspect in detail this gateway or the stone tablet and pedestal nearby.
Odds & ends: This chasm is the “heights” that Madame Fortuna foresaw. In other words, don’t try to jump it. If Darren left-clicks on the chasm five times, he’ll try — and die.
– If you’ve already collected the extension cord from the storage room at the top of the castle’s cellar stairs, you can also try to use it (a la Indiana Jones’s whip) on the roots above the chasm.
Look at the chasm. This allows you to take the folding ladder behind the near menhir at the right side of the castle. Do so and you’ll automatically reappear in the portal chamber with the ladder now serving as bridge.
Odds & ends: You can also try to use the one in the storage room at the top of the cellar stairs and learn it’s too short.
You’ll quickly identify a couple of issues: You can’t interpret the hieroglyphics on the tablet (though Darren’s uneducated guess seems pretty on-target). And you don’t have a black ball required to open the portal. Angelina stole one from the museum in Willow Creek and quietly picked up another in the summoning chamber in the BM2 endgame, but it went into the firepit with her and Darren’s mother.
As you may have guessed, the one leads to the other. Click on the tablet a couple of times and Darren suggests making a copy. Use either the camera or the pencil on the tablet and it’s done.
Translations
You can now ask far and wide about the symbols. Father Frederick, Mark (now in the graveyard), Spooner (back in the police station after failing to catch Tom), Dr. Winterbottom, Edward and even the two tourists at the museum have the “Hieroglyphics” topic (and the “Black ball” one, if you also clicked on the pedestal beside the tablet).
Odds & ends: The museum tourists, now talking, think Darren is a “Darren Michaels lookalike.” They speak mostly English, but their dialog is inter-cut with Russian.
“Spasiba” means “thank you,” “otlichno” means “great,” “otschen krasiwui” “very nice” and “Junosha” “young man.” “Vot taka ja chuin ja” should appear as “Wot takaja chuinja,” which translates as “This is such garbage.”
I couldn’t find a translation for “Gosslodi,” but, after online consultation with the husband of a fluent Russian speaker, I’m betting they meant to use“Gospodi,” which means roughly “Oh, lord.”
– If you visit the museum before you talk to Dr. Winterbottom about “Black ball,” Darren will have some additional dialog.
Edward’s your man here. Once he’s done telling you about his split with Denise, ask him about the hieroglyphics. He’ll link them to a local burial mound that was excavated some years back with the late Miss Valley’s help and eventually suggest that more black balls like the one that vanished with Angelina might be found within. (Per Dr. Winterbottom’s suggestion, he’ll also volunteer to serve as your butler, and will pay a visit to the castle the next day to discuss the matter.)
Odds & ends: You can also get a nudge toward Edward from Dr. Winterbottom (who turns over a book on Egyptian hieroglyphics) and from Edward’s museum pamphlets — found on the counter just inside the door. (You’ll have to use the book on the copy of the hieroglyphics or vice-versa to discover a note from Edward at the back.)
Burial Mound
So where is this mound? You can run around talking to everyone but the Russian tourists on this same subject, but it’s the wrong approach.
Odds & ends: However, it does have benefits. Talk to gravedigger Mark about “Burial mounds” to unlock picture #14 — the splash screen (also used as the scrolling backdrop for the credits) of a torch-bearing Darren standing before the Black Mirror.
Edward fleetingly mentioned Miss Valley’s involvement in the excavation. She’s the key. Our only connection to her in BM3 has been through Spooner. In the introduction, we saw him examining the murder location and then searching her house.
Can you get in there? You can. While apparently off-screen across the right of the two bridges in the full view of the village square (judging from Darren’s location on exit), the house has no existence within the broader game world. You can get to it only at this particular juncture and only by talking first to Spooner and then the constable about “Miss Valley’s house.” Zak then lets you into the parlor and watches while you search.
Look at the bookcase at the left and Darren extracts a folder. Right-click on it in inventory to read two pages of Miss Valley’s report. You’re supposed to underline three words or phrases that hint at the tomb’s location: “sector I3” in the second line of the first paragraph on the left page; “small animal bones” in the second-to-last line on the right page; and “marsh land.” on the last line.
But something in the underlining scheme seems to be boned. The game won’t recognize a correct answer for the sector, adds an extra word on bones (“from”) and accepts a wrong answer (“land”) for marsh .
No patch to date, but the game does permit an easy workaround. If you’re playing with “Additional game help” enabled, just right-click on the document in inventory to open it and wait about two minutes. A little lever then appears in the right page’s lower right corner. Click on it to skip the puzzle. If playing without this option, call up the main menu, select “Options,” then “Game” at the top of the screen and then “Additional game help.” Save this new configuration, return to the game, open the document, wait for the lever to appear and click on it. Darren then reads back the three clues.
You’ll need to clear up a loose end before you can leave. Miss Valley was the Order’s operations chief and as such the likely author of the scrap of a note you found in Ralph’s shack back in Chapter I. Was it written here?
Yup. Take a page from the notebook at the foot of the stairs and use the pencil on it. The result is a somewhat longer version that confirms Darren’s earlier supposition about the Order disbanding if something went amiss.
When done, talk to the constable or click on the door. Zak tells you to return the folder to its place, Darren automatically does so and you’ll find yourself back in the village square.
Odds & ends: The original tattered slip of paper vanished with the Order cowl between chapters I and II, so I’ve included screenshots of each above.
While each version fills in blanks in the other (and they’re clearly from the same loose-leaf binder), they don’t fit together that well. Lines from Version 2 are missing entirely from Version 1.
Conceivably the line-by-line correspondence is better in the original German. Or maybe they weren’t supposed to sync. I suspect that, being that the terser Version 1 was found with a locked-up Order cowl, that’s the one that went out to members and that Version 2 from Miss Valley’s place is a longer rough draft.
Here’s my take on an unexpurgated Version 2. Words in brackets [ ] are guesses at the empty stretches.
“In case we are unable to stop
[the progress of] the evil [spirit,]
we fail in our goal and the Order never existed.
[Though we fed the beast with the one life]
already sacrificed, that was never my intention.
If the cursed one [should achieve] his objective or
something happens to me, then
[hide your cowls and this note. The authorities]
can’t be allowed to find any trace that
might lead to us!”
Line 3 should really read something like, “we must act as though the Order never existed.”
– You can use the lump of coal you’ll find over on the hearth in lieu of the pencil.
Now you’re ready to find the burial mound. Conveniently, the “I3” referenced in Miss Valley’s folder is the coordinate for a location on your walking map and you’ve already been there. The marshy section can be found just right of the “bridge” in the upper-left corner and the bones are over to the right. And the “beaten track” now extends farther to the right. Follow it and there’s your burial mound.
Enter the tomb and click on any three of the five hotspots (not counting the small stones to the left) and Darren laments his inability to bring out Mordred on cue — attributing this to his medication and suggesting a cautious approach to Dr. Winterbottom on ways to mitigate its effects. Return to Willow Creek and talk to her about “Effect of the medication” and Darren spins an artful lie. Turns out antacids, coffee and certain teas diminish the impact of Haloperidox. You’ll need to collect all three.
Odds & ends: From the actual evidence, Mordred’s appearances and non-appearances don’t have much to do with the Haloperidox. After all, he’s not a true mental imbalance but a second soul — surfacing whenever his host feels strong emotions or deals with potential weapons.
Antacid: You can get one from Abaya at the little grocery store in the square — she’s still so scared that she’ll let Darren skate on the prescription — by simply asking about “Heartburn.”
Coffee: Edward at the cafe will sell you a packet of a strong Colombian blend.
Tea: You may have noticed earlier that the shop sells tea. Abaya doesn’t have either of these two teas in stock. But bounce back to the castle greenhouse and collect the dried-out “Tumulus Valerian” plant to the left of the well. (Note Darren mentions burning it rather than brewing.)
Odds & ends: Apparently a made-up name. (A “tumulus” is a burial mound.) However, Valeriana Wallrothii (how the plant is referred to earlier in the game) is an actual plant.
You’ll need to make one more stop. You can’t make coffee without a vessel of some kind, so drop into the castle kitchen to collect the pot from the stove — water is added automatically — and, if you don’t have issues with taking items before they’re strictly needed, the roll of plastic sheeting in the main hall. (It’s above and right of the central globe.) This’ll save you an extra trip.
You’ll have to build a campfire in the tomb. Return to the marsh, reenter the mound, activate the small stones to the left to build a “Fireplace” and use the dry twigs to the left of the tomb entrance in the exterior view on the ring of stones. Use the lighter on the twigs to get a fire going and place the kitchen pot on the flame.
And the rest can be done in any order: coffee on pot, antacid on pot and Valerian plant on the fire beneath. Only the last of these doesn’t work: The smoke doesn’t gather in the enclosure as intended but escapes out the exit. You’ll need to seal this. Once again, the work-in-progress castle proves the source of appropriate supplies: the aforementioned plastic sheeting in the main hall. Use this on the tomb entrance in the exterior view, then enter, use the Valerian on the fire (not the pot) and activate the pot to drink up your antacid-laced coffee.
A Mordred moment and vision of a burial ceremony quickly follow and Darren comes out of it knowing that a black ball was buried in a wall: the new hotspot (“Black mould”) between the left burial alcove and the exit. Just reach into it to claim the black ball.
Odds & ends: There’s no clear relationship to the appearances of mould back at the castle.
Darren Plays Portal
Back at the portal, use the ball on the holder and step through the fiery circle to reach the “slab” chamber under the Academy — the site of much of BM2’s endgame.
The portal vanishes. For the moment, Darren is stuck here.
A click on the portal establishes that this is your way out, so there has to be another black ball here somewhere. Click twice on the rocks blocking the stairs downscreen to ascertain that the body of an Order member is entombed here. This adds two hotspots (“Gaps”) to the left and right. Efforts to reach into these will establish it’s too dark to see inside, so cut to the chase. The lighter won’t work here, but use Murray’s camera on either gap to take a picture of a dead hand holding a black ball.
Darren wants a stick to poke the ball out the other gap. There’s nothing like that down here. But keep poking Louis’s body after Darren asks for the stick and he’ll, uh, improvise — breaking off Louis’s dead arm. The gardener finally makes himself useful. Use this on either gap and the ball becomes accessible from the other. Use the ball on the holder beside the portal and step through into the ritual chamber.
There’s little to do save read twice from the book on the central lectern for Mordred to take over Darren entirely.
He’ll take the book, adjust a black ball in the five holders at the left to engineer an exit via the portal under the southwestern woods and, followed by two hell hounds, march toward the castle. At the fork just short of the gates, Mordred is intercepted by the ghost of murdered spouse Maria, who accuses him of having killed their son Damian. (What else would he be called?) She enters Darren’s body …
Odds & ends: The two phrases spoken in the ritual chamber — “Zodocare Busadire” and “Amena Vei Busadire” — appear to be from the so-called “Enochian” language that appeared in the journals of Welch scholar John Dee in the 16th century. Operating under the assumption that this isn’t just sinister-sounding gibberish, I tried to piece together a rough translation from online dictionaries.
“Zodocare” is related to movement and change and “Busadire” means “glory.” Hence, being that this is a summoning chamber, “Zodocare Busadire” could mean something like “Assume your rightful place.”
“Amena Vei Busadire” is trickier. As far as I can tell, “Amena” and “Vei” aren’t Enochian words. However, the former is close to “Amema” which means “curse” or “cursed” and as such would fit well into the Gordon mythology. Possibly, “Their curse is your glory”?
Chapter V
… and must somehow diminish Mordred’s influence, for when Darren comes around in the castle, he’s himself again — save for those black eyes.
Honestly, this sequence didn’t deserve to be broken out into its own chapter. It’s essentially a long cut-scene with only the most nominal adventure-game elements and the environment here is so pared-down that solving these is beyond easy.
Darren finds himself in an unfamiliar bedroom — the one he was unable to unlock earlier in the game. (Someone has purportedly kicked in the door — though it actually appears to have been kicked out.)
Odds & ends: It’s never established exactly how Darren returned to the castle. Being that she unlocked an electronic gate for Darren back in Chapter II, kicking in doors doesn’t seem a likely activity for ghostly Maria.
On the plus side, Darren now has Mordred’s book from the ritual chamber. (It’s on the desk.) Have a look at it to ignite a brief Mordred moment and discover it’s blank. Recalling his experiences at the end of BM2, Darren now proposes to bleed onto the book to expose the text. You can either left-click on the book twice or do so once and then collect one of the glass shards on the floor beside the chair. Darren then automatically uses one to cut his hand.
When this doesn’t work to his satisfaction — it allows him to read only one ritual — Darren decides to follow father Samuel in suicide. He’s already atop the tower — how did he get up there, anyway? — when interrupted by the ultra-timely return of the nurse, now revealed to be a Vatican agent.
Automatic and then effectively automatic conversation with same, explaining the relationship of the Gordons to the Black Mirror and the “Guardian” role alluded to in the anonymous notes; transfer to Darren’s inventory of the “Book of the Guardians” Valentina found in castle library; removal to Warmhill; chat with exorcism-novice Father Frederick; and a new mission. Darren is to find some of Mordred’s belongings and some information about one of his sins.
Not much of a challenge. For starters, you’re locked out of Ralph’s shack and the whole southern part of the map — it wouldn’t do to show up in Willow Creek with black eyes (though it might have been fun; imagine Dorothy’s reaction to Darren-as-hellspawn) — and you just need one item (Mordred’s book) of which you already know the location and some info from another (Book of the Guardians) that you now have in inventory.
Return to the castle to be stopped at the gate by prospective butler Edward. Talk to him about “Edward” to have him deliver to Spooner the Louis-Angelina correspondence found in the ruined Academy.
In the castle, head up to the nurse’s old bedroom, take Mordred’s book from the desk at the left and right-click on the “Book of the Guardians” in inventory to learn about the circumstances of Maria’s death.
Back at the Warmhill church, enter by the side door. If you’ve done everything required, you’ll find Father Frederick and Valentina have moved to the altar. Either use Mordred’s book on the priest or talk to him about it to pass it along and use the “Mordred’s wife” topic to pass along what you’ve learned about Maria’s death.
Now the ritual can proceed. It does not go well. Father Frederick winds up dead. But before the father dies, he tells Valentina, “It’s … it’s the wrong place. There’s nowhere for him to go here.”
Odds & ends: The note on the desk is the last of the five anonymous ones. Focusing on the virtue of faith, it’s about as useless as its two predecessors in terms of clues. However, take it anyway and read it twice to unlock picture #15 — a cast shot that includes most of the major players. (Edward and Constable Zak are notable exceptions.)
– And while you won’t be using it until Chapter VI, it’s not a bad idea to collect the rope that’s purportedly hanging in front of the window. (Click on the curtain to take it.) Darren can then use this on Valentina for a funny line.
– The “Edward” topic sends the would-be butler off on the errand, so use the “Black eyes” topic first if you want to hear everything he has to say.
– You can call Madame Fortuna to learn that “death will touch you” — or maybe not. And this is your last chance to catch up with the lawyer and notary on any missed topics. (Their business cards vanish in Chapter VI.)
– New responses when you click on the family tree at the right side of the library and the mattresses against the rear wall of the study upstairs.
– Be sure to read Darren’s scratched-out suicide note in the diary (“To the finder of this book”).
– Finally, one of the game’s minor mysteries is cleared up: the lingering red cursor for the vicarage door. Return to the vicarage yard with Mordred’s book in hand and having read the passage from the Book of Guardians and try the door again to get a different response.
Chapter VI
Here you’ll initially control Valentina. Once Edward departs, use the library phone to brief the archbishop. You hear only one side of the conversation — and with Darren currently asleep upstairs there’s no diary entry to sum up the result — but it’s clear from Father Frederick’s last words and this exchange that the church wasn’t the appropriate spot for the exorcism. Valentina is going to try to locate the Black Mirror beneath the castle.
While limited to the castle proper, she can search any room save the back bedroom upstairs (where Darren is now sleeping).
But in fact Valentina is already in the right spot when the chapter starts. When she gets off the phone, she offers an unambiguous hint about secret passageways and drafts. And there’s a draft right here — albeit one that couldn’t be detected earlier.
You have doubtless noticed that the column between the bookshelves has never surrendered or explained its continuing interactivity. Something going on there. Use the matches on the column. The flame flickers. You’ll then be able to remove a plate, detect a metal wall to the rear and expose an odd-shaped keyhole.
The key is in the jewel box — another source of lingering interactivity — on the right side of Victoria’s old room upstairs. Take the box and Valentina notices its unusual weight and an apparent secret compartment. Leave the room to discover Darren’s awake. (If you took the jewelry box before you found the keyhole, you’ll have to go back upstairs to find him in the hallway.) Run through his conversation topics and then talk to him again about the jewel box (or just drag it onto him) and he’ll stomp it as Valentina shakes her head at macho simplicity and hand over the odd key within.
Odds & ends: Valentina can also use the matches on the library’s central carpet, the family tree at the right and the left of the two bookcases.
– In addition to the matches, Valentina has a dagger (which comes into play later in the chapter), a Bible, a Gordon file and a tape recording of the exorcism ceremony.
The last three are of strictly academic interest — the file does explain things you’ll encounter later in the chapter — and have no effective use in the game, but Valentina can try to use the dagger on the jewel box and keyhole, the Bible and file on Darren after he comes around and, a little farther along, the recorder on the shades down in the catacombs.
– Darren was wary of the cellar’s gloom. Valentina isn’t. Until she discovers the keyhole in the library, she can descend the stairs in the storage room off the kitchen, move across the scrolling screen and inspect each of the half-dozen hotspots by matchlight. And if Darren gave the rope to Valentina at the end of Chapter V, she can try to use it on the central well.
– As Valentina, look at the monitor to the left of Victoria’s bed and she’ll acquire a left-behind syringe of adrenalin.
This is another of those odd essential and yet non-essential items — a bit like the file in Ralph’s shack and the cigarette pack in the morgue, which turns up again should you fail to claim it on first acquaintance. If you don’t take it, Valentina will retrieve it automatically when it is needed later in this chapter. (Kinda makes you wonder why we’re playing at all!)
— As Darren, you can use the library phone to call Madame Fortuna. She foresees death, death and death — by bolt, by deluge and by darkness — and this time offers no suggestions for escape!
– From here on, you can play as either character — albeit with a few caveats. (Certain tasks are reserved to Darren.)
This has some interesting side effects. If Darren’s description of a location is less than helpful, give Valentina a shot. In certain contexts, she will overreach but in others she will throw Darren’s comparative simplicity into relief. She can explain a number of things that elude him — like the decision to keep the renovation debris from the old wing inside the castle.
The two can trade back and forth three items — the odd key, the jewel that completes it and the rope in Valentina’s old bedroom — by dragging and dropping.
Finally, there’a good deal of optional dialog between the two. Now, for instance: Once you’ve completed the initial exchange, talk to Valentina again for an unrevealing discussion of the ritual chamber, a short history of the Black Mirror and learn that Valentina is author of the “guardian notes” — tests to determine Darren’s suitability for the Guardian role.
– And that suggests a different interpretation for “the foreign woman” reference in Phil’s accounts sheet (“List of money deposits”) — found in the morgue back in Chapter II.
Back then, I speculated about who would hire Phil to spy on Valentina (then known as Sister Antolini). Four chapters later, there still isn’t a suitable candidate. So I wonder if it’s actually the other way around. Phil wasn’t watching Valentina. Rather, Valentina hired Phil in order to place the “look for people who need help” challenge in Darren’s path.
Granted, this would depart from the target/payment/client layout used for Phil’s other two accounts. And perhaps it’s a mistake to expect a computer game to track in this kind of detail. It’s not inconceivable that the designers simply wanted to attract our attention to Valentina and didn’t think to supply a workable rationale.
Back in the library, try the key in the column keyhole. (Either character can do this.) Nothing. A jewel is missing. Discuss this with your counterpart to learn it can be found on a bracelet Victoria gave Angelina — the one planted on the outstretched hand of Miss Valley’s burned body in BM2 to persuade Darren that Angelina had been killed. Hence, it’s now in the police evidence locker down in Willow Creek.
Switch to Darren — Valentina doesn’t mind confronting 800-year-old smoke monsters, but apparently has a thing about the rain — and visit the police station. (The map has been turned off up to this point, but now you can use it again.) A quick conversation with Spooner reveals that, based on Angelina’s letter to Louis, Darren is off the hook for the murders and, via “Missing jewel,” secures the bracelet.
It’s simple to extract the jewel. The cabinet just inside the door to the nurse’s old bedroom holds a pair of pliers. Darren couldn’t take it before. Now he can and you’ll get a candle in the bargain. Use the pliers on the bracelet (Darren only), place the liberated jewel in the key (either character) and use the key on the keyhole again (ditto) to open the entrance to a spiral staircase that evidently descends “a good few storeys.”
Odds & ends: This is your last meaningful opportunity to explore the countryside. Once Darren and Valentina descend into the region below the castle sewers, Darren won’t be able to return to the surface and Valentina will do so in only a nominal way.
The village and its environs seem well shut-down. But there’s one remaining optional task you can perform: Visit Ralph’s shack in the woods along the Warmhill road.
You’ll find the door has been smashed in and that the axe formerly located on the woodpile to the right is now embedded in the doorframe. Click twice on the opening and Darren speculates that Tom has been here — evidently trying to intimidate or silence a potential witness against him — and then enters.
We don’t see what Darren sees but it must be quite a sight, for Darren swears and, emerging, says, “There are some things you don’t want to see …” before he walks back down the path to the Warmhill road, refusing to return.
So who is dead? Ralph? It seems that way — until you head back toward the castle. As you pass the fork, Darren hears Ralph’s voice off in the woods, singing “Rain, Rain, Go Away.”
“I … I … I was only playing with him,” says the invisible man.
There’s a rustle — apparently to signify departure.
Darren then wonders if he’s been hearing Ralph or the voices of the dead. And of course that line makes the issue of who exactly has died ambiguous all over again. Maybe it was such a mess inside the shack that our hero doesn’t know whose body he saw. (Remember the chainsaw Darren left behind?)
You can resolve this issue. The voice came from over at the left side of the fork screen — i.e. close to the Warmhill road. Head back toward the church in screen-to-screen mode. Just past the bridge you’ll hear another rustle. Evidently someone stopping. Not exactly a game-changer, but, nevertheless, you can now take the side path and reenter the shack. This time, Darren says, “Ralph has got his revenge …” (If you click on the door to the Three Kegs Inn, he’s more specific: “The owner of the pub is dead.”)
And it gets better. Any time after your initial visit to the shack, you can report your finding to Spooner, via the “Hut in the woods” topic. This unlocks video #24 — a gag sequence from the burial mound.
– If you’ve clicked on the entrance to the closed cafe, Zak can give you some gossip about Denise and Edward.
– And don’t forget to look in the mailbox one last time to get sunglasses — evidently a gift from Edward. (As far as I can tell, they have no practical use.)
Sewers
Valentina automatically rejoins Darren (or vice-versa) and the two automatically descend into a large, watery chamber with no visible exit.
What with the paired symbols on the four columns, this looks very like part of a puzzle. From left to right, they are: house/jar, pitchfork/flower, bird/head and fish/hand. Memorize or jot down these combinations. You’ll need to refer to them soon enough.
However, the immediate puzzle lies elsewhere. You need to raise the central chain to open a path down and it stands to reason that the apparatus must be at the one castle location you’ve so far been unable to explore: the cellar.
Odds & ends: D&V can now discuss “Other exit” and raise the issue of another secret passage. And after one or the other has looked at a set of hieroglyphics, they can talk about them as well. Note that Valentina over-interprets the symbols. She’s looking for over-arching meaning, while Darren just takes them as they are. This time, he’s right. (But not the next.)
The Cellar
Send Darren back up the stairs and over to the supply closet at the top of the cellar stairs. As before, he won’t descend without light, so use the lighter on your newly-acquired grave candle and then drop down the stairs.
You’ll find the basement substantially as it was in the original TBM — with the notable absence of the fountain controls at the rear and notable addition of a monster water pump over at the right. It’s currently without power and in any case Darren can’t do more than fumble with the controls without more light.
You can plug in the construction light near the foot of the stairs. At the top of the stairs, take the extension cord on the right wall , plug one end into the socket below and drop the other down the stairs. Back downstairs, simply plug the free end into the light and you’ll have all the illumination you’ll need for your tasks here.
The chain that bisects the room below is the same one that goes down the well here. (If Valentina is still down in the sewers, you can establish this by left-clicking on the well.)
Can you pull it up? Yes. With the light, you can now open the hood of the pump over at the right and then use the free end of the chain over the well on the pump’s driveshaft. Once you power up the pump, it will serve as a winch and pull up the chain in the flooded room below.
This raises an issue: You have no ready way to plug in the pump. The extension cord you dropped down the cellar stairs won’t stretch this far to the right.
Now, there is independent power down here. You can turn it on using that lever on the rear wall to the left of the well.
But you’ll want to leave the juice off until the last moment. This saves you from making deadly mistakes. With the power on, Darren will die if he touches the hanging cable at the left, a powered-up but ungrounded pump or, a little farther along, the grate in front of the well. (The business about watching where he steps seems to be a red herring.) Better to make all your connections first.
There are three. The easy one is the ground wire (here mistranslated as “earth”). Just pick up the wire from the pipes above and to the right of the pump and attach them to the pump itself.
The power issue is trickier. It’ll go against all your instincts for self-preservation.
Do NOT try this at home.
A power cable is hanging from the ceiling near the construction light. It won’t reach the pump, either. But the puddle on the floor fills the gap between the hanging cable and the pump’s power cable — extending from just right of the construction light to the grate in front of the well.
In others, you’re going to use water as a conductor. Dip the hanging cable into the puddle below and the pump’s power cable into the grate in front of the well.
Odds & ends: Ignore all the business about the “poles” for the pump — there’s just the ground line to the right and the power cable to the left — and note that you’ll have to pick up the latter cable where it enters the pump, rather than at its free end.
Unfortunately, the water isn’t a good enough conductor to supply the needed power. But if you remember your high school physics as well as Darren remembers his, you’ll recall that salt water is a better conductor than fresh. You just need to salinate the puddle to the left of the well using the “Gritting salt” from the pail on the right at the top of the cellar stairs.
Finally, throw the lever on the rear wall just left of the well. A red light appears on the pump controls. Activate the controls, the pump starts, the chain rises and, in a cutaway to the waterlogged room below, you’ll see a cage rise into view. Valentina will join Darren in the cellar and tell him, “I’m impressed.”
Odds & ends: Interestingly enough, you can raise the cage before you even find the key to the hidden door in the library.
The descent will operate just as you would think: Darren in the cage with Valentina up at the pump controls. But if you try to Valentina at the controls now, you’ll find the lady balks at operating the winch.
Things have to be set up just so first and you may find this a bit tricky. First off, you need a hidden item — a length of rope outside the window of the bedroom where Darren wakes in Chapter V. (Either Darren or Valentina can take this, but it’ll take two left-clicks on the window for Valentina.) Once the cage has been raised, use this rope on the well to tie it off — it drops down alongside the cage — and then head back down to the sewer. (Both characters will appear there.)
Odds & ends: Once the two return to the sewer, they can talk about “Cage.”
As Darren, click on the rope and then talk to Valentina about “Pull rope” to reach an understanding on the signals. Then send Darren into the cage (you’ll have to put him in twice; the first time is just a test drive) and Valentina back to the cellar (anywhere will do; she doesn’t have to be at the pump controls) and have Darren pull the rope. The cage drops and you’re underwater .
Remember the symbols on the columns in the room above? Hope so. In this timed puzzle, you have 90 seconds to select, in sequence, the four symbols that are paired with the ones at the top of the display. Given that they’re lined up in order, it’s beyond easy: jar, rotate right (>), flower, rotate right, head, rotate right and hand. Once you click on hand, the cage descends again into a huge mausoleum (which the game will call “Hieroglyphics chamber”) and Valentina clambers down the chain.
Odds & ends: Quit the incomplete puzzle by pulling the rope at the right to resurface in the sewers — and unlock picture #10.
– Given that Darren’s just been underwater, how is it that the grave candle appears to remain lit?
Hieroglyphics Chamber
Here you’ll face the first of a series of puzzles that will clear the party’s path to the Black Mirror.
See the capsules on the six chains strung down the rear wall? Click on the central scale once. The chains move and one of the containers (which one varies) comes within reach. Open it to find a gold key. This fits one of the six locks on the stone door at the left.
Your task here is assembling items that, when weighed together on the scale, adjust the capsules to give you access to the rest of the keys. You can collect as many as seven items. Indeed, the game is really set up for you to grab them all and then winnow them down using the hints on the relief panel to the left of the scale — but the scale requires only four: the arrowhead in the leftmost sarcophagus, the fish in the second from the right and the bowl and staff in the catacombs through the entrance to the right.
The items in this first room are easy. Simply open the respective sarcophagi — this can be done only as Darren (albeit with Valentina’s hesitant help) — and then look inside.
Odds & ends: Darren also can collect the toy boat from the floor (either on his own or if Valentina directs him to it) as well the shield in the second sarcophagus from the left and the crown in the lower left sarcophagus in the catacombs (which we’ll get to in a moment). However, none has a practical use beyond as wrong answers in the weighing process.
– Once D or V has looked at the middle section of the relief panel, they can talk about “Hieroglyphics.” And it’s worthwhile, as Valentina’s interpretations of the symbols plays directly into the solution of the scale puzzle. (See “The Scale” below.)
– If Darren picks up the rusty sword in front of the second sarcophagus from the left, it’ll bring on a “Mordred Moment.”
– Try to use Darren’s castle keyring on the stone door to unlock picture #9.
– What’s with the headless statue and its ornate sword? It’s never definitively cleared up. Darren’s thinking Mordred — presumably headless after his fight with Marcus. But have Valentina examine the offering dish below and she’ll venture that the statue represents a pre-Christian god. And if she examines the smaller statues through the left door, she’ll report that they seem to have been constructed this way (i.e. rather than disfigured after the fact). So …
Catacombs
The two other items are a challenge. Located in the catacombs through the arch to the right, each is guarded by a “shade” — a pillar of smoke that, per the inscription above the entrance, will kill Darren or Valentina if given the opportunity. They’ll move through an open doorway into an adjacent darkened room to attack and under certain circumstances will even enter a lighted chamber.
Odds & ends: Once Valentina reads the Latin inscription over the right door (automatic when either D or V clicks on the entrance), Darren can open the Book of Guardians to a new entry — a loose note about shades that will surface again later in the chapter.
But at least the shades are predictable. And they are vulnerable: You’ll learn from the diary that the shades are sensitive to the pale light here.
That light is not a fixed property. Did you notice that, when Valentina automatically closes the right door of the catacombs entry room, the room goes from light to dark? The lighting in any given chamber is keyed to the number of open doors.
Odds & ends: Darren asks Valentina how she identified the switch for the door. She frames it as an issue of faith. But, c’mon, it’s the only switch right next to that particular door!
In other words, the light is something you can control. And it’s already been mapped out. Back in the hieroglyphics chamber, have Darren look into the little hole to the left of the catacombs entrance. It contains a map — each room marked with a Roman numeral. This indicates how many doors must be open to light a given room — for instance, two in the entry room and two in the shade room to the right. (And that’s exactly two, not “two or more.”)
What you may not realize at first is that you can use this to chase the shades out of position.
In each case, you’ll have to provide:
- a dark adjacent room into which the shade can flee. (If you turn on the light in a shade’s room without giving it an dark place to go, it will go into a lighted chamber to kill Darren or Valentina.)
- an open door between the shade’s original room and the one into which you’re decoying it
- and, finally, a light in the shade’s original room to chase it out.
You also need an exit strategy: How do you keep the decoy room lighted (i.e. safe) until you need it to be dark? 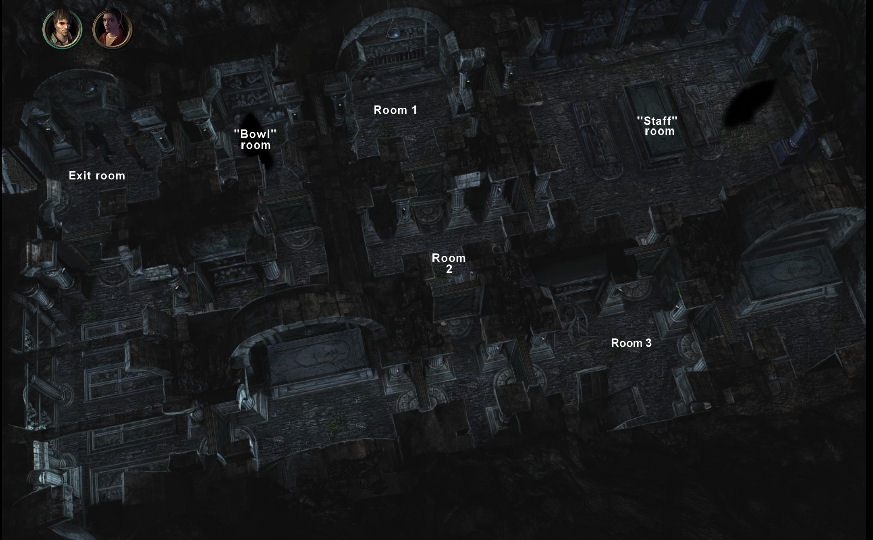
Bowl
The bowl is in the niche on the upper side of the room just right of your starting position. The way the maze is set up, you’ll have to dislodge the shade here before you can go after the staff in the catacombs upper right corner.
The first issue: Into which of the three surrounding rooms will you decoy the occupying shade?
The right and lower ones won’t work. The right is initially sandwiched between the two shades and you can’t set it up to receive the one without getting killed by the other in the process. And the lower has only two doors, while three are required to set up a room for a shade and engineer a safe escape.
However, you can lure the shade left into the catacombs’ entry chamber.
The room has to be dark to receive the shade. But you don’t want it to go dark until Darren and Valentina are safely outside, so you’ll want to set things up here so that the final step before leaving the decoy room — the closing of the escape door behind our heroes — is the one that darkens the decoy room.
First close the catacombs exit to the left (using the switch just above and to the right of the door), then open the lower door (the switch is just above and to the left) and finally open the right door.
The entry room is now lit (two open doors), you have an exit (the open lower door) and you’ve given the shade a passage into the decoy room (the open right door).
Just move Darren and Valentina through the lower exit and have one of them close it behind you. The decoy room goes dark again. It’s ready to receive the shade.
Now you just have to shoo the shade in there by turning on the lights in the “bowl” room. That requires two open doors. You’ve already opened one.
The other is the “bowl” room’s lower door. (The right one has the same attached issues as the right room’s use as a decoy room.)
You should be in the long, vertically-oriented room in the maze’s lower left corner. Open the upper of the two right-hand exits and move Darren into the little room just below the shade room. (He’s the only one who can take the bowl; Valentina just sees bones in the niche.)
You’ll want to keep the light on in this small room (one open door) to keep the shade at bay. As there’s no interior switch, have Valentina close the left door from the outside to restore darkness and then have Darren open the upper one to light both it and the shade room and send the smoky critter flying left.
As Darren, enter the room, take the bowl from the niche at its upper side and, if you like, close the left door to trap the shade. (This last step is not necessary unless you’re planning to open the door to the right, as you’re likely to do for “Using room 2” in the “staff” room sequence below.)
Odds & ends: While the catacomb appears onscreen as a single location, it functions in certain respects as a collection of separate rooms. Hence, Darren and Valentina won’t be able to see a given hotspot (i.e. the door switches and the light in the entry chamber) until one or the other moves to the appropriate chamber.
– Valentina can try to use her recording of the exorcism on the shades.
– One last Lost reference: The shades, especially when on the move, are clearly inspired by that TV show’s “smoke monster.”
Staff
This is in the sarcophagus in the big room at the upper right.
Here, you have a choice: You can divert the shade into any of the three adjacent rooms. It doesn’t really matter which one you chose, as you need to visit the same three in any case and leave open all three linking doors to light the shade room. But the middle room requires some extra gyrations. (For convenience, I’ll call these three decoy rooms 1, 2 and 3. See picture.)
– Using room 1: Have Darren or Valentina enter room 3, leaving the left door open behind them, open the upper door to light the room (two open doors) and then exit left.
Now send a character up to room 1 (via room 2) and open the left and then the right door to turn on the lights (three open doors). (Note that the switch to the first of the two doors you’ll open en route to this chamber is hidden and you may need to tap the spacebar when a character is in the room to locate the hotspot.) Then just close the lower door on your way out to return the room to darkness.
Finally, in room 2, open the right door to light the room (two open doors) and the shade room. The shade doubletimes it into the dark room 1 and you can bring both characters into the upper-right room to open the sarcophagus and claim the staff.
– Using room 3: The only differences between this and “Using room 1” above are closing the left door on the way out of room 3 to keep it dark and not closing the lower door of room 1 to keep it light.
– Using room 2: This is a bit more difficult than the other two. It may seem impossible at a glance, but the trick is setting up the rooms in the right order.
Send one character to room 1 and open the lower, left and finally the right doors to light the room.
Drop down to room 2, close the lower door (if open), open the right door to light the room and exit via room 3 and the former “bowl” room. (Leave open the door between rooms 1 and 2.)
Yes, room 2 is still lighted when you want it dark, but you can’t safely darken it from your current position. (There’s no interior switch for room 1’s lower door.)
Instead, retreat to the big room in the lower left corner and bring a character along the lower edge of the catacombs to the small room directly below room 2. Open the upper door to darken room 2 — all three doors should now be open — and then open the left and upper doors of room 3. Bring the other character into the “staff” room via room 1 — the lower route being vulnerable to the transplanted shade — to claim the staff and make your exit via room 1 and the former “bowl” room.
Escape
Now there’s just the issue of getting out. The shade from the bowl room blocks the exit. You’re going to have to put it back where it came from. (The large room below the exit chamber can’t be used for this purpose, as neither of the potential escape doors to the right have switches on the far side.)
Most of the scenarios above should leave the former “bowl” room in darkness and you won’t need to deal with it at all. Just move both characters to the large room in the lower left-hand corner, close both right exits and open the upper door to chase the shade out of the exit room. Enter the exit room, close the right door to lock in the shade, open the exit door, reunite the characters and leave the catacombs.
(If the “bowl” room is still lighted, move both characters into the “bowl” room, close the right door, open the left door to light the room and drop down one room and close the door behind you to darken the “bowl” room again. Then just mop up as described above.)
The Scale
Back in the hieroglyphics chamber, activate the central scale (twice if haven’t yet touched it). The items you’ve collected vanish from inventory and reappear arrayed around a closeup of the scale. (These include the boat from the floor, the shield from the second sarcophagus from the left and crown from lower left sarcophagus in the catacombs.) Which ones do you use? (Just pretend for a second I haven’t already told you, OK?)
This is based not on weight, but on the items’ significance in the relief panel to the left of the scale. And it’s a tricky affair — one of a few places in which the game challenges your powers of interpretation.
Have Valentina look at the middle section of the relief to the left — Darren can’t make heads or tails of it — and she’ll note first that seven “societal groups” seem to be represented here. It’s a short jump to link these groups to the seven symbolic items liberated from the hieroglyphics chamber and catacombs and then to conclude that the four groups pictured standing (i.e. in favor) are the ones that should be represented on the scale.
But which groups are standing? Valentina mentions two — priest (staff) and hunter (arrowhead) — and identifies the king (crown) and warrior (shield) are among those lying down (i.e. in disfavor). So far, so good.
That leaves the fish, bowl and boat as potential candidates for the two remaining spots on the scale. Now, you can just flip these around, a la the name tags in the Warmhill graveyard back in Chapter II, until you find the combo that works. But there are in fact a couple of ways to reason this out.
First off, note that there’s a rough correspondence between the positions of the seven standing/prone figures in the relief’s middle section and the seven columns in the bottom one. Valentina seems to suggest that these are job descriptions and it’s easy to match the prone king to the second column from the right (the only appearance of a crown in the bottom section) and the prone warrior to the third column from the left (the only appearance of a sword).
That leaves just the prone figure above the second column from the left, and it’s pretty clear from the “water” symbol at the top of the column below and the boat farther down that the third role is disfavor is “sailor.” Hence, the boat would also be excluded.. (Beyond that, look where you found the boat — not in a sarcophagus, but out on the floor of the hieroglyphics chamber. Hardly a signal of being held in favor.)
Drag and drop staff, arrowhead, fish and bowl onto the scale. It descends, the view pulls back and the six chains left and right align themselves so the capsules along their length are accessible from ground level. If you tampered with the scale earlier, you already know these contain the keys to the stone door at the left.
The unlocking process can play out in slightly different ways depending on what you may have done with the scale and the single capsule that was available earlier. If you took and used a key then, take another now and use it on the door to get the rest of the keys in one fell swoop. Use this collection on the door and you’re in. (If you didn’t, you’ll have to take two keys first.)
Chapel
Pass through a bridging chamber (not much of significance here) to the chapel or “cathedral.” As Darren, click on the altar on the raised portion of the room and Valentina joins him and translates a Latin sentence inscribed here: “At sunrise the king sent his warriors into battle against the darkness.” You’ll then be presented with a 7 x 5 grid of click-able icons. You’re expected to find a path from the sun in the left column to the moon in the right.
Many of the icons could be related to elements of that sentence but if you try to punch them in blind, you may discover the game is looking for a particular sequence and that gaps in your knowledge prevent you from filling in the blanks.
If you quit the puzzle, Darren suggests that Valentina take a poke at it. Switch characters, click on the altar again and she’ll note that the icons are the same as the ones back in the hieroglyphics chamber. As noted earlier, Valentina can supply a detailed interpretation. She believes the seven columns in the bottom third to be job descriptions for the seven types of people portrayed in the middle section — and note that two of the roles identified by her appear in this “At sunrise …” sentence: king and warrior. You simply need to note down the six symbols that appear for king (second column from the right: crown, bread, house, boat, shield and cup) and the six that appear under warrior (third column from the left: axe, helmeted head, sword, arrow, shield and bow).
Back in the altar, start with sun in the left column and then work your way through those icons in that sequence, ending with the waning moon. The path should look like this:
<>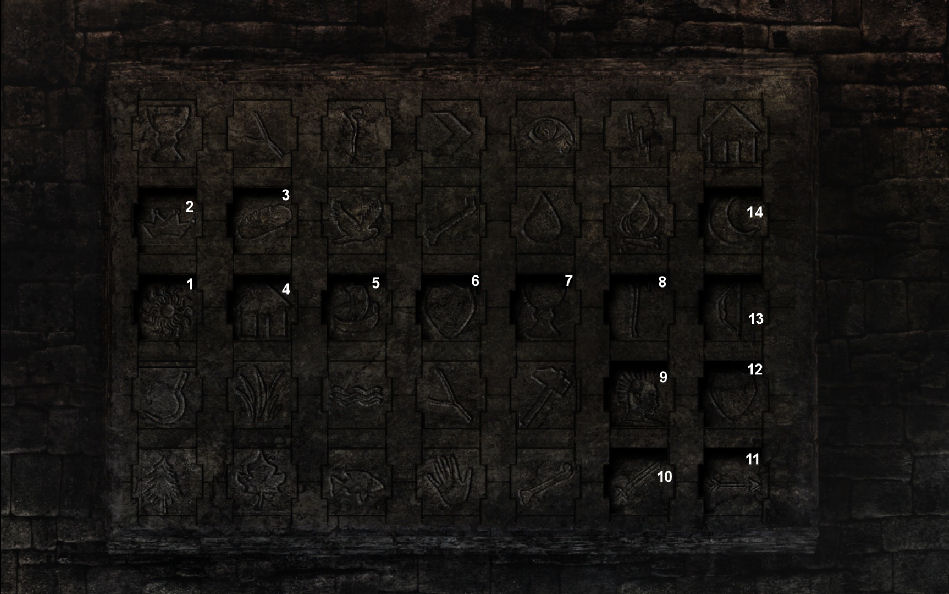
Complete the sequence and the altar descends, then the whole front section of the raised area, and you’ll find a descending staircase.
Odds & ends: Darren and Valentina can talk about “Chapel” here.
Laboratory
This leads to an alchemical laboratory with a stuffed-up chimney that Darren seems to recognize. This is where Angelina must have landed after her fall.
Odds & ends: If you say so, Darren. But it seems likely that a fall of this crazy distance — “a good few storeys” down to the sewers and then some down to the hieroglyphics chamber and lab — would have instantly killed the wicked little girl and that Darren wouldn’t have been able to simply clamber down after her.
And the Black Mirror must be through the stone door to the right.
How to get through? Remember how Darren opened the door in the Academy ruins in BM2? He cut his hand on a blade beside the door and then used his bloody hand on the door.
No such blade is in place here, but there is that rack of swords just below the door. As Darren, click on it. This brings out Mordred again and earns some scolding from Valentina. And that’s apparently enough to make Darren remember how he opened a door under the Academy.
In any case, talk to Valentina about her dagger and, despite the talk mere seconds before about not letting Darren near a blade, she’ll permit him to use it for this purpose. Darren then automatically opens the door to the mirror.
Odds & ends: Why does Darren need prompting to recall something he did just three weeks earlier? And, knowing what we now know, how did Angelina reach the Mirror in the vision we saw back in Chapter IV?
– Darren and Valentina can talk about “Mordred’s laboratory” here.
– As Valentina, click on the central lectern to unlock picture #8.
The Black Mirror
And here’s the Black Mirror itself.
Your arrival here sets off a cut scene and then an automatic conversation that draws a previously-undisclosed distinction between Mordred’s soul and the “shade” of Mordred’s soul that inhabits Darren and reveals Mordred’s goal of joining the two. (There’s a lot of exposition in this part — as if the game didn’t have room for the design imposed on it.)
Odds & ends: At the close of this exchange, the game automatically unlocks picture #24 — the only picture to be unlocked without the player having to do anything special.
To kick things along, switch to Valentina and have her examine the Mirror — Darren then reads the passage about shades from the Book of Guardians — and then return to the alchemy lab. Here Valentina has Darren consult Mordred’s book and learn that the sorcerer created a shade version of his sword that might be used on the other side of the Mirror.
Finally, click on the swords rack back in the lab. At that point, Valentina has an epiphany: Darren needs Mordred’s sword.
Odds & ends: Here the game also reveals in greater detail the fate of Maria and Mordred’s son and offers up its source for the black stain: the sword’s contact with “the other side.” That would certainly explain the stain on the tea-room wall, but not the one on the White Lady painting in Victoria’s room or the black mildew on the fallen skull. I still prefer castle renovator Steve’s explanation. (The castle is alive.)
At a certain point, Valentina will head out to recover the sword. You need to take three steps to trigger her departure. (Any order will do.)
– In the lab, have Valentina click on the alchemy table. Valentina now proposes to poison Darren to free Mordred’s “soul shade.”
– In the chapel, open the left sarcophagus and have Valentina inspect the contents. She’ll issue instructions to Darren on collecting Mordred’s remains and reassembling them on the altar before the Mirror. (You can also retrieve the tip of Mordred’s sword from the right sarcophagus, but this isn’t required at this time.)
– At the Mirror, click on the altar.
Whichever one you do last sets off a very long justification for the endgame ritual.
Odds & ends: Don’t worry. I didn’t understand it that well, either.
And there she goes.
You can perform Darren’s and Valentina’s tasks in either order.
– Switch to Valentina and you’ll find her already in the castle tea room. Use her dagger on the stain above the desk, take the sword and try to exit to the main hall. Valentina then says she’s headed for the castle library to look up poisons — and, if you didn’t pick up the adrenaline earlier, up to Victoria’s room to collect the hypo. She will automatically reappear at the Mirror once Darren completes the upcoming mini-game.
– Darren’s movements are constrained as well. (He can’t backtrack beyond the chapel.) Try to collect Mordred’s bones from his sarcophagus there and he’ll complain about not knowing what goes where. To refresh his recollection, use the camera to take a snapshot of the grave interior. Then grab the bones, return to the Mirror, use the remains on the altar and activate the altar to assemble them
This is the final puzzle in the game, and it’s a tricky one with several opportunities for small mistakes and little help from the game in resolving them. The inset photo is nominally useful in determining the positions of the two scapula (shoulder blades) and pelvic girdles. But it’s quite possible to produce a skeleton that seems to look right but is off in some minor detail.
If this happens, try reversing the direction of the lower arms and make sure you haven’t inadvertently broken a link somewhere.
Here’s a blow-by-blow:
1) Connect the small end of the spine to the skull. (You should see a string of glowing white dots connecting the two when they’re in close proximity.) The spine will serve as the foundation for the shoulder blades, rib cage and pelvic “girdles.”
2) Use the upper of the two shoulder blades on the upper (far) edge of the spine at the second vertebrae. Rotate the lower one once and connect it on the near edge of the spine.
3) Use the upper of the two rib cage pieces on the upper edge of the spine and the lower on the lower edge — both just below the fourth vertebrae.
4) Here’s a source of potential trouble: the pelvis. You’re not going to get the two girdles to look just like the inset picture (use the one below instead), but the key thing here is the general orientation — i.e. the sockets for the femurs on the inside.
Rotate the upper-right of the two girdle bones once and place it in the upper position at the base of the spine. Rotate the lower-left of the girdles once and place it in the lower position.
5) The leftmost of the leg bones at the upper left is the left femur. Rotate it once so the ball is at the right and attach it to the left (i.e. lower) pelvic girdle. Rotate the right femur (next to the left one) three times and attach it to the right (upper) girdle.
6) The remaining two leg bones are the right (upper) and left (lower) tibia/fibula — at the left and right, respectively. Rotate the one at the left once so the kneecap is to the right and facing away from you and connect it to the right femur. Rotate the left one three times so the kneecap is at the right and facing toward you and connect it to the left femur.
7) Finally, the arm bones are at the lower left. The left humerus is the leftmost of the four. Rotate it three times so the ball is at the upper right and connect it to the left (lower) clavicle. Rotate the right humerus (the lowest of the remaining three bones) twice and connect it to the right clavicle. Finally, just rotate twice each of radius/ulna sets so the darker ends are at the right and connect them to the left ends of the two humerus bones. (The upper left one goes on the right/upper arm and the lower right one on the left/lower one.)
And here’s how it should all look:
Valentina should reappear. (If she doesn’t, you have forgotten either to have her claim Mordred’s sword from the wall or to exit the tea room.)
Talk to her about “Mordred’s skeleton” and “Can start” and Darren will move to the altar.
(If the “Can start” topic doesn’t appear, you’ll have a “Tip of the sword” topic instead. This means you haven’t yet collected the tip from Maria’s sarcophagus. It’s the one across from Mordred’s back in the chapel. Do so now, return to the Mirror, click on the altar and talk to Valentina to get the “Can start” topic.)
You’ll now control Valentina back in Mordred’s lab. Activate the alchemy table to take the poison. (Hey, it’s not as though we’d have had any fun collecting the ingredients!) Return to the Mirror, use the poison or Mordred’s sword on Darren and wait through the cut-scenes. Something seems to go wrong — there’s a line about one of the figures behind the Mirror not being Darren’s soul shade — but the game is unclear on exactly what and in the end it seems not to matter. This other-worldly version of Darren automatically defeats this shadow version of Mordred without you doing a thing.
When he comes out, use the adrenaline on Darren to bring him around. (Even if Valentina didn’t take the adrenaline before the descent, she’ll have it now.) Cut-scene, credits and, at the last second, signs of life from the Mirror’s housing.
Odds & ends: While the “Final Fear” subtitle for the US edition indicates this was intended as the last game in the series, I guess they needed to keep the door open for a sequel if the thing sold big. And perhaps that’s also why the designers didn’t permit Darren to experience interactively whatever lies beyond the Mirror.
At this time, a fourth game seems unlikely. MobyGames.com reports that Cranberry Production, the Hanover, Germany developer that made Black Mirror II and III, has been integrated into parent company dtp’s operations at its Hamburg headquarters and is now involved in the creation of online games.
Then again, the series has already been handed off once — the original TBM was developed by now-defunct Future Games — and there’s nothing to prevent that from happening again.
– A clock is running here. If Darren remains technically dead for five minutes, he’ll stay that way and you won’t be able to bring him back except by restoring a saved game.
– Finally, in the fashion of modern movies, you’ll want to sit through (or just skip over) the credits for a largely noninteractive scene in the castle library in which you’ll get a final opportunity to study Darren’s diary. From the starting position, drop back four pages to “Book of the Guardians” entry to find the beginning of the new material. And stick around for the last exchange between Darren and Valentina, which may at first seem purposeless but appears to intimate how Angelina (who did not have access to Samuel’s soul keys) must have used the black ball to collect the five souls used to bring back Mordred in BM2. (Then again, wasn’t she in the Academy and summoning chamber when the castle was burning?)