Beyond Time
walkthrough
SOMEWHERE,
SOMEWHEN…
Just after arriving in
modern days Egypt, you find yourself in the sand between the pyramids.
Turn around and walk on till you see the Pharaoh’s statue to your left.
A swift flash of blinding light beams you back to those ancient days history
wasn’t all that prehistoric as you always knew it to be. This is the start
of your investigation…beyond time.
THE
TEMPLE OF HORUS
For proper orientation,
go to the point where you face the Pharaoh (we assume this is north) 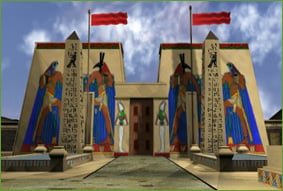 and
and
with the obelisk in your back (south). To the east and west there a temples.
Turn left towards the west temple, the temple of Horus, and listen to the
Priestess’ phantom explaining your task; find the Scarab Amulet and return
it to Horus. Enter the Temple of Horus and turn right. In the light circle
you’ll find a fragment of writing on parchment. Go back to the Horus statue
and go left from there. you can see two items on the ground of which you
can pick up only the left one. Take this amulet back to the statue and
place it on the chest of the bird. This will be your first victory!
From here, go to the right
and forward. Then use the icon which directs you to the left-and-forward.
Go forward once more and then left. Take a look at the column to see a
hieroglyphs picture which is a kind of door lock. This code will be helpful
later on. No need to draw this, when necessary later on, pictures will
be displayed in this walkthrough.
Go back to where you found
the amulet and pick up the other item. It’s a video device. Press the blue
play button and see the Traveller’s story when he used the amulet unwisely.
Click on a black square when ready. Now go right, forward, left and forward
towards a small table. Open the drawer to reveal another placate with another
door lock code. Once again, when needed, a picture will be included.
Turn around to look at
the back of the white altar and click on it’s bottom to open a secret compartment
which holds a clay tablet with the fire symbol. Then go left, forward,
left twice, left-and-forward and forward to find another door lock glyph.
Now go to the back of
the temple to the library and examine a green table. Open the drawer and
find the fourth and final door lock symbols in it. Now go to the right
side parchment rolls and examine the scrolls from the Book of Death. On
the other side of the room, some more scrolls are available. On one of
the tables, another scroll can be examined. There’s a lot of info in them,
but this should be the sum of knowledge you should remember after reading
all of them:
References to the scale of
Justice.
Osiris’ pattern for the third
chamber.
Osiris’ coffin is in the
fourth chamber.
Osiris has four grandsons.
Present in the Hall of Two
Truths are all of Great Nine and Little Nine.
Amentet is in the east.
Before you can board the
ship, you’ll have to posses some gifts for the Gods, being one gift of
the desert (a jackal), one gift of the air of Ra (a falcon) and a gift
of the green shores of the Nile (food = urn).
Note: Most of the
info on directions and elements will be automatically written down in your
notebook. This notebook can be accessed by using the help-function in the
menu. This will save you some time drawing pictures. Check it out!
Go back to the main entrance
and turn right before leaving. Go to the wall and turn left. See and climb
the staircase. You are now in the chamber of the High Priestess Menet.
The servant will inform you once more. Go to the desk like table and click
on the square in the wall between the four carrying figures. This opens
a compartment containing another clay tablet with the Air symbol on it.
Examine the scroll of
Osiris’ Betrayal on the table and gain some more valuable information:
Number of betrayers is 72.
Osiris’ body was cut in 14
pieces.
Examine the scroll of the
Snakes of Sakkara and find the solution to the puzzle. This puzzle can
be found on the bed side table. Click on it to play.
The scroll told you that
all sides are equal.
There are three sides (left,
right and bottom) and they each contain four snake heads.
The figures on the orange
discs are from one to nine stripes. This is 1 to 9.
The n-like symbol stands
for the figure 10. The n plus I is 11, etc.
The figures including the
10-symbol cannot be moved!
The total sum of all figures
is 78. This makes 78 / 3 = 26 is the total of each side separately.
Each side has a non movable
figure.
The sum of the figures in
two heads of a snake must be equal to another snake. This means the total
sum of one snake must be 13.
This is the only
working solution!
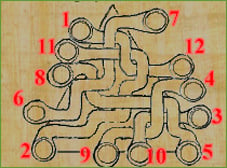
When finished, the drawer
opens and you can get the golden Eye of Osiris. Leave the temple.
THE
UNDERGROUND TEMPLE OF OSIRIS
 Go
Go
outside and turn left to examine the pool. Click on it and get another
tablet lying in the water. This is the water symbol. Now go towards the
sea and examine the left big urn near the wall (past the obelisk). In here,
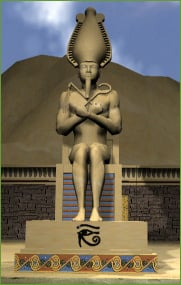
there’s the earth symbol. Go back and face the Pharaoh’s statue. Put the
golden Eye item on the Eye marks of the statue. It’ll slide back and reveal
an opening. Go down and forward to the central room.
Move around the altar
in the middle till you’ve found the water symbol. get the clay tablet with
the same symbol and place it on the altar. The gate will open. Enter. Pick
up the bucket of water and go back.
 Find
Find
the fire symbol on the altar and put the clay tablet for Fire on it. Another
gate opens. Enter. Pick up the torch from the left wall. Go to the flames
further up in the tunnel and control the fire with the bucket of water.
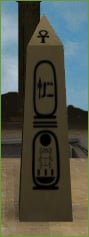
Go on to the roof and see the obelisk. As you found out before, Amentet
is life and his symbol is the Ankh. As Amentet is east, the ankh should
be east. Click on the top triangle to turn and make sure the ankh points
east. The east symbol can be looked up in the notebook (help-function).
Here’s a picture of how it should look. When you’re in a hurry, just click
twice and rest assured that this is right!
Go back to the altar and
find the earth symbol. Inser the same clay tablet and go through the gate.
Pick up the bucket of sand. This will make a wooden construction move and
reveal a rope. Burn the rope with the torch and the door will open. Again,
make the ankh turn east (one click for those hurrying through the game!).
Go back to the altar and
press the water sign to open the gate. Enter the tunnel and put the bucket
of sand on the scale to your right. This will pull up a wooden bridge.
Walk towards the obelisk and do the ankh turns east thing again (two clicks
this time).
 Go
Go
back to the altar and find the air symbol. Put on the clay tablet and enter.
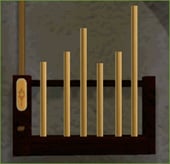
Although this is a gadget which is not necessary to complete the game,
it’s in the game so it should be played (in my humble opinion). The organ
you will find can play tunes and the idea is you should play the tune that
you hear in the background. Try it and when stuck; use the picture. To
let the organ play, press the air sign to the left. Remember that a gate
closes and will only open when you completed the puzzle.
Return to the altar and
leave the underground quarters. Turn around and get the golden Eye of Osiris
back. Turn right and go to the second temple.
THE
TEMPLE OF ISIS
 Go
Go
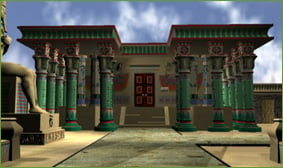
towards this temple of Isis and find the lock to the right of the door.
This is where you need the lock symbols you’ve found in the temple of Horus.
The lock has three wheels which can be turned in a one way direction by
clicking on them. The idea of the Temple of Isis is to get the gifts for
the Gods. To cut a long story short, you should repeat procedures four
times to complete it. For each time there’s a different door lock combination.
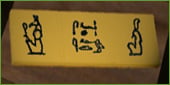
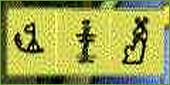
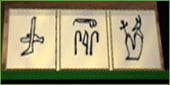
The solution for the locks is printed below. They contain a picture of
the lock and a three figure combination. The figures indicate the three
wheels and the times each wheel should be turned. Besides this, some extra
info will be given.
 ONE.
ONE.
The combi is 1-2-1.
Enter and meet a goddess (Isis?). Get the gift
of the desert; the jackal.
 TWO.
TWO.
The combi is 7-0-7.
Enter and turn left. Meet Isis and get the
Ankh symbol, the sign of life.
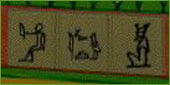 THREE.
The combi is 3-4-3.
Enter and meet Isis. get the falcon statue,
being the gift of the air of Ra.
 FOUR.
FOUR.
The combi is 5-6-5.
Enter, turn left, meet the woman and get an
urn, symbolizing the wealth of the shores of the Nile.
Leave the temple and go to the obelisk near
the water. Turn the top so that the ankh here also points east. This will
trigger the boat to arrive. You now have to go east.
Go towards the boat and place the falcon, jackal
and urn in the cupboard kind of thing near the boat. The idea is to get
them to the east bank one by one. Not a problem, if it was not impossible
to leave some gifts together on the west bank. The combinations falcon
and urn or falcon and jackal cannot be left alone. This forces you to use
this sequence (for example, other ones are also possible):
Urn to east bank.
Return empty to west bank.
Falcon to east bank.
Return urn to west bank.
Jackal to east bank.
Return empty to west bank.
Urn to east bank.
When you’ve done all this, the three items will
be in your inventory again. Go to the building.
EAST
BANK LABYRINTH
The labyrinth on the east bank is your next
challenge. Enter and go to the golden statue where you place the three
gifts on their marked positions. Go forward and open the doors.
In this labyrinth there’s plenty to see but
not all ‘must be’ done. I’ve included the necessary action. For extra info,
I’m planning a map with all living quarters for extra game info. A bit
patience is necessary here 🙂
Anyway, after passing the labyrinth doors, go
left, left-and-forward, forward 4 times and finally turn right.
The Scale Room.
The idea of the scale puzzle is to get a balanced
scale with two bottles that, of course, need to be filled with an even
amount of fluid. Never in this game is mentioned that all the fluid
should be used so that’s one mystery solved! The bottles can contain 8,
5 or 3 capacities. The device works as follows; the bottle to be emptied
should be placed on the high point, the bottle to be filled on the lower
point and to pour you should pus the button. Put the big bottle (8) on
the high point and the medium bottle (5) on the lower point and pour. This
means that the medium bottle contains 5 capacities and the big bottle 8
minus 5 is 3 capacities. Then pour the contents of the medium bottle into
the small bottle (3). This means that the small bottle contains 3 capacities
and the medium bottle 5 minus 3 is 2 capacities. The big and small bottle
both contain 3 capacities. place them on both ends of the scale and the
puzzle is solved.
Click on the crystal to find out the coordinates
of Tikal: 64 : 90 : 20.
Go left, forward twice, left-and-forward, forward
eight times, left-and-forward, right-and-forward and finally right. Enter…
The Osiris Room
The idea here is to replace the strips of glyphs
to get a combination seen before. You can either check the picture or click
the slides this many time: 6 1 7 2 0 1 5 8 6 7.
Click on the crystal to get the coordinates
for the Space Station: 14 : 25 : 50.
Turn around, leave the room, left-and-forward,
right-and-forward, forward and right-and-forward.
The Horus Room
You can reach the crystal in this room by clicking
on the tiles. There’s five steps to be taken;
First step = star, second step = star, third
step = moon, fourth step = moon, fifth step = star.
Click the crystal and the coordinates for Atlantis
will be yours: 19 : 60 : 30.
Turn around, leave the room and make a left-and-forward
turn, a right-and-forward sweep and turn left to get at:
Daedelus’ Room
Push the yellow square to enter. Go to the chair
in the right corner and take a look at the scrap of paper on it.
Move right twice and leave the room. Left-and-forward
and then four steps forward. Right-and-forward and a right turn to get
to…
Lantis’ Room
Open the door by pressing the pink button. Go to
the desk and read another note. The other half?
Go right then forward, left-and-forward, right-and-forward,
forward twice and left-and-forward.
The Jackal Room
Enter and put the golden Eye of Osiris beneath
the statue. A crystal will appear which reveals the coordinates of the
Tibetian location to you; 85 : 80 : 40.
Turn around and step forward. Right-and-forward,
left-and-forward and you’ll be at:
The Isis Gate #1
Click on the pedestal to reveal a three figure
number plate. Answer the question by entering the three figure answer.
The answers can be found in all scrolls read
earlier in the Temple of Horus and other locations.
Question here is how many bad guys betrayed
Osiris. Answer is 74, so enter 074.
The Isis Gate #2
The questions is how many are present in the Hall
of Two Truths. This is everyone of Great Nine and Little Nine, making 2
times 9 is 18. Answer to be entered: 018.
The Isis Gate #3
How many grandsons does Osiris have, that is the
question. The answer? Four! 004.
Go through the door and click on a green square
on the wall. Enter this room, which is…
Howard’s Room
Go to the desk and look down. Open the box and
get the key. Look up and turn right. Go forward, left-and-forward, right-and-forward
en click on the next gate.
The Isis Gate #4
Bloody as it is, you need to tell the machine in
how many parts Osiris’ body was cut; 014.
Pass the gate and open the next door with the
Ankh item. Place it on the same symbol on the door to open. Go forward
into the elevator and turn around. Press the control panel to go up to:
The Control Room
Move forward twice and then turn left. There’s
an earth globe to the right of the screen (half visible). Click on it and
press the red button to activate. Turn right and click on the control panel.
Move to the great control panel (forward and down) and click the red button
to activate. Then press the centre triangle until Lhasa is the given destination.
Click on the green button to agree and enter the coordinates of Lhasa by
clicking on the red zeros as many times as necessary: 85:80:40.
LHASA,
TIBET
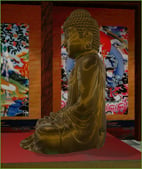 Move
Move
forward and click on the Buddha statue’s head. Go down into the passageway
and move: forward, left-and-forward, forward 3x, right-and-forward, forward,
left-and-forward, forward, left-and-forward, forward, left-and-forward,
forward. Look at the book and see an image of another puzzle.
The idea of this puzzle is the same as the snakes
puzzle. This one is horribly more difficult. This is what is understandable:
The total sum of all numbers is 180.
The circle contains 6 parts (I’ve divided them
by yellow lines)
The book said every part has to be equal. This
means 180 / 6 = 30 as total sum of each part.
The book said every combination is equal. There
are 9 pairs so 180 / 9 = 20 as total sum of each combination of 2 numbers.
The difficulty here is this. If you find all the
right combinations, there’s more than one place to put them, they can be
placed in different parts. Not to mention the multiple solution of making
20 and 30 total sums. This is the solution:
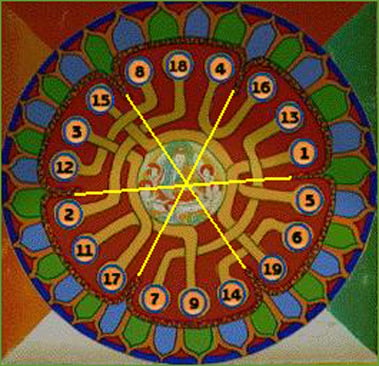
I’ll be honest with you; I cheated on this one.
But hey, don’t even true adventurers like Indiana Jones and James Bond
sometimes need and seek help? I tried this one for a day and gave up when
I was up to my knees in scribblings and scratching, still not finding and
completing this puzzle. To give credit to those I’ve contacted for advice:
Balmoral Software. Honour to those who deserve it! This one drove me nuts
(they even said there’s 114 possible solutions and only one is the right
one…) and I think you must be a @#*! genius to complete this one. I’m
wondering if there’s anyone who got this one by him-/herself.
When solved, a key will be yours. Get it and
leave the temple: left, forward, right-and-forward, forward 2x, right,
forward 5x, right-and-forward, left, left-and-forward, forward, right-and-forward,
forward 2x. Open the doors and get flashed back to the control room. Look
down and repeat the procedure to get flashed to Tikal.
TIKAL,
CENTRAL AMERICA
 Go
Go
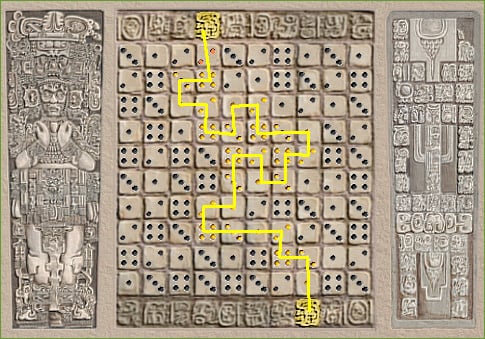
forward 3 times, left, forward 4 times, left, forward 3 times, left and
forward 2 times. Look at the statue with the dice to your right and notice
the following pattern: 1-3-4-2. This is the solution for the puzzle. Go
to the square and see the floor being divided in dice. The goal is to get
across by using the dice combination repeatedly. Click on a tile with dice
number 1 first, then pick a dice with 3 dots which is next to the previous,
then pick a 4 dice, etc. Continue from the bottom yellow Inca sign to the
top yellow Inca sign. Here’s the solution:
Climb the pyramid all the way to the top and pick
up the crystal on the altar. Turn around and move down (a total of 6 forward
steps) and then right. Forward 3 times, right, forward twice, left, forward
3 times more and down. Then go forward 6 times. The key from Tibet unlocks
the door. Go through the doorway and the hallway. In the chamber, turn
left and click twice on the plate in the wall. This opens and shows a crystal.
Turn right and repeat this procedure untill four crystals are revealed.
Something opens! Go right, forward-and-right, forward and turn right. Turn
the skull and click on the pedestal. The coffin in the center of the room
will open and you can pull another crystal from the hand of the skeleton.
Turn around and go through the hall and up the stairs (total of 14 steps
forward) and then turn left. Go forward, then right and forward 4 times.
Turn right, forward twice and then two right turns. get flashed back to
the control room and repeat the time travelling idea to Atlantis: 19:60:30.
ATLANTIS,
SOMEWHERE UNDERNEATH THE SEA
Move around the beach by just clicking forward
till you reach an elevator. Push the button to go down. what follows is
an annoying part where you have to guide a sub through the ocean to find
a crystal. The green lights indicate how close you are to the crystal.
The pink lights indicate possible directions (down = turn around). I hate
sequences like this so I’ll just spoil it  to
to
ya and don’t spill another word on it: Forward 3x, right, forward, right,
forward, left, forward, left, forward. Get the crystal by pushing the T-shaped
handle. Turn around (down!), forward, forward, right, forward, left, forward,
left and forward 3x.
Go up with the elevator and find the two multi
coloured poles to get flashed back. When you try to travel to the next
destination, you won’t have enough power. This is what you should do:
Turn around and go back into the elevator. Turn
around and press the red button. This might take a bit of precision; use
the tumb of the icon. Go out the elevator and find the 4 empty green columns.
Drag a crystal into the opening and do this 3 times. Then go back to the
elevator and down.
You need one more crystal for the last column.
Find the white planet and click on it. Press the red button to activate
Traveller 1 destinations. Go to the control panel and click on it’s left
part. Move forward and down and press the green and red button. Enter the
14:25:50 Space Station location and go there.
THE
SPACE STATION, OUTER SPACE
Go forward into the docking bay and then left,
forward, left into the elevator. Click on the panel at your left and select
Floor 2. Go forward twice, left-and-forward and forward till you  reach
reach
a golden pyramid. Push it and get the number 167. Go right twice and forward
eleven times to see some card to your right. Get it and turn around. Go
forward 3x and left to the elevator. Insert the card into the slot below
the left panel and go to Floor 3.
Go forward, left, forward, forward, left, forward
3x, right-and-forward, up the stairs, turn right and take one step forward.
Go to the panel and click the red button. Enter 167 and go through the
opening into the next room. Go to the chest and open it with the key from
your inventory. Get the power crystal. Leave the room through the 5-sides-door
and get back to the elevator. Go down to Floor 1 and from the docking bay
en get back to the control room.
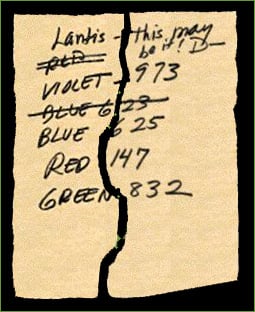 Get
Get
back in the elevator again and go up by pressing the red button with the
tumb. Put the crystal in the only empty column left and go back to the
elevator. Go up and see some brunette with an attitude problem telling
what to do and what not to. Who the &*%! is she? Turn left and see
a colored pyramid. The idea is to put in the right combination for each
colour. This is where the note fragments from Howard come in handy. The
solution is:
Red = 147, turn left,
Blue = 625, turn left,
Green = 832, turn left,
Purple (or violet if you really want) = 973, voila!
Now it’s time for the long awaited and blood, sweat
and tears costing end sequence which is truly disappointing. Some hollow
laughing dude (Howard?) tells you it ain’t over till it’s over… Game
over, anyway.
THE
END
View this guide raw, exactly as the archive holds it
Parts of this guide
One guide by Marc Kappers, in 2 parts. They read in order, and the part you are on is marked.
- Part 1
- Part 2