Atlantis: Evolution
Atlantis Evolution
by Atlantis Interactive Entertainment
Walkthrough by MaGtRo October
2004
Gameplay: After installation, select a
player number from the glyph at left inside the design. The main menu is
accessed by pressing the ESC key. To show the label of the glyphs on the main
menu, move the cursor over the different glyphs. Top right is the sound levels. Here adjustments for voices,
music, sound effects and overall volumes are found. The center glyph is the
options, where crosshair, 16-32 bits, mouse adjustment, subtitles, smooth mode
and language selections are done. Left on main menu is save-load game selection
and far left is exit game. Save game has a check for confirm and X for abort.
The saved game is seen as a graphic with time and date done. In all pages, the
‘return to game’ glyph is at bottom right of the screen.
Right click to access the inventory bar at the bottom of the
screen. Right click an item in inventory to look at it closer in a separate
screen. Click on an inventory item and it becomes the cursor. Right click to
close the inventory bar and the item-cursor can now be used on the gameplay
screen. The fully installed game plays without a CD in
the CD drive. Pressing ESC skips the cutscenes.
You can get caught but
there’s always another chance. Save often. Be sure to exhaust all dialogues when talking to
different characters.
June 1904: Curtis Hewitt, a 25 yr. old photographer is on his
way back from Patagonia and is aboard the ship Lemuria. The ship is caught in a
storm in the waters of the Bahamas.
Lemuria: In inventory is a box of
matches.
In the cabin, Curtis needs to secure his equipment and protect
the pictures that he took in Patagonia. Close the porthole window. The porthole
window keeps on being blown open by the wind. Exit the cabin.
Go left down the hall
and up the stairs. The mate shouts – we
are abandoning ship. Go back to the cabin.
Click twice on chest beside the bed – once,
the chest is opened and second time, it becomes the cursor. Right click to open the inventory
bar and the chest is placed in inventory. The ship sinks.
At sea: Watch the trials of Curtis after the
ship sank. He goes in a waterspout and the vortex takes him to a calm sea. After
the cutscene, take the knife, beside the chest. Turn around and take the
lantern and the left oar (not necessary) Talk to the 2-headed
bird. Try to shoo the bird away with knife or oar and… Oh my Lord!
Atlantean space ship:
Dock: Right click to open inventory bar
and place matches over the lantern. Take lit lantern and right click to close
the inventory. Go forward up the stairs and look at the murals on the walls.
Click on active spot and see stars. The names are learned later but added here
for reference.
Zanat – Male God with
upraised arm – left and right yellow stars and top and bottom blue stars.At right wall:
Sama, Goddess of day – Goddess with wand upraised
and holding sun – top and bottom blue stars.Kama, Goddess of night – Goddess with hands upraised to
moon – top and bottom yellow stars.Left wall:
Enna – seated Goddess on
the left wall – left and right blue stars and top and bottom yellow stars.Cosmo, God of death – God on cloud throwing fire bolts to demon
– blue star on top and yellow star at bottom.
Press the blue button at door at other end of the room
beside a rounded closet on the left.
Cockpit: Look around. Note a round
viewer-monitor at left corner of room. There’s another rounded closet at right
side of room. Use the knife on door of closet. The knife breaks. Take a helmet
with goggles on it. Go to the viewer at other end of the room and click the
helmet on the viewer. See scenes on the viewer. A cutscene is shown with Curtis
running to the boat. The boat gets transported to the world seen on the viewer
and immediately Curtis is surrounded by guardians of humility.
New
Atlantis Orientation Center 17:
Talk to the guard that is left behind and learn that this is Orientation Center 17 at New Atlantis. Learn about all the Gods. Take the oar
from the boat. Try hitting the guard with the oar or exiting through the green
lit exit. Any chance for escape is futile and will lead only to being shot.
Halt Deviant! Go to the viewer in front of the Goddess bust and take
the goggles. The other guard comes in. Move around until Curtis is brought to the cab to be
recycled.
Cab puzzle: Once in the cab, with the
goggles in inventory find a way to the exit. The object of the puzzle is
to get through 2 levels of cab ride without stopping on a recycle area as shown
by the red lines.The map is on the
screen. Steer the cab following the map, by using the arrow buttons at right. The white
structure at end is where you want to go to. Follow the
path that doesn’t have red lines. There are 2 levels. Click the arrows
before you get to the intersection you want to turn on. If you finished the
first level and die on the second level, the puzzle starts on the second level.
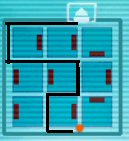
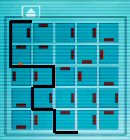
Exit to outside. There are 2 paths. The left path is blocked.
Take the right path. Talk to the 3 people working the land. Let’s see the
headman then. Go forward to the community.
Community
49/4:
Go to the bust of Enna with the ever moving eyes
at left of path.
She sees the local man but not Curtis. Hmmm…
Take bucket in front of second
stone hut on right. Talk to woman
sitting by child at the next hut. Learn about where the Gods live and the God
of Life.
Go to end of the path to the big building behind the well. Enter
the chapel with the bust of Enna in front. Click on monitor and see how Zanat
took over New Atlantis.
Go to the house left of the chapel
and either talk to the headman
outside or inside the hut. Meet headman 49/4 and learn about the old gods. Enter
the stone hut and look around.
Go back to the path
where the land laborers are located. Meet a reoriented woman. Talk about her to the
headman and the woman sitting with the child.
Statues and Well: Go to the well at center of the
gods’ statues. Take the
Atlantean device on the stand and click on etched pads to learn of the
different gods. Use the X pad to get out of closeup.
Click on the stars of
each statue. Wow, those are quite a bunch of stern gods.
Talk to old man getting water by well
completely. He
won’t talk to you anymore and departs. Take the rope he left behind. In
inventory, combine rope and bucket to get roped bucket. Use roped bucket
on well. Pull rope and click in bucket with water. Drinking water triggers the
old man to call the guardians.
The man squealed on you. The guardians are coming. If you do not
escape fast enough, you will be taken.
Take the path at other side of the well and escape to the
forest.
Forest,
part 1:
Note: The guardians of humility will be
chasing you in the forest. Every 2-3 clicks will be a safe place to hide – under
an overhang or a cave that hides you from the spaceship above. Look at the shadow of the
spaceship to see if it has gone away before coming out. If you get caught, any
item picked up will still be in inventory and there is no need to go back to
those places.
First clearing:
Go forward and turn left by the water area. Enter a clearing. Immediately enter
the stone hut. Look down and pick up one half of an owl’s face. Exit the stone hut. Go forward and
turn left at the path by the creek.
Second clearing: Before the wood bridge, turn
around and see a path going left and forward. The left path goes back to where you came
from. Go forward and see a path to the right. You don’t need to go here but you
can use it to hide if needed. Continue to go forward until a clearing that is covered
by tree branches. Pick up the wood stick. Go back and see a path to the
right that goes to a tree. You can hide under the tree if needed.
Go back to the main path
by going forward from wood stick clearing, turn left, forward until you get back
to the wood bridge. Go forward and 2 clicks from the bridge is safe haven under
moss covered overhang. Continue forward 3xs and see a small cave on the left
that can be used as safe place. Continue forward and left at the stone wall. 3
clicks from the stone wall is another overhang (stone). Go forward 2 clicks and
turn right into the crab cave.
Crab cave: Go forward on the center
path and see crabs that will attack if you cross their path. Look left and see
a stone owl on the wall missing half its face. Turn right and see a lizard on a
post. Talk to the lizard and it will go away. Use the wood stick on the post to
divert the log that the crabs walk on. Place the half owl’s face on the stone
owl. Ooohah!
Forest,
part 2: Go through opening and forward out of the
water. Wood stick is not in inventory anymore.
Turn around and walk
forward 2xs into the forest. The path splits right and left. The paths will eventually
join later.
Take the right path. Go
forward 2xs and turn right. See Enna’s bust and offerings in front of her. Look
close at the flowers on the left. Click to take the crawling worms. For
ease in traveling through this part of the forest, we will go back to the other
path. Turn around from flower, forward, turn left on path after Enna and go
forward bypassing the path on the left to go back to the waterfall.
Go forward 5xs turn left
and see a red bird perched on top of a tree branch on the left. Feed the worms
to the red bird. Take the tree branch.
Turn right from branch
and go forward 5xs passing a right path that goes back to Enna. Meet a hungry
man eating plant at middle of the path. If you try to go pass it, Curtis will be
dinner. Use the tree branch as a ‘toothpick’ for the giant man eating plant.
Miranda:
Go forward and look at the world in a novel position. Talk to Miranda
completely. Talk to Gran and then watch Gran in action. Talk to Gran again.
Learn about the first people. Go forward to Miranda and talk to her again. Learn
about the Atlantean as slaves to the Gods. Watch. Learn about Chel at the other
side of the volcano. Follow the way that leads to the Source.
Community 49/4: See a clean shaven and newly clothed Curtis.
Talk to Miranda and learn that the community is in danger because of you. Go
back to the community and see that Miranda is now with you as shown by her
picture at top left of frame. Go forward and turn right to go to the community.
Meet and talk to the
reoriented woman by the bridge. She mistakes you as Lord Cosmo. Talk to the
other people standing by their stone huts and they all mistake you as the God of
Death.
Enter the chapel, the
big building behind the statues and well. Talk to the headman and learn about
the picture panel behind the back of the Zanat statue. The sacred device is in
the headman’s hut.
As you go out, go to the house right of
the chapel. Take the remote control-sacred device from the
bottom slot right of Enna.
Targeting device:
Go outside and click the remote control on the back of Zanat. Use the goggles on
the viewer and then click to look close.Click on right red
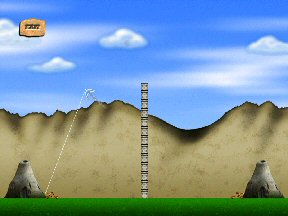
button to start the target shoot. The object of the puzzle is to set the correct
angle of the line of fire of the left catapult and to destroy the right hut.Position the cursor so
that the fireball will go over the wall and hit the hut on the right. Left click
to shoot after the angle is set.
When done correctly,
press the green button.
Watch the community hail
Curtis as the God of Life. A yellow top star and bottom blue star is placed on
Curtis’ forehead. It is the opposite of the placement of stars on Cosmo.
Talk to Miranda. Watch
them travel to the volcano.
Forest,
part 3:
Go forward and watch the guardian catch a woman. Go forward and the guards
mistake you for Cosmo. Talk to the guard. Talk to the frightened woman. Miranda
says she threw something away.
Go forward to the path
before the stone arch. Look down and take the necklace.
Forest:
Note: If you’re doing this on your own, notice that every
time Miranda comes down from her picture on top left and becomes part of the
screen – something is needed to be done (except for one scene in the center of
the forest). The red monkey appears close to the path of the important tree in the forest.
The route shown below skips the center of the forest. Take a look around and see
the wonderful plant life.
Turn back to the
clearing and turn left.Take the left path and
go forward 4xs just pass the stone arch.Turn right and see a
path. Turn right again and see another path just behind the stone arch.Take the extreme right
path with the blue plant behind the stone arch.Go forward pass the log
bridge. Click forward once and the giant boulder should be on the left.Pan around and see a
path to the left and to the right separated by a tree.Take the left path. Go
forward until the end. Miranda talks about the source of the stream being at the
other direction.Look down and take the
bent stick. Look close by right clicking the wood in inventory and see a
lightning bolt etched on the handle.Go back by going forward
to the boulder and then turn left. Go forward on the path right of the tree, pass the log
bridge and to the split in the path.Turn right at main path.
Go forward 4xs. Left and forward to moss covered tree arch.Go pass the tree arch
2xs and see that Miranda is now beside you. Look down and take the red pulley from under the mushrooms. Talk to Miranda.Go forward 3xs and take
the right path by the stream.Go forward 2xs and turn
right.Go forward and talk to
Miranda again. Take the rope from the 2 posts.Go across the water and go forward 3xs.
See the monkey cross
your path. Pan right and go forward under the moss covered tree arch.Go forward until 2 logs
are in the path.Turn around and take the
purple pulley from tree trunk.Turn around and continue
forward until the giant tree at the end.
Lightning struck tree:
Look close and see that the tree was hit by lightning. Talk to Miranda again.
Unlock the tree:
In inventory, combine the necklace with the bent stick to make a wooden key. Click
the wooden key on the hole of the tree. Bingo!Lift the stone:
See a stone slab on the floor inside the tree. Click on the slab. Place the red
pulley on ring of the beam above the slab. Place the purple pulley on ring of the slab.
Click the rope on the purple pulley. Click on rope. Impressive!
Other
side of Volcano:
Underground to the
Source:
Enter the hole and watch Curtis and Miranda transverse the mountain to the other
side.
Sea Serpent puzzle:
See a ledge on the right that accesses the rope above the water. The rope leads to
the other side. Look down and pick up small rocks from the ground. Click
the rocks on the water and see the ‘Loch Ness’ monster.The object of the puzzle
is to divert the sea serpent away from the right ledge to prevent it from having
Curtis as dinner.Click the rocks as far
away as possible – close to the exit at other end of the cavern.Wait for the sea serpent
to appear where the stone was thrown and immediately click on the ledge at right.Click again on the
ground of the right ledge to stand on the ledge.Rope trick:
Climb the ladder. Look down and click on the ring embedded on the wall.Turn around click on the
bar.Just before Curtis hit
the wall – left click the mouse so that he can jump off. If you click ahead,
Curtis is bait and if click is late, he hits the wall.
Chel: Climb the ladder and go
forward to ‘Paradise’. Take the left path and look around. See a platform with the
eyes monolith at the center. A beautiful lake is at the end of the path. Turn
around and take the right path.
Meet Chel. The monkey
drops the ladder. Look around the tree house. Talk to the monkey and then talk
to Chel. Learn about Chel being a former guardian and Lani, Chel’s partner who
is to be
reoriented by the guardians.
Reconditioning block:
See a guard at the door of the building. You can pick up the branch behind you
and throw it at middle of path to try to divert the guard or just simply waltz in and press the blue button
of the building. The guard thinks you’re Cosmo anyhow.
See a reconditioning
chair at the other end of the room. It is the only way to get to Lani. Sit on
chair and press the green button. And
away we go!
Fight the conditioning
process: A reconditioning helmet goes down on your head. You have to fight to prevent being brainwashed.The object of this arcade puzzle is to
destroy all the guards below and all the gods at the end of the screen. There are 4 chances-airships
to get through the puzzle. If all airships are destroyed, you have to start over.Collect all the crystals
that are used as power of your airship.You can move the airship
using the mouse. Left click to shoot and right click to drop bombs.The best hints given to
me by Jenny100 are to use bombs on the guards and laser fire on the gods. Use
rapid, continuous fire on the gods while protecting your airship from the fireballs-arrows.
Some of your shots will eventually take out the gods.When successful, the
chair enters another chamber.
See another chair ahead. Wake up Lani and then
talk to her. Go to the door, press the blue button and exit. Go forward and meet
Chel hiding behind the tree.
Tree house: Lani
is brought to the tree house. Lani is in bad shape and Miranda leaves to get
herbs for a cure. Check on Lani in the bedroom. Talk to Chel outside. There’s a
boat that can be used to go to the hole in the ocean. Curtis can go back up. A
tiny crystal is inserted inside the brain of newborns and that is why Enna sees
them but not Curtis.
Miranda brings bad news.
The island is surrounded by airships hunting for Curtis. The community will be
destroyed. They planned for Curtis to get to a transport ship that delivers provision to
the Gods in their floating palace, to get to the Pillar of Fire and take the
crystal that powers it. Sure, that’s easy enough!
Skyport: Save game often.
Stealth Puzzles
outside the skyport: The object of the puzzle is to
get to the storage buildings left of this guarded buildings and from there to
the transport ship.
Guarded buildings:
Pick stones from the
ground in front of Enna’s bust.Wait for the first guard
to go to the left.Go forward 2 times and
go left.Enter the open building
with crates at right.Throw stones on the
openings on the wall at left when facing inside the building.Wait for the guard to
appear at right of screen.Exit the building and
turn left in between the buildings.Turn left behind the
building. Go forward twice and left to go in between the buildings.Go forward to the far
wall of the compound pass the 2 rows of buildings. Pick the log from the
ground.Turn around and go back
between the buildings to the other wall where you came from.Turn left and see a
guard with his back is turned. Conk him on the head with log. This act will
bring the guards by the statues to check here.Turn right immediately
and go forward between the buildings towards the wall where you got the log.By the wall, turn right
and go forward where the statues are located previously guarded.Storage buildings:
Turn left and hide by
the statue of Enna.Watch the guards on the
left by the gate and the workers on the building at in front. Be sure
to move only when no workers are seen in the screen.When the workers have
carried the crate into the building and are now out of sight, immediately click
forward, turn right and go to the back of the building on the right.
Crate puzzle:
See a viewer by a rusty
door. Click the goggles on the viewer.The object of the puzzle
is to move the crates on top of the green circle. (Shades of BS3.)The arrow keys on the
right move the man on the puzzle.Do not place a crate in
a corner or else it will not be movable.On the third level
puzzle – fill the bottom green circles first, then top right and last the top
left.On the fourth level –
exit the confinement of the crates and move the green crate to bottom left. Then
place a crate at top left, then bottom right. Fill in the last 2 green circles.
Get to the transport
ship:
Enter the building.
Take the open crate in front as soon as you entered the building. See that
Curtis is carrying it.Exit the building and
go to the other building. Remember to not see any workers before moving.In front is an open
crate, take the crate from inventory and click the crate on the open crate.
Click on the crate again to get in the crate.
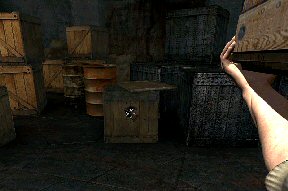
Watch Curtis enter the
crate and be taken to the sky palace.
Sky
Palace:
Delivery zone: Save
often.
Stealth puzzle in
delivery zone, part 1:Get out of the crate.
Wait for the guard on the left to have his back turned, go forward, right and
right again. Go to the sacks and take the front sack to cover the Cosmo-like
face.We will take the long
route. Turn around and go forward on aisle by wall.When the guard on the right has his back turned,
go to ornately decorated hallway and the guard on the left will just scold you.
Go around to the other
side.Stealth puzzle in
delivery zone, part 2:Pass by a man crouched on the left. Turn around and take bolts
from the box behind the worker.From here, wait for
guard to walk to the left and be hidden by the crates then go forward.Facing the space between
stacks of crates, wait for another guard on the right (partly hidden) by the
hall to move away and then go forward to the ornate hall.Stealth puzzle in
delivery zone, part 3:If facing the
delivery area, you are at the left
hallway. Turn around and see a guard standing by the middle hallway.
Click the bolt on the stacked drums in front of the guard.
When he goes to the
drum, quickly go to the left side of the huge black tank right of the clicked on
drums.Turn around and see a
lit hallway that is guarded. That is the hallway where you want to go.Turn around again and
continue around the huge tank bypassing a guard on the left.Go forward once towards
the open doorway to the outside.Turn around and see the
guard of the lit hallway moving towards you.Immediately retrace your
steps by going to the other side (right) of the tank from the guard.Enter the now unguarded
hallway, go forward and left to see a viewer by the door.
Displacer:
The hallway ends in a
locked door. To the right is a keypad and to the left is a viewer.
Monkey Door puzzle:
Use the goggle on the viewer. Click on viewer to look close.The object of
the puzzle is to move the monkey from bottom to top at the ? square.You have 3 monkeys to
work with. The door at bottom right exits the game.Move using the arrows at
bottom right.Time the move up to
evade the snakes and the insects. Cross the water by jumping from one boat to another.The game ends if you
reach the end of the screen, falls off into the water or get run over by the
critters.Move the monkey on the ?
square and it will change to a number.Go up from number square
and the next level is seen. Do this on 4 levels to get 4 numbers.Keypad:
After successfully getting the numbers (you really don’t need to, just use the
walkthrough numbers) then turn around and
enter the numbers 4411 to show on the panel. Press the bottom right button and
the door opens.
Displacer:
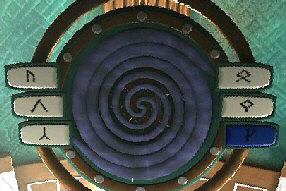
This room transports you to different places in the sky palace. To use the
displacer, click on any destination button and then click the center of the blue
spiral.
Top left button goes to
the displacer outside Kama’s apartment.Left middle button goes
to displacer outside Sama’s apartment.The bottom left button
goes to Enna’s garden.The top right button
goes to Zanat’s garden.The middle right button
goes back here to the displacer at the delivery zone.The blue button will later
be learned to be part of Cosmo’s code.
Click on top or middle left
button and get transported to a garden. Look around and talk to the
people. They are very obedient servants.
God’s
quarters:
Go forward to the center
of the complex. At the central area with
a pillar at the center, meet Enna who is upset at how Cosmo looks. Go around and
see that the side entryways lead to one of the God’s living quarters. Each
quarter has their own garden.
| Deliberation Hall | ||
| Cosmo | ||
| Enna | ||
| Sama | ||
|
Kama |
||
Cosmo’s apartment: Sama is standing
by the entry way to Cosmo’s quarters. Go through the entryway,
see a large statue of Cosmo being polished. Go forward and talk to the guard standing by the
door. Enter and hear Cosmo shout that he is in complete solitude in preparation
for the Divine Deliberation.
Look around the living
area and take the piece of silk from the divan at left side of the
room.
Enter the sleeping
quarter and talk to Cosmo. After that diatribe, use the silk on Cosmo. When he
is tied up, talk to him completely. Learn the need for a key for the pillar
of fire and that Enna
has the key. Also learn that the pillar of fire is controlled by keys that can be
pressed. Look around the room and then exit to join the others for the Divine
Deliberation.
Hall of Divine Deliberation: Exit to the Central
area, turn right and enter the next entryway. Meet the happy family, Enna, Sama
and Kama. Where’s Cinderella? Talk to all of them completely.
Where will I be without my button? Hmm… Sama might have given us hints as to where the pillar is. The Zanat statue is
missing an eye. After the deliberation is done, Enna gives the cannon key
to the pillar of fire so that community 49/6 can be exterminated. You are
dismissed.
Garden outside the
Deliberation building: Exit the building and study the glyph
on the tree surrounded by columns. This is the glyph of
the top left and middle right buttons of the displacer. Take the side path to an
alcove and note (for later) that there’s a servant’s outfit on the floor.
Exit to go to central
area. Look up and see Enna’s and Zanat’s gardens.
Cosmo’s apartment:
Enter the entryway left of Deliberation Hall. Talk to servant cleaning Cosmo’s
statue. Enter the apartment and talk to Cosmo. Learn about phase 2 of the plan
and
4 sequence of 4 different buttons. The key given by Enna opens a picture panel
that has red button to exterminate the natives. My, he sure is a smart one!
Sama’s apartment:
Go through entryway left of Cosmo’s apartment. Talk to the servants. Note that
there’s a displacer on a side path before the apartment. Enter Sama’s apartment. Talk
to Sama and learn more clues – there are 3 pairs of displacer button symbols around
the garden for the combination of the pillar of fire. Time to hunt for the other
2 pairs of displacer button symbols. We already saw one on the tree outside the
Deliberation Hall.
Kama’s apartment:
Go through entryway left of Sama’s apartment. See that there’s a displacer at end of
the path right of Kama’s apartment. Enter and try to talk to the servants. Go to
the bedroom and click on Zanat’s bust by the bed. It has a viewer in the back but
we need more disks.
Talk to Kama in the
bathing room and she will give hints for finding the pillar of fire. Use the
displacer to go to 4 locations. There’s a need for a sequence of buttons. Look
for Cosmo’s garden clues. Zanat has not been seen for quite a
while.
Enna’s apartment:
Go through entryway right of the Deliberation hall or left of Kama’s
apartment. Look around and talk to the guard by the door. Enter the apartment
and try to talk to Enna in her boudoir. Only the servants are allowed in her
boudoir.
Enna’s garden:
Go to a displacer at either Sama’s or Kama’s garden and press the bottom left
pad and then the central blue spiral. Look at the glyphs on Enna’s statue – it’s
the middle right and the bottom left buttons of the displacer.
Zanat’s garden:
Go to the displacer. Press the top right button and then the central spiral.
Look at Zanat’s statue. It’s broken. The garden is unkempt. Look at the broken
columns and see a slab with the displacer glyphs on the ground – the bottom left button and
the blue button glyph.
Pillar
of Fire:
Pillar of Fire
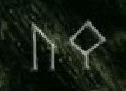
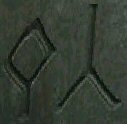
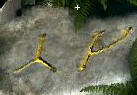
displacer puzzle: Go to a displacer.We found Cosmo’s 3 pairs
of displacer clues, see below:
From tree From Enna’s statue From Zanat’s garden Cosmo stated that there
are 4 different buttons, so press the 4 different buttons found in sequence of
the garden clues:
Top left, middle right,
bottom left and blue button. If done in wrong order, the buttons will not all
stay lit.
Go forward to the pillar
of fire and try to ‘break it’.
Break pillar of fire:
Click on the crystal. Get reminded to find and take the crystal. Insert the cannon-pillar key from Enna at center circle slot. Look down and use goggles on viewer. Click on viewer
for a close up of the puzzle.
Lines puzzle:
The object of the puzzle is to leave as small area for the blue lines to move
until it has no more space to move around in.The puzzle uses the
keyboard arrows. You are green line.The game ends when you
touch the edge or your own line or the blue line.My strategy was to block
the blue line from having a large space and then hug the blue lines and the
edges as close as possible. Once the blue line is caged in, move around and wait
for the blue line to run out of space. If successful, the viewer turns off.
Click on red button to
see if the pillar of fire is functional. Take the blue
crystal from the top panel.
Time
to look for Zanat:
Cosmo’s apartment:
Let’s talk to Cosmo, the fount of information and learn that only Enna’s console can access Zanat’s
laboratory. There are 5 disks that are needed to open the secret door.
Kama’s Apartment:
Talk to Kama and hatch a plan to get all the disk together. They will meet at a
neutral place like Enna’s old apartment. Take disk 1 from
the dresser at top of screen.
Sama’s Apartment:
Talk to Sama and learn that Enna’s apartment was Zanat’s. It is also the access
to Zanat’s lab. Take disk 2 from the table left of Sama.
Kama’s apartment: Talk to Kama
again in the bathing area. Go back to the bedroom
First Tower
Puzzle: If you have not done it yet, click on Zanat’s
statue by the bed and see a viewer in the back. Click the goggles on viewer.
With disks 1 and 2 in possession, the puzzle is now accessible. Click to look
close.The object of the puzzle
is to move the orange bars to the right in same position as the original left
post placement.Place small orange bar
at center and the larger orange bar to the right. Then move center bar over the
right orange bar.Take disk 3.
Cosmo’s apartment:
Talk to Cosmo. Go the living area and look at the bookcase right from
exiting the bedroom. Pull the active book at middle right and a viewer is seen
on left wall.
Second Tower
Puzzle: If you have not done it yet click on active
book at bookcase close to bedroom and access the viewer. Click the goggles on
viewer. With disks 1, 2 and 3 in possession, the puzzle is now accessible. Click
to look close.The object of the puzzle
is to move the orange bars to the right in same position as the original left
post placement.Place small orange bar
at right post and the middle sized orange bar to the middle post. Then move
small bar over the middle sized orange bar at center post. Move large orange bar
to right post. Move small orange bar to left post. Place middle sized bar over
large bar at right post. Place small bar over the rest at right post.Take disk 4.
Enna’s old apartment:
Enter the grounds of Enna’s apartment and go to the side path that leads to a
walled in alcove right of the main apartment. Turn around, forward and Curtis should say Sama didn’t come after all.
Sama’s apartment:
Talk to Sama and ask why she didn’t come to Enna’s old place. Time for plan B.
Kama’s apartment:
Talk to Kama about not showing up. Curtis should now say, as Cosmo he couldn’t
sneak up on Kama’s (game’s typo – should be Sama’s) backroom.
Hall of Deliberation:
Enter the building and note the place settings on the table. There are only
berries for Zanat at far end of the table.
Look close at the statue
and click on eye – note that it is missing an eye. The door on the left is
locked. Click the blue crystal on Zanat’s eye and the door opens.
Enter and go the viewer
at the end. Use goggle. Permission to use copier denied.
Servant’s clothes:
Take the servants clothes in the alcove beside the Hall of Deliberation.
The clothes can be taken only after talking to Sama and Kama not coming to the
meeting and Curtis should say that Cosmo can’t go the backroom.
Sama’s Apartment:
Go the bedroom dressed in servant’s clothes.
Third Tower
Puzzle: Press the circle at top right of the
frame of the dresser mirror. Access the viewer. Click the goggles on viewer.
With disks 1 to 4 in possession, the puzzle is now accessible. Click to look
close.The object of the puzzle
is to move the orange bars to the right in same position as the original left
post placement.Numbering the bars 1-4,
with 4 as the largest bar and 1 as the smallest: Place bar 1
at middle post and orange bar 2 to the right post. Then move bar 1 over the bar
2 at right post. Move orange bar 3 to middle post. Move orange bar 1 to left
post. Place bar 2 over bar 3 at middle post. Place bar 1 over the middle post.
Place bar 4 to right post. Place bar 1 over bar 4 at right post. Place bar 2 at
left post. Place bar 1 over bar 2 at left post. Place bar 3 over bar 4 at right
post. Place bar 1 on middle post. Place bar 2 on right post. Place bar 1 on
right post.Take disk 5.
Go left to the bathing
area. Take the piece of pottery from side of the pool.
Enna’s apartment:
Now, that you’re a servant you can go to Enna’s boudoir. Look around and then
go to the bathing area. Look at the left side of the left urn at the back wall
of the bathing area. See a piece is missing. Place the piece of pottery taken
from Sama’s apartment on pottery. A viewer is exposed.
Fourth Mini Tower
Puzzle: Click the goggles on viewer. With
disks 1 to 5 in possession, the puzzle is now accessible. Click to look close.The object of the puzzle
is to move the orange bars to the right in same position as the original left
post placement.Numbering the bars 1-5,
with 5 as the largest bar and 1 as the smallest: Place bar 1
at right post and orange bar 2 to the middle post. Then move bar 1 over the bar
2 at middle post. Move orange bar 3 to right post. Move orange bar 1 to left
post. Place bar 2 over bar 3 at right post. Place bar 1 over the right post.
Place bar 4 to middle post. Place bar 1 over bar 4 at middle post. Place bar 2
at left post. Place bar 1 over bar 2 at left post. Place bar 3 over bar 4 at
middle post. Place bar 1 on right post. Place bar 2 on middle post. Place bar 1
on middle post. Place bar 5 on right post.Place bar 1 at left post
and orange bar 2 to the right post. Then move bar 1 over the bar 2 at right
post. Move orange bar 3 to left post. Move orange bar 1 to middle post. Place
bar 2 over bar 3 at left post. Place bar 1 on the left post. Place bar 4 to
right post.Place orange bar 1 at
right post and orange bar 2 to the middle post. Then move bar 1 over the orange
bar 2 at center post. Move orange bar 3 to right post. Move orange bar 1 to left
post. Place bar 2 at right post. Place bar 1 over the rest at right post.Time to see mighty Zanat.
If successful, turn left and see a corridor open up.
Zanat’s laboratory:
Big guy isn’t home. Go around and sit on the chair. Greetings, Tane my brother.
Talk to the screen. Click on each dialogue repeatedly until the selection turns
gray. Learn about revenge, sacred relic, copies, Enna’s murder, completion
of legend and destroy temple. After the conversation, stand up and Zanat says:
Permission to discontinue the copies and to access the
appropriate device, the Crystal eye will be required.
Hall of Deliberation:
Enter the building, click the blue crystal on Zanat’s eye and the door opens. If
you did not use the crystal on the eye, the copies and the guardians will stop
you.
Enter and go the viewer at the end. Use goggle. Now the viewer can be accessed.
Click on viewer.
Pong game:
The object of the game is to hit the insect on the right until it completely
breaks up and crumbles.You are the left bar.
Move the bar up and down to hit the ball. You can control the intensity of the
ball’s strength by adjusting the angle the ball hits the wall.First remove the screen
protecting the insect and then continuously hit it until it breaks up.
Go back to the dining
area and see the
robot copies are now inoperable. The guards want to shoot you. Talk to the guards
and convince them you are Cosmo. Talk to guards again. Go back to Zanat’s lab.
Zanat’s laboratory:
Go to Enna’s bath area and then to the lab. Sit on chair and talk to Zanat. Legend
states that you walk through the wall. Stand up and go through the relic – the
blue screen.
Pre New Atlantis:
Cut the serpents head
off: Meet Zanat and the repeat of the day Zanat killed Tane.
You have to defeat Zanat in order to cut his existence off or you become part of
the Relic.
Star puzzle:
See laser bars preventing entry to the house. A star puzzle is on the right.
Click on star to show the sign of the God of Life as placed on Curtis’ forehead
at the Community – yellow star on middle top and blue star at middle bottom. All
the rest are black stars. The
bars disappear.
Go inside the house and
look at the objects on the table. Click on the flyer-airship 2xs and realize
Tane is part of you.
Young Enna:
Click the chime on left table. Is that you mother? Enter the passage on the
left. Go forward to the window and turn to face young Enna. Click on Enna. Turn
right and click on pitcher. No reaction. Go forward to writing desk beside
the fire stand. Click on scroll on desk. It is Zanat’s letter about
incapacitating Tane’s mother’s flyer. Click again on the scroll. The scroll
rolls down on floor. Click on scroll again and it goes out of Enna’s room.
Tane’s parents:
Go to right passage beside the little airship. Listen to Lem and Sita;
Tane’s, Zanat’s and Enna’s parents. Click on either parent and see a flashback
of them
murdered. Tane cries for revenge. Click on Sita and Lem until Sita starts paying
attention to you. Go to the curtain door of the front part of the house and Sita
will follow.
At the foyer, click on
the stuck scroll on the floor. Click on Sita and she says ‘show me’. Click on the chimes. See
Sita read Zanat’s letter. Click on airship and see the airship. Click on Sita
and learn that Enna took the crystal of the airship. Go to Enna’s room and click
on Sita. Go to the foyer and click on Sita. Now how we have to find the crystal.
Search
for crystal:
Poet’s bust:
Go outside and search. Click on left yard. Go forward and 2-3 clicks on the
stone walkway, turn left to a bust. Click on statue and then click on blue bird.
The bird flies on the poet’s head. Go right of the bird and click on sundial on
ground. Go back and click on poet’s head again. Now we know there’s a cavity
underneath.
Go back to the path and
proceed to the left. At the end of the stone path, look down and pick up
stones.
Guard house:
Enter the guard house. See 2 guards asleep. We better get them out of the way.
Click twice on the tipsy soldier on the chair. He woke the other soldier up. We
better frighten him some more by repeatedly clicking on him. Go to the open window on the right wall and click on
the shutters continuously. Watch them enter the closet. Go to the closet and
click the bar down to lock the soldiers in. Exit the building.
Temple:
Go to the building behind the guard house. Enter and see another guard watching
the priestess and the relic. Click on the priestess and see a flashback of the
priestess dead and the relic gone. Look-click at the relic at the altar and
learn about the relic’s history.
Finding the crystal:
Go back to Sita at the house. Click on Sita. To get Sita to follow you, click
the stones outside and Sita follows. Join Sita and click the stones down the
stone path until the poet’s bust. Click on poet’s bust area’s ground. Then click
on blue bird so that it sits on poet’s head. Sita will remember about the hidden
cavity. To show Sita how the head works,
click stones on area right of bird where the sundial is located. Watch Sita
turns the sundial. Click stones on the poet’s area. The crystal is now in Sita’s
possession.
Getting the relic:
Click pebbles on path to get Sita to the temple. Click stones inside the temple. Watch
Sita say she’s here for the relic. The guard disagrees. Click on fire stand
behind the guard, sit back and watch the action.
Face off with Enna:
Go back to house and proceed to the flyer behind Tane’s parent’s room. Watch
Enna with a knife stop her parents from leaving. Click on Lem, the priestess and
Sita. Click on the cat on the floor. Click on the relic twice and watch.
Listen to Tane, Curtis
and visitors. See the end of story. Atlantide. Watch the scene after the credit.
I must be dead.
Halt Deviant!
This
document may not be distributed without express written permission of the author
and the content may not be altered in any way.
For
Questions or Comments on this Walkthrough,
Write to:
MaGtRo
Copyright © 10/2004
MaGtRo