Arthur’s Knights II: The Secret of Merlin – Part 2
CD 2
Quest 7 – Morgan’s
Wrath
Chapter
1:
Arden:
Merlin’s Tree – Greet Merlin and he says that Bradwen is not welcome
in Avalon but 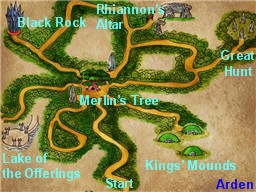
Morgan has launched a great hunt for Bradwen. Ask about the Great Hunt – A pack of wolves lead by the Horned Man.
Perhaps Bradwen’s dark side will help him in this. Take the path adjacent
to a crystal and the one guarded by a horse. You can see the white stag
there. Follow the map to the Great Hunt
area.
Great Hunt Area – Talk to the Horned Man. Ask him about the Great Hunt. He will give 1000 heartbeats and then he
will release the wolves for Bradwen’s soul. Immediately or else Bradwen
will be killed, go to Black Rock – check the
map. Black Rock – Go to the
center of the posts at right side of the screen. Hear a call for help.
Talk to the man entrapped inside a crystal. It is the doppelganger, the
one that has taken the features of Bradwen and Lancelot before. Use the
sword of truth on the crystal to find out if he
is saying the truth and then free the doppelganger. Ask him about the
great hunt. The Doppelganger while wearing
Bradwen’s appearance will lure the pack and when the horn sounds, the way
will be open to Bradwen. Immediately, ride the horse and go to the Great
Hunt – look at the map. Go forward to the Stone circle and see the white
stag stand at the center of the circle and disappear. Corwyn refuses to
follow Bradwen to Avalon. Walk to the center of the stone circle and
appear later in Avalon. Wonder how the horse got there?
Chapter
2:
Avalon: First
island – Talk to the Pied Knight. He would not listen, so fight him.
No one is the winner. Talk to the Pied Knight again about the Pied Knight. Bradwen will know him if he pierces the
knight’s armor. Bradwen’s conscience makes him choose from the white or
the red stone, i.e. to kill the knight or not. Choose the white stone and
tell the knight that Bradwen is not a murderer. The way is still blocked
by the fire. Go back to the first bridge. Talk to Morgan, who is surprised
that Bradwen did not recognize her. Ask her about the curse and the Pied Knight.
After the talk with Morgan, Bradwen is transported to the Tower of the
Wind.
Chapter 3:
Tower of the
Wind – Climb the tower and talk to Dwella, Queen of the Fairies of the
Heavens. Tell 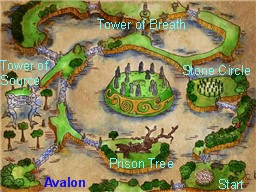
In order to pierce the armor of the knight, Bradwen must guess who
‘you’ is in the riddle. I will always be younger than
you. Love me or hate me, we will always be bound to one another.
Without you I would not exist, but if you disappear, I will
exist yet. Go to the right red circle and automatically arrive to the
top of one of the side tower. There are the brown stone of the earth,
white stone of the eldest child and the red stone of the father. Remember
that the riddle asks who are you. Pick up the
red stone of the father. Cross to the other side and give Dwella
the red stone of the father. Dwella revealed
that you, Bradwen are Pied Knight’s father. Madog, who the fairies took in
grew quickly since time is different in Avalon. That knowledge pierces the
Pied Knight’s armor. Go down the tower and see
Madog. Talk to
the Pied Knight about Pied Knight. Madog wants
proof that Bradwen did not abandon him. Give Madog the
sword of truth so that he can use it on Bradwen. Madog refuses to
go with Bradwen but he gives 2 magic grains
that can resists even Morgan’s magic. He also tells Bradwen to go to the
Prison tree and find an ally.
Chapter
4: Prison tree – Talk
to the winged fairy and Bradwen makes a comment about not seeing any mark
of God here. Walk to the base of the Prison Tree and look at the stone
slab inscribed with the mark of St. Joseph. Ask the fairy about the stone slab. She refers Bradwen to Kael at the Tower
of the Spring. Tower of
Source – Talk to Kael, Queen of the fairies of the waters and ask
about the stone slab. She will give you a cup
with magical water to see what the slab conceals. The slab is held by the
roots of Yrsghul, the Prison tree. To give Bradwen the cup, he must bring
6 of her complementary sisters found on the outer small islands together.
Talk to the sisters, starting from the sister on the outer island at the
left side going counter clockwise. The first says I am she who moulds
inanimate things. I mould, I sculpt, sometimes I destroy. The second
sister says I am she who waters whatever bears hairs, feathers or
scales. The third says I am she who nourishes that which grows and
needs the sun. The fourth says I am bound to the animals. Find
my twin and giver her this – a sign of the
animal. The fifth says I am bound to the stones and the
rocks. Find my twin and give her this – a sign of
a vegetable. The sixth says I am bound to the plants. Find
my twin and give her this – sign of
mineral. Give
the sign of mineral to the first sister who
moulds, the sign of the animal to the second
sister who waters whatever bears hair and give the sign of the vegetable to the third sister who
nourishes that which grows in the sun. Talk to Kael and she will give the
cup of spring that will make the tree grow. The
fairies disappears.
Chapter
5: Prison Tree – Use the Cup of Spring on the stone slab. Walk to the opening
made by the disappearance of the stone slab. Bradwen finds St. Joseph who
seems asleep or under a spell. Use a magic bean
on St. Joseph. It has been a long time since Morgan has imprisoned him
under the tree. Talk to him about the curse.
St. Joseph explains that St. Epona cursed Bradwen ancestors, who were
misled by the devil because they killed the sacred unicorns. He falls back
asleep. Use the second magic bean on him again.
Ask him about how to remove the curse. With
little information said, St. Joseph falls back to sleep. Talk to Madog
waiting outside and he transport Bradwen to meet with
Morgan. Central
Island – Ask Morgan about talking more with St.
Joseph. St Joseph came to Avalon to convert Morgan, so was
punished. To allow more time to talk to him, Morgan ask that Bradwen put
things in place in the labyrinth. Walk to the central brown circle and
enter the
labyrinth.
Labyrinth – See a standing stone at the last ring of the maze. Go
forward, left, up on the second opening, right, down and right and pick up
a red stone. Go back to the standing stone at
the last ring in the maze. Place the red stone
on the standing stone. Get transported close to another standing stone at
third outer ring. Go down, left, up, right, down, left, up, right
and pick up a yellow stone. Go back to
the standing stone and place the yellow stone
on it. Bradwen is now transported on the fifth outer ring close to another
standing stone. Go down left, up, left and pick up the
gray stone. Place the gray stone on the
standing stone and get transported to the center ring. Pick up one of
Morgan’s grains. Bradwen is transported to the
Prison Tree island.
Prison Tree – Go to St. Joseph and use the grain on him. Ask about the curse and be told that only St. Epona can lift her
own curse. Find her and beg her forgiveness. Follow the white stag
and it will lead to the Ciborium of Divine
Grace. Ask about the Ciborium. Lift the
Ciborium to the lips and know where St. Epona is. Do not lose hope. Go
outside and talk to Madog again. He would not go with Bradwen and will
send him back to the world of men. Bradwen will now look for the White
Stag and the Ciborium.
Quest 8 – Ciborium of
Divine Grace
Chapter
1:
Cornwall: Edge of the Woods – Talk to a
happy but aged Corwyn, the squire. Corwyn is happy to 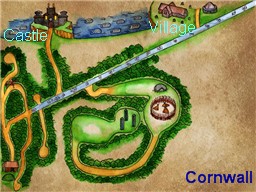
Madog and says that Lady Lutisse’s love is still ardent. Arthur is at war
with Lancelot who ran away with Guinevere. Saxons are taking advantage of
the dissent. They are in Cornwall near Tintagel Castle. Lady Lutisse
called Corwyn from Arden to help run the kingdom. Dionicus wanted a relic to heal King Mark. Corwyn was robbed of the
relic by the Servants of the Horned Snake and
was run off by a phantom. The phantom is by the end of the woods and
prevents anyone from leaving. The Horned
Snake is a creature from Hell and that it is God’s punishment for
Mark’s sins. It is in Tintagel Castle. Ask about Mark and the Ciborium.
Woodcutter’s hut – Ride straight to the woodcutter’s hut.
Talk to the woodcutter who remembers Bradwen as the one who vanquished the
ogre. The Knights have been killing each other and leave Britain to the
mercy of the Saxons. Ask him about the Horned
Snake. The Horned Snake’s disciple threw the Tintagel crosses in
the brambles in the forest. Go to the bushes just across the door of the
hut and pick up the cross. Go behind the smoke
hut in the back and pick up another cross. Pick
up the third cross by the far side of the hut.
Ride back and keep to the right to get to the main
road. Main
Road – The path is blocked by a ghost and a wall of fire. Talk to the
ghost. Leave him and take the road to the left of the screen. Ride and
find a shield and a body. It is dead Cymerill and his shield. Go back to the ghost at the main road
and show him the shield. The ghost now
remembers his name – Cymerill and is grateful. Cymerill extracts an oath
from Bradwen to save King Mark and allows him to
pass.
Castle – Ride and then turn left where there is gray stag on a
rise. Talk to the man who is a follower of the big horned one and he
allows Bradwen to enter at his own risk. They have run off the King’s
guards. Look around
the castle courtyard and see 3 headstones at the rear of the castle tower.
Bradwen reads Christ crucified between 2 thieves. St. Joseph’s headstone is in the subject. Place the 3
crosses on them. Pray at the center headstone and get a head of a horned
serpent.
Enter the great hall of the castle and see the Great Horned Snake. Talk to
the Horned Snake. The snake mentions that it was Bradwen who converted
Tudglyd, the ogre. Bradwen repeated his oath to take the throne back and
return it to King Mark. The Horned Snake laughs it off as it did with
Cymerill. It mentions that it took back what men stole from him. The snake
would not talk until Bradwen kills one of its servants, with black armor.
Ask about the Black Knight. The knight tried to
steal its cauldron and he and his followers were expelled and hid in the
swamp. Exit and leave the castle but the guard attacks. Bradwen kills him.
Chapter
2: Village
– Find the white stag in front of the church gate. Talk to blind
Cornelius. His healing attempts have not cured King Mark. Enter the church
and talk with Dionicus. Novelius died 5 yrs ago. Bradwen’s presence gives
him hope that they can care for King Mark and drive the Horned Snake out.
Ask about the Horned Snake, King Mark, relic
and the Ciborium. The Horned Snake, who
serves the devil came from the marshes and is very old. King Mark’s sins
caused God to free the snake and the snake bit the king and no one can
cure him of the venom. Tell Dionicus of the stolen relic, St. Joseph’s
hand and Dionicus believes that it would have been ineffective anyhow for
curing King Mark. The Horned Snake stole the Ciborium, an antique treasure
of the fairies and without the ciborium cannot rule over Cornwall. Before
the arrival of St. Joseph, the Snake ruled and the blood of its victim was
poured into the cup and all its disciple drink from it. St. Joseph had
transformed the cup that whoever drinks from it will have his sins
pardoned.
Look at the statue of St. Joseph of Arimathea on the left side of the
church and read that The sins of a bad king will reawaken the beast,
but a fisher king will come and bring down the creature of the devil.
Look at the tomb on the floor at the center of the floor – Here lies
Meriadoc, first Christian King of Cornwall.. Ask Dionicus about St. Joseph, tomb and King Mark. Dionicus repeats the prophecy and thinks
that King Mark can benefit from drinking from the ciborium. After St.
Joseph vanquished the Snake, he gave the crown to a child who became the
first Christian king of Cornwall, he and his descendant were the guardians
of of the Ciborium.
Chapter
3: Village Church
(continued) – Go to the retable on the right side of the chapel and
read Only the valiant will break the chains of falsehood. Ask
Dionicus about the retable, the gifts of the
angels. St. Joseph had a vision and Dionicus repeats the inscription on
St. Joseph’s statue about the bad king, awakening the snake and the fisher
king. The retable was to guide the king in his combat but no one can open
it. The bar locking it is indestructible. Go back to the retable and use
the sword of truth on it. The retable opens and
read Surrounded by the 2 thieves, you will pray to the son of God.
We did that already! Use the head of the horned snake
on the retable. The Horned snake had drawn the inhabitants of
Cornwall into devil worship. The blood of sacrificial victims was poured
into a large cauldron. Turn to the left door of the retable and read
the parchment. You shall cut the tongue of the devil. Ask Dionicus
how to cut Devil’s tongue. He does not
know. Go
outside and ask Cornelius about Devil’s tongue.
The plant, devil’s tongue is venomous and to never touch it with bare
hands. It grows in the marshes of Cornwall. Ask the way to the Black Marshes of Cornwall. Cornelius does not know
since he is not from
here. Go
around to the back of the church and enter the opening by the chickens to
the Blacksmith shop. Go to the barrels by the wall on the left side of the
opening and pick up the blacksmith’s tongs.
Talk to the man standing outside by the fence about the Black Marshes. He warns not to go there since the
horned snake was born
there. Go the
opening behind Cornelius and talk to one of King Mark’s guard. Ask him the
way to the Black Marshes. The guard gives a map
to the marshes. Go to the stone hut on the left and see King Mark lying on
a pallet. Exit and look at the map. Go to the Black
Marshes.
Black Marsh –
Corwyn noted the flag above the black tent. Go around and turn to the
right. Look at the Celtic cross 
In accordance with divine will, St. Joseph crossed the marsh and drove
the evil spirits out. Go farther left and see a bridge to a hut that
Bradwen thinks belongs to dwarves. Continue to the left of the screen and
see the flower, Devil’s tongue. Use the blacksmith’s
tongs to pick up the devil’s
tongue.
Village – Go to the retable and use the devil’s
tongue flower on the left door with the parchment. A painting
appears and a new parchment is seen on the right door. The new
painting reads – The devil promised the horned snake that no man come
from the womb of a woman could defeat it, but the devil is deceitful.
The parchment on the right door reads – The hand of St. Joseph blesses
the innocent. We need to look for the relic then. Go to St. Joseph’s
statue on the other side and pray to him. Take St.
Joseph’s staff that appears.
Chapter
4: Black Marsh – Go
back to the Celtic cross of St. Joseph and use St.
Joseph’s staff on it. Your faith will be your guide. A path
appears to the island of the Black Tent. Cross and talk to the Black
Knight, who is a follower of Melatus. Bradwen asks for the relic, St.
Joseph’s hand. Ask him about the Horned Snake.
He was deceived by the devil. Bradwen asks him to serve Arthur and to do
chivalrous deeds. The Black Knight gives the relic and serves Arthur. Cross the bridge and see a
young boy at the small hut but he runs
away.
Village – Use the relic on the right
door of the retable. A new painting appears on the door, which reads –
St. Joseph discovered a child who was a captive of the Horned Snake.
The child has been pulled from the belly of his mother. Armed with a
wooden sword, the child killed the snake, which withered away. St. Joseph
made the child the first Christian king of Cornwall. Pray at the tomb
of the Meriadoc and pick up Meriadoc’s sword
that is the answer to the prayer for
help.
Black Marsh – Go back to the boy’s hut. Place Meriadoc’s sword on the table by the wooden horse.
Bradwen calls the wild boy. Talk to the boy. He said that he had a dream
where Bradwen gave him a sword and a crown. He will follow Bradwen. The
boy is the son of King
Mark.
Castle – The prince follows Bradwen to the castle. The boy kills
the Horned Snake and before the snake dies, it cried warning about the
Hidden King. Pick up the ciborium. Talk to the boy and he wants to stay and
not follow Bradwen.
Chapter
5: Village
– Tell Cornelius that Cornwall is free of the Horned Snake and he can
return to Magovenium. Talk to Dionicus in the church about the Horned
snake and send a message to Lady Lutisse. Ask Dionicus about the Hidden King. One of the disciples of the evil one was
promised Britain by the devil and it is this one that called himself the
Hidden King. Ask how to use the Ciborium.
Turn towards He who blessed it and drink. Talk to King Mark’s guard
in the area behind Cornelius about getting rid of the servants of the
horned Snake. Enter the stone hut on the left and use the Ciborium on King Mark. Talk to him about God
forgiving him, his son that he had condemned defeated the snake and that
his kingdom is free. King Mark gives the royal seal of
Cornwall for his son and relinquishes the crown making his son
king. Mark will join the monks.
Castle – Give the royal seal to the
young Prince. He asks Bradwen to stay as his guide but Bradwen refuses
because of his quest. Go by the place close to the wall where the Bradwen
picked up the Ciborium and then use it.
Chapter
6: St. Epona’s
prison – Use the sword of truth on the
flames that blocks the path. Go down and Master Foulque explains that this
is St. Epona’s prison. Find the white stag at the floor of the prison.
Pray to the stag, who transforms to St. Epona. Implore pardon from St.
Epona and she grants it removing the curse. She tells Bradwen to drink
from the cup and he will get out of the prison but only the death of the
Hidden King can free her. Bradwen’s ancestor was tricked into believing
that he will be immortal if he kills the sacred unicorns. Bradwen gives
his oath to fight until he or the Hidden King dies. Ask about the Hidden king. It was born of the shadows, wants sole
rule of Britain, was vanquished by her and then St. George sent it back to
the shadows after St. Epona’s death. It has the appearance of a dragon.
Ask about the dragon. She asks Bradwen to go
back to his kingdom, drink from the cup and beware of the falsehood used
by the devil. Move away and drink from the cup.
CD 3
Quest 9 – The Prophecy
of the Shadows
Chapter
1: Kingdom of the
Atrebates:
Castle – Bradwen returns to his kingdom. Talk to the guard. Enter the
Great House and talk to Elad. Elad says that Lady Lutisse is in the
monastery in Magovenium since Novelius’ death. Arthur’s kingdom is falling
apart and Lancelot has taken arms against the king. Mordred is laying
siege to Magovenium. Bradwen asks Elad to stay until he has finished his
task. Ask about Mordred and the dragon. Nai the hermit is
the only one who knows how to enter the amphitheatre. The priest in Lucius’ village might
know where Nai is. Bradwen tells Elad that he must kill the dragon and the
first sign of the dragon’s reign is
here.
Lucius’ village – Ask the priest standing by the tree about Nai. Nai is in Dragon’s hill and has taken a vow of
silence until Novelius’ vision has been
fulfilled. Novelius’ vision is painted in a fresco in the
castle. Castle – Enter
the Great House and look at the blue starred fresco by the wall. Apocalypse, St. John talks about a white haired man
wearing a robe to his ankles, armed with a sword, wearing 7 stars and a
golden belt. Look at the fresco again and Corwyn says, it could be you My
Lord, same hair, the
sword…. St.
George’s Hill – Nai ignores attempts to talk to him.
Lucius’ village –
Talk to the priest about the Apocalypse. The
priest agrees about the hair and the sword except for the gold belt but he recalls the 7 stars of the mosaic
here at the villa. Go to the Roman mosaic floor in front of the main door
of the house. Pick up the 7 stars from the
lower portion of the mosaic.
Castle – Talk to the blacksmith on the left side of the Great House
about the golden belt. The blacksmith has a
golden belt passed down through his family and
gave it to Bradwen.
St. George’s Hill – Nai now would talk and exclaims that the vision
is true, God’s messenger is here and the Angel of truth is with him.
Bradwen gives Nai the golden belt and to tell Elad to gather an army to
lift the siege of Magovenium. Ask Nai about Novelius’ vision. Nai gives a stick, which is a part of Novelius’ bishop’s staff. Ask about entering
the amphitheatre. Nai gives a map of the city to Bradwen. Move away from Nai and
then look at the map.
Chapter
2:
Magovenium:
Monastery – Bradwen is inside the monastery. Go to Novelius’ cell and
find Lady Lutisse. After a warm welcome, tell her about the curse done by
the red dragon. Lady Lutisse reminded Bradwen
that St. George killed the dragon in Uffington, the castle area and used a
lance as weapon. The lance is from wood of Christ’s cross and the iron’s
point was from one of the nails from the cross. Dionicus knows more about
the lance but is a prisoner of Mordred in the city. Lutisse gives a cross, which is a part of Novelius’ staff given by
Novelius for Bradwen. To get out to the city, Lutisse gives the key to the postern gate. Go down the stairs and use
the key on the postern door opposite the main
monastery door. Open and exit to the
city. Ruins –
Look in the map to get to the ruins. A guard is standing by the ruins.
Talk to the bragging guard and Bradwen kills him. Enter the hut at the
bottom of the screen and talk to Dionicus in the back room. Talk to
Dionicus about the dragon and St. George’s lance. Dionicus gives another part of
Novelius’ staff making Novelius’ staff whole.
The lance was entrusted to the kingdom’s first priest and the prophecy about it says At the heart of the saint,
the instrument of faith takes hold. God projects his strength and the
Saints weapon is revealed. Go to the Kingdom of the
Atrebates.
Kingdom of the
Atrebates: St.
George’s Hill – Look at the inscription in front of the cross. Here is
where St. George struck down the dragon. The O in St. George is a heart.
Use Novelius’ staff on the inscription. Pick up St.
George’s lance. A voice is heard saying – The fifth bowl will open the door of the kingdom of the beast
for you.
Chapter
3:
Magovenium:
Monastery – Enter the monastery by the postern gate since the main
gate is locked. Talk to Novelius in his cell about the fifth bowl. Novelius says it means the 7 bowls of the
plague and he gives a manuscript – Dionicus’
letter to explain it. Move away from Dionicus and then read the
letter. The bowls will be returned to man
when the 7 frescoes are united. The first is hidden in abundance. The
second fresco is hidden at the feet of Christ. The third fresco hides
where the weapons were. The fourth fresco is hidden near the blessed
fruits. The fifth fresco is hidden where the devil was defeated. The sixth
fresco is hidden under the king. The seventh fresco is hidden under the
Emperor’s
face.
Now, we look for them. Go to the chapel and pick up the second fresco on the altar by the cross. Place the
second fresco on the second alcove wooden wall.
Go down the stairs and pick up the first fresco
from the barrels (abundance) by the stairs. Go outside through the postern
door, enter the main door to the amphitheatre and go to the
catacombs. Catacombs – There
are several guards around but Bradwen is ignored. Enter the catacombs,
down the stairs, left and pick up the third
fresco. There are weapons by the wall. Go down to the devil’s pit
via the archway on the right of the screen, down and then through the
archway to the right. Enter the opening across St. Epona and go to the
opposite side. Pick up the fifth fresco in
front of the entrance to hell. Bradwen can go out from here through the
archways now. Ruins – Pick up the
fourth fresco from the foot of St. Joseph’s
tree. Now go to the Kingdom of the
Atrebates.
Kingdom of the
Atrebates: Castle
– Talk to the guard. Enter the Great house and pick up the sixth fresco by the
throne.
Lucius’ village – Pick up the seventh
fresco by the Roman mosaic on the floor. Time to place them back at
the monastery.
Magovenium:
Monastery – Enter through the postern door. Place the frescoes in their proper places on the side alcoves
of the monastery. After placing the seventh fresco, an earthenware bowl
appears in all the alcoves. Do not pick that up. Go to the fifth alcove
and pick up the light colored fifth bowl. Exit
the monastery and it is time to enter the kingdom of the
beast. Kingdom of the
Atrebates: Red
Dragon – Pour the contents of the fifth bowl on the eye of the red
dragon. Before Bradwen goes to the kingdom of the beast, Nai arrives with
news from God. Lady Lutisse is with God and the angels now. Bradwen sends
his love to her in heaven.
Chapter
4:
Kingdom of the Beast: Look around and see 3 boned bridges and 3
shades. Talk to the shade of Cadfanan, Bradwen’s father, close to a lava
pool entryway. His soul is the prisoner of the dragon. Ask about the dragon and Cadfanan knows only that an island
contains his real name and an ogre stands guard by the bridge. Talk to the
shade of Tudglyd, the sorcerer ogre blocking the right bridge. Tudglyd
cannot touch Bradwen but he can block his way. Ask him about the dragon. The dragon has been asleep for centuries and
will wake when his name is called from the Dragon stone. Talk to the shade
of Cymerill by another opening to the lava pool. The dragon has devoured his soul. Ask about Tudglyd and he talks about the promise – Tudglyd promised to serve the Christian God
and cannot hinder the quest. Middle bone
bridge – Walk around the rim of the island and see 2 empty cages and a
cage with Novelius’ shade. Ask him about the dragon. Novelius says there are some stones placed on
an island. Some are the teeth of the dragon. If observed in the correct
order, the name will be revealed. The teeth are different from the
other stones. The first, second and third can be found in the outer
circle. The fourth is near the third tooth on the middle circle. The fifth
and sixth follow on the middle circle. The last is aligned with the first
but is on the inner
circle.
Left boned bridge – The island is full of inscribed standing stones.
Go to the stones in the outer circle 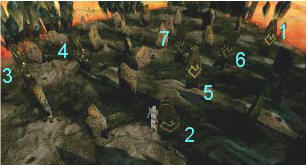
right side if the bridge is on top of the screen. Look at the stone and it
will light up. Continue looking at the stones and if it is the right
stone, it will light up. After the 7th stone, pick up the name of the dragon from the center of the inner
circle.
Right boned bridge – Remind Tudglyd of his promise. Tudglyd agrees and let Bradwen pass.
Cross the bridge and see the sign of the dragon on the ground. Awaken the
dragon by calling him, place the name of the
dragon on the sigil of the dragon. Osthryth! With the use of St.
George’s lance, Bradwen slew the dragon.
Chapter
5: When
the dragon was defeated, Gwen, Bradwen’s first wife appears and accuses
Bradwen of abandoning her in search of power and allowing her to be killed
by the witch. Gwen was told this by Madog, their son who appears too and
was responsible for bringing her there. Bradwen gives her the sword of
truth so that she will know that what she accuses him of is not the truth.
Gwen strikes Bradwen a heavy wound. Madog changes into the devil and
laughed at him for he has tricked Gwen in believing her son, she loves so
much. Bradwen calls Corwyn and asks him to pick up the sword.
Playing as Corwyn,
pick up the sword by standing close to Gwen,
who is crying now. Give the sword of truth to
Bradwen. Bradwen knights Corwyn, so he kneels before no man. Bradwen gives
the sword to Corwyn and asks Corwyn to get him
the lamp of St. Epona, the only thing that can cure him. Walk to the other
bridge at the other end of the island. On the way pick up an ice crystal. The bridge is blocked by Melatus, the
Black Knight. Do not fight him. Use the sword of truth
on Melatus to find out his weakness. Melatus says that his weakness
is water but in the sea of lava, there is no water. Talk to Melatus again
and fight him using the ice crystal-dragon’s
tear as weapon. Walk across the bridge and find a shield, a cup , a
crown and Rhiannon-St. Epona’s lamp. Get the lamp and use it on Bradwen. Master, you cannot be
dead. Bradwen is healed.
Master Foulque
explains that with the death of the dragon, St. Epona was freed. The world
of shadows fell with the dragon in the abyss of the void. Only Arthur and
Merlin can reunite the kingdom and they are both dead. Bradwen survived
but the Saxons overtook Britain and were victorious. Bradwen took the
remaining knights and became the King of Little Britain. He taught
Arthur’s principles of Chivalry to his companions and that is how it was
handed down to the present. Lancelot and the other knights are real since
they exist in you heart.
Here ends the Tale
of Bradwen, Knight of the Round table and King of the Atrebates.
This document may
not be distributed without express written permission of the author and
the content may not be altered in any way.
For Questions or
Comments on this Walkthrough,
Please write to: MaGtRo
Copyright ©
6/2002 MaGtRo