Arthurs Knights 2

by MaGtRo about 86 minutes to read

Arthur’s Knights
2


The Secret of
Merlin


By Cryo
Interactive


Walkthrough by
MaGtRo     June, 2002


Game
Play
: The
movement in the game uses the arrow keys of the keyboard. The menu uses
the mouse pointer. Pressing the space bar is the main Action key – speak
to someone, open a door or pick up an inventory. For the space bar action
key to work, Bradwen must face with his body slightly at an angle, the
person to talk to directly or face the center of the object to interact
with. Using shift and arrow keys makes Bradwen run or the horse gallop and
climb stairs. Clicking the right mouse
button displays or hides the interface bar at the bottom of the
screen.               
The circle on the left of the interface bar shows the activity at the
moment such as location of the game play, the person to talk to or if
combat is possible. It also shows the map, when destination is selected in
the inventory area. Next is the inventory area that has the choice of
items,
represented by the hand icon that are picked up when Bradwen is on foot;
the subjects, represented by the mouth icon that can be discussed when
speaking to someone and the destinations, represented by the
horse icon while on horseback. When a new item, subject or
destination is obtained an automated transfer is seen on the top left of
the screen indicating that it is placed in the inventory. When talking to
a character, always exhaust all dialogues by pressing the action key/space
bar and then open the subjects in inventory and talk
about all the lit
icons.         
To the
right of the inventory area, represented by a book is the storyline that
summarizes the progress of the game story. Hints can be picked up from the
storyline. The far right of the interface bar shows the green Menu globe
that accesses the Save, Database and Quit choices. There are 10 save game
slots and can be written over. There are 2 separate games, one Bradwen as
a Paladin and the other, Bradwen as a Celt. To play the other game during
or after finishing the first choice – select a new character and start a
new game.


Items to be picked up. Subjects to talk about. Destinations to go to.

A young page asks
Master Foulque if the tales about Bradwen are finished. Facing Master
Foulque, click on the picture on left bottom of the screen or press the
Action key/space bar. Click on the picture of Master Foulque to hear his
answer. There are 2 stories about Bradwen:  as a Celt during the time
of Arthur when fairies, dragons and ogres are present and follows the old
life that believe in the great goddesses or as a Paladin, the pious knight
and defender of the cross. To choose which one, turn around and walk
towards the door. There are 2 books on either side of the door, a red book
for the Celtic story and the white book for the Christian story. Walk
towards the selected story, face the book directly, click space bar/action
key and see automated action of book going to
inventory item. Walk back to Master Foulque, face him directly, right
click to bring up the interface bar, click on book of spells, click on picture of Foulque to start
the story.


Read the summary of
the previous tales of Bradwen in the book at the right side of the
inventory area. This is the continuation of the legend of Bradwen, Knight
of the Round Table and King of the Atrebates.


Bradwen the Celt
(Red Book)


Quest 6 – The Crown of
the Atrebates


Chapter
1:          Kingdom of the
Atrebates
:
         
Castle – Bradwen
rides back to his kingdom of the Atrebates to assume
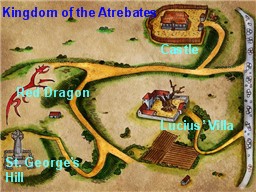
the responsibility of kingship. His wife, the fairy Fydia awaits him at
Mogovenium. Gawln greets him at the gate of the Castle. In the inventory
are his wife’s sisters, the fairies Fiachra,
Fhola and Ferdia, as
well as the 3 flamed sword. Enter the compound
and talk to Elad in front of the Great House. Elad informs him that the
kingdom is in fear of evil spirits. Ask about
the phantoms that became rampant in the removal
of the Morganor and the Picts. Go to the right and enter the hut by the
roasting pig. Take ham from the table. Go to
Bradwen’s old home with the red dragon depicted on the door and he will
not enter because of painful memories. Leave the castle. When on the
horse, select the destination (horse) icon, right click and then click on
the circle on the left and get a map. The map shows where Bradwen is in
relation to places. If Bradwen is on foot, see where his horse
is.              
Red Dragon field – Talk to the shepherd about the phantoms. The phantoms carry humans to the other
world and devour them. Ask about the pilferage
mostly in Lucius’
villa.               
Lucius’ villa –  Inside the villa, talk to the hungry Pict,
Fyannan. He wants food before he will talk to you. Give him the ham. Ask about pilferage
and phantom. Spirits massacre his clan when
they took treasures in the great forest – Arden.


Arden:
         Kings’ Mounds – The only road open from Merlin’s Tree is the
one to the right guarded by a black bird. Enter and ride to Kings’ Mound.
See and talk to the boar. He was Golistan, Chief warrior of Morganor. Ask
the boar about the phantoms. They stole the
treasures of the mound and the spirits attacked. Now, the clan warriors’
souls are in cocoons and he is a boar in the forest whose mission is to
guard the stolen treasures. Bradwen states that only his 3-flamed sword
containing the 3 fairies can break the spell. Fhola burns iron, Ferdia
burns stone and Fiachra, the eldest can burn magic. Use Fiachra on Golistan. Pick up the tusk he left behind when he disappeared. To the
right, a brown cocoon is on the ground. Use the tusk on the cocoon to free the souls. Pick up the
royal treasures. Go to the mounds and see an
ancestral ghost standing in front of the central mound. Give him the
treasure and then speak to him. The dead King
gives a unicorn horn, which is the mark of his
shame and possibly Bradwen’s salvation. Go now and be King. Ride the horse
and choose Kingdom of the Atrebates as
destination.


Kingdom of the
Atrebates:         
Castle
– Enter the Great house and happily greet Fydia, fairy wife of
Bradwen. As Queen, Fydia will renew the pacts with the other fairies for
the good of the land.  Thank Elad for taking care of the kingdom.
Tell him about the phantom King wanting Bradwen
to wear the crown. Elad says the crown has
disappeared for the coronation ceremony. It is the Crown of the King of
the Atrebates, which Cadfanan nor Morganor wore. Talk to Fydia about the
crown. She says that the crown was made by the fairy of Lake Arden for the
Atrebates when the pact was concluded. And men made a coffer for the crown. Ask about the coffer. The green and blue metal coffer is decorated
with dolphins. Bradwen remembered delivering it to the fairies for
Cadfanan.  Tell Elad that the kingdom’s hardship will cease since the
spirits are appeased and have gone back to the other world. Go to Arden.


Chapter
2:         
Arden:          
Merlin’s Tree –
Talk to a waiting Merlin standing by his tree. Merlin
states that Bradwen has to do and undo many things alone. Talk to
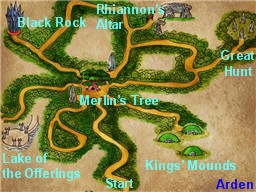
him about the crown. The Lady of the Lake has
the crown of Atrebates and to summon her, the Rhiannon’s cup is needed. When the cup is recovered
set it in middle altar of Arden Lake. Gael, Nael and Jael keep the cup at
Rhiannon’s knoll. Go to the now open road on the
left.       
             
Rhiannon’s knoll
– As soon as Bradwen walks close to the pond, a wall
of flame blocks his exit. Talk to the first stone and Jael appears. Jael
is angry with her sisters, Gael and Nael. Ask her about the cup. The cup is broken but the Mother-Goddess will
give the first half if the sisters go together by the pond and the second
half if all of them are at the spring up the hill. To carry Jael as a
pearl, she gives a magical Jael stone. Do not
click on the stone on Jael for she cannot be alone with her other 2
sisters. Go to the second stone, and talk to Gael. She does not want to be
alone with Jael. Take the magic Gael stone. Go
to the third stone and talk to Nael and she also does not want to be alone
with Jael. Take the magic Nael stone. Click the
magic stone on Nael and have a pearl. Go to the
left until the pond close to the wall of fire. Place the pearl in the pond
and Nael transforms back. Go back to Gael and click the Gael stone on Gael
and take the pearl. Bring the pearl to the pond
and do the same as with Gael. Lastly, go back to Jael and do the same.
Pick up half of the cup.           
Now, how to get all of them up to the spring up the hill under the altar.
Start by using the stone on Jael, pick up the pearl, for up the hill drop
the pearl in the spring. Now go back down to the pond and do the same to
Gael or Nael. Now, there will be a sister with Jael. Transform Jael (the
one on the right) back to a pearl bring her down to the pond and transform
her. Bring the other sister as a pearl up the hill and repeat the process.
Now take Jael up the hill to be with her sisters. Pick up the whole cup. Ride out to go to the Merlin’s tree. Take the
adjacent open road and ride to the
lake.             
Lake of Offerings – Walk to the side of the lake and pass between
any of 2 standing stones. Go the middle island and place the cup on the altar. Talk to the Fairy of the Lake that
appears. To renew the pact, Bradwen must prove himself worthy. Talk about
the crown and take the test. Place the stones that represent king, men, gods and earth on
the four islands. Place the yellow stone of the
king at the altar at the middle island where the cup is. Place the
others any order at the side islands. Talk to the Fairy again and she
gives the crown and the pact is resealed and
bade Bradwen to go to where the Kings are born and laid to rest.


Chapter
3:        
Arden:           
King’s Mound
– Go to the road that has the black bird. Talk to
the Ghost of King Cadfanan about the King.
Place the crown on Bradwen’s
head.           
Black Rock
– After the extreme pain in placing the crown on his head,
Bradwen’s hair turns white. Bradwen realizes he is facing a giant at Black
Rock. He states that he is a friend and that the pain is Gods’ punishment
for now he is cursed. Ask about the curse. Only
he can help but first Bradwen must prove his commitment to the way of the
beast. He wants Gawain’s head and he gives you a sword. The exit is by 2 posts and where a white wolf
stands.          
Merlin’s tree – Talk to Gawain standing by Merlin’s Tree about the
giant who tricked Gawain to be there at Arden.
Gawain states that Bradwen’s ancestors are giant
slayers.          
King’s Mound – Ask Bradwen’s father’s ghost about the giant. The Giant of Bestiality can only be slain by
the 3-Flamed sword. Rhiannon gave it to the first King of the
Atrebates.           
Rhiannon’s Altar – Go to the top of the hill to the altar and talk
to Fiacra. Rhiannon is angry and her curse was passed to Bradwen when he
became king. She will give the Sword of Flames if the answer to the riddle
is brought to her – If I am free I can destroy, if tamed, I can
comfort. The wind helps to kindle me, but can also kill me. One can die
within me, but also die without me
. By the three standing stones of
the fairies are 3 stones – Air, Water and the red stone of Fire. Take the
red stone of Fire and give it to Fiacra. Take
the 3-Flamed
Sword.          
Black Rock – Talk to the giant and then fight him using the 3-flamed sword. Choose the Kingdom of the Atrebates destination.


Chapter
4:
          
Kingdom of the
Atrebates:
         
Castle – Bradwen is sick. Enter the castle and go to the Great
house. Talk to Fydia about the curse.
Benevolent Rhiannon gave a sacred vessel to the Atrebates – the cup decorated with unicorns. It is said that this
vessel could heal all ailments and that the engravings tell of the
goddess’ magic. Talk to Elad about cup decorated with
unicorns. He said that Lucius’ inherited it when he was building
his
villa.           
Lucius’ Villa – Enter the villa and go to one of the pillars by the
Roman mosaic floor in front of the main door of the house. Look at Rhiannon’s cup and see unicorns depicted on the
cup.          Castle
Talk to Fydia about the unicorn. Bradwen
describes the cup with a unicorn touching an injured king with its horn
and the king is healed. Fydia reminds Bradwen of the unicorn horn given to
him by King Cadfanan’s ghost. Talk to Elad, who worries how Bradwen’s hair
changed like his father. Show him the unicorn’s
horn and he remembers a statue of a man holding a horn. Enter the
Great House and see a statue on the floor by the blue icon of St. George.
Approach the statue on its right and then pick
it up. It is missing one arm and a lower part of the unicorn’s horn is
broken.           Now to
search for the missing part. Go to Bradwen’s house with the red dragon on
the door. Pick the statue from the floor. It
shows a child holding the man’s left hand and the base of the unicorn’s
horn. The statue is combined in the inventory as statue of king and child. Talk to Fydia and then ask
her about the statue and ritual.  Fydia states that it is an ancient
ritual wherein when man and child, who replaces the sacred unicorn grasp
the magical horn together, the healing can
begin.           St.
George’s Hill
– Talk to the shepherd, Gwendal. He likes the sword.
Talk to him about the unicorn horn. Watch the
dance!          Castle
– As soon as Bradwen enters the castle ground, Merlin appears. Bradwen’s
pain is now bearable. Merlin tells him that he has resisted the giant’s
trick as his father, Cadfanan and his uncle, Novelius have done. Bradwen
must follow Morgan’s stag and it will lead to the Mother – Goddess and all
his questions will be answered. The white stag is in front of the Great
House. Master Foulque tells that Bradwen followed the white stag to Arden
but lost its tracks.


Quest 7 – The Fairy
Queen

Chapter
1:          
Arden:         Merlin’s Tree

Fate appears in the subject panel. Corwin, the
squire notices a stick on top of the dolmen in front of Merlin’s tree.
Pick up the branch of wild rose. Talk to Gawain
behind the tree and then ask about Fate. He has
seen the white stag by Rhiannon’s Altar but it
disappeared when Gawain was challenged by the Pied
Knight, who seeks Bradwen’s death. Take the road with a horse by
it. Check the map and go to Rhiannon’s
Altar.          Rhiannon’s
Altar
– Look at the black horse at the ground and Bradwen says that
forces of darkness have ravaged the earth here. Go to the altar at the top
of the hill and press action and Bradwen will call Rhiannon. Look close at
the white horse on the ground. Bradwen says that Rhiannon, pure as the
unicorn and as fresh as the rose has disappeared together with the
unicorns. Look at either horse’s head statue at
the right or left of the altar. Place the unicorn horn on the horse’s head
and see that it fit the forehead. He realizes that it is a unicorn statue
now.          Merlin’s
Tree
– Talk to Gawain about the unicorn and he says only the pure can
approach a unicorn.      Lake of Offerings
– As soon as Bradwen walk towards the center altar, a voice says “Bradwen
don’t forget me”. Look at the pillar with flowers on it at the center
island. It is the fairy of the waters that was
a fish once that loved Gawain in Avalon. Bradwen helped transform her back
in the adventure in Arthur’s Knights 1. She was transformed because she
defended Bradwen at the Fairy Council. To help her – Only love can
conquer the magic of Morgan
. Corwyn remembers being turned into a
mushroom by this fairy and did not want Bradwen to help
her.          Merlin’s
Tree
– Ask Gawain about the fairy. Gawain
remembers being given a branch of wild roses by her as a show of love. Go
to the flowers in front of Merlin’s Tree and pick up a rose fit for a
queen.         Lake of the
Offerings
– Use the branch of wild rose on
the flowered stone and she transforms back to a fairy of the waters. Talk
to the fairy and find out that Morgan despise Bradwen because of her love
for her sister Rhiannon. Talk to the fairy and she asks for one of
Merlin’s eternal roses. Give her the rose. Ask
her about the unicorn – There were 3 unicorn
horns – the first was carried to his grave by the first cursed king, the
second was tossed in the lake of Offerings and the last was lost in the
Land of Shadows. If Bradwen finds the second horn, he can accomplish his
destiny. Ask about the horse statues – they
once guarded the gates of Avalon when they were still open. It was
Rhiannon who opened the door but since the curse, it was closed. Ask about
the Pied Knight, who is Morgan’s champion and
has orders to kill Bradwen. Ask about the white
stag that has fled to Avalon. Ask her about Fate. Look at the center island’s altar where the
ancient kings made offerings to
Rhiannon.          
Merlin’s Tree – Get another rose from
Merlin’s flower
garden.          Lake of
the Offerings
– Place the rose on the center island’s altar and
Bradwen returns to the tradition of offering here. Pick up the second
unicorn horn.         
Rhiannon’s Altar – Place the other horn on the other unicorn’s head
by the Altar with fire and the fire disappears. Walk under the dolmen of
the altar. Corwyn, his squire refuses to follow him to Avalon. Bradwen
disappears from Arden and appears in Avalon.

Chapter
2:          
Avalon
:         
 Entrance Island – Go forward to the clump of white flowers
and pick some of the flowers with a handful
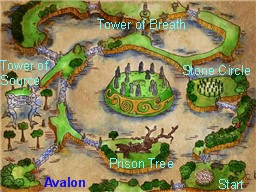
of pollen that the fairies likes so much. Go forward and turn left
to the flowering tree. A crow croaks a warning not to touch the fruit of
the tree. Go back and cross the bridge. Ride to Stone
Circle.          
Stone Circle – Look at the flowered stones around the stone circle.
Find the white stag inside the stone circle and the Pied Knight on the
other side. Talk but do not fight the Pied Knight about the Pied Knight and Fate. He
is the key to Bradwen’s destiny and to know his fate, Bradwen must pierce
his armor. Leave him and go to the Tower of
Breath.          Tower of
Breath
– Climb up the main tower and talk to the winged fairy, who is very
angry. Leave her and go to the Tower of Source using the crystal bridge at
the right end of the
island.          Tower of
Source
– Talk to the welcoming fairy that warns about Morgan’s wrath
and the winged fairies’ hearing. Ask her about the winged fairies, who is in love with the Pied Knight.
The Pied Knight hid his heart under the seasons to not be enchanted by the
fairy. Bring the heart to the fairy to be able to talk to her. What
feeds the fairies will break the heart of stone.
Ask about the Pied Knight, who wears rainbows in his arms. Ask
about Fate and find out that the winged fairies
might know about it. As thanks, give her pollen and new pollen is in
inventory.        Stone Circle
Go to the flowered stone close to the Pied Knight and use pollen on it. The stone disappears and pick up the
heart shaped ruby of the Pied
Knight.        Tower of Breath
Give the winged fairy the heart shaped ruby.
Ask her about the Pied Knight. She gives a
riddle – When you meet her, she knows not her name. As long as you
walk, she cannot catch you. When you leave her in one world, you’ll find
her in the next.
Go to the red circle on the left, automatically cross
to an outer tree tower. See black stone of death, white stone of the moon,
blue stone of progeny and gray stone of shadow. Go back to the winged
fairy and give her the blue stone of
progeny/childhood. If given the wrong stone, she changes Bradwen to
a wild boar. She says that the Pied Knight is his son Madog. Ask about Madog.
Madog was abandoned by the Picts at the forest of Arden, where Morgan
picked him up. He is now 20 yrs old since time is different in Arden. He
is also cursed when Bradwen took the crown. Ask about the white stag – the stag leads the living to their
destiny and the dead to the other world. Ask about Fate – Only Madog, his son knows Bradwen’s destiny.
He must pierce Madog’s armor, which he already did by use of the blue
stone and finding out that he is his
son.          Stone
Circle
– Talk to the Pied Knight about Madog. Bradwen explains that he did not know about
the curse until he wore the crown. Ask Madog about Fate. Madog explains about a unicorn in his dream
that told him that his father would lift Rhiannon’s curse. He gives the
jewel the unicorn left
behind.          Tower of
Source
– Go to the islet with fire blocking entry. Use the jewel on the fire. Look at the broken stone and see
that the unicorn engravings are similar to that of Rhiannon’s altar. Look close at the bones in the
foreground and pick up a black eye-shaped
stone. Pick a blue eye-shaped stone and
a green eye-shaped stone at the other piles of
bones. Ask the fairy at the central island about Rhiannon. The standing stone was broken because
someone violated a pact and that is when Rhiannon cursed the Atrebates.
Ask about the unicorns, which are Rhiannon’s
companion and learn that the unicorn stone in Arden is a reminder of the
pact with the Atrebates. She does not know about the pact. Ask her about the curse
and learn about the pact that was engraved on the stone. Ask her about the stone eyes and she says they are the magical unicorn
eyes from the 3
unicorns.          Tower
of Breath
– Ask the winged fairy about the unicorn. The unicorns were the breath of Rhiannon and
when they died, Rhiannon died too. The marks where they were killed are in
Arden forest. Ask about the curse and she says
to follow the white stag. Ask about the stone
eye. The eye of the eldest unicorn saw into the past, the beautiful
one saw the present and the youngest saw the
future.          Stone
Circle
– Go to the white stag and arrive in Arden.

Chapter
3:          Arden:
The
black unicorn shaped ground that marked the death of the Rhiannon’s 3
unicorns can be found at the King’s Mound, Lake of the Offerings and
Rhiannon’s Altar.        
Rhiannon’s Altar – Look at the black unicorn shape on the ground.
Climb up the hill and see the 3 white unicorn shapes on the ground around
the altar. Standing close to the head of the leftmost white unicorn shape,
place the green eye stone on the head. Pick the
green eye stone again. Use the black eye stone on the middle unicorn shape, pick the
black eye stone again and place the blue eye stone at the one on the right. Pick the
blue eye stone also. Go back down to the black
unicorn shape on the ground and see that it is now white. Pick up the
blue disk from the
head.          Lake of the
Offerings
– Pick up the green disk from the
now white unicorn shape on the
ground.          King’s
Mound
– Pick up the black disk from the now
white unicorn shape on the
ground.          
Rhiannon’s Altar – With the 3 disks and
the 3 magical eyes, walk under the dolmen of
Rhiannon’s Altar.

Chapter
4:         
Avalon:
          
Tower of Source – Talk to the fairy about the stone discus. She says that the pact was written on
similar disks. Place the black disc on the
broken stone pillar. Hear Rhiannon say “Since the dawn of time, I Rhiannon
reigned on this earth”. Place the blue disc on
the pillar – Rhiannon said that a pact is made with the Atrebates, the
fairies will not harm the children and that man will not lay hand on the 3
sacred unicorns. Place the green disc on the
stone. After the stone pillar is complete and the last disc in place,
Bradwen is transported to the central island in front of Morgan,
mother-goddess.            
Center Island – Talk to Morgan and hear her anger because Bradwen
has freed Gawain, rejected her, vanquished her champions, provoked
rebellion among her fairies, and is Arthur’s Knight and Merlin’s friend.
Fydia, his wife extracted a promise from Morgan not to harm him. Flame of life goes into the hand inventory. Ask
Morgan about Rhiannon. She has disappeared. Ask
who killed the unicorns and find out that it is
the king that gave Bradwen the unicorn horn. Tell her about the curse and how Bradwen will stop it. Only Rhiannon,
the one who laid the curse can remove the curse. Around Morgan are the
idols of Air, Fire, Earth and Water, idols that he cannot reach. Place the
Flame of life on the idol of fire and hear her
say the she brought on the destiny of mankind. Place the black-eyed stone on the idol of the earth and hear
her say that she takes care of the dead and the living also derived
strength from her. Place the blue-eyed stone on
the idol of air and hear her say that she is the guarantor of the here and
now.  Place the green-eyed stone on the
idol of water and hear her say that her waters give birth to the future.
Rhiannon disappears after the last stone is placed. Stand at the center of
the circle where Morgan stood and get transported to the Matrix of
Time.

Chapter
5:
          Matrix of
Time
– Go forward, right and talk to the Guardian. He is the Guardian
of all that has come before. You must defeat him to carry out your
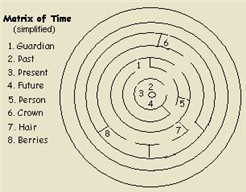
destiny. Do not fight him. Go to the central area of the maze. Look at the
Pact stone of Rhiannon at the center and Bradwen renews his vow. Go to the
stone of the past and earth at the right of the central stone. The stone
of the past says that only oblivion can unmake the pitfalls of the past.
Go out, right and talk to Morganor. Bradwen does not believe his brother
was already dead and that the one Bradwen killed in Camelot was a creature
of darkness. Go back where Bradwen first appeared in the maze. Go to the
level one higher and turn left, pick up the crown. Give the crown to
Morganor and bid him to rule the Dead. He gives the Sword of Oblivion. Go to the Guardian of the past and
fight him with the Sword of Oblivion. Look
close at his body and pick up the Black stone
of the past. Go back to the central area and place the black stone on the Stone of past and
earth.          Go back and
talk to a new Guardian – the Guardian of the present. Follow the same
procedure, do not fight him and go back to the central area. Look at the
stone of Air and present at the middle of the outer stones. The stone of
Air say that only Honor can unmake the pitfalls of the present. Go to
where Morganor was and talk to Guinevere. She wants you to forsake your
honor and oath to Arthur and give her your love. Go out and turn right
where Bradwen first arrived at the Matrix of time, go up one level and
turn right. Pick up Fydia’s lock of hair. Go
back to Guinevere and give her the lock of
hair. She will give the Sword of Honor.
Fight the Guardian of the present using the Sword of
Honor. Look close at the body and pick up the blue stone. Place the blue
stone on the Stone of Air and
present.          Now, the
Guardian is of the Future. Do not fight him also and look at the Stone of
Air and Future at the central area. The stone says that only Wisdom can
unmake the pitfalls of time to come. Now the personage at the right is
King Arthur, who is blind and in despair because his kingdom is falling
apart. Go back out and to where Fydia’s hair was. Go farther down, one
tier up and pick up berries that Merlin says
cures blindness. Give the berries to King
Arthur and he gives Merlin’s sword forged by
the wisdom of the gods. Fight the Guardian of the future with Merlin’s sword. Look close at his body and get the
green stone of the future. Place the green stone on the stone of Air at the central area.
Look at the Big central stone and swear again to lift the curse. A voice
is heard saying to look for the Cup of
Knowledge to learn where Rhiannon
is.          
Arden – Once more, Bradwen is transported in front of Morgan. She
thinks it is futile to look for both the Cup of Knowledge and Rhiannon.
Talk about the Cup. The Cup is one of the
treasures of Britain that was lost in the invasion of the Romans and
whoever drinks from that cup will have their questions answered. She hopes
that the white stag is running Bradwen around in circles.

CD 2

Quest 8 – The Cauldron
of Celidoin

Chapter
1:         
Arden:          Lake of the
Offerings
– Talk with faithful Corwyn, Bradwen’s squire. It has been
20 yrs since Bradwen left and is still unchanged. Fydia, Bradwen’s Queen
has disappeared and Lancelot made off with Guinevere. King Arthur wants
revenged. Cedric, King of the Saxons allied with Mordred, a knight and has
been pillaging cities. Merlin has also
disappeared.         Merlin’s
Tree
– The white stag stood on the other side of the tree. Follow the
stag and after many months, lost his trail in the Cornish Forest.

Chapter
2:          
Cornwall:
         
Road – Ride forward and hear fighting. See Cymerill beset by 2 men.
Talk to the one on the left, who calls themselves, the Masters of
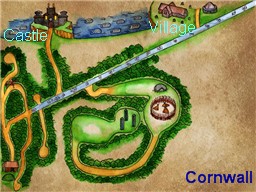
Cornwall. Fight the men and then talk to Cymerill. He asks that you save
King Mark of Cornwall who is in danger. Bradwen reluctantly promises. Ask
about King Mark. The
king is ill and a Black Knight has assembled outlaws to ravage the country.
Cymerill dies. Search the 2 villains and get a horn from one and from the other a golden ring bearing King Mark’s coat of Arms –
Cymerill’s ring. Make another vow on Cymerill’s
body.          Castle
– Ride forward a little bit and turn left towards the castle, where a gray
stag stands grazing. Look at map to be sure. Talk to the guard at the
castle. Talk about King Mark and then show the
gold ring to prove that you know Cymerill.
Enter the castle and see the old King Mark. Ask about the Black Knight and King
Mark. A monk was to have a sacred relic of St.
Joseph that could heal the king but was feared killed by outlaws.
King Mark gives an offering to the monks. Ask
about the Cup. Look around the room and see a
banner of the boar the most powerful of the Cornish tribes. Exit the tower
and look around the
courtyard.          
Pick up a ham, a log
and an idol of the Morgan, mother-goddess.
Climb the steps to the castle wall on the left side and pick up an idol of
Rhiannon from an altar being destroyed. Talk to
the man. He was following Mark’s orders and would not stop the destruction
in fear of the King. Exit the castle walls and walk the
bridge.           Talk
to the same guard. He said the black knight has already pillaged the royal
treasures while Mark was gone and is just waiting for the King to die
before coming back. Ask about the horn. The
horn is a relic from the druid’s time and used to frighten swamp evil
spirits.         
Village – Talk to blind Cornelius, a monk from Magovenium and learn
that Uncle Novelius has died. He asks for help. Ask him about the relic. The black knight has stolen the relic and
wants ransom.          Go
around the right side of the church and talk to the old woman praying in
her yard. She said that famine has driven the villagers away and that she
is hungry. Give her the ham. Ask her now about
the Black Knight and then King Mark. The Black knight is from the Black Marsh, where she said has evil spirits. King
Mark does nothing about the
famine.         
Castle – Ask the guard about the Black
Marsh. He gives a map to the swamp. Look
at the map in inventory and see the Black Marsh
in destination. Ride to Black
Marsh.          Black
Marsh
– Ride forward to the Black Tent. Walk towards the left where the Black Knight is standing and around the reeds towards a
bridge. Two ghosts appears and Corwyn cries warning. Blow the horn and cross the bridge. Talk to the Black Knight.
He serves the Hidden King of Britain. He is invincible and no weapon can
defeat him. Ask about the Hidden King of
Britain and the relic. He said the
Hidden King will soon rule Britain and he will be the King of Cornwall. He
wants ransom for the relic. Give him the offering and he gives the relic. He says that Bradwen wants something else,
which are the Cup of Knowledge and the white stag. Ask him about the
poison given to King Mark. Ask about the Cup of
Knowledge. The Black Knight says that he has the Cup and he wants
Bradwen to disavow his promise to save King Mark and the Bradwen’s sword.
Bradwen will not break his oath. Leave, ride the horse and click on Cornwall in destination.
        

Chapter
3:
          
Village – Enter the church
and give the relic to Cornelius. Cornelius
prays but King Mark’s soul is too black to be healed. Look at the shield
on the altar and then ask Cornelius about the prince. The shield belongs to Mark’s son and Mark
ordered the shield placed on the altar so that God will watch over the
young prince. The prince has left Cornwall and no one knows what happened
to him.          Go to the
old woman in her yard beside the church and ask her about the prince. The prince is good and merciful like his
mother Queen Isolde and since he left the King has become twice as
cruel.          
Castle – Ask the guard about the prince.
The prince seemed depressed and just left one morning. Enter the castle
tower and talk to King Mark. He gets angry about his not being cured by
the relic. He is cold. Go to the fireplace and place the log in it. Ask about the prince. King Mark thinks that the prince is
softhearted and left because he wants to have adventures like Tristan. Go
out and talk to the guard about the prince
again and he says that the prince was not wearing his talisman. Go back to the king and ask about the talisman. The king finally gives a key to the prince’s tower
room.           Go out
the courtyard and climb the step on the right side. Use the key on the room close to the stairs. Enter and Corwyn
exclaimed how sad the room is. Look and pick up a slate cylinder at the alcove on the corner of the
room. At the opposite corner, look and then pick up the foam cylinder. Place the cylinders on the eyes of the drawing on the floor.
Pick up the talisman from the third
indentation.           
Show the talisman to the guard outside and he
notes that there is a piece missing. Show it to King Mark and he said that
it was from Merlin and that he came to the castle. Ask about Merlin. Merlin was there several days ago looking for
a cup.      Go to the left stairway in the
courtyard and ask the man destroying Rhiannon’s altar about Merlin. Merlin
threatened to shut him up in the Green Mounds
for what he is doing. ask him about the Green
Mounds and he says it is a magical hill, the grass is always green
even in winter and the witches hold their Sabbath
there.     Ask the guard outside about the Green Mounds and he says to follow the coast north.
Ride the horse and choose Green Mound as
destination.         
 

Chapter
4:           Green Mound
– Ride and the walk forward to the Green Mound. Use shift forward to
climb the steps. At the top, pick up the bracelet that has a boar engraving. Look at the
standing poles and see wolves’ head and ashes, which is work of a
sorcerer.  Go down and look at a path on the left side of the cliffs.
Then go back to the horse and ride the opposite direction of the
mound.          Look at the
Druid’s sacred altar but no one offers sacrifices anymore. There are 3
pillars surrounding the main altar. One has a statue on it and Bradwen
prays to the statue. The other 2 steles were defiled and are missing the
idols on them. Place the 2 statues on the 2 steles. Merlin appears, go to him
and a raven cries “Heed the guide”. Pick the raven up and say ‘Come be my guide”. Tell Merlin of
what has happened and Merlin warns about the shadows. Ask about the Hidden King. The Hidden King was once vanished by
Rhiannon and now returns to be Britain’s king. Ask about the Black Knight and Merlin cannot help defeat him
because the shadows hide the knight. Ask about King
Mark and Merlin says to give Celidoin’s cauldron its rightful place
and Mark will be cured. Ask about the Cup. The
Cup was a gift by Celidoin, the fairy of the Green Mound to the first king
of Cornwall and is the sign of the pact between the fairy and Marks
forbearers. The pact was Celidoin promise for King power and fertility for
the land as long as the cup is in Tintagel. But if the cup left the
castle, famine for the land and incurable illness to the king. The Black
Knight took it and the pact was broken. Mark and the people have forgotten
about the pact. Show the bracelet to Merlin.
Merlin said that the wolves’ stands are to block the passage of the
fairies and that the bracelet is a squire’s bracelet given as a symbol of
heir profession. Show him the talisman. The
talisman is from Celidoin, a fairy so beautiful that any man falls
hopelessly in love with her. The prince met the fairy and left for a quest
to forget his unrequited love. Ride the horse and then select Cornwall as
destination.         Castle
– Show the bracelet to the guard and he says
that it belongs to Guyon, the prince’s squire. He lost his mind when the
prince disappeared and is now a hermit in the marshes. Show the bracelet to the king and he said that prince’s squire
comes from the Boar clan, whose loyalty is legendary as the banner attest.
Guyon joined the outlaws. Take the Boar banner standing by the wall. Leave the castle and go
to the Black
Marsh.         
Black Marsh – Walk forward by the reeds and then turn to the top of
the screen instead of the left going to the Black Knight.
Notice smoke rising over the treetops. Move forward and see a bridge to a
small hut. Bradwen thinks it was build by elves or sprites. Go forward to
the end of the marshes towards the smoke over the treetops facing a
clearing across the marsh. Release the raven
from inventory. It flies away and lands on a hut roof – What the body
sees, the mind perceives
. Cross the bridge that appears. Look at the
cabin but cannot enter. Use the boar banner and
Guyon appears. Guyon wants King Mark to suffer and his loyalty lies only
on the Prince of Cornwall. Show him the bracelet
and he will answer you. Ask about the Prince. Guyon was the one who set up the wolves’
stand to stop the fairies from entering. When he told the lovesick prince,
he flew into a rage. The prince went out looking for a love potion to make
Celidoin love him but vanished instead. Show him the talisman and admitted that the Black Knight is the
Prince poisoned by the Hidden King of Britain subject to his will. Guyon
gives a lock of silver hair. Ask him about the
silver hair. The hair is the fairy Celidoin’s.
The hair is automatically joined with the incomplete talisman to make it
whole.          Go to the
Black Knight.  Show him the whole talisman
and he falls down and disappears. Go to the table and pick up the Cup of
Knowledge.         

Chapter
5:
          Castle
– Tell the guard that the black knight has been undone and will not come
anymore. Tell the king that he will soon be cured but as usual he is as
arrogant as ever. Go up to the Rhiannon’s table that is being demolished
up the castle wall. Place the Cup of Knowledge
on the table. Go back to the king and tell him he is cured but the King
wants revenge on all and even with Bradwen’s warning, threatens to join
with the Saxons against the rest of the kingdom. Go back up and drink from
the cup at Rhiannon’s
altar.          
Rhiannon’s prison – Go down and talk to Rhiannon. She would not
remove the curse from the King of the Atrebates to the last descendant.
After informing her of Bradwen’s destiny, she then said that it is
necessary to confront the red dragon, her
brother and enemy and also the Atrebates’ emblem and worst enemy. He is
also known as the Hidden King of Britain. The
red dragon’s imprint is the one by the Atrebates’ castle at the hill.
Rhiannon slew him before Time began because he would have devoured the
whole world. Bradwen’s forbearer was deceived by the dragon and was used
for the dragon’s vengeance. They are now in his belly at the world of
shadows. Ask about the curse. The curse will
cease when Rhiannon is freed after the red dragon is slain for the second
time. Locate the entrance to the Land of Shadows and slay him. Look for
the entrance at the red dragon hill in the Kingdom of the
Atrebates.

CD 3

Quest 9 – The Hidden
King of Britain

Chapter
1:           Kingdom of
the Atrebates:         
Castle
– There is no inhabitants left in his Kingdom when Bradwen
returns. Enter the castle and go to the Great House. Talk to Elad and find
out that they, lead by Gawain went into battle
against the Saxons but lost. Ask about Gawain
and find out that he has been captured by the Saxons camping at Red Dragon
Hill. The ransom was refused. The Britons plan to go to the coast and
travel to little Britain where it is still at peace. Look at the throne
and pray at one of the statue at the right of the room. Ride out to red
dragon field.          
Red Dragon field – Cerdric, King of the Saxons stood on the hill.
The Hidden King told him Bradwen is coming and wants him alive. Cedric
says he is invincible now and has killed a lot of knights. Ask about Gawain. Gawain is crucified by Merlin’s Tree in Arden.     

Arden:          
Merlin’s Tree
– Find Gawain crucified and he asks Bradwen to find the
last treasure of Britain that Merlin has requested. Cerdric has the
treasure and it must be offered to the mother-goddess. Gawain dies and
Bradwen is now
alone.          Black
Rock
– See the ghost of Cadfanan, Bradwen’s father but in reality is
the Dragon, hidden King of Britain. He can only be harmed by Madog,
Bradwen’s son and the red dragon thinks he is dead.  The dragon was
told by the shadows that it is Madog’s destiny to kill him and so he took
over Morganor’s body and killed Madog. Bradwen tells the dragon that it is
Bradwen’s destiny to kill him. The dragon says Rhiannon lost her lance
therefore he is invulnerable and tries to entice Bradwen to join him. Tell
him Bradwen will find  Rhiannon’s lance.
The dragon says that the lance was broken in 3 pieces, each of which was
modeled from a unicorn. Talk about the unicorn and how the dragon tricked the first king
into killing them. The dragon dares Bradwen to enter the Land of the Shadows to slay him. To enter the Land of
Shadows, one must be invited.       
Rhiannon’s Altar – Pick up the 2 unicorn
horns that Bradwen left on the unicorn’s head 20 years
ago.          
Kingdom of the
Atrebates:         Red Dragon
Hill
– Fight Cerdric with a unicorn horn.
Search his body and get the last treasure of
Britain. Time to fulfill the last task for Gawain. Go to Arden.       

Arden:        Merlin’s
Tree
– Place the last treasures of Britain
in the middle of the 3 Standing Stones behind the dolmen. Morgan appears.
Talk to her about what Bradwen found about Rhiannon and the dragon. She
agrees to help in killing the dragon if Bradwen be the last mortal to
enter Avalon. She will close Avalon and leave Britain on its own. The age
of the fairies is done. Fydia and Madog are in Avalon. The dragon will die
and Rhiannon will be free before the rising of the new moon but the bad
moon is nearing and it is favorable to the dragon. Tell her about the
Land of Shadows which is in fact here at Arden.
He who is able to pass between the fangs of the beast will be able to
enter his mouth and will thus discover the land of the Shadows.
Ask
her about Rhiannon’s lance. Rhiannon’s lance
was the axis of the globe. Find the median of the kingdom of Atrebates and
in this spot reforge what has been rent asunder. Ask how to find the unicorn horns. The third horn returned where the tip
of the lance struck the beast. The 3 unicorns were but one, the call of
the 2 will attract the third. Go back to Bradwen’s kingdom.

Kingdom of the
Atrebates:         Red Dragon
Hill
– Look around and note that there are 6 black spots on the ground
and one brown one, located where the eye of the dragon is. Look at the
brown spot and Bradwen says it is where Rhiannon wounded the dragon. Place
the 2 unicorn horns on the brown spot. Pick up
the third unicorn horn that appears. Now to
find the median of the
kingdom.         Castle
Enter the Great house and look at the throne. Place the 3 unicorn horns on the 3 unicorn of the throne’s
back. Pick up Rhiannon’s lance.

Chapter
2:    
Arden:        Black Rock
– Talk to
the Dragon appearing as Cadfanan. He says that Arthur is hurt and that
Bradwen is the last of the Knights of the Round Table. Fight the dragon
using Rhiannon’s lance and win. Look at his
body and find a sharp crystal. The dragon’s
body disappears. Now to find the fangs of the beast and enter the mouth as
Morgan said. Go to the bottom of the screen and pick up another sharp crystal hidden in the standing rock by the lava
pool. Further down, pick another sharp crystal
within the standing rock. Pick the other 3 sharp crystals close to the
entrance hidden in 3 standing rocks. There are 6 sharp
crystals like 6 black spots on the red dragon
hill.          Kingdom of
the Atrebates:         Red Dragon
Hill
– Cerdric’s body is gone as well as the other Saxons. Place each
of the sharp crystal on each of the black spots
on the dragon’s mouth. Corwyn cries warning about being engulfed in the
dragon’s maw. Bradwen is transported to the Dragon’s
realm.           
   

Chapter
3:         Land of Shadows:
 The dragon’s realm is filled with shadows that conceals the
dragon. There are 3 boned bridges and one of them is blocked by fire and
the one at the other end is blocked by wandering
spirits. Corwyn cries warning of the
spirits.           
Middle bone bridge – Enter the middle bone bridge. Walk around the outside paths of the island and look inside
the cages hanging around the rim of the island. Talk to Cerdric, king of
the Saxon caged in one of them. The other cage is empty. Another cage has
the Fairy of the waters. She said that she was captured in Arden by the
Dragon since she cannot return to Avalon. She will be freed if the dragon
is slain. Ask her about the dragon. Fire will awaken the dragon. Ask about the witches.           
Use the middle path across from the bridge, climb to the top of the
island. See 3 witches around a bubbling cauldron. Talk to one of the
witches. They are the guardians of the dragons and watches over him during
his long sleep. Ask about the red dragon. They say that he cannot be found and Bradwen will wander
aimlessly until he dies. Ask about the wandering spirits by the other
bridge. They were 2 knights and she asks if you know them. Tell the witch
about Fate and the
path to the dragons. The witch gives a riddle – Under his yoke, men are
blind. In his domain, all perish. In his realm, everything withers away
and in his land, there is no
law.
           
Talk to the fairy again and ask about the witches. Go around the perimeter
of the island again and pick up skulls of
oblivion, death, night and evil. The witch does
not take any of the skulls. Exit
this island and walk to the other boned bridge blocked
by wandering
spirits.          Right
bone bridge
– Use the skull of evil on the
wandering spirits and they disappear.      Cross
the bridge. This must be where the dragon is since his sigil is on the
ground. Use the 3-flamed sword on the red
dragon sign on the ground. The island is the dragon. The dragon awakens
and magically makes Bradwen’s wound caused by the curse to open. The
dragon waits for him to loose all his blood so that his daughters, the
witches can feast on him.  Corwyn stands alone and powerless to help
Bradwen, who has fallen down.

Corwyn
Playing as Corwyn, go and look at Bradwen. Go to the opposite side of the
dragon’s body and cross another bridge. At the center of this island are 4
silver lanterns on 4 stands. Pick up the 4
lanterns.          Go
the fairy in the cage at the middle island. Talk to her and ask about the
lanterns. One of them is Rhiannon’s lamp that
she used to guide the dead and can cure Bradwen but the other 3 made by
the dragon can definitely kill him. Aha! Go to Cerdric’s cage and use one
of the lanterns on
him.       Go back across the bridge and see
2 wandering souls. Use  2 lanterns on them
and see if they are the correct one. Corwyn is now left with one. Go back
to Bradwen. Use the last lantern on him. He
rises and fights the dragon. The dragon dies.

Master Foulque
explains that Bradwen is cured, Rhiannon is  freed and the curse is
lifted. The dragon falls into the abyss. Rhiannon took Bradwen to the
other world.  Bradwen, Fydia and Madog are reunited and lived
happily. 

Brave men find the
path to the old world to learn chivalry. The Path to Chivalry is within
you and not around us. The Age of the Fairies are done.


Bradwen the
Paladin (White Book)


Quest 6 – The Return of
the King


Chapter
1:          Kingdom of the
Atrebates:         
Castle
– Bradwen returns to his kingdom with the Sword of Truth and the
horn of Melatus, the Black knight he
saved.  King Arthur made Bradwen, King of the Atrebates but according
to the custom of his people, only he who wore the crown is worthy to be king. Bradwen meets Olwen, his
father’s caretaker by the castle gate and she curses him. She will stop
knights-murderers who killed her husband and
will not let Bradwen pass. A Pict with a hatchet killed her husband and
she wants
revenge.            
Lucius’ Villa – Talk to Claudius, who is glad to see him and ask
about the murderer. The Pict is around stealing
food.  Walk towards the child and he cries “Long live Elad, the King
of the Atrebates”. Ask about Lord Elad. The boy
said that Elad is wearing the king’s crown. Ask Claudius about Elad and the crown. He
said that the new king would like a knight like you in his retinue and was
not struck dead when he wore the crown. Looking around, note the Roman
mosaic floor in front of the main house depicting an Emperor and several
stars. Go out of the gate and a Pict ambushes Bradwen. Bradwen kills the
Pict. Search his body and get the hatchet-axe
that killed Olwen’s
husband.         

Chapter
2:
          
Castle – Ask Olwen if she asked Elad
about the murderer. Give her the hatchet. Enter
the castle grounds. Take the left path and talk to the blacksmith about
Elad. Elad ordered that all mirrors in the
kingdom be destroyed after his coronation. Corwyn, the squire does not
want Bradwen to enter his old home with the red dragon on the door. Talk
to the guard by the Great House. Enter the great house and talk to Elad.
He insists that whoever wore the crown without becoming weak is the king.
He asks that Bradwen go to the monks of Magovenium to be sure of the tradition started by St.
Joseph of Arimathea. On the way out, look at the statue on the wall and
note that the ancient gods was not able to protect his family.

Chapter
3:           
Magovenium
: Ride to the Amphitheater (check the map). Talk to the
guard. Enter through the right
door and go to the right side of the platform to the door with a cross on
it.            
Monastery – Enter the monastery and talk to drunken Armenius. Climb
the steps, open door and look at all the side chapels on the left side of
the screen. Joseph of Arimathea drunk from a cup, was imprisoned and hid
the Grail in Britain. St. Joseph’s coming to Magovenium defeating the
devil and founded the monastery. St Joseph’s baptizing The White Lady of
Arden called Epona, the patron of Atrebates. In this fresco second from
the end,  there are 2 crowns. Only God’s chosen can wear the King’s
crown. Any imposter will be subject to divine wrath and will be wounded in
his very flesh. The last fresco depicts – God’s gift protected St. George
from the venom when he slew the
dragon.        Go to the hallway facing
the third to the last fresco and enter the last door on the left. Talk to
Dionicus. Bishop Novelius is not there and no one knows where he is. Ask
Dionicus about the crowns of the Atrebates and
Elad. An old legend about the crowns was
written down by St. Joseph. The manuscript (Cadfanan’s
letter) was stolen by a Black Knight under the devil’s spell.
Elad’s words about kingship were verified by Dionicus. Exit the monastery
and go to the opposite door with a cup inscription across the platform of
the amphitheatre.        
Catacombs – Enter and Corwyn cries warning. Go down the steps, down
the screen, right to archway, down the screen and forward to another
archway. Go down the steps and enter the first alcove on the right. Look
at the tomb and then blow the horn of Melatus.
Talk to Melatus and ask about the letter. He
gives the letter he stole and his debt is
repaid. Read the letter and find out that the
devil made a false crown given to a second son and with the use of Solomon’s mirror,  St. Joseph revealed the
deception. Bradwen cannot exit the devil’s pit. Pray to St. Epona and will
be transported to the chapel at the
monastery.        
Monastery – Ask Dionicus about the Mirror 
of Solomon. The mirror is in the monastery and it reflects the soul
not appearances. Pick up the mirror by the door and show it to him. He
does not know. Go to the hallway and enter the next door. Talk to blind
Cornelius. Show him the mirror and he says he cannot see it. Pick up all
the mirrors in the monastery and show it to
Cornelius one at a time. There is one in the room,  at the end of the
main hallway, 2 in the chapel, Novelius’ office (door in hallway by the
main door) and by the drunken monk downstairs. The mirror at the end of the hallway shows Cornelius a
dazzling light. Go back to the Kingdom of the
Atrebates.        

Chapter
4:          Kingdom of the
Atrebates:         
Castle
– A guard stands inside the great House. Talk to Elad and he
still would not give up the throne. Show Elad Solomon’s Mirror. The crown disappears and Elad
admitted making a deal with the devil and deceived the people. Bradwen
pardons Elad. Ask Elad about the crown and find out that the monk
responsible for the true crown sold it for a jug of wine to the devil.
Hmmm! Talk to the guard outside the Great House and the blacksmith. They
want Bradwen as King when he finds the
crown.           
Magovenium:         
Monastery
– Talk to drunken Armenius about the crown. Novelius entrusted him with the coffer but he
sold the coffer to the blacksmith of Magovenium
for a jug of wine. The blacksmith hanged himself after getting the crown.
The blacksmith’s widow might know but she left. Go outside the theater and
ask the guard about the blacksmith of
Magovenium. He made a pewter pot for the guard.
          

Kingdom of the
Atrebates:         
Castle
– Ask the Atrebates blacksmith about the blacksmith of Magovenium. He told Bradwen that the
blacksmith’s widow moved to the new village at Lucius’
villa.          Lucius’
Villa
– Talk to Claudius outside the gate. Enter and talk to the woman
by the left side of the main house. Ask her about the blacksmith. The blacksmith buried the crown and
hanged himself because the devil tormented him. Open the door behind her
and enter. Look at the pewter sword and ask the
widow about it. She gives Bradwen 3 pewter
swords that were the last work of the blacksmith. Go back inside
and pick up the fourth sword of
pewter.            
Magovenium:         
Blacksmith shop
– Place the 4 swords one at
time on the smithy’s forge and pick up each steel
plates hidden underneath the pewter. Read each steel plate in
inventory. The East is in the dragon’s eye. The blossoming tree in the
midst of the ruins shows the South. The North Star will guide you. The
West bows down before the cross of the dragon killer.
Now, a-hunting
we will go!         
Ruins – ride down to the crossroad, turn to the left of screen and
then left to the side street. Enter the ruin’s arched way and to St’
Joseph’s Tree. Pick up a piece of the Atrebates
crown from the ground under the tree.
           Kingdom of
the Atrebates:         Red Dragon
Hill
– Go to the brown circle of the Dragon’s head and pick up piece of the Atrebates
crown.          St.
George’s Hill
– Walk to the clearing on the left and go to the altar
and pick up piece of the Atrebates
crown.          
Lucius’ Villa – Go to the mosaic floor depicting stars and pick up
piece of the Atrebates crown. Corwyn cries that
you have all the pieces of the crown and go to
the castle for the
Coronation.           
Castle – In the Great House, face the throne and wear the crown. A fearsome wound appears on his left side and
struck him down. His hair changed to white. Lady Lutisse, Bradwen’s wife
arrives, prays to St. Epona and to care for
him.

Chapter 5:
         
 Kingdom of the
Atrebates:         Castle

Talk to Lady Lutisse about the care of his wounds she has given. Bradwen wants to convene a
meeting of the noblemen but Lady Lutisse wants that work to be given to
Novelius. Sir Lancelot visited while Bradwen
was sick and is off on an adventure. Talk to her about Novelius, Wounds, St. Epona and the crown.
Bradwen looks like his uncle Novelius now with
his white hair. St. Epona, patron saint of the
Atrebates will heed her prayers because the wounds are resistant to her
healing. As long as Bradwen holds the sword of truth, the God thinks he is
worthy of it. Bradwen wants to relinquish the crown because he is wounded
when he wore it. Go outside and talk to the guard, he wants you to
renounce the crown since you are not worthy. Talk to Armenius sent by
Dionicus. Ask him about Novelius. He has a
letter from Novelius. Go away from Armenius
(Armenius is not shown on the circle on the bottom left) and read the
letter. Novelius is at Forest of Arden and
warns that Bradwen not wear the crown until he gets back. Bradwen can
still refuse the crown and live peacefully.

Arden:          
Kings’ Mound
– Take the road guarded by a black bird. Find Novelius
fighting with phantoms. Corwyn cries
that  flames surrounds Novelius and the fairies have bewitched him.
Use the sword of truth on Novelius and he is
set free but the sword disappears also. The ancient Kings were angry with
Novelius and he cries when he realizes that Bradwen has worn the crown. Be
the valiant knight and learn to be king that is your path. Ask about the
sword of truth and the crown. Novelius explained that the disappearance of
the sword is God’s test and the wound he received is the assurance that he
is worthy to be king because it is a sign that he got the Atrebates Kings’
curse. The curse was because one of their
ancestors freed the dragon that St. George killed and the kings and his
descendant were cursed for the suffering the dragon has caused. Talk
about Bradwen’s wounds, white hair and the red
dragon. All of them, father, uncle, brother and even Madog, if
alive are wounded. Talk about Morganor and
Novelius. Morganor shaved his white hair to
hide the sign of the curse and he hated Bradwen because he was spared the
curse. Only Bradwen and Novelius know of the curse now. Novelius advises
Bradwen not to let anger and hate fill him. Ride back to Merlin’s Tree and
take the other open road at the other side of the tree.

Chapter
6:
         Black Rock
Go to the left side of the tower and enter the central portion of the
Black Rock by the bridge. Go inside and see a sword made from the black
rock itself and the devil. Bradwen is trapped inside. Talk to the devil.
The devil taunts Bradwen on his hair and wound. He also taunts about
Arthur’s possible rejection of him and Lancelot’s unfaithfulness by
meeting Guinevere at Arden. The devil wants
Bradwen to kill Lancelot and he will make him King of Britain. Pick up the
devils’ sword and the blockage was removed and
the devil disappears. Leave and
ride.          Lake of the
Offerings
– Enter the adjacent open road by Merlin’s Tree and ride to
the Lake. Talk to Lancelot, who is glad to see Bradwen well. Ask him about
Guinevere. Do not fight him but persist on
asking about Guinevere. Lancelot finally
admitted that he asked a final meeting with the Queen and since he is in
love with the Queen, he will leave Britain forever. Bradwen apologizes
about his mistrust because of the devil’s trickery. Lancelot says that
Novelius is waiting for Bradwen at Magovenium.         

Chapter
7:          
Magovenium:
        
Monastery – Go to the room by the hallway close to the door by the
stairs. Enter and talk to Novelius. Tell him about the devil’s trickery.
Hallelujah! Bradwen passed the test. All the cursed ones are tested by the
Devil. Morganor accepted the pact with the devil. Talk about the curse and the sword of
truth. Bradwen does not want to passively accept the curse, he is a
knight and a fighter. God took the sword of truth back and it could have
been used to find out about the curse. Go out and enter the chapel door at
the main hallway. Pray at the altar to have the sword of truth
back.           
Amphitheatre platform – Go to the large opening on the floor where
steam and fire are seen. Drop the devil’s sword
back to the devil’s pit. The door to the catacombs
opens.          
Catacombs – Walk down until the devil’s pit. Enter the opening
across St. Epona. Walk to the other side and pick up the Sword of Truth in front of the entrance to hell. Go
back to St. Epona’s statue. Look at the statue and see that it is bleeding
on the left side as Bradwen’s wounds are. Use the
Sword of Truth on St. Epona and hear her say that she was the one
who cursed the kings of the Atrebates to suffer body and soul. Bradwen is
then transported to the chapel at the
Monastery.        
Monastery – Tell Novelius about St.
Epona. Novelius still wants Bradwen to just passively accept the
curse. Since God heard the first prayer, go to the chapel altar and pray
again. Bradwen asks for a sign since he already rejected the devil twice.
Exit the
monastery.           
Amphitheatre platform – A big white stag with a cross on its antler
has entered the city. Look at this sign that Bradwen asked for – the white stag of
Arden.          
Monastery – Tell Novelius about the white
stag. God sends Bradwen a guide. Novelius finally accedes that
Bradwen is right in not conceding to the curse. Follow the stag for it is
the messenger God sends to knights in distress. Go back and talk to the
stag. Follow the stag and it will bring Bradwen to the Forest of
Arden.

CD 2

Quest 7 – Morgan’s
Wrath

Chapter
1:           
Arden:          
Merlin’s Tree
– Greet Merlin and he says that Bradwen is not welcome
in Avalon but it is his destiny to pass through the Other World.
Morgan has launched a great hunt for Bradwen. Ask about the Great Hunt – A pack of wolves lead by the Horned Man.
Perhaps Bradwen’s dark side will help him in this. Take the path adjacent
to a crystal and the one guarded by a horse. You can see the white stag
there. Follow the map to the Great Hunt
area.           
Great Hunt Area – Talk to the Horned Man. Ask him about the Great Hunt. He will give 1000 heartbeats and then he
will release the wolves for Bradwen’s soul. Immediately or else Bradwen
will be killed, go to Black Rock – check the
map.       Black Rock – Go to the
center of the posts at right side of the screen. Hear a call for help.
Talk to the man entrapped inside a crystal. It is the doppelganger, the
one that has taken the features of Bradwen and Lancelot before. Use the
sword of truth on the crystal to find out if he
is saying the truth and then free the doppelganger. Ask him about the
great hunt. The Doppelganger while wearing
Bradwen’s appearance will lure the pack and when the horn sounds, the way
will be open to Bradwen. Immediately, ride the horse and go to the Great
Hunt – look at the map. Go forward to the Stone circle and see the white
stag stand at the center of the circle and disappear. Corwyn refuses to
follow Bradwen to Avalon. Walk to the center of the stone circle and
appear later in Avalon. Wonder how the horse got there?

Chapter
2:          
Avalon:           First
island
– Talk to the Pied Knight. He would not listen, so fight him.
No one is the winner. Talk to the Pied Knight again about the Pied Knight. Bradwen will know him if he pierces the
knight’s armor. Bradwen’s conscience makes him choose from the white or
the red stone, i.e. to kill the knight or not. Choose the white stone and
tell the knight that Bradwen is not a murderer. The way is still blocked
by the fire. Go back to the first bridge. Talk to Morgan, who is surprised
that Bradwen did not recognize her. Ask her about the curse and the Pied Knight.
After the talk with Morgan, Bradwen is transported to the Tower of the
Wind.

Chapter 3:
         Tower of the
Wind
– Climb the tower and talk to Dwella, Queen of the Fairies of the
Heavens. Tell her about the Pied Knight.
In order to pierce the armor of the knight, Bradwen must guess who
‘you’ is in the riddle. I will always be younger than
you. Love me or hate me, we will always be bound to one another.
Without you I would not exist, but if you disappear, I will
exist yet.
Go to the right red circle and automatically arrive to the
top of one of the side tower. There are the brown stone of the earth,
white stone of the eldest child and the red stone of the father. Remember
that the riddle asks who are you. Pick up the
red stone of the father. Cross to the other side and give Dwella
the red stone of the father. Dwella revealed
that you, Bradwen are Pied Knight’s father. Madog, who the fairies took in
grew quickly since time is different in Avalon. That knowledge pierces the
Pied Knight’s armor. Go down the tower and see
Madog.           Talk to
the Pied Knight about Pied Knight. Madog wants
proof that Bradwen did not abandon him. Give Madog the
sword of truth so that he can use it on Bradwen. Madog refuses to
go with Bradwen but he gives 2 magic grains
that can resists even Morgan’s magic. He also tells Bradwen to go to the
Prison tree and find an ally.

Chapter
4:
        Prison tree – Talk
to the winged fairy and Bradwen makes a comment about not seeing any mark
of God here. Walk to the base of the Prison Tree and look at the stone
slab inscribed with the mark of St. Joseph. Ask the fairy about the stone slab. She refers Bradwen to Kael at the Tower
of the Spring.         Tower of
Source
– Talk to Kael, Queen of the fairies of the waters and ask
about the stone slab. She will give you a cup
with magical water to see what the slab conceals. The slab is held by the
roots of Yrsghul, the Prison tree. To give Bradwen the cup, he must bring
6 of her complementary sisters found on the outer small islands together.
Talk to the sisters, starting from the sister on the outer island at the
left side going counter clockwise. The first says I am she who moulds
inanimate things. I mould, I sculpt, sometimes I destroy
. The second
sister says I am she who waters whatever bears hairs, feathers or
scales
. The third says I am she who nourishes that which grows and
needs the sun
. The fourth says I am bound to the animals. Find
my twin and giver her this – a sign of the
animal. The fifth says I am bound to the stones and the
rocks
. Find my twin and give her this – a sign of
a vegetable. The sixth says I am bound to the plants. Find
my twin and give her this – sign of
mineral.          Give
the sign of mineral to the first sister who
moulds, the sign of the animal to the second
sister who waters whatever bears hair and give the sign of the vegetable to the third sister who
nourishes that which grows in the sun. Talk to Kael and she will give the
cup of spring that will make the tree grow. The
fairies disappears.

Chapter
5:       Prison Tree
– Use the Cup of Spring on the stone slab. Walk to the opening
made by the disappearance of the stone slab. Bradwen finds St. Joseph who
seems asleep or under a spell. Use a magic bean
on St. Joseph. It has been a long time since Morgan has imprisoned him
under the tree. Talk to him about the curse.
St. Joseph explains that St. Epona cursed Bradwen ancestors, who were
misled by the devil because they killed the sacred unicorns. He falls back
asleep. Use the second magic bean on him again.
Ask him about how to remove the curse. With
little information said, St. Joseph falls back to sleep. Talk to Madog
waiting outside and he transport Bradwen to meet with
Morgan.         Central
Island
– Ask Morgan about talking more with St.
Joseph. St Joseph came to Avalon to convert Morgan, so was
punished. To allow more time to talk to him, Morgan ask that Bradwen put
things in place in the labyrinth. Walk to the central brown circle and
enter the
labyrinth.          
Labyrinth – See a standing stone at the last ring of the maze. Go
forward, left, up on the second opening, right, down and right and pick up
a red stone. Go back to the standing stone at
the last ring in the maze. Place the red stone
on the standing stone. Get transported close to another standing stone at
third outer ring. Go down, left, up, right, down, left, up, right
and  pick up a yellow stone. Go back to
the standing stone and place the yellow stone
on it. Bradwen is now transported on the fifth outer ring close to another
standing stone. Go down left, up, left and pick up the
gray stone. Place the gray stone on the
standing stone and get transported to the center ring. Pick up one of
Morgan’s grains. Bradwen is transported to the
Prison Tree island.         
Prison Tree – Go to St. Joseph and use the grain on him. Ask about the curse and be told that only St. Epona can lift her
own curse. Find her and beg her forgiveness.  Follow the white stag
and it will lead to the Ciborium of Divine
Grace. Ask about the Ciborium. Lift the
Ciborium to the lips and know where St. Epona is. Do not lose hope. Go
outside and talk to Madog again. He would not go with Bradwen and will
send him back to the world of men. Bradwen will now look for the White
Stag and the Ciborium.

Quest 8 – Ciborium of
Divine Grace

Chapter
1:         
Cornwall:      Edge of the Woods
– Talk to a
happy but aged Corwyn, the squire. Corwyn is happy to hear about
Madog and says that Lady Lutisse’s love is still ardent. Arthur is at war
with Lancelot who ran away with Guinevere. Saxons are taking advantage of
the dissent. They are in Cornwall near Tintagel Castle. Lady Lutisse
called Corwyn from Arden to help run the kingdom. Dionicus wanted a relic to heal King Mark. Corwyn was robbed of the
relic by the Servants of the Horned Snake and
was run off by a phantom. The phantom is by the end of the woods and
prevents anyone from leaving.  The Horned
Snake is a creature from Hell and that it is God’s punishment for
Mark’s sins. It is in Tintagel Castle. Ask about Mark and the Ciborium.        
 Woodcutter’s hut – Ride straight to the woodcutter’s hut.
Talk to the woodcutter who remembers Bradwen as the one who vanquished the
ogre. The Knights have been killing each other and leave Britain to the
mercy of the Saxons. Ask him about the Horned
Snake. The Horned Snake’s disciple threw the Tintagel crosses in
the brambles in the forest. Go to the bushes just across the door of the
hut and pick up the cross. Go behind the smoke
hut in the back and pick up another cross. Pick
up the third cross by the far side of the hut.
Ride back and keep to the right to get to the main
road.           Main
Road
– The path is blocked by a ghost and a wall of fire. Talk to the
ghost. Leave him and take the road to the left of the screen. Ride and
find a shield and a body. It is dead Cymerill and his shield.  Go back to the ghost at the main road
and show him the shield. The ghost now
remembers his name – Cymerill and is grateful. Cymerill extracts an oath
from Bradwen to save King Mark and allows him to
pass.          
Castle – Ride and then turn left where there is gray stag on a
rise. Talk to the man who is a follower of the big horned one and he
allows Bradwen to enter at his own risk. They have run off the King’s
guards.          Look around
the castle courtyard and see 3 headstones at the rear of the castle tower.
Bradwen reads Christ crucified between 2 thieves. St. Joseph’s headstone is in the subject. Place the 3
crosses on them. Pray at the center headstone and get a head of a horned
serpent.           
Enter the great hall of the castle and see the Great Horned Snake. Talk to
the Horned Snake. The snake mentions that it was Bradwen who converted
Tudglyd, the ogre. Bradwen repeated his oath to take the throne back and
return it to King Mark. The Horned Snake laughs it off as it did with
Cymerill. It mentions that it took back what men stole from him. The snake
would not talk until Bradwen kills one of its servants, with black armor.
Ask about the Black Knight. The knight tried to
steal its cauldron and he and his followers were expelled and hid in the
swamp. Exit and leave the castle but the guard attacks. Bradwen kills him.

Chapter
2:           Village

– Find the white stag in front of the church gate. Talk to blind
Cornelius. His healing attempts have not cured King Mark. Enter the church
and talk with Dionicus. Novelius died 5 yrs ago. Bradwen’s presence gives
him hope that they can care for King Mark and drive the Horned Snake out.
Ask about the  Horned Snake, King Mark, relic
and the Ciborium. The Horned Snake, who
serves the devil came from the marshes and is very old. King Mark’s sins
caused God to free the snake and the snake bit the king and no one can
cure him of the venom. Tell Dionicus of the stolen relic, St. Joseph’s
hand and Dionicus believes that it would have been ineffective anyhow for
curing King Mark. The Horned Snake stole the Ciborium, an antique treasure
of the fairies and without the ciborium cannot rule over Cornwall. Before
the arrival of St. Joseph, the Snake ruled and the blood of its victim was
poured into the cup and all its disciple drink from it. St. Joseph had
transformed the cup that whoever drinks from it will have his sins
pardoned.           
Look at the statue of St. Joseph of Arimathea on the left side of the
church and read that The sins of a bad king will reawaken the beast,
but a fisher king will come and bring down the creature of the devil
.
Look at the tomb on the floor at the center of the floor – Here lies
Meriadoc, first Christian King of Cornwall.
. Ask Dionicus about St. Joseph, tomb and King Mark. Dionicus repeats the prophecy and thinks
that King Mark can benefit from drinking from the ciborium. After St.
Joseph vanquished the Snake, he gave the crown to a child who became the
first Christian king of Cornwall, he and his descendant were the guardians
of of the Ciborium.   

Chapter
3:          Village Church
(continued) – Go to the retable on the right side of the chapel and
read Only the valiant will break the chains of falsehood. Ask
Dionicus about the retable, the gifts of the
angels. St. Joseph had a vision and Dionicus repeats the inscription on
St. Joseph’s statue about the bad king, awakening the snake and the fisher
king. The retable was to guide the king in his combat but no one can open
it. The bar locking it is indestructible. Go back to the retable and use
the sword of truth on it. The retable opens and
read Surrounded by the 2 thieves, you will pray to the son of God.
We did that already! Use the head of the horned snake
on the retable. The Horned snake had drawn the inhabitants of
Cornwall into devil worship. The blood of sacrificial victims was poured
into a large cauldron
. Turn to the left door of the retable and read
the parchment. You shall cut the tongue of the devil. Ask Dionicus
how to cut Devil’s tongue. He does not
know.           Go
outside and ask Cornelius about Devil’s tongue.
The plant, devil’s tongue is venomous and to never touch it with bare
hands. It grows in the marshes of Cornwall.  Ask the way to the Black Marshes of Cornwall. Cornelius does not know
since he is not from
here.           Go
around to the back of the church and enter the opening by the chickens to
the Blacksmith shop. Go to the barrels by the wall on the left side of the
opening and pick up the blacksmith’s tongs.
Talk to the man standing outside by the fence about the Black Marshes. He warns not to go there since the
horned snake was born
there.           Go the
opening behind Cornelius and talk to one of King Mark’s guard. Ask him the
way to the Black Marshes. The guard gives a map
to the marshes. Go to the stone hut on the left and see King Mark lying on
a pallet. Exit and look at the map. Go to the Black
Marshes.

Black Marsh
Corwyn noted the flag above the black tent. Go around and turn to the
right. Look at the Celtic cross and read –
In accordance with divine will, St. Joseph crossed the marsh and drove
the evil spirits out
. Go farther left and see a bridge to a hut that
Bradwen thinks belongs to dwarves. Continue to the left of the screen and
see the flower, Devil’s tongue. Use the blacksmith’s
tongs to pick up the devil’s
tongue.         
Village – Go to the retable and use the devil’s
tongue flower on the left door with the parchment. A painting
appears and a new parchment is seen on the right door. The new
painting reads – The devil promised the horned snake that no man come
from the womb of a woman could defeat it, but the devil is deceitful
.
The parchment on the right door reads – The hand of St. Joseph blesses
the innocent
. We need to look for the relic then. Go to St. Joseph’s
statue on the other side and pray to him. Take St.
Joseph’s staff that appears.

Chapter
4:
        Black Marsh – Go
back to the Celtic cross of St. Joseph and use St.
Joseph’s staff on it. Your faith will be your guide. A path
appears to the island of the Black Tent. Cross and talk to the Black
Knight, who is a follower of Melatus. Bradwen asks for the relic, St.
Joseph’s hand. Ask him about the Horned Snake.
He was deceived by the devil. Bradwen asks him to serve Arthur and to do
chivalrous deeds. The Black Knight gives the relic and serves Arthur. Cross the bridge and see a
young boy at the small hut but he runs
away.          
Village – Use the relic on the right
door of the retable. A new painting appears on the door, which reads –
St. Joseph discovered a child who was a captive of the Horned Snake.
The child has been pulled from the belly of his mother. Armed with a
wooden sword, the child killed the snake, which withered away. St. Joseph
made the child the first Christian king of Cornwall
. Pray at the tomb
of the Meriadoc and pick up Meriadoc’s sword
that is the answer to the prayer for
help.           
Black Marsh – Go back to the boy’s hut. Place Meriadoc’s sword on the table by the wooden horse.
Bradwen calls the wild boy. Talk to the boy. He said that he had a dream
where Bradwen gave him a sword and a crown. He will follow Bradwen. The
boy is the son of King
Mark.          
Castle – The prince follows Bradwen to the castle. The boy kills
the Horned Snake and before the snake dies, it cried warning about the
Hidden King. Pick up the ciborium. Talk to the boy and he wants to stay and
not follow Bradwen.

Chapter
5:           Village

– Tell Cornelius that Cornwall is free of the Horned Snake and he can
return to Magovenium. Talk to Dionicus in the church about the Horned
snake and send a message to Lady Lutisse. Ask Dionicus about the Hidden King. One of the disciples of the evil one was
promised Britain by the devil and it is this one that called himself the
Hidden King. Ask how to use the Ciborium.
Turn towards He who blessed it and drink. Talk to King Mark’s guard
in the area behind Cornelius about getting rid of the servants of the
horned Snake. Enter the stone hut on the left and use the Ciborium on King Mark. Talk to him about God
forgiving him, his son that he had condemned defeated the snake and that
his kingdom is free. King Mark gives the royal seal of
Cornwall for his son and relinquishes the crown making his son
king. Mark will join the monks.       
Castle – Give the royal seal to the
young Prince. He asks Bradwen to stay as his guide but Bradwen refuses
because of his quest. Go by the place close to the wall where the Bradwen
picked up the Ciborium and then use it.

Chapter
6:          St. Epona’s
prison
– Use the sword of truth on the
flames that blocks the path. Go down and Master Foulque explains that this
is St. Epona’s prison. Find the white stag at the floor of the prison.
Pray to the stag, who transforms to St. Epona. Implore pardon from St.
Epona and she grants it removing the curse. She tells Bradwen to drink
from the cup and he will get out of the prison but only the death of the
Hidden King can free her. Bradwen’s ancestor was tricked into believing
that he will be immortal if he kills the sacred unicorns. Bradwen gives
his oath to fight until he or the Hidden King dies. Ask about the Hidden king. It was born of the shadows, wants sole
rule of Britain, was vanquished by her and then St. George sent it back to
the shadows after St. Epona’s death. It has the appearance of a dragon.
Ask about the dragon. She asks Bradwen to go
back to his kingdom, drink from the cup and beware of the falsehood used
by the devil. Move away and drink from the cup.

CD 3

Quest 9 – The Prophecy
of the Shadows

Chapter
1:          Kingdom of the
Atrebates:         
Castle
– Bradwen returns to his kingdom. Talk to the guard. Enter the
Great House and talk to Elad. Elad says that Lady Lutisse is in the
monastery in Magovenium since Novelius’ death. Arthur’s kingdom is falling
apart and Lancelot has taken arms against the king. Mordred is laying
siege to Magovenium. Bradwen asks Elad to stay until he has finished his
task. Ask about Mordred and the dragon. Nai the hermit is
the only one who knows how to enter the amphitheatre. The priest in Lucius’ village might
know where Nai is. Bradwen tells Elad that he must kill the dragon and the
first sign of the dragon’s reign is
here.           
Lucius’ village – Ask the priest standing by the tree about Nai. Nai is in Dragon’s hill and has taken a vow of
silence until Novelius’ vision has been
fulfilled. Novelius’ vision is painted in a fresco in the
castle.        Castle – Enter
the Great House and look at the blue starred fresco by the wall. Apocalypse, St. John talks about a white haired man
wearing a robe to his ankles, armed with a sword, wearing 7 stars and a
golden belt. Look at the fresco again and Corwyn says, it could be you My
Lord, same hair, the
sword….          St.
George’s Hill
– Nai ignores attempts to talk to him. 
         Lucius’ village
Talk to the priest about the Apocalypse. The
priest agrees about the hair and the sword except for the gold belt but he recalls the 7 stars of the mosaic
here at the villa. Go to the Roman mosaic floor in front of the main door
of the house. Pick up the 7 stars from the
lower portion of the mosaic.      
Castle – Talk to the blacksmith on the left side of the Great House
about the golden belt. The blacksmith has a
golden belt passed down through his family and
gave it to Bradwen.         
St. George’s Hill – Nai now would talk and exclaims that the vision
is true, God’s messenger is here and the Angel of truth is with him.
Bradwen gives Nai the golden belt and to tell Elad to gather an army to
lift the siege of Magovenium. Ask Nai about Novelius’ vision. Nai gives a stick, which is a part of Novelius’ bishop’s staff. Ask about entering
the amphitheatre. Nai gives a map of the city to Bradwen. Move away from Nai and
then look at the map.

Chapter
2:        
Magovenium:          
Monastery
– Bradwen is inside the monastery. Go to Novelius’ cell and
find Lady Lutisse. After a warm welcome, tell her about the curse done by
the red dragon. Lady Lutisse reminded Bradwen
that St. George killed the dragon in Uffington, the castle area and used a
lance as weapon. The lance is from wood of Christ’s cross and the iron’s
point was from one of the nails from the cross. Dionicus knows more about
the lance but is a prisoner of Mordred in the city. Lutisse gives a cross, which is a part of Novelius’ staff given by
Novelius for Bradwen. To get out to the city, Lutisse gives the key to the postern gate. Go down the stairs and use
the key on the postern door opposite the main
monastery door. Open and exit to the
city.          Ruins
Look in the map to get to the ruins. A guard is standing by the ruins.
Talk to the bragging guard and Bradwen kills him. Enter the hut at the
bottom of the screen and talk to Dionicus in the back room. Talk to
Dionicus about the dragon and St. George’s lance. Dionicus gives another part of
Novelius’ staff making Novelius’ staff whole.
The lance was entrusted to the kingdom’s first priest and the prophecy about it says At the heart of the saint,
the instrument of faith takes hold. God projects his strength and the
Saints weapon is revealed
. Go to the Kingdom of the
Atrebates.           
Kingdom of the
Atrebates:          St.
George’s Hill
– Look at the inscription in front of the cross. Here is
where St. George struck down the dragon. The O in St. George is a heart.
Use Novelius’ staff on the inscription. Pick up St.
George’s lance. A voice is heard saying – The fifth bowl will open the door of the kingdom of the beast
for you
.

Chapter
3:        
Magovenium:          
Monastery
– Enter the monastery by the postern gate since the main
gate is locked. Talk to Novelius in his cell about the fifth bowl. Novelius says it means the 7 bowls of the
plague and he gives a manuscript – Dionicus’
letter to explain it. Move away from Dionicus and then read the
letter. The bowls will be returned to man
when the 7 frescoes are united. The first is hidden in abundance. The
second fresco is hidden at the feet of Christ. The third fresco hides
where the weapons were. The fourth fresco is hidden near the blessed
fruits. The fifth fresco is hidden where the devil was defeated. The sixth
fresco is hidden under the king. The seventh fresco is hidden under the
Emperor’s
face
.           
Now, we look for them. Go to the chapel and pick up the second fresco on the altar by the cross. Place the
second fresco on the second alcove wooden wall.
Go down the stairs and pick up the first fresco
from the barrels (abundance) by the stairs. Go outside through the postern
door, enter the main door to the amphitheatre and go to the
catacombs.       Catacombs – There
are several guards around but Bradwen is ignored. Enter the catacombs,
down the stairs, left and pick up the third
fresco. There are weapons by the wall. Go down to the devil’s pit
via the archway on the right of the screen, down and then through the
archway to the right. Enter the opening across St. Epona and go to the
opposite side. Pick up the fifth fresco in
front of the entrance to hell. Bradwen can go out from here through the
archways now.      Ruins – Pick up the
fourth fresco from the foot of St. Joseph’s
tree. Now go to the Kingdom of the
Atrebates.         
Kingdom of the
Atrebates:          Castle
– Talk to the guard. Enter the Great house and pick up the sixth fresco by the
throne.           
Lucius’ village – Pick up the seventh
fresco by the Roman mosaic on the floor. Time to place them back at
the monastery.          
 Magovenium:          
Monastery
– Enter through the postern door. Place the frescoes in their proper places on the side alcoves
of the monastery. After placing the seventh fresco, an earthenware bowl
appears in all the alcoves. Do not pick that up. Go to the fifth alcove
and pick up the light colored fifth bowl. Exit
the monastery and it is time to enter the kingdom of the
beast.         Kingdom of the
Atrebates:          Red
Dragon
– Pour the contents of the fifth bowl on the eye of the red
dragon. Before Bradwen goes to the kingdom of the beast, Nai arrives with
news from God. Lady Lutisse is with God and the angels now. Bradwen sends
his love to her in heaven.

Chapter
4:            
Kingdom of the Beast: 
Look around and see 3 boned bridges and 3
shades. Talk to the shade of Cadfanan, Bradwen’s father, close to a lava
pool entryway. His soul is the prisoner of the dragon. Ask about the dragon and Cadfanan knows only that an island
contains his real name and an ogre stands guard by the bridge. Talk to the
shade of Tudglyd, the sorcerer ogre blocking the right bridge. Tudglyd
cannot touch Bradwen but he can block his way. Ask him about the dragon. The dragon has been asleep for centuries and
will wake when his name is called from the Dragon stone. Talk to the shade
of Cymerill by another opening to the lava pool. The dragon has devoured his soul. Ask about Tudglyd and he talks about the promise – Tudglyd promised to serve the Christian God
and cannot hinder the quest.      Middle bone
bridge
– Walk around the rim of the island and see 2 empty cages and a
cage with Novelius’ shade. Ask him about the dragon. Novelius says there are some stones placed on
an island. Some are the teeth of the dragon. If observed in the correct
order, the name will be revealed. The teeth are different from the
other stones. The first, second and third can be found in the outer
circle. The fourth is near the third tooth on the middle circle. The fifth
and sixth follow on the middle circle. The last is aligned with the first
but is on the inner
circle
.           
Left boned bridge
– The island is full of inscribed standing stones.
Go to the stones in the outer circle on the
right side if the bridge is on top of the screen. Look at the stone and it
will light up. Continue looking at the stones and if it is the right
stone, it will light up. After the 7th stone, pick up the name of the dragon from the center of the inner
circle.           
Right boned bridge – Remind Tudglyd of his promise. Tudglyd agrees and let Bradwen pass. 
Cross the bridge and see the sign of the dragon on the ground. Awaken the
dragon by calling him, place the name of the
dragon on the sigil of the dragon. Osthryth! With the use of St.
George’s lance, Bradwen slew the dragon.

Chapter
5:
           When
the dragon was defeated, Gwen, Bradwen’s first wife appears and accuses
Bradwen of abandoning her in search of power and allowing her to be killed
by the witch. Gwen was told this by Madog, their son who appears too and
was responsible for bringing her there. Bradwen gives her the sword of
truth so that she will know that what she accuses him of is not the truth.
Gwen strikes Bradwen a heavy  wound. Madog changes into the devil and
laughed at him for he has tricked Gwen in believing her son, she loves so
much. Bradwen calls Corwyn and asks him to pick up the sword.

Playing as Corwyn,
pick up the sword by standing close to Gwen,
who is crying now. Give the sword of truth to
Bradwen. Bradwen knights Corwyn, so he kneels before no man. Bradwen gives
the sword to Corwyn and asks Corwyn to get him
the lamp of St. Epona, the only thing that can cure him. Walk to the other
bridge at the other end of the island. On the way pick up an ice crystal. The bridge is blocked by Melatus, the
Black Knight. Do not fight him. Use the sword of truth
on Melatus to find out his weakness. Melatus says that his weakness
is water but in the sea of lava, there is no water. Talk to Melatus again
and fight him using the ice crystal-dragon’s
tear as weapon. Walk across the bridge and find a shield, a cup , a
crown and Rhiannon-St. Epona’s lamp. Get the lamp and use it on Bradwen. Master, you cannot be
dead. Bradwen is healed.

Master Foulque
explains that with the death of the dragon, St. Epona was freed. The world
of shadows fell with the dragon in the abyss of the void. Only Arthur and
Merlin can reunite the kingdom and they are both dead. Bradwen survived
but the Saxons overtook Britain and were victorious. Bradwen took the
remaining knights and became the King of Little Britain. He taught
Arthur’s principles of Chivalry to his companions and that is how it was
handed down to the present. Lancelot and the other knights are real since
they exist in you heart.

Here ends the Tale
of Bradwen, Knight of the Round table and King of the Atrebates.


This document may
not be distributed without express written permission of the author and
the content may not be altered in any way.


For Questions or
Comments on this Walkthrough,
Please write to: MaGtRo


Copyright ©
6/2002  MaGtRo