Agon Ancient Games Of Nations

by Zurreen Zubairie about 67 minutes to read

AGON – Ancient Games of
Nations

The Mysterious Codex


(A Walkthrough by
Zurreen Zubairie)

Copyright
© 2007.  All rights reserved.

(Please,
note that this walkthrough is copyrighted.  Hence, any attempt to
reproduce anything from this walkthrough will be severely
punished to the maximum extent of the law.)

The Walkthrough

            This is a
point-and-click game.  Please, note the following explanations for the
shorthand references I have made throughout this walkthrough.

Close
up on…
  Click on the
magnifying-glass icon appearing on an object or location, to get a close up of
that object or location.

Flip
through the pages…
  The
pointing finger is one of the ways to interact with the objects in this game. 
The other is the gear icon.  In the case of pages of a book or document,
however, you "flip through the pages" of a book by clicking on
the big black arrows (pointing left or right, depending on whether you would
like to read ahead or go back to an earlier page), but you must click on the
pointing finger to "flip through the pages" of a letter.  In
short, just click on whatever icon might have been provided to "flip
through the pages" in question.

Look/Turn
up, down, left, right, etc….
 As you will
soon see, there are no directional arrows in this game.  The only way to
explore your environment is to click and hold the left-mouse
button as you move your mouse (or mouse-ball) to examine your surroundings. 
Indeed, in the very first scene, the objects you need to examine are literally
under your nose.  But the only way to access them is by the use of this click-and-hold
the mouse button technique.

Please, also note that "The Mysterious Codex" is only
the first "installment" in the AGON series.  In other words, do not
be disappointed to find that the end of this particular game is not the end of
the story itself.  In fact, this installment contains only the first three of a
total of fourteen game episodes.  One might wonder, of course, what if
the game doesn’t do well and the remaining episodes never materialize.  But the
story line is quite intriguing, and the two board games are very challenging as
well as a lot of fun.  Hence, even if the developers renege on their promise to
deliver more, this particular installment itself is worth playing.

Finally, please, feel free to address any comments or
questions about this walkthrough to .


* * * * * * * * * * * * * * * * * * * * * * * * * * * * * *
* * * * * * * * * *

Episode
1: London

            At the end
of the opening cut scene, you find yourself in the office of Professor Samuel
Hunt (our hero), at the British Museum in London.  Look down to see some papers
at the very corner of the table in front of you.  Close up on those papers. 
The professor mumbles, "Ah, this must have been Smythe!"  So
read the letter by that man first (the two white pages starting with "Dear
Friend").  We learn that Smythe is the museum director’s secretary and a
friend of the professor.  Make a note of his phone number (on the second page
of the letter): 55-623.

Step out of the close up on Smythe’s letter, and click on
the newspaper next.  Read the article appearing on the lower-left corner, under
the picture ("Is the British Museum keeping some secrets?").  [Note
for the "discerning" gamers:  We were given the date of October 13,
1903 at the end of the opening cut scene.  The P.S. in Smythe’s letter stated
that he had brought "today’s newspapers."  Yet, the date of this
newspaper is "for the week ending Saturday, October 21. 1903" 
Obviously, it is not likely that a newspaper would have been delivered eight
days in advance.  So the date at the beginning must be a typo.  Ignore this
discrepancy, however, because neither of these dates is really relevant to the
story anyway.  The year is all that matters, as we shall shortly see.]

Listen to another comment by the professor, as you put away
the paper.  Then, click on the thick white envelope.  Read the anonymous
letter, signed W.K., and then click on the yellow page to the left that is
still inside the white envelope.  This is the first of the three pages of the
Mysterious Codex you will collect in this installment of the game.  Step out of
the close up, and the page will be deposited in the professor’s files.

Note: You
can always look at the documents collected during a particular episode by
clicking on "F" on the dial you see at the upper right-hand corner of
the screen.  You will then be shown a page (or table of contents) listing the
collected documents.  Just click on the document that you would like to see
again.  Note also, however, that once you go on to the next episode, the
documents collected in the previous episode will no longer be available for
viewing.  But don’t worry: you won’t need to refer to a document from an
earlier episode after you have successfully completed that episode.

            Step out of
the close up on the table corner and the professor will indicate that he must
let Smythe know about this, i.e., the mysterious letter and its attachment.  So
turn around, step towards the door and click on the gear icon to open the door
and step out into the corridor.  The professor indicates that the only phone
available at this time of the night is in the Director’s Office.  So turn left
and go to that office at the end of the corridor.  As you click on the door,
however, you find that it is locked.  So turn around again, and go all the way
down to the opposite end of the corridor.  Step to your left, and turn around
left to find a door with the sign "Back Staircase" on the wall to the
left of that door.  Approach this door, close up on the keyhole and note the
key in there.  [You will realize the relevance of this fact later.]  Step out
of the close up, and click on the door, to come out at the head of the
staircase.  Go down four flights of stairs, reaching the ground level.  Step
through the door and look around to your right to find the guard, Swanson, sitting
behind a desk.

            Step up to
him and then turn around left, to face the man across the desk.  Now click on
the speech icon, appearing on Swanson, to talk to him.  At the end of the
conversation, he allows you to look at the inventory ledger.  You will be shown
a brief glimpse of this notebook during the conversation itself.  As the
dialogue ends, look down at the edge of the table closest to you, and click on
the brown battered notebook.  Flip through the pages, but realize that you
don’t have enough information yet, about what you are looking for, to be able
to see in which of the four warehouses you will find it.  Note, however, the
comment on the left page at the very end of the notebook: Dr. Moresby’s new
safety key is the one with the green ribbon!
  [This information will come
in handy later.]

            Talk to
Swanson again.  At the end of this conversation, he gives you the key to the
Director Moresby’s office, so that the professor can supposedly call his wife
to let her know that he will be working late again tonight.  Go back upstairs,
bring out the key from your inventory, and click on the door to unlock it and enter
the Director’s office.

It is dark inside.  So turn around and click on the gear
icon to the right of the door, to switch on the lights.  The camera will automatically
pan from the light switch back to the view in front of you, to show you the
essentials of the room.  As the camera stops panning, the professor will make a
comment about Smythe’s "invaluable treasures."  So this is actually
Smythe’s office.  If you look down to your right, you will find three flyers on
the little round table.  Feel free to leaf through those flyers.  Further down the
same wall, you will find a filing cabinet.  Step forward and turn right to look
at it.  Only one of the drawers is unlocked: the second one from the top, on
the right side.  Open it to find only one file that you can pick up.  Feel free
to examine it, to find a letter as well as two pages giving a brief history of
the British Museum.  Nothing you need in your quest.  Step out of the close ups
and look to your left now.  There is a little cabinet, under the window, with a
tea-set sitting on top.  Step towards the window and close up on the cabinet below
to open it.  "Let us see one of Smythe’s treasures."  Pick up
the big dark square bottle of whiskey from the right on the upper shelf.

            Step out of
the close up and turn around.  We will ignore Smythe’s desk, on your right, for
now.  Go past it to the double doors instead, and enter the Director’s office
itself.  This room is dark as well.  Turn around and click on the light switch
to the left of the double doors.  Again, the camera will give you a
panoramic view of the room.  There are four sets of bookcases to your left, a
fireplace in the wall in front of you, and a large desk to the right of the
fireplace.  Feel free to go along the bookcases and examine the few books you
will be allowed to pick up from two of these bookcases.  Next, go over to the
fireplace, and pick up a box of matches you will find to the left of the
candle-holder on the mantel.  Turn right now and go around behind the
large desk.  Close up on the top of the desk.  Click on Moresby’s business card
lying on the left side of the desk.  You don’t need his number though, so put
it back.  Pick up the blue rubber stamp, from the top center of the desk, behind
and to the left of a glass bottle.   Finally, click on the old-fashioned phone
to your right.  A key pad will appear to your right, as the operator will ask
you for a phone number.  Use the key pad to click in Smythe’s number:  55-623.  [You do not have to press
"Enter."]  Sit back then and listen to the conversation between the
two men.

            As the
conversation ends, step out of the close up on the desk and look left and down
at the wastebasket sitting on the floor next to the desk.  Close up on this
wastebasket and pick up the crumpled piece of paper lying inside.  Based on
what you have learned from Smythe, you know exactly what you are looking for
now: "Black granite
sculpture (sitting figure).
"
 You will find this item listed on the third line from the bottom of the page. 
Make a note of the number appearing to the right of this entry: 1020624.  [You will need this number
later.]   Note also the date on the left for this item: 1 October.

            Go back out
to the corridor, "but the door is left open ‘accidentally‘…" 
Go downstairs and talk to Swanson again.  A cut scene follows in which the
professor gives Swanson the bottle of whiskey.  The guard starts to drink and nod
off already.  But you need to wait for him to be completely out before you can do
anything sneaky.  So you must bide your time until then.  Look at the inventory
book again.  As you open it, you see that the first page on the left is for the
year 1901 and that on the right is for the year 1902.  Turn the page and note
that the left page is for the year 1903, the year of this story.  As you look
down the list of items on this page, you find only one entry for
"sculptures, utensils."  The date for the entry is right as well: 1 October,
same as the one noted in the crumpled page in Moresby’s wastebasket.  So now we
learn that we should find the statue in Store D.

            Go back
upstairs to Smythe’s office, and step behind his desk.  Close up on the top of
the desk and pick up an "ORDER" form from the top tray on your left. 
"Yes, I was looking for something like this …"  The form
will appear on your left, as a key pad appears on your right.  Note the dark
vertical line after the words "inventory number" on the form.  This
is our cursor, indicating where the letters we type will go in.  Use the key
pad to click in the number we had noted from the crumpled page in Moresby’s
wastebasket: 1020624.  The
cursor automatically moves over to the next place of entry, after
"Store."  Click D,
the storage room that should have our sculpture, according to the inventory
notebook.  Be sure to now press "ENTER"
on the key pad, to register your input with the computer.  The accuracy of your
data is confirmed when the professor comments, "I just need to certify it
now!
"  Open your inventory, click on the rubber stamp, and then click just
above the words
"locus sigilli."  The professor exclaims, "That’s
it!
," indicating we are done.

            Go back
downstairs, to find Swanson keeled over his desk.  Step towards the key
cabinet
on the wall to the guard’s left, and a cut scene will kick in. 
After the cut scene, turn around left and click on the cabinet to open it.  You
will find that there are eight key slots but only six keys lying at the bottom
of the cabinet.  Recall that we had found the key to the Back Staircase door already
in its keyhole upstairs.  The label for the key slot second from the left, down
in the second row of the cabinet, has been scratched off.  Hence, we need to
concentrate only on the six remaining key slots.  Here is where each key goes:

Main Building:  Put the key with the tag marked MB under this label.

Dr. Moresby:  As noted previously, the key with the green
ribbon goes here.

Store A:  Put the clean, silver-colored key under this
label.

Store B:  The key with the two smaller keys attached to
it goes here.

Store C:  The key with a smaller key attached to it
goes here.

Store D:  Put the rusty key under this label.

            As you
place the last key, the professor’s comment will confirm that you have made the
right selection and the rusty key, for Store D, will be deposited in your
inventory.

            You need to
go down the corridor facing Swanson’s desk.  In order to do this, you will have
to step towards the back staircase door and then to the left, to come back
around in front of the desk.  Turn right now, and take two steps forward
down the corridor.  Turn around to your left and pick up the lantern, sitting on
top of a pile of crates, almost behind you.  Turn around right, back in the
direction you had been taking, and take another step down the corridor.  Turn
right then and close up on the crooked sign, to the right of the door in front
of you.  It says: Storage Room D.  Step out of the close up, click on the rusty
key in your inventory, and then on the double doors to enter the storage room.

            It is pitch
dark inside, and the professor says so.  Open your inventory and click, first
on the matchbox and then on the lantern, to light the lantern.  [Note: The
lantern itself stays in the inventory, but you have light now.]  We need to go
all the way down to the wall on our left, but this is somewhat tricky. 
The best way to do this is to pan a little bit to your right and click on the
arrow pointing to the left side of the room.  This takes you to the entrance to
the next-to-the-last aisle on the left side of the room.  But we want to go to
the very last aisle, not this one, so don’t go in any further.  Rather, turn
around left and click on the arrow that points further to what is now to your
right.  Click on the wall you now see in front of you, to finally reach the
side of the room you had wanted to reach all along.  Turn right and take two
steps down this aisle, to reach the end of the aisle.  Turn right again and
you will see moonlight coming from a couple of windows up in the wall to your
left.  Take one step forward, and then click on the forward arrow to take
another one when a cut scene will bring you to a granite figure, in a sitting
position, on the floor.  The figure has its arms wrapped around a square
diagram.  Close up on that diagram.  Pick up the gray stone lying in the
lower-left portion of the diagram.  "I must solve the message of the
stone!
"

            Click on
the X /"Exit" at the lower-left corner of the screen to step out of
this particular close up.  Step out of the other close up in the usual way (by
clicking on the down arrow at the bottom of the screen).  Go out of the storage
room and back up to the professor’s office.  [In case you might have forgotten
how to get there:  As you step through the back staircase door upstairs, turn
right and step forward.  Turn right again, and take another step forward.  The
professor’s office will be immediately to your left.]

            There is a
large bookcase with three subdivisions on the right side of the room.  As you
approach this bookcase, feel free to examine the few books you will be allowed
to look up in the middle and rightmost sections of the bookcase.  The book we
are looking for, however, is the dark green one, situated to the right of (and leaning
away from) the cardboard box, in the third from the top shelf of the rightmost
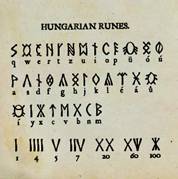
section of the bookcase.  It is called "Classes LINGUARUM." Flip
through the pages of this book until you find the "Hungarian Runes."


            Based on
the information in this page, the first line on the stone reads:

E 3+5+20 [or E28]; N 3+5+60 [or N68]

Similarly, the second
line should read as OINIAV.  However, the rules on the second page (not
shown here) tell us that the runes were usually written "alternating
direction left to right then right to left."  Hence, since we had read the
first line left to right, we must now read the second line right to left.  Thus,
the second line actually reads as VAINIO.

            Open your
inventory and click on the stone.  A white piece of paper appears to your left
with two sets of three boxes each on the first line and a set of six boxes on
the second line.  Note the cursor in the first box on the top line.  Use the
keypad appearing on your right to click in E28
The cursor goes to the second set of three boxes, still on the first line. 
Click in N68.  As the
cursor moves down to the six boxes on the second line, click in VAINIO.  Press "ENTER." The professor confirms
that we have the right solution.  He also suggests looking up the map.

            Turn to
your left now and approach the map on the wall.  Close up on it and your cursor
itself becomes a large magnifying glass.  Move this glass around and note that
the higher up you move over the map, the directions (showing vertically on your
left) change from South to North, while moving further to the right changes the
directions (showing horizontally above the map) from West to East.  Thus, move
the glass around until you see N 60-70 vertically to the
left of the map, and E 20-30 horizontally above the map. 
Once you have these co-ordinates, click and you will zoom in further on the
map.  Move the glass around again until you get N 65-70 on your
left and E 25-30 at the top of the screen.  Click to zoom in even
further.  Finally, you are at a stage where you can zoom in on the
actual co-ordinates from the stone.  So move the glass now until you get N68 on your left and E28 above the map.  Click on these
co-ordinates and listen to the professor.  Then go back to Moresby’s office and
call Smythe [55-623].  [Note
It might be a good idea to save your game just before you make the call,
because this is the last point when you can click on F in the dial in the upper
right-hand corner of the screen and still look up the documents collected in
this episode.]  Listen to the conversation between the two men, and we are off
to Lapland!

* * * * * * * * * * * *

            As the first
episode concludes, we are shown a map and a path is drawn across it marking the
professor’s travel.  Note the documents that accumulate around this map as the
path is marked.  You will regain control of the game only after the path is
completely drawn.  Read the documents.  You will find three letters (from
Smythe to the professor) on the left side of the map, a postcard (from the
professor to Smythe) at the top right of the map, and two letters (from the
professor to his wife) on the right side of the map.  Finally, there is a book (the
professor’s biography, written by his wife) at the lower right-hand side of the
map.  But don’t worry: there are only two pages to read here.  [Again, note:
this would be a good place to save your game as well, because none of
these writings are deposited in the professor’s file when the following episode
begins.  Thus, if you save your game now, you can easily come back to this save
and reread anything here that you might wish to read again.]

* * * * * * * * * * * *

Episode
2: Lapland

            The train
drops the professor at the station and moves off.  Step forward, turn left and
click on the door to knock.  Click again to enter.  "Uhh!  What a
stuffy smell of alcohol!
"  Turn left and step forward.  Close up on
the map on the wall to your left, and note the three villages indicated there. 
Turn to your right then, to find the station master in bed, apparently out in a
drunken stupor.  Step up to him, listen to the professor’s comment, and then
click on the man to try to wake him up.  "Hopeless…"

If you stay in the station long enough, you will hear the
professor start to complain about the cold in the room.  He will also worry
about the station master freezing to death before he wakes up.  So let’s take
care of that before doing anything else. Turn slightly to your left and go to
the bookshelf on the wall to the left of the large mirror.  Feel free to click
and leaf through the two books on the left, but it is the fourth one
from the right that is important.  Close up on that book, click on it to
straighten it and reveal a box of matches behind.  Pick up the match box, and
step out of the close up.

Go over to the boiler that you will find against the wall
opposite the map.  Look down at the lower part of the boiler.  Pick up the
"stump" (firewood) from the floor immediately to the left of the
boiler.  Now close up on the boiler door below.  Click on that door to open
it.  Now open your inventory, click on the newspaper and then click in the
boiler opening, to put the newspaper inside.  Similarly, put the stump in there
as well.  Finally, click on the matchbox in your inventory and then click
inside the boiler opening, to start the fire.  Look up and click on the lever
on the vertical pipe at the top of the boiler, but the pressure fails to rise. 
There seems to be no need to raise that pressure just yet, so go back to the
station master.


Look up at the single bookshelf above the bed.  Feel free
to leaf through the book on the right, but it is the second one from the
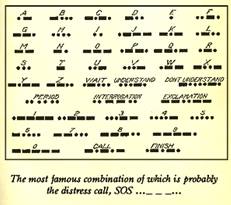
left that we will need shortly: "Learning the Morse Code."  Flip
through the pages to the chapter entitled "The International Morse
Code."

            Turn left
and step over to the window in front of you.  Look down at the cabinet (or
"cupboard") under the window.  Feel free to leaf through the book on
the top edge of the cabinet closest to you.  Close up then on the cabinet doors
below.  Click on the right doorknob, to find the cabinet locked.  Step out of
the close up and turn slightly left to face the wall with the other window. 
Move towards that window, turn right and close up on the two drawings above the
desk.  Step out of this close up then and into the one on the wall drawing above
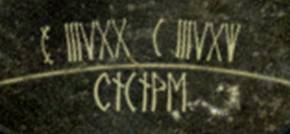
and to the left of the desk.  "Kaira…?"  Find this word scribbled
in the lower right corner of the drawing.  Make a note of the letters that
appear under it: c-f-c-f-c-d-c.

            Step out of
this close up and into the one on the desk itself.  There are only two objects
on which you can click.  Click first on the yellowish envelope in the left
corner of the desk.  Next, click on and read (the two pages of) the letter in the
center of the desk.  "Everyone’s fate is a whole novel…!
Step out of this close up, turn left and look down at what looks like a night
stand, under the window.  Note the device with a strip of paper coming out of a
roll, sitting on this night stand.  Close up on this device, to find that it is
a telegraph and that the last message has not yet been decoded.  Click on the
strip and use your recently acquired knowledge of the Morse Code to decode the
message.

As usual, a blank piece of white paper will appear to your
left and a key pad will appear to your right.  As you click in the letters on
the white page using the key pad, note: click on the "NEXT"
button at the lower left corner of the key pad to leave a blank space between
words; use the red button (with the arrow) in the lower middle, to delete the
previous letter(s), if you make a mistake; finally, do not worry about
punctuation, nor should you try to leave more than one blank space between
words.  Thus, click in the following message:

TO
76 PROFESSOR SAMUEL HUNT FROM ENGLAND IS EXPECTED TO ARRIVE ON WEDNESDAY PLEASE
PREPARE A SLEIGH FOR HIM PEKKA


Check to make sure that you have made no
typographical errors.  Otherwise, you would not be allowed to proceed in the
game.  After checking, press "ENTER,"
and hear the professor read the message, thus confirming the accuracy of your
input.  Hence, we learn that Smythe had done his best but in vain, because there
is still no sleigh around to deliver the professor to his next destination.  So
now you need to take care of this problem yourself.

Step out of the close up.  Go out of the station, turn left
and take a step forward.  Note the water tank that the professor points out to
you.  Turn left then, and take two steps forward.  Turn left again, step forward,
and then turn around left to find the door to the shed in front of you.  Click
on the door to find it locked.  Close up on the hole in the wall to the left of
the door.  You can’t see any lock, but it must have something to do with
opening the door.  You must now figure out the mechanism that makes it work.

            Go back inside
the station and approach the railway man again.  Note that he has turned over
to his right side.  Close up on the red belt around his waist.  Pick up the
small key sticking out of his back pocket.  Step out of the close up and
approach the cabinet under the window to your left.  Close up on the cabinet
doors once again, and use the key on the right doorknob to open the cabinet. 
Pick up the green medicine bottle sitting on two pieces of paper, in the upper
shelf.  Now click on those documents, to find a two-page letter from the
railway man’s son and a yellow-colored piece of paper with a drawing on it.  Look
closely at this drawing.  Note the two levers in the middle of the page, each
of them with a gear to its right.  The lever on the left has nine grooves in
it, and the gear next to it also has nine protruding points.  Note also that
the gear clicks into the lever at the second notch from the top. 
Similarly, the lever on the right has thirteen notches on it, and the gear next
to it also has thirteen protruding points.  This gear clicks into the lever at
the fifth notch.  We now have all the information we need about the shed
door’s lock system – thanks to Paavo, the railway man’s son.

            Step out of
the close up and go to the door.  Instead of stepping out, however, turn around
to see three plates on the wall in front of you.  Step forward, look down, and
see the stool on the floor.  Click on the arrow pointing LEFT, to move the
stool under the leftmost plate on the wall.  You can close up on this plate
now, so do that.  Turn the plate all the way to the left and then all the way
to the right.  You will find that it makes eight turns.  Thus, it controls the
smaller gear we saw in Paavo’s drawing.  Turn the plate to the extreme left. 
Since this starting position is in fact the first notch on the diagram, turn the
plate to the right once.

Step out of the station.  Turn left, and step forward. 
Turn left again, step forward, and then close up on the rusty-looking
small plate on the wall to your left.  As you count, you find that the valve in
this plate makes twelve turns.  Hence, it must be what controls the other gear depicted
in Paavo’s drawing.  As you had done with the plate in the station, turn the
valve all the way to the left and know that this is the first notch from the drawing. 
So turn the valve to the right four
times
.  Step out of the close up.  Go right and around the
corner of the building, to return to the shed door.   Close up on the hole to
the left of the door and note the triangular opening within that hole now.  You
must now find the key that fits this opening.

            Step out of
the close up, go right and around to the end of that wall.  Look up to see the
bell above you.  Pick up the clapper.  This is the key we wanted!  So return to
the shed door again, close up on the hole, and use this key on the triangular
opening.  You are automatically brought out of the close up.  Click on the
door.  "Open Sesame!"  You find yourself inside the shed at
last.  Turn left, step forward, and close up on the steam organ below.  As you
touch a key, you find that you need steam pressure to make it work.

The time has come to raise the pressure in the station’s boiler
now.  So step out of the shed, turn right, and take two steps forward to reach
the water tank.  Take a step UP on the ladder, turn around, and take another
step UP to reach the top.  Step forward now, look down, and click on the lever on
the floor, to see it turn and point towards the station/shed building.  Go to
the station now, close up on the boiler, and click on the vertical lever.  See
the pressure rise!  Go back to the shed and try to play the organ again, but it
still doesn’t work.


Step out of the close up, look down to your right, and pick
up the "lint" (looks like a roll of gauze) from the floor.  Turn
right now and step forward to the wall opposite the door.  Click on the valve
in the pipe in front of you.  The professor exclaims in joy but this sense of
triumph is cut short by the observation that "The steam is escaping,
the pressure is falling!
"  No problem.  Look to your left, to see the
white steam coming out of the pipe.  Open your inventory, click on the lint and
then on the spot in the pipe the steam is coming from, thus sealing the leak. 
Go back to the organ, close up on it, and click: C F C F C D C (the code you had noted from the Kaira
drawing in the station).  Let’s see if it worked…

            Step out of
the shed and to your right, and you will see "Kaira."  This is your
ticket out of this place, but you must now give her the directions for the
village you need to visit.  Go back to the organ inside the shed.  Recall the
three villages you had seen on the map in the station.  If you play CDC, then go
out and approach Kaira, you will find her facing in the direction of the
village to the west.  But that is not the village we want.  Again, if you play
DFD, she will turn to face in the direction of the village to the east.  But
that is not the village we want either.  So just play CFC, come out and find Kaira facing
north.  That’s the direction to the village we want!  So approach Kaira, click
on her cart, and off we go to Borgesiida!

* * * * * * * *

            As you
arrive in Borgesiida, you find a number of houses scattered around.  If you go
knocking at the doors, however, you will find that some people will open the
door and quickly shut it again, while others will never answer.  "This
mistrust is truly scary!
"  Here is how to quickly get through this
segment of the game.

            As the cut
scene ends, turn left and step forward.  Turn left and knock on the
door.  Nothing happens.  Turn right, step forward, and turn left to knock at
another door.  No answer.  Turn right, step forward, and turn left until
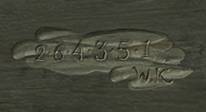
you find yourself facing the side of a house.  Note the scraping on the left
side of the wall.  Close up on this and make a note of the numbers: 264351.   Under the numbers, there is
"that strange monogram again!," i.e., W.K.

            Step out of
the close up, turn right and step forward.  Turn right again, and step
forward.  Turn right now and take two steps forward.  Look to your left
to see a fence.  But if you click on the gear icon at the gate, nothing will
happen (just yet).  So just turn right, step forward, right again, another step
forward, and then turn left to see a door with what looks like an oval-shaped
black metal knocker on it.  Pick up the icicle hanging down and over the left
wooden post in front of the door.  Now click on the door to enter what turns
out to be a bar.

            Step to the
counter on your left and try to talk to the barman.  You get a choice of making
one of three statements in the dialogue box.  Try each of them, one by one, only
to get a grunt but no answer from the barman every time.  Turn right now, step
over to the girl in front of you, and try the three lines with her.  She will
look up but not even grunt in response.  Turn to your right again, step
forward, and pick up the bluish tin cup from what appears to be a mantel but
has no fireplace underneath.  Turn slightly to the left now and approach the
boiler in that corner of the room.  Open your inventory and place the icicle in
the cup.  Now put the cup on the boiler.  The icicle will melt and the cup will
automatically return to your inventory.  Put the medicine (from the train
station) into the cup, to get "dissolved medicine."

            Turn right
now, step forward, and turn right again, to see the sick dog on the floor to
the left of the door.  Approach the dog and put the dissolved medicine in his
food dish.  A cut scene will begin, and end with the girl stepping out the door
and signaling the professor to follow.  So step outside, turn right and
approach the girl standing by the fence.  Click on her to talk to her, and
another cut scene will follow.  Click on the fence gate now to open it.  Step
inside and towards the reindeer.  Pick up the oil can lying on the snow to the
right of the sleigh.  Then, click on the sleigh, and we are off to see Vainio!

* * * * * * * *

            The ride is
cut short, however, as a wooden bridge collapses before us.  The professor
steps out of the sleigh and must go on foot from here.  Step forward to cross
the bridge and hear it collapse completely behind us.  There is only one
direction we can take right now, so turn left and step forward.  As you move
the cursor over a structure up on the hill slightly to your right, the
professor will remark, "Lo, a polar lights observation post!
Before we get to that, however, let’s turn around left and take that one step
back to the collapsed bridge.  As you move your cursor, you will see that you
can now go in two different directions.  The left one will take you back
to that observation post.  Take a step to the right instead.  Turn left and
take two steps.  Turn left again, take one more step, and then look to your
left to find a giant bolder on the ground with two much smaller stones in front
of it, at its base.  Pick up the wheel lying between these two smaller stones.

            Turn right,
step forward.  Turn left then, and take another step forward.  That observation
post is in front of you again but the only way to reach it is to turn left,
take a step, turn right, and take two steps forward.  As you thus approach the
device, close up on it.  Feel free to close up at the top to get a starry
view.  Step out of that close up then, and look at the panel below with six zeros
showing.  Click in the numbers 264351
(that we had noted from the side of the house back in that village).  Now open
your inventory, bring out the wheel, and click on the left side of the device
to attach the wheel to that side.  Bring out the oil can then, and click on the
wheel, to oil it.  Now click on the wheel again.  The numbers panel will open
like a drawer, revealing a scroll inside.  Pick up the scroll, to find that it
is another page from the mysterious codex.

            Step out of
the close ups.  Turn around and step forward (it will seem like you have
taken two) to come down the hill.  Turn left, and take a step forward.  Turn
slightly to the right, and take another step forward.  You will see a kind of
gulley ahead of you.  Take two steps forward through it, to arrive at a pier. 
Close up on the boat sitting on the pier.  There is nothing there.  [Note
there would have been an oil can in the boat, if you hadn’t already picked one
up before getting on the sleigh at the village.  Thus, this would have been
your "second chance" to get one, to use it on the observation post.]

            Step out of
the close up, turn right, and take two steps forward.  Turn slightly to the
right, and take another step forward.  Turn a little to the left, and see a
large gulley.  Take a step through it.  "Isn’t that a hut there in the
distance?
"  Yes, it is, and you can even see the smoke coming out of
the chimney at the top.  Take two steps forward to approach it and then click
on the door to enter.  A cut scene follows.  Step towards the young man and
give him the letter from his sweetheart back in the village.  Another cut scene
follows and you are then presented with the rules for the board game, Tablut. 
Be sure to flip through the pages to read all four pages.  Click on
X/"Exit" and we are ready to play our first AGON board game!

TABLUT

            Following
is my solution to the game in the NORMAL mode.  [Please, remember: you
can go to the main menu, click on Game Options, and then change the difficulty
level to EASY to no doubt come up with a shorter/easier solution.]   Please,
note the following in "deciphering" my solution: I have labeled the
rows A-H, and the columns 1-9.  Thus, the first cell in the upper left corner
is read A1 and the last one at the lower right as I9.  The red squares in my
diagram correspond to the red squares in the game, to hopefully make it easier
to compare the two boards. The green squares in my diagram represent the cells
occupied by your pieces at the start of the game.  Finally, the red
square in the center is occupied by your KING, of course.  Please, note also that
you need to make ONLY the moves indicated in BLUE at the left in the following
directions.  Moreover, here is an example of how to follow those directions:
The first move (E7 à D7)
means that you must move your piece from cell E7 to cell D7
As for the parenthetical statements after each move, they are for reference
purposes only, to confirm you have made all the "right moves" so
far.  Feel free to ignore these notes completely, of course.  If you decide to
use them, however, please note that these parenthetical notes indicate: the result(s)
of your move, if any; the computer’s response; and the result(s) of the
computer’s response, if any.  With all this in mind now, let’s play TABLUT!

E7 à D7 … [E8 moves to
D8]

E6 à D6 … [I6 moves to
E6]

C5 à C6 … [D1 moves to
D3]

F5 à F6  … [E6 killed; F1
moves to F5, killing your G5]

E4 à F4  … [F5 killed; H5
moves to F5]

C6 à C3
… [D3 killed; A4 moves to E4, killing your E3]

D5 à D4 … [E4 killed; E2
moves to E4]

F4 à G4 … [E9 moves to
E6]

G4 à F4 … [E4 & F5
killed; E1 moves to E4]

F4 à G4 … [I5 moves to
F5]

G4 à F4 … [E4 & F5
killed; B5 moves to D5]

D6 à C6 … [I4 moves to
I2]

C6 à D6
… [D5 & E6 killed; A5 moves to D5]

D6 à C6 … [A6 moves to
A2]

D7 à D6 … [D5 killed; D8
moves to D7]

C6 à C8 … [D9 moves to
D8]

F6 à E6  … [F9 moves to
F5]

E6 à E8 … [D8 killed; I2
moves to E2]

E8 à D8 …  [D7 killed; E2 moves to E4]

D6 à F6 … [F5 killed; A2
moves to A4]

D4 à C4
… [A4 moves to B4]

C4 à D4 … [E4 killed; B4
moves to B8]

C3 à A3 … [B8 moves to
B2]

D4 à D2 … [B2 moves to
C2]

F4 à B4  … [C2 moves to
B2]

C8 à C2 … [B2 moves to
B3]

C2 à C3 … [B3, the last
enemy piece, killed].

* * * * * * * * * * * *

            As the
second episode concludes, we are once again presented with a map and the
professor’s travel to his next destination, Madagascar, is marked across it. 
As the marking is completed, read the correspondence between Smythe and the
professor.  There are two letters from Smythe to the professor at the left side
of the map; another letter from Smythe to the professor at the top of the map;
and then, a letter from the professor to Smythe at the right side of the map. 
Finally, read the eight pages of the professor’s biography, written by his
wife, at the lower right portion of your screen.

            [Note
Again, this might be a good spot to save your game, just in case you
might want to come back and reread any of these documents or the biography.]

* * * * * * * * * * * *

Episode
3: Madagascar

            We find the
professor at the beach.  As the cut scene ends, you should be looking out to
sea.  Turn a little to your right and take two steps forward (moving away to
the left from the boat) to arrive at an apparent dead end by the rocks.  Turn
right, and go back along the beach to return to the boat.  Keep going forward
(to the right of the boat this time), and go to the other end of the beach. 
Pan the camera to your left and note the fishing net.  Now turn a little to the
left, step forward.  Turn right, take another step, and hear the professor’s
comment about the wall around the village.  Turn right and step forward to approach
the guard at the village entrance.  The dialogue box will indicate many
possible topics as the conversation develops.  Exhaust all of these topics. 
Don’t worry even when the guard threatens you with his spear.  Just keep on
clicking on the speech icon on the guard, covering the topics, until that icon no
longer appears on the guard.   Thus, you find out about the villagers’ distrust
of pirates, a little bit about the forest, and about the fact that there is
apparently one last and old pirate still to be found in the clearing beyond that
forest.

            Follow the
guard’s suggestion to use berries to lure a lemur into leading the way through
the forest.  So pick up a handful of red berries from the pan sticking out of
the wall slightly to your left.  Turn slightly further to your left and note
the narrow path leading into the forest.  Take two steps down this path, and
the camera will automatically pan down to your right to show you a lemur
sitting on the ground.  Close up on the stone in front of him.  Place the red berries
on the stone, and a short cut scene will show the lemur taking them.  You will
be automatically brought out of the close up.  Step forward into the forest. 
You hear nothing, and you will find arrows pointing in four different
directions.  Step forward again.  "Where are you my little helper…?
Almost as if on cue, you will hear the lemur’s cry.  You must now follow those
cries to help you reach that clearing the guard had mentioned.

            Note
Every time you take a step, there will be arrows pointing in four directions.  The
trick is to pan the camera around to a point where the lemur’s cry sounds the
loudest.  Click on the arrow in that spot to move forward.  Wait to hear the
sound of the lemur again, determine where that sound is the loudest, and then
click on the arrow appearing in that spot.  Some people might do the whole
thing in eight clicks; others will take ten.  But don’t despair even if it
takes you longer to get through.  Just keep following the lemur’s cries in this
way.  [I also got the feeling that it is best to click in the middle of the
lemur’s cry itself.  So maybe this part of the game has as much to do with
coordinating with the sound as well as the spot where that sound is heard
the loudest.]  When you take the last step, a cut scene will show the professor
stepping out of the forest.  The camera will pan down to the right
automatically, to show the lemur sitting in front of yet another stone.  We
will need him again on our way back.  But for now…

            Step
forward, turn right, and step forward to approach the fireplace on the ground. 
Look down to your right, and pick up the rags.  Turn back to the fireplace, look
up and take two steps forward.  Turn right, step forward, and pick up
the firewood on the ground below.  Turn back around and step forward.  Turn
right, step forward, turn right again, step forward, to arrive at yet another
clearing.  Pick up the "slats" (wooden planks) from the pile behind the
crate with some kind of a device sitting on the top.  Close up on this device then
and find that it is some kind of a presser: when you click on the handle in the
back of the "head," the upper part of the "mouth" presses
against the lower part.  Hmmm…

            Step out of
the close up, and note that you can go either left or right.  Take a step
towards the right, turn left, and take another step forward.  Now pan the
camera around to your left to find a large tree with some wooden planks
attached to serve as steps.  This is the tree that the professor was talking
about when we had initially arrived at the area with the fireplace.  Click on
the UP arrow, and the professor indicates that some of the steps are missing.  No
problem.  Open your inventory, click on the slats and then on the rags, to make
two temporary steps.  Pick up one of them and click on the top hole you see on
the side of the tree – in the empty part, under the steps already there [your
step will begin to glow when you hover it over the correct spot].  Now pick up
the other temporary step and click on the tiny spot under the step you
just attached (note where the second step glows) to attach this one to the tree
as well.  The professor will indicate that the row (of steps) is still
incomplete, but that he can manage.

            Go up a
step, to find that you cannot go further.  Note the large wooden board below, practically
at your feet, serving as a kind of landing.  Turn around, look down, and pick
up one of the temporary steps you had just attached to the tree.  With this
step still in hand (appearing as your cursor), turn back around and look down under
the landing
for a spot where the temporary step will glow again.  Click, and
that step will now be attached in front of you.  Go up, and a cut scene will
show the professor going up the rest of the way and arriving at the entrance to
the tree house.  Turn to your right and step through the reddish curtain.

            Turn left
and look down at the middle shelf.  Note the brown bowl of rice on the left
side of that shelf.  But you don’t have anything you can use to take some rice
out, nor does there appear to be any reason just yet to do so.  So look back in
front of you, step forward, and close up on the table down to your right.  Pick
up the matchbox sitting behind the hand sander.  Then pick up the ENINA
card to its left.

            Step out of
the close ups, turn right and step forward.  Turn right and close up on the wall
painting.  Make a note of the letters etched at the side of the sail ship: ABE.  Step out of the close up, and
turn around (to the left of the ladder).  Pick up the "missing step"
leaning against the wall in front of you.  Then pick up the EFATRA card
from the bucket to the left of where the step had been sitting.  You might have
to pan the camera slightly to the right to pick up the IRAY card from
the floor, immediately to the left of the doorway.  Turn right and go up the
ladder to arrive at the second level.  Turn right and step through the curtain
of vines.  The old pirate lies on a bed in front of you.

            Turn right
and pick up the ROA card from behind the bag of mushrooms on the top
shelf.  Now step towards the old man and the camera will automatically pan down
on him.  Bring out the wine from your inventory and give it to the old man.  A
cut scene follows.  You must now find some food for the old man.  Look to your
left and pick up the DIMY card from the right of the wash basin, on the
table next to the bed.  Turn around further to your left and close up on the
corner shelf.  Pick up the lantern from the top shelf to the left of the
pole holding up the shelf.  Pick up the "bowl" (it is actually a deep
frying pan) from the top shelf to the right of the same pole, and a
handful of brown berries from the shelf below.  Step out of the close up.  Go
back down to the first level.  Go over to the entrance but before you leave,
turn right and use your recently acquired "bowl" to take out some
rice from the middle shelf.

            Step out of
the hut and take two steps down to find that you can go no further.  There is a
gear icon right at your feet.  Bring out the step you had found in the hut and
click where you had seen the gear icon (the step will glow when you hover it
over that spot).  Now step down and forward, to reach the fireplace clearing. 
Turn left to look at the fireplace.  Bring out the bowl of rice and click on
the pot over the fireplace, to pour the rice into that pot.  Look up, step
forward and turn around to your right to see a barrel full of water.  Fill your
bowl with some of that water and return to the fireplace.  Put the water in the
pot over the fireplace, only to find that it is not enough.  So go back to the
barrel of water and fill your bowl with some more water.  Return to the
fireplace and pour that water into the pot.  Bring out the firewood from your
inventory and place it under the pot.  Finally, click on the matchbox and then
on the firewood below, to light a fire under the pot.

            Hanging
around and waiting will not do any good.  You are supposed to do something else
before the rice is cooked.  So look up, and take two steps forward.  Turn left
then, step forward, turn right, and step forward, to reach the second
clearing.  Close up on the device on the crate, place the brown berries in the
"mouth," and press the handle at the back of the "head." 
The brown berries will turn into red berries.  Pick up those red berries, and
step out of the close up.  Note, once again, that you can go either left or
right.  Turn left this time, step forward; turn slightly to the left again, and
take another step forward; then, turn right and take two steps forward,
to return to the fireplace.  The rice is cooked now.  Fill your
"bowl" with some of that "steamed rice."  Turn left and step
forward to reach the big tree.  Go up to the second level and give this bowl of
rice to the old man.

            Click on
the speech icon now appearing on the man.  When he asks, "who are
you?," you can actually pick either of the answers given, because you will
get the same information in response.  I prefer the second choice though:
"Adventurer (in search of the Agon)," because the old man
seemed to become a little hostile when I had tried the first choice in playing
this portion of the game earlier.

            The dialogue
moves forward and the old man is reluctant to go in details for fear that it is
a long story.  Click on "Please, tell me…" to encourage him to
continue.  A cut scene follows in which you learn all about the old man –
Jonathan Morgan, and the late Captain Jeremiah Dodd.  As the cut scene ends,
click on Morgan, to gain more information.  You will have to do this several
times, but be sure to keep clicking and asking all the questions that appear in
the dialogue box, until the professor indicates that we should not disturb the
man any further.  Now turn right and step towards the ladder by the window. 
Turn around to face the ladder, and click to go up.  Turn around then to face
another ladder.  Go up that ladder as well, to reach the third level, and inside
the Captain’s "quarters."

            There is a large
window-like opening on your left.  Click on the cards hanging on the wall to
the left of that window, and thus pick up the VALO, FOLO, FITO,
and SIVY cards, one by one.  Turn around to your right, and look down on
the ground, under the hammock.  Feel free to leaf through the book in the front
but it is the one in the back, almost hidden in the right corner under the hammock,
which we really need.  It is called "Vocabulary of the Malgasy
The language of Madagascar" and is stated to be "The
Most Detailed English-Malgasy Dictionary."  "Well, well…
And there is good reason for this comment by the professor.  As you leaf
through the pages, note that the words on the cards we had picked (Dimy, Enina,
etc.) represent numbers.  Feel free to make a note of the Malgasian equivalent
of the ten numbers [1-10] you find in this dictionary, or wait for my
diagram that shortly follows.

            Turn left
to face the central part of the quarters now.  Look down on the floor.  Again,
feel free to pick up and leaf through the two books in the box to your right.  Next,
pick up the TELO card lying on the ground to the left of the box full of
books.  You will see it sticking out from just above the book you find leaning
against a pile of other books on the floor.  Thus, you should now have a total
of ten cards.  [Note:  you can click on the "F" on the dial in
the upper-right corner of your screen, thus opening up the Table of Contents
where you can click on any one of the ten cards you collected in this tree house. 
Thus, you can refer to these cards at any time that you wish.]

            Now pick up
that dark book leaning against the pile of other books:  "Falconer’s
Marine Dictionary
."   Note the three questions on the left page as
you open the book:  Where? What? When?  The professor is right that
these are supposed to serve as some kind of reminders for us as well.  In fact,
the next time you open the book, a key pad will appear to your right and you
will actually have to answer these questions.  But we don’t have enough
information to do that just yet.  So just flip through the pages and, as you
begin the actual dictionary portion of the book, note the letters ABE at the
top of the second column on the left page.  Recall that these are the same letters
that we had seen on the side of the ship in the wall painting at the first
level.  The text following the letters in the book, although hard to read, is actually
irrelevant to our quest.  The letters are all that matter.  But again, we don’t
have enough information yet to figure out what they mean.  So let’s move on for
now…

            Close up on
the telescopic apparatus in front of the window to your left.  Close up first
on the settings to the left of the telescope.  Note the three levers.  The one on
the left can be set at Roman Numerals I, II, or III.  The one in the center
moves horizontally, from left to right, and can be set at 10, 20 or 30. 
Finally, the one on the extreme right moves vertically, from bottom to
top, and can be set at 10, 20 or 30 as well.  Feel free to try different
settings.  Every time you change the setting for any lever, step out of the
close up on the settings and into the one on the telescope, to check the
result.  You will find that some settings will show writings on objects, indicating
different times (at dusk, at midnight, etc.) and places (behind
the village
, on the forest path, etc.), while others indicate nothing
at all.  Again, we don’t have enough information yet to find the answers that
we need.  So let’s move on again for now…

            It is time
to visit the Captain’s grave.  So step out of the tree house, and take a step
towards the fireplace.  Take another step forward, on the path to the right of
the fireplace, to return to the edge of the forest.  The camera will automatically
pan around to focus on the lemur sitting on the ground below.  Close up on the
stone in front of him, place the red berries, and watch the lemur take them.  You
will be brought out of the close up automatically.  Take two steps into
the forest, and you will hear the lemur’s cry.  So as before, just click on the
arrow in the spot where the lemur’s cry appears to be the loudest, to return to
the village.

            As you thus
step out of the forest, take two steps forward (away from the forest) to
approach the guard.  There is no need to talk to him, however.  Just pick up
another handful of berries from the pan to his left, turn slightly further to
the left, and take two steps down that narrow path back to the edge of the
forest.   Close up on the lemur sitting on the ground to your right, place the
red berries on the stone, and watch him take off.  As you are brought out of
the close up automatically, step forward to enter the forest yet again.  But this
time, we are not going to the clearing on the other side, but to the Captain’s
grave in the forest itself.  So you can ignore the lemur’s cry altogether. 
Just keep clicking on the arrow right in front of you to keep going forward.  Not
counting that step you took to enter the forest after the lemur took off, you
should find yourself facing the grave at the fifth click.

Note:  Please, SAVE your game at this point and read
the following instructions carefully, to avoid possible frustration in attempting
this puzzle.


            There are
nine poles on the left side of the grave.  Note the colored shapes on the poles,
under the ox figurines, and you will find that each of these patterns on the
different poles is comparable to a pattern (also under an ox figurine) in one
of the cards you collected in the tree house.  The English-Malgasy Dictionary
had helped us determine the correct order (1-10) of those cards.  Thus, we can
see that the poles here are "out of order."  We need to rearrange
them now in the correct order, left to right, going from the foot to the head
of the grave.

            But we had collected ten cards,
and there are only nine poles by the grave.  Hence, one of the cards should be
redundant.  In my case, it was number ten, Folo.  However, I played this
game twice and found the poles set up in a different order around the grave
each time.  So I have included the tenth card in the picture that shortly
follows, just in case that pattern happens to pop up in your particular game. 
It is also for this reason that I cannot give you an exact solution to this
puzzle.  But I hope, the following suggestions will be helpful.

1.   Take one step to the left of the
grave, and turn left to face the three poles presented to you.  Note that you
can pick up any one of these three poles, but DON’T do that just yet. 
Rather, refer to the cards in your File (or to my diagram below) and make a
note of each of the three poles in the order that they appear, left to right
(For example: Is it 7, 6, 8? or 9, 6, 4?, etc.).

2.   Take another step to your right, and
turn to face the second group of three poles.  Again, determine and make a note
of the order in which these three poles appear, left to right.

3.   Finally, take another step to your
right, and turn around to face the last group of three poles.  Determine and
make a note of the order of these poles as well.

4.    This will be a good point to save
your game, now that the computer has already established the order of the nine
poles and before you move any one of them.

5.   Once you have noted the order of all
nine poles, you must now rearrange them in the correct order.  In this
connection, please, keep two things in mind.

            (a)   You do NOT have to
put a pole into your inventory and then bring it out again to put it in a
different position.  It would be much easier just to carry the pole.  So
when you pick a pole out of its original position, move it to the left or right
(depending on where you want to go) of the group of three poles in front of you
and click where the pole (in your hand) glows.  You will be moved to that
position, with the pole still in your hands, appearing as your cursor. 

            (b)   Don’t forget that when
you pick up a pole, you will then be able to see only 8 poles on the ground. 
This is probably the trickiest part of the puzzle – keeping track of the order
of the remaining poles after you have picked up one of them.  Taking notes to
indicate what you have moved where will be really helpful for
this purpose.

            The cards,
numbered 1-10, are as follows:

            Once again, remember that you
have to rearrange the poles so that they will appear in the correct order, left
to right, i.e., starting from the pole at the foot of the grave to the one at
the head of the grave.  The correct order most likely will be 1-9 (but
try 2-10, if the pattern from the tenth card happens to pop up).  As
soon as you place the last pole in its correct order, the professor will
confirm, "Yes, no doubt, this must have been the original order.
Let’s find out now what we accomplished by arranging the poles in the correct
order.

            Go to the last pole at the head
of the grave.  Look down to your right, and close up behind the
headstone.  Etched in the stone, you will see twenty-six letters of the English
alphabet, and a foreign symbol above each of these letters.  Thus, each foreign
symbol is supposed to represent the letter of the English alphabet appearing
under it.  Go back to the poles (now to your right), and note that one or more
of these same symbols have been carved on the wooden portion of each pole,
under the colored pattern we had been examining up until now.  So now that the
poles are in their correct order, the symbols are in the correct order as well;
and all you have to do is to make a note of the symbols on the poles, and then refer
to the back of the headstone to see what English letters they represent, to decipher
the message on the headstone.

            When you
are ready, click on the back of the headstone and a
piece of white paper will appear to your left and a key pad to your right. 
Click in the following message, using the NEXT button at the lower-left
corner of the key pad to leave a blank space between words: 

UNDER THOSE DATES WK


Press ENTER
on the key pad.  The professor will confirm the solution, and indicate that we
must now figure out what the reference to those "dates" means.

            Go back to the foot of the
grave and step towards the right side of the grave this time.  Close up
on the front of the headstone.  Open your inventory, click on the knife,
and then click on the dates (1821-1875) written on the headstone.  Thus,
that part of the headstone is removed, revealing a compartment inside.  Click
on the piece of paper to the right, to retrieve the third page of the
mysterious codex.  Now click on the notebook to the left, and flip through the
pages.  Note the diagram at the very end of the notebook.

            We must now return to the
Captain’s quarters back in the tree house.  So step to the foot of the grave, and
then into the forest.  Step forward again, and you will hear the lemur’s cry.  Once
again, follow his sound to return to the clearing by the fireplace.  Step
forward and then to your left, to approach the tree.  Go all the way up to the
Captain’s quarters.  Close up on the telescopic apparatus, and then on the
settings.  Now click on the F, on the dial in the upper-right corner of your
screen, to bring up the Table of Contents.  Click on "Captain Notebook." 
Go to the end of the notebook and look at the following diagram again.

            Recall the letters we had seen
on the wall painting on the first level of the tree house:  ABE.  This is the code to the settings
as well as the clue to the answers to the questions in that book on the floor. 
Here is how to decode both.  Note that the diagram is actually divided up into
three separate sections, each consisting of nine boxes each.  Find the letter
"A" in the left section, under Roman Number I.  Note
further that the numbers written vertically to the left of the diagram
represent the settings of the lever that moves vertically (i.e., the lever on
the right side of the settings).  There are no numbers written horizontally
under the diagram.  You must assume that they are and that they represent
the settings of the lever that moves horizontally (i.e. the middle lever in the
settings).  Thus, we see that the "A" in the left section of the diagram
requires us to set the left-most lever to I, the
middle lever to 10, and the right-most lever to 10 as well.  Click the
X/Exit to step out of the close up on the notebook and set the levers to these
positions.  Then step out of the close up on the settings and into the one on
the telescope, to find the words "on
the Beach
" written on a board on a tree branch.

            Next, we look at the "B"
in the middle section of the diagram, under Roman Number II, to find
that it requires a horizontal setting of 20 and a vertical setting of 10.  So
set the left-most lever to II, the middle lever
to 20, and the right-most lever to 10.  Now close up on the telescope,
to see the words "the skull rock"
written on an object.  Finally, look at the "E" in the
right-most section of the diagram, under Roman Number III, and find that
it requires a horizontal setting of 20 and a vertical setting of 20 also.  So
set the left-most lever at III, the middle lever
to 20, and the right-most lever to 20 as well.  Close up on the
telescope again, to see the words "at
ebb of tide
" written on a broken wooden crate.

            We are now ready to answer the
three questions in that book.  So step out of these close ups and look down at
that book, "Falconer’s Marine Dictionary," leaning against the
pile of other books on the ground.  Close up on that book and, as indicated
earlier, a key pad appears to the right while the cursor appears after the
first question "Where?"  Click in the words
"on the beach"
(using the NEXT button at the lower-left corner of the keypad to leave a
blank space between words).  Press ENTER on the keypad to go to
the next question "What?"  Click in the words "the
skull rock
" and then press ENTER on the keypad
again
to go to the last question "When?"  Click in the
words "at ebb of tide"
and press ENTER on the keypad to finish.  The professor will
confirm the correctness of the solution.

            Step out of the close up and go
down to the second level of the tree house.  As you step forward, be sure to
grab a handful of brown berries from that corner shelf to your left.  You can
leave the tree house now.  As you get off the last step, pan the camera to your
right (just to the left of the tree steps) and step forward.  Pan the camera to
your right again, and step forward.  Now pan the camera to your left and down
to find that presser.  Close up on the presser, put the brown berries in its
"mouth" and then press the handle at the back of its "head,"
to turn the brown berries into red berries.  Pick up the red berries, and step
out of the close up.  Again, note that as you turn around, you can go either
left or right.  Step forward to your right.  Turn left, and step forward (to
return next to the tree).  Step forward, to find the path towards the forest either
to your right or in front of you.  Step forward on this path and then pan the
camera down to your left, to find the lemur sitting on the ground.  Close up on
the stone in front of him, put the red berries on the stone, and then wait to
be automatically brought out of the close up.  Now turn slightly to your right
and step forward to enter the forest.

            You will be happy to know that
you don’t have to follow the lemur’s cries all the way back this time because,
as soon as you take that one step into the forest after the lemur, a cut scene
will show the professor back at the beach.  It will be dusk already. Wait for
the professor to finish his comment and then step forward to your left.  The
camera will pan to the right automatically, and the professor will exclaim
about seeing Skull Rock clearly from that position.   Look down and pick up one
of the green strands from the ground.  "A strong water plant, and very
flexible, too.
"  Pick up another strand.  

            You must now go along the beach
to the rocks on the other side.  So turn slightly right and step forward.  Turn
slightly left then, and step forward again.  Turn slightly to the left yet
again, and step forward to finally reach the rocks.  Now turn left, and step
forward, in the direction of the sea.  Step forward in the same direction,
reaching the sea.  Turn right now and step forward to the left of the huge
rocks.  Turn slightly to the right and step forward in the direction where you
see some bright orange bamboos lying up ahead.  At this point, you can either
go forward or to your right towards the bamboos.  But you cannot pick up any of
those bamboos just yet, so step forward instead, to arrive at the mouth of a
cave.  As you approach it, the camera will pan slightly to focus the view
directly over this cave, as the professor makes a comment about the cave.

            Step into the cave, and a cut
scene will follow.  Step forward, turn slightly to your left and click on either
one of the bamboos in the water.  The camera will automatically pan down to
your left to show the two bamboos now arranged horizontally on the ground.  The
gear icon on the bamboos indicates the need for further action.  Step back out
of the cave, turn left, and step up in the direction of those bamboos you had
seen just before entering the cave.  Pick up all eight of them (five from the
front and three at your back) and return to the cave where the first two
bamboos had been laid out for you.  Open your inventory, click on a bamboo and
then on the spot between the two already on the ground.  Thus, put all the
bamboos on the ground to see them arranged in the form of a raft.  Now click on
the two strands of seaweed in your inventory, one by one, and then on the
"raft," to tie those bamboos together at the top and bottom ends of
the raft.  Click on the completed raft, and a cut scene will follow.

            As the cut scene ends, step
forward, and hear the professor complain about the darkness.  So open the
inventory, click on the matchbox and then on the lantern, to light up the
place.  [As in the beginning of the game, the lantern will stay in the
inventory, but you will now have some light.]  Turn back around and step
forward, to see the raft in the distance.  Click on the forward arrow to hear
the professor explain that the raft has drifted away, so you will have to find
another way of getting out (after you are done in this place, of course).

            Turn around and take six steps
forward, until you hear the professor’s comment about the fact that this is the
place where only the Captain had set his foot.  Pan the camera down to your
left, to see the chest on the ground.  If you click on the gear icon at this
time, you will see a cut scene showing that the chest is too heavy for the
professor to move it just yet.  So close up on the chest instead, and find that
it is full of rocks.  Click on the rocks, one by one, to remove them.  You will
find a white box at the lower-left corner of the chest.  As you click on this
box, you find that it is a board game.  Click on the X/Exit, to step out of
this close up.  Be sure to remove any remaining rocks from the chest, and then step
out of the second close up in the chest itself.  Now click on the gear icon
appearing on the chest, to see a cut scene showing the professor moving the
chest aside and discovering "another tunnel" behind it.

            Before we go into this tunnel,
however, turn right and take two steps forward.  The professor indicates that
we cannot go any further this way.  Close up on the rocks in front of you. 
There is a pickaxe-head caught between the rocks.  Try to pick it up and the
professor indicates that you cannot free it by hands alone.  Step out of the
close up, turn around and take the two steps to come back to the chest.  Step
into the tunnel to the right of the chest and another cut scene follows. 
Apparently, the professor has tripped or fallen, but don’t worry!  You can
still come back to the chest.  You would just have to go UP to do so.

            For now though, take eight
steps forward, adjusting your view as you go along to keep moving in that
direction.  You will find yourself at the end of the tunnel with a ladder lying
against the wall to your right.  Step towards the ladder and pick it up.  Now
turn left and step towards the pool of water.  There is a rope dangling down
from above, with a bucket tied to the bottom end of the rope.  Look up and move
your cursor around on the well’s wall, to the left of the rope.  You will see a
gear icon where the well’s natural wall ends and a man-made brick wall rises
above it.  Bring out the ladder from your inventory and click where it glows,
to place it against the natural edge of the well’s wall.  Step up on the ladder. 
Click on the arrow pointing up to hear the professor’s comment that you cannot
go any further and that even though some of the bricks can be moved, "hands
are not enough for such an operation.
"

            Look down to the right of the
ladder and pick up the pole standing in the shadows, against the well’s wall, some
feet away from the ladder.  It turns out to be a pickaxe-shaft.  Step down the
ladder, and go all the way to the other end of this tunnel.  Pan your camera UP,
to find a hole in what appears to be the ceiling.  This is the spot through
which the professor had apparently fallen.  Click on the arrow appearing in
this spot, to climb back up next to the chest.  Move your cursor around to find
the chest and then take two steps into that very short, dead-ended tunnel, to
the right of that chest.  Close up on the rocks we had seen earlier. 
Now open your inventory, click on the pickaxe-shaft and then on the pickaxe-head
stuck among the rocks, to use the shaft to pry out and pick up the pickaxe-head. 
The shaft is still in your hands.  So just click on the pickaxe-head now in
your inventory, to attach the shaft to the head, thus getting a whole pickaxe.

            Go back to the chest and into
the tunnel behind it.  Go all the way to the other end and step up on the
ladder.  Close up on the brick wall in front of you.  Bring out the pickaxe
from your inventory, and click on the brick at the lower-right corner of
the screen.  Thus, that brick is removed, leaving behind an empty slot.  You
can now use that slot to move around the bricks, so that some of them would serve
as steps to help the professor climb out of this well.

            Here is the order in which you
should place the bricks.  The two "columns" in the center of the wall
is where the bricks will serve as steps.  The two slots on either side of those
columns are for "spares."  Note that you need to place a total of eight
bricks, four in each of these two central columns.  Note also the number of dashes
after the "X" on each brick.  The two bricks with only one dash each are
too short to serve as steps, and need to be discarded in the spare
slots.  The rest of the bricks need to be arranged in the order shown below.  [Note
the number after the dash in the following picture represents the number of dashes
on the right edge of the bricks in the game itself.  Thus, for example, "X
– 4
" refers to any brick with four dashes on its right edge.]

            As you place the last brick in
the correct order, the professor will confirm the solution, and a cut scene will
follow immediately.  The professor climbs out of the well only to be struck by
the guard from behind.  He wakes up in the Chief’s hut, and must now explain
why he was found entering the village in such a suspicious manner.  At the end
of the cut scene, click on the Chief to start a dialogue.  You are given a
choice of three statements.  Use all three, by picking the choice at the top
every time.  At the end of the third statement, a gear icon will appear on the
Chief.  Bring out the board game from your inventory and give it to the Chief. 
Another dialogue follows.  Again, click the choice at the top first and then
the second one that follows.  The Chief is convinced of the professor’s good
intentions, and asks him what he would like in exchange for the favor he has
done the Chief.  You get only one choice: ask him to help old Morgan.  The
professor then asks that they start playing the board game immediately.  So you
are presented with the rules for the board game.  Be sure to read all four
pages of these rules.  We are now ready to play our second and last board game
of this AGON installment.

FANORONA


            Following
is my solution to this board game.  Again, it is for playing the game in the NORMAL mode.  [Feel free to change the difficulty level to EASY, to no doubt come up
with a much simpler solution.]  Please, note that this time, I have not
indicated the results of your moves, nor the enemy moves and their results. 
Given the nature of this particular game, it would have made things only more
complicated, rather than simpler, if I had done so.  There are more columns and
fewer rows in this solution than there had been for the first one, because of
the difference in the two boards, of course.  Otherwise, the format of the
solution is the same.  Thus, the first move [C4 à C5]
means that you must move your piece from cell C4 to cell C5.  Note also that
this is the only move I have recommended that will require you to choose
which enemy piece should be removed from the board.  As I have indicated
parenthetically, pick the piece on cell C6.  So with all this in mind now,
let’s play FANORONA!

C4 à C5 (pick C6 to be removed from the
board)

C5 à D6 à E6

D3 à D2 à E3 à C3 à E5 à C7 à B6 à C6 à C7

D1 à C1 à C2 à B2 à B4 à D4 à B6 à B1

E2 à D2

D5 à C5

C5 à C6

C6 à B6

B6 à B7

B7 à B8

B8 à C9

            Sit back now and enjoy the
ending.  But don’t doze off altogether or you will miss what is obviously meant
to serve as a prelude to the first episode ("The Lost Sword of
Toledo") in the next installment of AGON that the developers have
promised.

Have a Safe and Happy Spring Break!

* * * * * * * * * * * * * * * * * * * * * * * * * * * * * *
* * * * * * * * * *