Agon: The Lost Sword of Toledo Walkthrough
2. Place the
photopaper in sensitizing solution for 10 seconds.3. Turn
around and hang the wet sensitized photo paper on the drying line at right
end.Take the dry developed glass negative from
the tray right of the sinks.Go to the
chair across the door and take the empty copyframe.Combine the
empty copyframe with the developed glass negative to get copy frame with
glass negative.Take the
dry sensitized photopaper from the drying line.Combine the
copyframe with glass negative and the dry sensitize photo paper to get
loaded copyframe.Exit the
dark room and go to the courtyard.Place the
loaded copyframe on the sunny spot at the edge of the well.
Open the Music Box 3:
Talk to Carmen completely. Professor Hunt tells
Carmen about the innocence of Francisco.About the third lock, she mentions the fascination
of her father with El Greco, unfinished paintings and a bible quotation read
during the funeral.Ask about the other characters.
Painter’s room:
Research El Greco:
Go back inside to the corner where the easel is
standing.Look close and study the 3 paintings on the floor
leaning on the wall. It is of the same theme.Turn around and go to the bookcase at other wall.
Take and read all the pages of the El Greco book
from the middle top shelf of the left bookcase.The last page has the painting, The Fifth Seal
which is the theme of the 3 unfinished painting.Exit the house and courtyard.
Iglesia San Pedro: Go to
the church.Talk to Father Perez. He gives a small bible
to use to find the painter’s funeral words.Father Perez’ ill friend has not been heard from
yet.Diez-Palencia’s house: Go
to the painter’s house and room.Music
box:Open the
bible and look for a relevant passage that is connected to El Greco.Check Book
of Revelation page 712 and see the bottom line (06:09).And when
he opened the fifth seal, I saw under the altar the souls of them that were
slain for the word of God, and for the testimony which they held.Look close
at the music box.Enter
R E V 0 6 0 9. Click on the lock at bottom. The music box opens.Take the
short letter and weird key.The music
box is done now.Look close
at the weird key. Read the short letter.
Find the
Secret cellar:
Darkroom:
Go to the darkroom. Go to the corner right of the big container of water.Move aside
the rug on the floor to reveal a trap door. Look close
and use the padlock key found in the music box 2 level on the padlock.Try to go down and see that it is dark.
Go to and
take the empty oil lamp left of the door. Go to the
chemical shelf at back wall. Use the empty oil lamp on the paraffin oil at top of the shelf to get filled oil lamp.Go down the
trap door and automatically the lamp lights up in inventory.Sewer:
Turn left and go forward until grill door.Sewer
maze:Turn right
and forward 2 clicks. Look around and see the crossroad. See the symbol on
the wall at right. It looks familiar. That is the first symbol at the bottom
corner of each page of the photo development notebook. That’s it!Study the
notebook and write down the sequence of the symbols.Go through
the sewer maze and look for the path that leads to the next in the sequence of
the symbols.Look around
after each step to see if there are any side paths or a symbol on the wall.The
direction below is based from one crossroad to another.At sword
with crown crossroad: Go forward (with painting at right – 2 clicks)) until the next
painting
– horse and crossroad.At horse crossroad: Go left and forward (1 click) to
gate.Exit
place – Listen and hear noises of life.Look left of
the grilled door and climb the rungs on the wall and hear/see parrot and
fountain. Climb back down.Look close
at the grilled door and see that it has a strange lock.Continue the
maze until the next symbol – sun (1 click and seen at left) and
crossroad.At sun crossroad: Go forward until the next symbol
(3 clicks) – monkey (symbol at right) and crossroad.At monkey
crossroad: Go left until the next symbol (1 click) – circles/crown (symbol at right) and crossroad.At circles/crown crossroad: Go left until the next
symbol (2 clicks) – hand and crossroad.At hand crossroad: Go left until the next symbol (1
click) – portrait (symbol at right) and crossroad.At portrait crossroad: Go forward until the next
symbol (5 clicks) – rosette and crossroad.At rosette
crossroad: Go right until the break on the wall (1 click).Another step by step for the maze by Looney4Labs:
Climb
down the stairs and go left 3 clicks (there will be a locked gate in front of
you)Go right
2 clicksLook on
the wall to the right—see the Sword and Shield with Crown.Go
forward 1 click-you are facing a wallGo right
1 click—you are facing the HorseGo left 1
click. Watch the cut scene. Now you are facing a locked gate. Look to the
left and see rungs. Climb up and hear/see parrot and fountain. Climb down.
Look at the strange lock on the door.Go right
1 click. See the Sun on the left.Go
forward 3 clicks. See the Monkey on the right.Go left 1
click—See the Crown/circles on the right.Go left 1
click—you are facing a wall.Go right
1 click—you are facing the Hand.Go left 1
click—See the Portrait on the right.Go
forward 1 click—you are facing a wall.Go left 1
click—you are facing a wall.Go right
1 click—you are facing a wall.Go right
1 click—you are facing a wall.Go left 1
click—you are facing the Rosette.Go right
1 click to the break in the wall.Secret
cellar: Enter through the break on the wall and be in the
meeting place of the Different Sun.Look around.
Turn right and check the #14 picture of tiles on the shelving.Go to the
bookcases by the wall.Check the
small table left of the bookcase and click the book aside to see a key. Take
the other weird key. Check the
book that was moved. Oh my! Check the scroll above the book.Check the
bookcase and check the special books. One at the middle shelf is the list of
the tortured-prisoners during the Inquisition. At right
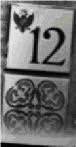
side of the middle shelf are 2 pictures: #2 and #12 with ornate tiles.Go forward
to the wall and take note of the writing on the wall: 111412310 WK. Look close
at the writing on the wall.Pan down and
look at the locked boxCheck the
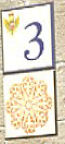
altar and see 2 pictures: #13 and #3.Exit the
secret place and see a map. The map has links to Exit, Diez-Palencia and
Secret cellar.Click on
Diez-Palencia. Climb the ladder and be in the darkroom.
Finish
the proof of Francisco’s innocence:
Go to the
well at the courtyard. Take the sundried loaded copyframe.Look close
at the loaded copyframe and get developed glass negative, empty
copyframe and sunlight copy photoGo back to
the darkroom.Prepare
the developing solutions:1. Place 60 ounces of water from the faucet of the big container
beside the sinks on the left sink.2. Place 40 ounces of water from the faucet of the big container
beside the sinks on the middle sink.Take 1 ounce of Gold chloride (AuCl3) found on shelf
above the sinks and add it to the middle sink.Take 1 gram of Ammonium rhodanide (NH4SCN) found at
shelf above the sinks and add it to the middle sink.3. Place 40 ounces of water from the faucet of the big container
beside the sinks on the right sink.Take 10 ounces of Natrium carbonate (Na2CO3) found at
slim necked bottle on the middle shelf at back wall and add it to the right sink.
Develope the photograph:1. Place the copy photo on the left sink
for 20 seconds as seen on the timer at left of the screen.2. Place the copy photo on the middle
sink for 80 seconds as seen on the timer at left of the screen.3. Place the colorized photo on the right
sink for 80 seconds as seen on the timer at left of the screen. Take the wet processed photo.4. Turn the faucets to empty the 3 sinks.
5. Place 60 ounce of water into any sink.
6. Place the wet processed photo into the water for
60 seconds. Take the wet final photo. Really. Really good.7. Hang the wet final photo on the line. Move one or 2 steps away. Go back and take the
final photograph.Go outside to Carmen. Talk to Carmen about the
secret meeting place and give her the final photograph.
Get to the Church Tower:
Iglesia San Pedro: Go to
the church. See Father Perez standing there.Go to the iron door.
Weird key: Remember Carlos mentioned that he
found a double key for the tower gate.In inventory, combine the 2 weird keys.
Right click one weird key to get a close up view.
Take the other weird key from inventory and click it
on the close up of the other weird key.Click on the snap of the short weird key. The 2 keys
are now one weird double key.Look close at the keyhole and see that the double
key and the keyhole match.Try to use the double key on the keyhole and
Professor says to find a way to do it without Father Perez. This will trigger the next part.Get the priest away from the church:
Plaza de la Mancha:
Domingo, the guitar player:
Talk to Domingo about a favour.Give Domingo 100 pesetas. Professor Hunt asks
Domingo to call Reoyos at the police station using the phone at the Taverna.
Tell Reoyos that he wishes to talk to Father Perez concerning the ill friend,
Fernando. He is to call in half an hour.Iglesia San Pedro: Go to
the church. Talk to Father Perez.See what happens when Reoyos arrives. The coast is
clear.Church Tower:
Iron door: Look close and use the double key
on the metal door’s keyhole. Turn the key and open the door.Professor Hunt enters the secret tower room.
Tower room: Look around.
See a broken ladder going to the top of the tower where the doves are.Go to the corner small table. Take the key from
tower. Take the letter from Carlos on the table. Read Carlos
Candelas’ letter. Carlos talks about a ‘reserve’ and Carmen’s medallion from
her mother maybe the solution.Check the bookcases at the other end of the room and
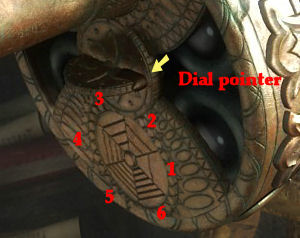
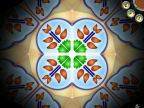
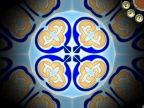
other artifacts on the table.Kaleidoscope: Look close at the
kaleidoscope by the window.Look through the lens and see wonderful colored
prisms. These look familiar.Tubes – There are 6 tubes of prism that can be rotated as
seen inside the big chamber at side view.Prism design – There are 8 prism designs as seen when viewed
through the lens for one of those tubes. There are side arrows that cycle the
designs.Dial – The tubes can be rotated using the dial on the front
of the kaleidoscope. The dial’s code as to where it points is based on the
circle with lines below it. The lines are in wedges. One line means the first
in the sequence, 2 lines wedge is the second in the sequence and so on… Turn
the dial to point where the selected wedge is positioned in the circle.Kaleidoscope puzzle: The aim of
the puzzle is to select a specific design for each of the 6 tubes and the
tubes are to be done
in numbered order.The designs to be selected are taken from all the
pictures of tiles with numbers and design seen throughout the game.The sequence of the design to be entered in the
kaleidoscope is based on the clue left by WK on the wall of the secret cellar in
the sewer.After roaming throughout, note that there are some
similar numbers in the pictures but have different tile design. By trial and
error, deduce which one to use.Deduction of the numbers on the wall: The
number seen on the wall at the secret cellar is: 111412310.Numbered pictures seen in town: Painter’s room – 10; Plaza – 1, 3; Police station –
18, 16; Candelas – 8, 11, 5, 7, 14, 15, 19, 1, 12 and 4; Darkroom – 11; Secret
cellar – 14, 2, 12, 13, 3.Possible numbers to use: 10, 1, 3, 11, 14, 1, 12, 4,
11, 14, 2, 3.Take note that there are 2 numbered 1, 3, 11 and
14.– Starting at the end of 111412310;
there are no 23 or 31 or 0. So the two numbers at the end are 3 and 10. 111412
– 3 – 10.– To deduce the rest 111412; the possibilities are:
1, 11, 4, 12, or 11, 1, 4, 12 or 11, 14, 12 or 11, 14, 1, 2. Since we need 4
more numbers because there are 6 tubes, we can eliminate 11, 14, 2. We are
left with 1, 11, 4, 12 or 11, 1, 4, 12 or 11, 14, 1, 2.– Since the possibility of 111, 4, 1, 2 or 1/11,
11/1, 41, 2 are not possible. Then the middle number is 12. We are left with 1114 – 12 – 3 – 10.– To have 3 numbers, the third number will have to
be 4.– We need 2 numbers now: 1/11, 11/1, 4 – 12 – 3 –
10. By process of elimination, found that only #1 pictured pattern matches one
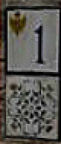
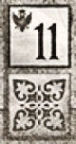
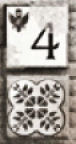
of the patterns in tube 1 of the kaleidoscope.– The deduced sequence of numbers is: 1 –
11 – 4 – 12 – 3 – 10.The duplicate numbered patterns are also eliminated
by checking on that appropriate tube.Design and sequence of tiles:
Check these designs to recall what pattern to select in the kaleidoscope.1 is from the corner at Plaza de la Mancha.
11 is from the photo album in Francisco’s room.
4 is from the photo album in Francisco’s room.
12 is from the secret room in the sewer.
3 is from the Palace at Plaza de la Mancha.
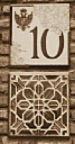
10 is from the wall picture above the desk in the
painter’s room.
Enter the chosen design on the tube:Turn the dial with wide tip to position similar to
if the dial is on the circle below it – point to one line at
the front of the kaleidoscope.Look through the lens and cycle using the side
arrows to select the correct design from picture #1.Leave the selected design and pull back.
Turn the dial (counterclockwise) with wide tip to
point to 2 lines’ position (as seen at bottom circle) at the front of the
kaleidoscope.Look through the lens and cycle using the side
arrows to select the correct design from picture #11.Leave the selected design and pull back.
Do the above procedure for 3 lines (#4 picture), 4 lines
(#12 picture), 5 lines (#3 picture) and 6 lines (#10 picture).If the designs are correct and placed in correct
sequence, a click is heard and the kaleidoscope opens to reveal the codex.Take the fourth codex. Read the codex from
John Gillam.




Exit the tower and the church.
Diez-Palencia’s house: Go
to the painter’s house and then to the darkroom.Secret cellar: Go down the
trap door and get the map.Click to go to secret cellar. Go to the writing on
the wall.Look close and down to the locked box. Use the key
from the tower on the padlock. Open the box.Take the sword forged by Juan Candelas the blade
master. Look close at the initials on the coat of arms – JC.Remember that the stolen sword with Arriaga has an
initial CC (mirror arrangement). This is the error that was noticed by
Francisco on the sword.Exit the secret cellar and the sewer. Go back to
Diez-Palencia’s place.Exit the courtyard.
Recover the Alquerque board game:
Candelas house: Go to
Candelas house.Talk to Isabel and find out what happened to the
Alquerque game board and Arriaga. Arriaga escaped in the courtyard with a fountain.
Ricardo is the name of the parrot. Hmm…Isabel gives the forge key. New location made.
Exit the house.
Candelas II: The
cellar of the Candelas house is blue. That is the forge. Click on Candelas II.Look around the forge. See that there are a lot of
active items.Check-look close at the casting frame on the worktable.
Professor Hunt says
it needs clay, metal and right temperature.Take the crowbar on the top shelf left of the
furnace. Exit the forge.Arriaga:
Diez-Palencia’s house: Go
to the painter’s house and then to the darkroom.Go down the trap door to the sewer. Select Exit link
at top of map.Exit: Check the grilled door and
see a ring on the ground behind the grill. Use the crowbar to get the ruby ring.Pan left and climb the rungs on the wall.
Use the crowbar on the manhole cover. See Hunt comes
up from the sewer.Arriaga’s:
Check the parrot. Enter the house through the door.
Go forward to the shop room.
See 3 bowls of bird seeds on the end of the counter.
Click on overturned bowl. Someone was in rush to get these birdseeds. Get birdseeds from that overturned bowl.Look at the chess set spilled on the floor.
There’s not a single knight on the metal pieces. Interesting…Look at the ivory and ebony chess set on the shelf.
Take the ivory knight piece (horse head).Go back out to the courtyard. Give birdseeds to the
parrot.The parrot recites the steps of the Viennese Waltz.
Sounds like a route to me.The parrot says: Forward – left – forward – right –
right – left – forward – forward – right – right – forward – left – left –
right – left.Go down the manhole.
Exit: Look close at the
lock. Use the ivory knight piece on the keyhole. It fits! The ivory chess
piece will break. We need to make a metal one.Go forward on any exit to get the map. Exit to Diez-Palencia. Exit the sewer and courtyard.
Plaza de la Mancha:
Go to the potter’s stall. Talk to the potter and ask
for clay now that you know how to do the casting at the forge. Give the potter the ruby ring. Take clay left of the table.Go to the square and take the newspaper from
the bench.Candelas II: Go to
the forge.
Make a knight’s key mould:Go to the central worktable.
Take the knife from the table. Look close at
the casting frames. In inventory, combine the clay and knife to get 2 pieces
of clay bricks. Place the clay bricks on the casting frames. Both
frames have clay.Place the ivory knight on left frame. Click on the
frames to combine the 2 part and produce a mould.Take the ivory knight out and see the mold.
Use knife on the top of the left clay frame and see
a trough.Go to the wall left of the furnace and take a
metal unfinished key. Place the unfinished key on the clay mould. That’s
the handle.Click the mould to combine the 2 parts. Take
casting frame.
Light the furnace:Take firewood from the bin left of the
furnace. Place firewood in the furnace.Place newspaper on firewood.
Use matches on firewood and newspaper.
Click the bellows left of the furnace 3 or more
times to get a steady fire.
Burn the clay mould:Place the casting frame in the furnace to burn the
clay mould.Take the gloves on the shelf left of the
furnace.Use the gloves on the casting frame. It is moved to
one side.
Cast the key:Pan down and right. Take the pot that still
has some metal in it.Place the pot in the furnace to melt the metal.
Click the bellows left of the furnace 3 or more
times to get a steady fire.Look around the forge to give time for the metal to
melt.Go back to the furnace. Use gloves and pick up the
pot.Pour the metal in the pot on the casting frame.
Take the mould frame and place it on the anvil.
Use the knife to open the casting frame.
Take the moulded chessman key from the cast
mold.Diez-Palencia’s house: Go
to the painter’s house and then to the darkroom.Exit: Go down the trap
door, to the sewer and get the map. Select Exit.Look close at keyhole of the grilled door.
Use the moulded chessman key on the keyhole.
Enter and start the maze.
Follow the direction of the Viennese Waltz given by
Arriaga’s parrot.Go: Forward (you already did this from the gate) –
left – forward – right – right – left – forward – forward – right – right –
forward – left – left – right – left.
Arriaga’s hideout:See the
stairs to Arriaga’s hideout. Climb and go through door.Professor
Hunt is pushed into a cell by Arriaga. Now, Hunt is imprisoned.Look
around the room and see what we can do.Go to the
bag inside the open cabinet. Take the Alquerque board from the sack.
Escape the
prison:
Go to right
corner and look up. Look close at the grate up in the ceiling. It is quite
high. We need to get up there and open the grate.Look above
the open cabinet. See a chain with a hook and a box.Get the
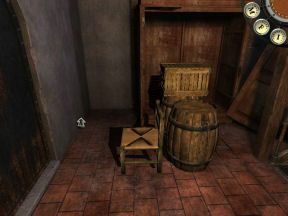
box on top of cabinet:Pick up a
barrel. Turn and place it down one space at a time until it is positioned
just in front of the open cabinet.Pick up
the other barrel and place it close to the first barrel.Pick up
the closed box and place it on top of the barrel closest to the open cabinet.Pick up
and place the chair in front of the other (second) barrel.Climb up
the makeshift step by clicking on the box on top of the open cabinet.Take the
rope inside the open box on top of the cabinet.Take the
box on top of the cabinet and bring it down. Lay it on the floor.Climb back
up and take the spade head and broken spade handle from top of
the cabinet.Try to get
the chain with the hook. It is too high up.
Get the
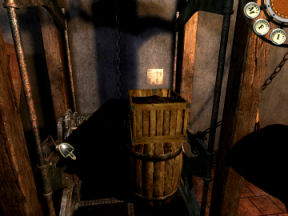
chain on ceiling:Elevator:
Enter the elevator and read the poster on the wall.It states
that the capacity of the elevator: 2 adults, an adult or half full barrel or
an adult and 2 boxes.Look at the
left side of the elevator and see the brake system of the elevator.Use the
broken spade handle on the top of the left-lower wheel to have a makeshift
handle.Release the
brake on the left and turn the makeshift handle.Lower
room: Go to the right side of the elevator.Take the
long pole leaning on the wall.Take the
barrel with cover and place it in the elevator.The way I did this without
being locked in is to stand close to the wall in front of the barrels.Take the open barrel and drop it in front of the
closed barrel by the wall on the right.Then stand by the elevator and take the closed
barrel and drop it inside the elevator.Enter the
elevator. Release the break and turn the wheel.Climb the
makeshift steps to the top of the box over the barrel.Look up and
use the long pole on the chain hooked on the ceiling. The chain with
hook is in inventory.Get to
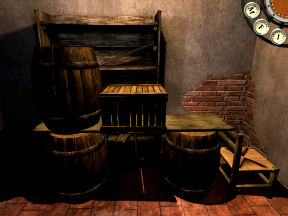
top of the shelf on the other side of the room:Pick up a
barrel. Turn and place it down one space at a time until it is positioned
in front (not side) of the left side of the shelving.Pick up
the other barrel and place it one space away from the first barrel.Take the
plank leaning on right side of the shelving and place it on top of the
barrels. If the barrels are too far from the plank, it will not be possible
to place it on the barrels.Pick up
the barrel taken from the lower room from the elevator and place it on top
of the plank and over the barrel on the left.Take the
closed box and place on top of the plank close to the barrel.Place the
chair at end of the setup at right.
Remove
the grate from the ceiling:Climb up the
setup by clicking on top of the shelving.Use the
chain on the grate in the ceiling. The chain is now hanging by the hook on the
grate. Climb down.Weigh
down the elevator:Review the
poster that shows the maximum capacity of the elevator.Based on the
poster, a half filled barrel equals an adult. So a filled barrel equals 2
adults.Release the
break and turn the wheel.In
inventory, combine the shovel head and the long pole to make a shovel.Place 4
scoops of dirt in the open barrel. If you place 8 scoops, the barrel is
filled. So 4 scoops equals an adult based on the capacity poster.Take the
half filled barrel and place it inside the elevator.Go up to the
top floor.Take the
half filled barrel and place it outside the elevator.Take the
open box and place it in the elevator.Go down the elevator.
In the lower
room, take the open box and place outside the elevator.Use the
shovel on the dirt and fill the open box with dirt (2 scoops).Take the
filled box and place it inside the elevator.Go up to the
top floor.Take the
filled box from the elevator and click it on the half filled barrel to empty
the box and add soil to the barrel that has 6 scoops now.Go down once
more and fill the box with soil.Bring it up
and fill the barrel to capacity (total 8 scoops).For the
third time, go down once more and fill the box with soil.Go up. Take
the filled box and place it outside the elevator.Take the
filled barrel and place it inside the elevator.Take the
filled box and place it over the filled barrel.Go to the
hanging chain. Click on the chain above the view of the barrel and be holding
one end of the chain.Attach the
end of the chain on the side of the elevator.Stand in
front and outside the elevator.Use the
shovel on the brake of the elevator. Watch.
Escape:
Take the hook that fell off the chain.Combine the
rope and hook to get rope with hook.Climb up to
the top of the setup.Use the rope
with hook on the opening in the ceiling.Click on
rope to climb up. Surprise, Isabel!Forge:
Give Isabel the Alquerque board. Exit the
forge.Candelas
house: Go to Candelas.Automatically talk to Francisco in his bedroom.
Talk to
Francisco. Professor Hunt gives him the original sword.
Alquerque board game:
The dial on
the screen at top right changed to: E for Exit, R for rules and M is for menu.Read the
rules.You can
change the setting of the game to easy or normal at the options in main menu.Win the game
once and Francisco gives granite plate.Watch.
Next
destination: Peking in Tale of the 4 Dragons
This document may not be
distributed without express written permission of the author and the content
may not be altered in any way.
For Questions or Comments
on this Walkthrough,
Please write to:
MaGtRo
Copyright © 2/2008MaGtRo