Agon 4

by MaGtRo about 41 minutes to read


AGON 4: Lost Sword of Toledo


by Private Moons Studios

Walkthrough by MaGtRo   February 2008

Gameplay:    This is a first
person point and click game. The Main Menu has New Game, Resume Game, Play Board
Game (activated after completion of the in game puzzle game), Game Options,
Extra Features and Credits.

The Game Options have the Audio, Video and Game
selections. The Audio options have adjustments for noise, music and speech. The
Video options have adjustments for color depth, anti-aliasing and screen size.
The Game options have selections for panoramic speed, subtitles and difficulty
level.

Extra Features have Dorothy’s Table, Memories and
Credits. Dorothy’s Table has Professor’s Hunt’s letters to his wife and Smythe
about his adventurous trip to get to Toledo and a question about the Madagascar
document. His biography (events when Professor Hunt was 12 years old) is also on
the table. Memories has the background of the earlier AGON adventures and the
collected Codex’. Certain
stones are left in different places to guide the one who fulfills the destiny of
releasing the forgotten board game to the world. Credits shows the makers of AGON.

Game Menu has Save, Load, Back to game and Exit (autosave).

Dial Menu is seen at top right of the game screen. M
stands for Menu, F for Files and I is for inventory. Dial Menu during the board
game has E for Exit, R for rules and M is for menu.

Inventory is at top of the screen and seen when the I
dial is clicked on. A click on the I dial again closes the inventory. The same
function can be done by pressing the space bar. A close or zoom view of the item
is possible if there is a gear beside the item. Right click on the item and it
shows a full screen view. Items can be combined by clicking one over another
item.


Professor Hunt writes to his wife, Dorothy while
traveling to Toledo, Spain in a coach. A priest is the other passenger in the
coach. He will visit the daughter of Dorothy’s old drawing teacher and search
for the Candelas family that is the keeper of the board game here. He left the
coach at the Plaza de la Mancha.


This walkthrough shows one possible
sequence of events. Things can be done in different order and different times.

Find Dorothy’s former teacher:

Plaza de la Mancha:    Look
around the plaza. Take note that the buildings are marked by tiles with a number
and a design. The plaza road is #1 and the palace on the other side is #3.

See a guitar player, potter and a man reading a
newspaper. Talk to the man reading the newspaper.

Talk to either the potter in his stall or the
guitarist completely about Salvador Diez-Palencia the painter’s house. Learn
that the painter is in Plaza San Pedro.

Map:    Go through the arch
and see a map. Click on a highlighted location and be there in that location.

Click on Diez-Palencia in the map.

Diez-Palencia’s house:   

Courtyard:    Talk
to Carmen, the daughter of Diez-Palencia. She was expecting Professor Hunt.
Learn that her father died last year and what has happened to her.

She gives the key to the painter’s room and
the gate.

Learn about the life of Salvador Diez-Palencia and
his romantic liaison with a married British Countess. Carmen will be 21 years old
in 2
months. They are poor. He willed everything to Carmen including a music box he made.

Learn about Carmen’s problem and the paper signed by
her father. If she does not have a husband whose estate matches the worth of
the house before she turns 21, then Alonso Garcia de la Rica is going to get
her property and she is to marry his son Eugenio.

Learn about Francisco, the blacksmith she loves. He
is in jail for theft. Learn that Francisco is the Candelas that Professor Hunt is
looking for. The new location for the Candelas house is placed in the map.

Learn that Francisco supposedly stole a sword made
by Francisco’s grandfather from the de la Rica’s house.

The tune in the music box is her father’s favorite
music.

Painter’s room:    Use the key on
the door at right of the courtyard. Look around the room.

Check the desk at left. Look at the picture on the
wall above the desk. It has #10 on it and a designed tile.

See a Chinese box in one of the pigeon holes. Read
the letter with the box. It is a cigar box given by the painter’s friend
Alonso. We will open this box later. Read the trumpet teacher’s journal of
students and the grades.

Open the top left drawer of the desk under the
window. Take a winding key.

Check the paintings at left corner on the floor
beside the easel. There are 3 paintings of the same theme.

Check the door and see that it is locked. Check
the trumpet of the painter on the wall.

Check the bookcases and see there are several
Spanish music sheet books on the left bookcase. The bookcases by the
bed have El Greco, Man of La Mancha and Masters & Masterpieces of Painting.
The other has Astronomy for All book at top left and other books.

Music Box:    Open and
look close at the music box on the side table of the bed.

The box has 8 dials with 12 characters each. The
lock at bottom edge of the box is the ‘enter’ key.

Use the winding key on the slot at bottom left
of the box. Click the key. Watch the ballerina dance to music. Remember
this music.

Click on the ballerina while it is dancing.
A roll of paper fell off the tutu.

Take and right click to read the small letter in
inventory. The music box contains treasures.

Go outside and give the small letter to Carmen.

Exit through the gate. Before leaving, Carmen offers
some biscuits. Take a biscuit from the plate on the well rim.

Open the Music Box 1

Plaza de la Mancha:    Go to Plaza de la Mancha.

Find out the tune of the music box:   

Go and talk to Domingo, the guitar player completely.

He will help for something in return. Give him the
biscuit.

Domingo plays 3 songs. None of the three is the
music box song.

Go back to the painter’s house and get another
biscuit. If you need a reminder of the music, play the music box again.

Go back to Plaza and give biscuit to Domingo.

Domingo plays 3 more songs. None of the three is the
music box song.

Go back to the painter’s house and get another
biscuit.

Go back to Plaza and give biscuit to Domingo.

Domingo plays 3 more songs. First of them is El Nenufar.
It is the song of the music box.

Diez-Palencia’s house:    Go back to the painter’s house
and then the painter’s room.

Find the code for the music box:

El Nenufar:    Go to the
bookshelf right of the locked door.

Check all the books and look for El Nenufar. It is
in the book at top left of the bookcase.

Open the book and see that the El Nenufar was written
by A. Lozano and it is his Op. 28.

Trumpet Teacher’s journal:   
Go to the book on the desk by the door.

Flip through the pages and look for Op.28.

The song was taught at 1899 class VI to Carlos
Juarez during the 2nd semester.

Music Box layer 1:    Go to and
look close at the music box.

We need 8 letters. Each dial is labeled by
numbers.

Turn the dials to form: L O Z A N O V I

Press the lock at the bottom of the box. Yes,
this will be the solution.
Bell rings.

The music box opens. See the medallion and
a letter.

Carmen enters and will read the letter.

Exit the courtyard.

Candelas’ house:    Select the
Candelas house in the map.

Talk to Isabel, Francisco’s mother completely. Learn
about the police station.

She doesn’t know about the AGON. She talks about
Francisco and the famous Candelas swordsmith family.

Learn about her husband and the lost sword. The
lost sword has a jewel, perfect blade and the initials of the blademaster.

Talk to her again and learn about the other
characters. Alonso changed a lot after a family tragedy.

Take a closer look at the picture on the wall right
of the exit door. It is a picture of tiles with #8 and ornate design.

Exit the house.

Diez-Palencia’s house:    Go
to the painter’s house.

Talk to a crying Carmen. She gives the letter of
Salvador Diez-Palencia
.

Learn about the other characters.

Painter’s room:   

Music Box layer 2:    Look
close and see that there are 8 dials.

It looks like the code is a date and the day of
the week.

Long letter:    Right click
and read the letter. Learn the secrets and weaknesses of the father.

Learn about the tower in the church with a gate
that can not be opened and what is in the tower.

Learn about and the friendship of the 3 men:
Alonso, Carlos and Salvador.

It was 14 years ago before this Easter that the
men formed a secret society called Different Sun.

Learn about the disaster that broke the
friendship.

Learn about the 3 major periods in Salvador’s
life: his 15 year stay in England, his return to Toledo with Carmen and the
creation of the Different Sun.

Go outside and talk to Carmen completely.

Learn that the 3 friends met in the bedroom but
they are not there when Carmen peeked. She gives the darkroom key.

Last year end of May is when the father died. Carmen was born 4th of September, 1883.

Exit the courtyard.

Talk to Francisco:

Policia Local:    Go the
police station.

Talk to Sergeant Reoyos completely. Learn more about Francisco and the lost sword.

Permission from Alonso is needed to talk to
Francisco. Alonso is not in Toledo.

Talk to Reoyos again about the other characters.

Look at last year’s moon calendar on the wall and
take note that there’s a telephone right of the door.

Exit the police station.

Plaza de la Mancha:   

De la Rica’s Palace:    Turn
right at the Plaza in front of the man reading the newspaper.

Go to the corner and see the #3 tile on the wall.

Palace garden:    Turn
right and forward to the small gate with a bell. Ring the bell.

Talk to Hugo, the French Butler completely. Learn that he is partial to Francisco’s
innocence. Hugo can help by forging a permission letter.

Hugo wants you to sell a valuable stamp
to Arriaga, the antique dealer for 1500 pesetas. New location is in the map.

Talk to Hugo again. Learn about the winery book (had a copy) that held
the stamp made in 1854 (50 years ago).

The lost sword was admired by several men.

Arriaga:    Go to the archway
and click on Arriaga’s store in the map.

Talk to Arriaga completely. Arriaga states that he
has special items that are obtained by questionable means.

He wants proof that Professor Hunt has money to pay
for the special objects.

Show Arriaga the stamp. In the selection of cost;
select 1700 (or 1300) pesetas.

If 1700 pesetas is selected, end up with 1600
pesetas
. Professor Hunt is slick.

Talk again and ask about other things and
characters.

Exit the store and go to the Plaza.

Palace Garden at the Plaza:   
The garden gate is open. Enter the gardens. Look around.

Go and talk to Hugo at the gazebo. Give 1500 pesetas
to Hugo and now has 100 pesetas in inventory.

He gives the forged permission and the
winery book
. Check the winery book and see that it has equinox
topics. Read the permission.

Talk to him again about other topics.

Policia Local:    Go to the
police station. Give Reoyos the permission.

Talk to him again about other topics. I really
like cigars.

Turn right and forward through the jail area. Select
any identification.

Talk to Francisco completely. Francisco was
surprised about Professor Hunt being the hero that will bring freedom. The
board game is Alquerque.

Learn about the mistake in the sword’s coat of arms
and the other suspects.

He needs pen and paper to write for Isabel to watch
the shop.

Go outside the jail area and talk to Reoyos completely. He doesn’t
want to give the paper and pencil.

Get cigars:    There are 2
ways to get a cigar.

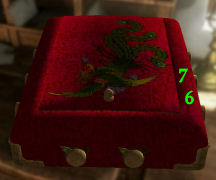
1. One way to get a cigar: Open the Chinese box in
Salvador’s desk.

Go back to painter’s bedroom and look close at
the Chinese box of cigars.

Note that there are 8 switches; 3 on each sides
and 2 in front.

They are all now facing left. To open the box
the switches should all face right.

Save game here. Find out what other switches are
affected by each of those switches.

Left side switches: Front side switches: Right side switches:

1 affects 1, 2, 5 and 7

2 affects 2, 1, 3 and 8

3 affects 3, 5, 6 and 7

4 affects 4, 1, 6 and 8

5 affects 5, 2, 3 and 6

6 affects 6, 2, 5 and 8

7 affects 7, 1, 3 and 4

8 affects 8, 1, 4 and 7

Solution:   Go Back to saved game
before puzzle is touched and click on switches 6 and 7.

2. Another way to get a cigar:     Remember that the
cigars were given by Alonso. Maybe we can get some there.

Go to the Palace Garden. Talk to Hugo
completely.

Hugo leaves to get the cigar. Take and read the
letter on the bench. Learn more about Hugo.

Go forward to the Garden gate. One step close to
the gate brings Hugo back with the cigar.

Give cigar to Reoyos.

Take the paper and pencil from desk behind
the counter. Look at the 2 pictures on the desk. It has the #18
and ornate tile in one and #16 and ornate tile in another.

Go to Francisco and give him the paper and pencil.
He writes the letter. Read Francisco’s letter to Isabel.

Investigate Arriaga:

Candelas house:    Go to
Candelas house.

Give Isabel Francisco’s letter. Talk to Isabel
completely. She allows Professor Hunt to go to Francisco’s bedroom.

Climb the stairs at right and enter the door on the
left.

Francisco’s bedroom:    Look
around.

Look outside the window and see a closed window blind across the street. It is above Arriaga’s store.

See that there are several active items in the
bedroom but they can not be taken out of the room.

There’s a tricycle on the shelf left of the door,
a mirror at the corner and a fishing rod left of the desk.

Look at the photo album on the desk and see
pictures of numbered and ornate tiles. The numbers are 11, 5, 7,
14, 15, 19, 1, 12 and 4.

Look at the book on the side table beside the bed.
It is an almanac with a perpetual calendar.

Exit the room.

Diez-Palencia’s house:    Go
to the painter’s house.

Talk to Carmen. Professor Hunt asks to borrow her
medallion
, the heirloom from her mother.

Carmen says that Father Gabriel Perez, the priest
that rode with Professor Hunt in the coach wants to talk to him. New location
is made.

Arriaga:    Go to Arriaga’s
store.

Talk to Arriaga. Show the medallion to Arriaga. That is proof enough of serious intent to buy that
Arriaga invites Professor Hunt upstairs to see the special items.

Follow Arriaga behind the curtains. See a locked
door at end of hallway.

Climb the stairs and enter the open door on the
left.


Special

items room:
    Look around and check the items that
Arriaga accumulated through doubtful means.

Go to the window and turn around. See a jeweled
sword that has a coat of arms on the hilt facing the window. Remember what
Francisco stated about the mistake on the coat of arms.

Professor Hunt is definite that the sword by the
window is the stolen sword.

Try to open the blinds but Arriaga refuses because
of neighbors.

Talk to Arriaga again and choose any answer. Now
you can leave the room and the store.

Get proof of the stolen sword: 

Diez-Palencia’s house:    Go
to the painter’s house and room.

Dark room:    Use the
darkroom key on the darkroom door and enter.

Turn right and take matches from the edge
of the bigger table by the wall. The small table by the door has an inactive
oil lamp.

Turn around and use matches on the lamp on top of
the shelving beside the door. Red light illuminates the room.

Look around at the sinks, big container of water,
drying line and the chemicals. The drying line has a picture of #11 tile and
an ornate tile.

Check the carpet under the drying line and see
that there is a padlocked trapdoor.

Turn around and go to the bigger table by the
wall. Take camera (automatically lens cap) and empty photo
cassette
.

Look close at cabinet above the table. Take the
sensitized glass negative from the left side bottom shelf of the cabinet.

Study the camera procedure above the long bench.

As a step in the preparations for taking
photograph:    

Close the lid of the red lamp above the shelves by the door.

Combine the sensitized glass negative and the photo cassette in inventory to
get loaded cassette.

Exit the room and the courtyard.

Candelas house:    Go to
Candelas house.

Go up to Francisco’ room.


Prepare to take picture:

Place the camera on the window sill across the
closed window blind of Arriaga’s special items room.

Take the fishing rod at corner left of the
desk. Use the fishing rod on the base of Arriaga’s closed windows blind. Watch.

Take the toy tricycle on the shelf left of
the door. Go back to window and then look up. Place the toy tricycle on the
ring of the window frame above the window sill. Take the other end of the
fishing line that is now on the window sill and use it on the tricycle.


Focus the camera:

Click on the front part or top of camera to get a
close up of the side view.

Click on the notches at the base of the camera.
This pulls out the accordion of the camera. Pull out to the last (4th) notch.

Look close at the glass plate at the back of the
camera. Check the image and see that there is not enough light.

Take the mirror right of the window and
place it at right side edge of the window sill. Adjust the mirror’s
angle until the closed blind of Arriaga’s window is lit up completely.

Look again at the glass plate at back of camera.
It is now bright. Yes, it works now.

Load the camera:

Look close at front of camera. Place the lens cap
on the lens. Take the end of the fishing line and place it on the hook of
the lens cap.

Use the loaded photo cassette on the glass plate
at back of camera. The frosted glass plate is now in inventory.

Click on the right edge of the inserted cassette
to take the cassette frame out of the back of the
camera. This leaves
the sensitized glass negative inside the camera.

The photographic trap is ready.

Exit the room and the house.

Arriaga:    Go to Arriaga’s
store. Talk to Arriaga completely. Follow Arriaga to the
room above.


Special

items room:
    Talk to Arriaga again to open the blinds.

Go to the window and click the window blinds.
Watch.

Talk to Arriaga again to exit the room and the
store.

Candelas house:    Go to
Candelas house. After greeting Isabel, go upstairs to Francisco’s
room.

Take the proof:    Click the back of the camera to pull the cassette.

Take the frosted glass from inventory and click it
on the back of the camera to get exposed negative in cassette.

Exit the house.

Open the Music Box 2:   

Recall that the next lock of the music box requires
a date and day.

The major events in the painter’s life include his
years in England, Carmen and getting back to Toledo and the formation of the secret society. The
only one that has a definitive date is the formation of Different Sun was 14 years ago before last year’s Easter.


Let’s find out the date and day of Easter:

Iglesia San Pedro:    Go to
the church.

Father Perez:    Enter the
church and talk to Father Perez completely.

Learn about his ill friend at Santa Clara Hospital
in Madrid and that he talked to the doctor by phone.

Learn how to determine when Easter falls. Easter
falls on the first Sunday after the first full moon following the Spring
Equinox. It usually falls between the 22nd of March and April 15.

Ask about the other characters. There are 2 phones
in town; one at the police station and one at the pub.

Iron door:    Turn right and go
to the ornate metal door.

Look close at the keyhole. There are 2 keyholes or
double lock.

Talk to Father Perez about the iron door. Learn that it leads to the tower and has not been
opened for over 100 years. Remember the long letter that mentions what
Carlos found.

Leave the church.

Policia Local:    Go to the
police station.

Look at last year’s calendar on the wall. Based on what Father’s Perez stated; Easter usually
falls between March 22nd and April 15 or after the Spring Equinox.

Open the calendar to March. Based on Father Perez; Easter falls after the first
full moon following the Spring Equinox.

Open the winery book from Hugo to page 12 and see that Spring
Equinox is March 21.

The first full moon after the Spring Equinox in
March last year was March 23.

The first Sunday after March 23 is March 30th. So
Easter fell on March 30, 1903 last year.

The formation of the secret society was 14 years ago
on March 30, 1889.

Candelas house:    Go to
Candelas house.

After greeting Isabel, go to Francisco’s room.

Open the almanac beside the bed to the perpetual
calendar.

Perpetual Calendar: Read the procedure to
use the graphs.

The formation of the society was March 30 1889.

On the chart on the
left page, look for 89 (based on 1889).

Follow that 89 row to the chart at right page. See that 5 is under III
(March is the 3rd month).

Procedure states to add date in question to number
found. 5 + 30 = 35.

At the Days of the
week at top of the right page, 35 is on Saturday.

Diez-Palencia’s house:    Go
to the painter’s house and room.

Music box:    Look close at
the music box.

Turn the dials to 1 8 8 9 Mar 3 0 Sat.

Press the lock. This solution looks promising.
The music box opens.

Take the painter’s notebook and a
padlock key
.

See that the next puzzle is about a bible
quotation.

Develop the
photographic proof.

Read the notebook and see that it has procedure for
photo development. Take note of the symbols at bottom corner of each page.
Wonder what those are for…

Go to the darkroom.

Go forward and take the book at top shelf beside the
chemicals
at back wall. Read the book and see the chemical name and symbol of the
reagents. Use the book as reference in the preparation of the solutions.

Take the measuring cups: 10 oz, 1 oz
and 1 gr. from the back of the 3 sinks at other side of the room.


Prepare the developing solutions:

1. Place 40 ounces of water from the faucet of the big container
beside the sinks on the left sink.

Take 10 ounces of Developing solution found at
left of top shelf at back wall and add it to the left sink.

2. Place 40 ounces of water from the faucet of the big container
beside the sinks on the middle sink.

Take 10 ounces of Natrium /Sodium thiosulfate (Na2S2O3)
found at left of middle shelf at back wall and add it to the middle sink.

3. Place 50 ounces of water from the faucet of the big container
beside the sinks on the right sink.

Take 5 ounces of Natrium carbonate (Na2CO3) found at
slim necked bottle on the middle shelf at back wall and add it to the right sink.


Developing the glass negative:
   

Close the lid of the red light lamp to darken the room.

Right click the exposed negative in cassette in
inventory to get
exposed glass negative
and empty photo cassette.

1. Place the exposed glass negative on the left sink
for 30 seconds as seen on the timer at left of the screen.

2. Place the exposed glass negative on the middle
sink for 30 seconds as seen on the timer at left of the screen.

3. Place the exposed glass negative on the right
sink for 60 seconds as seen on the timer at left of the screen.


I think I have done everything right. It’s time to
dry it.

Open the lid of the red lamp to get light. Place the wet developed glass negative on the
tray right of the sinks by the wall.


Sensitizing the photographic paper:

Take no sensitized albumen photopaper from the
top shelf of cabinet above the
table at other side of the room.

Empty the sinks by clicking on the faucets.

1. Place 40 ounces of distilled water from the shelf
above the sinks on one sink.

Take 10 ounces of Silver Nitrate (AgNO3) found at
shelf above the sinks on sink with distilled water.

2. Place the
photopaper in sensitizing solution for 10 seconds.

3. Turn
around and hang the wet sensitized photo paper on the drying line at right
end.

Take the dry developed glass negative from
the tray right of the sinks.

Go to the
chair across the door and take the empty copyframe.

Combine the
empty copyframe with the developed glass negative to get copy frame with
glass negative
.

Take the
dry sensitized photopaper
from the drying line.

Combine the
copyframe with glass negative and the dry sensitize photo paper to get
loaded copyframe
.

Exit the
dark room and go to the courtyard.

Place the
loaded copyframe on the sunny spot at the edge of the well.

Open the Music Box 3:   

Talk to Carmen completely. Professor Hunt tells
Carmen about the innocence of Francisco.

About the third lock, she mentions the fascination
of her father with El Greco, unfinished paintings and a bible quotation read
during the funeral.

Ask about the other characters.

Painter’s room:   

Research El Greco:

Go back inside to the corner where the easel is
standing.

Look close and study the 3 paintings on the floor
leaning on the wall. It is of the same theme.

Turn around and go to the bookcase at other wall.

Take and read all the pages of the El Greco book
from the middle top shelf of the left bookcase.

The last page has the painting, The Fifth Seal
which is the theme of the 3 unfinished painting.

Exit the house and courtyard.

Iglesia San Pedro:    Go to
the church.

Talk to Father Perez. He gives a small bible
to use to find the painter’s funeral words.

Father Perez’ ill friend has not been heard from
yet.

Diez-Palencia’s house:    Go
to the painter’s house and room.

Music
box:   

Open the
bible and look for a relevant passage that is connected to El Greco.

Check Book
of Revelation page 712 and see the bottom line (06:09).

And when
he opened the fifth seal, I saw under the altar the souls of them that were
slain for the word of God, and for the testimony which they held
.

Look close
at the music box.

Enter
R E V 0 6 0 9. Click on the lock at bottom. The music box opens.

Take the
short letter
and weird key.

The music
box is done now.

Look close
at the weird key. Read the short letter.

Find the
Secret cellar:

Darkroom:   
Go to the darkroom. Go to the corner right of the big container of water.

Move aside
the rug on the floor to reveal a trap door. Look close
and use the padlock key found in the music box 2 level on the padlock.

Try to go down and see that it is dark.

Go to and
take the empty oil lamp left of the door. Go to the
chemical shelf at back wall. Use the empty oil lamp on the paraffin oil at top of the shelf to get filled oil lamp.

Go down the
trap door and automatically the lamp lights up in inventory.

Sewer:   
Turn left and go forward until grill door.

Sewer
maze
:

Turn right
and forward 2 clicks. Look around and see the crossroad. See the symbol on
the wall at right. It looks familiar. That is the first symbol at the bottom
corner of each page of the photo development notebook. That’s it!

Study the
notebook and write down the sequence of the symbols.

Go through
the sewer maze and look for the path that leads to the next in the sequence of
the symbols.

Look around
after each step to see if there are any side paths or a symbol on the wall.

The
direction below is based from one crossroad to another.

At sword
with crown crossroad: Go forward (with painting at right – 2 clicks)) until the next
painting
– horse and crossroad.

At horse crossroad: Go left and forward (1 click) to
gate.

Exit
place
– Listen and hear noises of life.

Look left of
the grilled door and climb the rungs on the wall and hear/see parrot and
fountain. Climb back down.

Look close
at the grilled door and see that it has a strange lock.

Continue the
maze until the next symbol – sun (1 click and seen at left) and
crossroad.

At sun crossroad: Go forward until the next symbol
(3 clicks) – monkey (symbol at right) and crossroad.

At monkey
crossroad: Go left until the next symbol (1 click) – circles/crown (symbol at right) and crossroad.

At circles/crown crossroad: Go left until the next
symbol (2 clicks) – hand and crossroad.

At hand crossroad: Go left until the next symbol (1
click) – portrait (symbol at right) and crossroad.

At portrait crossroad: Go forward until the next
symbol (5 clicks) – rosette and crossroad.

At rosette
crossroad: Go right until the break on the wall (1 click).

Another step by step for the maze by Looney4Labs:

Climb
down the stairs and go left 3 clicks (there will be a locked gate in front of
you)

Go right
2 clicks

Look on
the wall to the right—see the Sword and Shield with Crown.

Go
forward 1 click-you are facing a wall

Go right
1 click—you are facing the Horse

Go left 1
click.  Watch the cut scene.  Now you are facing a locked gate. Look to the
left and see rungs.  Climb up and hear/see parrot and fountain.  Climb down.  
Look at the strange lock on the door.

Go right
1 click.  See the Sun on the left.

Go
forward 3 clicks. See the Monkey on the right.

Go left 1
click—See the Crown/circles on the right.

Go left 1
click—you are facing a wall.

Go right
1 click—you are facing the Hand.

Go left 1
click—See the Portrait on the right.

Go
forward 1 click—you are facing a wall.

Go left 1
click—you are facing a wall.

Go right
1 click—you are facing a wall.

Go right
1 click—you are facing a wall.

Go left 1
click—you are facing the Rosette.

Go right
1 click to the break in the wall.

Secret
cellar:
    Enter through the break on the wall and be in the
meeting place of the Different Sun.

Look around.
Turn right and check the #14 picture of tiles on the shelving.

Go to the
bookcases by the wall.

Check the
small table left of the bookcase and click the book aside to see a key. Take
the other weird key. Check the
book that was moved. Oh my! Check the scroll above the book.

Check the
bookcase and check the special books. One at the middle shelf is the list of
the tortured-prisoners during the Inquisition. At right
side of the middle shelf are 2 pictures: #2 and #12 with ornate tiles.

Go forward
to the wall and take note of the writing on the wall: 111412310 WK. Look close
at the writing on the wall.

Pan down and
look at the locked box

Check the
altar and see 2 pictures:    #13 and #3.

Exit the
secret place and see a map. The map has links to Exit, Diez-Palencia and
Secret cellar.

Click on
Diez-Palencia. Climb the ladder and be in the darkroom.

Finish
the proof of Francisco’s innocence:

Go to the
well at the courtyard. Take the sundried loaded copyframe.

Look close
at the loaded copyframe and get developed glass negative, empty
copyframe
and sunlight copy photo

Go back to
the darkroom.

Prepare
the developing solutions:

1. Place 60 ounces of water from the faucet of the big container
beside the sinks on the left sink.

2. Place 40 ounces of water from the faucet of the big container
beside the sinks on the middle sink.

Take 1 ounce of Gold chloride (AuCl3) found on shelf
above the sinks and add it to the middle sink.

Take 1 gram of Ammonium rhodanide (NH4SCN) found at
shelf above the sinks and add it to the middle sink.

3. Place 40 ounces of water from the faucet of the big container
beside the sinks on the right sink.

Take 10 ounces of Natrium carbonate (Na2CO3) found at
slim necked bottle on the middle shelf at back wall and add it to the right sink.


Develope the photograph:

1. Place the copy photo on the left sink
for 20 seconds as seen on the timer at left of the screen.

2. Place the copy photo on the middle
sink for 80 seconds as seen on the timer at left of the screen.

3. Place the colorized photo on the right
sink for 80 seconds as seen on the timer at left of the screen. Take the wet processed photo.

4. Turn the faucets to empty the 3 sinks.

5. Place 60 ounce of water into any sink.

6. Place the wet processed photo into the water for
60 seconds. Take the wet final photo. Really. Really good.

7. Hang the wet final photo on the line. Move one or 2 steps away. Go back and take the
final photograph
.

Go outside to Carmen. Talk to Carmen about the
secret meeting place and give her the final photograph.

Get to the Church Tower:   

Iglesia San Pedro:    Go to
the church. See Father Perez standing there.

Go to the iron door.

Weird key: Remember Carlos mentioned that he
found a double key for the tower gate.

In inventory, combine the 2 weird keys.

Right click one weird key to get a close up view.

Take the other weird key from inventory and click it
on the close up of the other weird key.

Click on the snap of the short weird key. The 2 keys
are now one weird double key.

Look close at the keyhole and see that the double
key and the keyhole match.

Try to use the double key on the keyhole and
Professor says to find a way to do it without Father Perez. This will trigger the next part.

Get the priest away from the church:

Plaza de la Mancha:   

Domingo, the guitar player:   
Talk to Domingo about a favour.

Give Domingo 100 pesetas. Professor Hunt asks
Domingo to call Reoyos at the police station using the phone at the Taverna.
Tell Reoyos that he wishes to talk to Father Perez concerning the ill friend,
Fernando. He is to call in half an hour.

Iglesia San Pedro:    Go to
the church. Talk to Father Perez.

See what happens when Reoyos arrives. The coast is
clear.

Church Tower:

Iron door: Look close and use the double key
on the metal door’s keyhole. Turn the key and open the door.

Professor Hunt enters the secret tower room.

Tower room:    Look around.
See a broken ladder going to the top of the tower where the doves are.

Go to the corner small table. Take the key from
tower
. Take the letter from Carlos on the table. Read Carlos
Candelas’ letter. Carlos talks about a ‘reserve’ and Carmen’s medallion from
her mother maybe the solution.

Check the bookcases at the other end of the room and
other artifacts on the table.

Kaleidoscope:    Look close at the
kaleidoscope by the window.

Look through the lens and see wonderful colored
prisms. These look familiar.

Tubes – There are 6 tubes of prism that can be rotated as
seen inside the big chamber at side view.

Prism design – There are 8 prism designs as seen when viewed
through the lens for one of those tubes. There are side arrows that cycle the
designs.

Dial – The tubes can be rotated using the dial on the front
of the kaleidoscope. The dial’s code as to where it points is based on the
circle with lines below it. The lines are in wedges. One line means the first
in the sequence, 2 lines wedge is the second in the sequence and so on… Turn
the dial to point where the selected wedge is positioned in the circle.

Kaleidoscope puzzle:    The aim of
the puzzle is to select a specific design for each of the 6 tubes and the
tubes are to be done
in numbered order.

The designs to be selected are taken from all the
pictures of tiles with numbers and design seen throughout the game.

The sequence of the design to be entered in the
kaleidoscope is based on the clue left by WK on the wall of the secret cellar in
the sewer.

After roaming throughout, note that there are some
similar numbers in the pictures but have different tile design. By trial and
error, deduce which one to use.

Deduction of the numbers on the wall: The
number seen on the wall at the secret cellar is:  111412310.

Numbered pictures seen in town:    Painter’s room – 10; Plaza – 1, 3; Police station –
18, 16; Candelas – 8, 11, 5, 7, 14, 15, 19, 1, 12 and 4; Darkroom – 11; Secret
cellar – 14, 2, 12, 13, 3.

Possible numbers to use: 10, 1, 3, 11, 14, 1, 12, 4,
11, 14, 2, 3.

Take note that there are 2 numbered 1, 3, 11 and
14.

– Starting at the end of 111412310;
there are no 23 or 31 or 0. So the two numbers at the end are 3 and 10. 111412
– 3 – 10.

– To deduce the rest 111412; the possibilities are:
1, 11, 4, 12, or 11, 1, 4, 12 or 11, 14, 12 or 11, 14, 1, 2. Since we need 4
more numbers because there are 6 tubes, we can eliminate 11, 14, 2. We are
left with 1, 11, 4, 12 or 11, 1, 4, 12 or 11, 14, 1, 2.

– Since the possibility of 111, 4, 1, 2 or 1/11,
11/1, 41, 2 are not possible. Then the middle number is 12. We are left with 1114 – 12 – 3 – 10.

– To have 3 numbers, the third number will have to
be 4.

– We need 2 numbers now: 1/11, 11/1, 4 – 12 – 3 –
10. By process of elimination, found that only #1 pictured pattern matches one
of the patterns in tube 1 of the kaleidoscope.

– The deduced sequence of numbers is:  1 –
11 – 4 – 12 – 3 – 10.

The duplicate numbered patterns are also eliminated
by checking on that appropriate tube.

Design and sequence of tiles:    
Check these designs to recall what pattern to select in the kaleidoscope.

1 is from the corner at Plaza de la Mancha.

11 is from the photo album in Francisco’s room.

4 is from the photo album in Francisco’s room.

12 is from the secret room in the sewer.

3 is from the Palace at Plaza de la Mancha.

10 is from the wall picture above the desk in the
painter’s room.


Enter the chosen design on the tube:

Turn the dial with wide tip to position similar to
if the dial is on the circle below it – point to one line at
the front of the kaleidoscope.

Look through the lens and cycle using the side
arrows to select the correct design from picture #1.

Leave the selected design and pull back.

Turn the dial (counterclockwise) with wide tip to
point to 2 lines’ position (as seen at bottom circle) at the front of the
kaleidoscope.

Look through the lens and cycle using the side
arrows to select the correct design from picture #11.

Leave the selected design and pull back.

Do the above procedure for 3 lines (#4 picture), 4 lines
(#12 picture), 5 lines (#3 picture) and 6 lines (#10 picture).

If the designs are correct and placed in correct
sequence, a click is heard and the kaleidoscope opens to reveal the codex.

Take the fourth codex. Read the codex from
John Gillam.


Exit the tower and the church.

Diez-Palencia’s house:    Go
to the painter’s house and then to the darkroom.

Secret cellar:    Go down the
trap door and get the map.

Click to go to secret cellar. Go to the writing on
the wall.

Look close and down to the locked box. Use the key
from the tower on the padlock. Open the box.

Take the sword forged by Juan Candelas the blade
master. Look close at the initials on the coat of arms – JC.

Remember that the stolen sword with Arriaga has an
initial CC (mirror arrangement). This is the error that was noticed by
Francisco on the sword.

Exit the secret cellar and the sewer. Go back to
Diez-Palencia’s place.

Exit the courtyard.


Recover the Alquerque board game:

Candelas house:    Go to
Candelas house.

Talk to Isabel and find out what happened to the
Alquerque game board and Arriaga. Arriaga escaped in the courtyard with a fountain.
Ricardo is the name of the parrot. Hmm…

Isabel gives the forge key. New location made.

Exit the house.

Candelas II:     The
cellar of the Candelas house is blue. That is the forge. Click on Candelas II.

Look around the forge. See that there are a lot of
active items.

Check-look close at the casting frame on the worktable.
Professor Hunt says
it needs clay, metal and right temperature.

Take the crowbar on the top shelf left of the
furnace. Exit the forge.

Arriaga:

 Diez-Palencia’s house:    Go
to the painter’s house and then to the darkroom.

Go down the trap door to the sewer. Select Exit link
at top of map.

Exit:    Check the grilled door and
see a ring on the ground behind the grill. Use the crowbar to get the ruby ring.

Pan left and climb the rungs on the wall.

Use the crowbar on the manhole cover. See Hunt comes
up from the sewer.

Arriaga’s:   

Check the parrot. Enter the house through the door.

Go forward to the shop room.

See 3 bowls of bird seeds on the end of the counter.
Click on overturned bowl. Someone was in rush to get these birdseeds. Get birdseeds from that overturned bowl.

Look at the chess set spilled on the floor.
There’s not a single knight on the metal pieces.
Interesting…

Look at the ivory and ebony chess set on the shelf.
Take the ivory knight piece (horse head).

Go back out to the courtyard. Give birdseeds to the
parrot.

The parrot recites the steps of the Viennese Waltz.
Sounds like a route to me.

The parrot says: Forward – left – forward – right –
right – left – forward – forward – right – right – forward – left – left –
right – left.

Go down the manhole.

Exit:    Look close at the
lock. Use the ivory knight piece on the keyhole. It fits! The ivory chess
piece will break. We need to make a metal one.

Go forward on any exit to get the map. Exit to Diez-Palencia. Exit the sewer and courtyard.

Plaza de la Mancha:   

Go to the potter’s stall. Talk to the potter and ask
for clay now that you know how to do the casting at the forge. Give the potter the ruby ring. Take clay left of the table.

Go to the square and take the newspaper from
the bench.

Candelas II:     Go to
the forge.


Make a knight’s key mould:

Go to the central worktable.

Take the knife from the table. Look close at
the casting frames. In inventory, combine the clay and knife to get 2 pieces
of clay bricks. Place the clay bricks on the casting frames. Both
frames have clay.

Place the ivory knight on left frame. Click on the
frames to combine the 2 part and produce a mould.

Take the ivory knight out and see the mold.

Use knife on the top of the left clay frame and see
a trough.

Go to the wall left of the furnace and take a
metal unfinished key
. Place the unfinished key on the clay mould. That’s
the handle.

Click the mould to combine the 2 parts. Take
casting frame
.


Light the furnace:

Take firewood from the bin left of the
furnace. Place firewood in the furnace.

Place newspaper on firewood.

Use matches on firewood and newspaper.

Click the bellows left of the furnace 3 or more
times to get a steady fire.


Burn the clay mould:

Place the casting frame in the furnace to burn the
clay mould.

Take the gloves on the shelf left of the
furnace.

Use the gloves on the casting frame. It is moved to
one side.


Cast the key:

Pan down and right. Take the pot that still
has some metal in it.

Place the pot in the furnace to melt the metal.

Click the bellows left of the furnace 3 or more
times to get a steady fire.

Look around the forge to give time for the metal to
melt.

Go back to the furnace. Use gloves and pick up the
pot.

Pour the metal in the pot on the casting frame.

Take the mould frame and place it on the anvil.

Use the knife to open the casting frame.

Take the moulded chessman key from the cast
mold.

Diez-Palencia’s house:    Go
to the painter’s house and then to the darkroom.

Exit:    Go down the trap
door, to the sewer and get the map. Select Exit.

Look close at keyhole of the grilled door.

Use the moulded chessman key on the keyhole.

Enter and start the maze.

Follow the direction of the Viennese Waltz given by
Arriaga’s parrot.

Go: Forward (you already did this from the gate) –
left – forward – right – right – left – forward – forward – right – right –
forward – left – left – right – left.


Arriaga’s hideout:

See the
stairs to Arriaga’s hideout. Climb and go through door.

Professor
Hunt is pushed into a cell by Arriaga. Now, Hunt is imprisoned.

Look
around the room and see what we can do.

Go to the
bag inside the open cabinet. Take the Alquerque board from the sack.

Escape the
prison:

Go to right
corner and look up. Look close at the grate up in the ceiling. It is quite
high. We need to get up there and open the grate.

Look above
the open cabinet. See a chain with a hook and a box.

Get the
box on top of cabinet:

Pick up a
barrel. Turn and place it down one space at a time until it is positioned
just in front of the open cabinet.

Pick up
the other barrel and place it close to the first barrel.

Pick up
the closed box and place it on top of the barrel closest to the open cabinet.

Pick up
and place the chair in front of the other (second) barrel.

Climb up
the makeshift step by clicking on the box on top of the open cabinet.

Take the
rope inside the open box on top of the cabinet.

Take the
box on top of the cabinet and bring it down. Lay it on the floor.

Climb back
up and take the spade head and broken spade handle from top of
the cabinet.

Try to get
the chain with the hook. It is too high up.

Get the
chain on ceiling:

Elevator:    
Enter the elevator and read the poster on the wall.

It states
that the capacity of the elevator: 2 adults, an adult or half full barrel or
an adult and 2 boxes.

Look at the
left side of the elevator and see the brake system of the elevator.

Use the
broken spade handle on the top of the left-lower wheel to have a makeshift
handle.

Release the
brake on the left and turn the makeshift handle.

Lower
room:
    Go to the right side of the elevator.

Take the
long pole
leaning on the wall.

Take the
barrel with cover and place it in the elevator.

The way I did this without
being locked in is to stand close to the wall in front of the barrels.

Take the open barrel and drop it in front of the
closed barrel by the wall on the right.

Then stand by the elevator and take the closed
barrel and drop it inside the elevator.

Enter the
elevator. Release the break and turn the wheel.

Climb the
makeshift steps to the top of the box over the barrel.

Look up and
use the long pole on the chain hooked on the ceiling. The chain with
hook is in inventory.

Get to
top of the shelf on the other side of the room:

Pick up a
barrel. Turn and place it down one space at a time until it is positioned
in front
(not side) of the left side of the shelving.

Pick up
the other barrel and place it one space away from the first barrel.

Take the
plank leaning on right side of the shelving and place it on top of the
barrels. If the barrels are too far from the plank, it will not be possible
to place it on the barrels.

Pick up
the barrel taken from the lower room from the elevator and place it on top
of the plank and over the barrel on the left.

Take the
closed box and place on top of the plank close to the barrel.

Place the
chair at end of the setup at right.

Remove
the grate from the ceiling:

Climb up the
setup by clicking on top of the shelving.

Use the
chain on the grate in the ceiling. The chain is now hanging by the hook on the
grate. Climb down.

Weigh
down the elevator:
   

Review the
poster that shows the maximum capacity of the elevator.

Based on the
poster, a half filled barrel equals an adult. So a filled barrel equals 2
adults.

Release the
break and turn the wheel.

In
inventory, combine the shovel head and the long pole to make a shovel.

Place 4
scoops of dirt in the open barrel. If you place 8 scoops, the barrel is
filled. So 4 scoops equals an adult based on the capacity poster.

Take the
half filled barrel
and place it inside the elevator.

Go up to the
top floor.

Take the
half filled barrel and place it outside the elevator.

Take the
open box and place it in the elevator.

Go down the elevator.

In the lower
room, take the open box and place outside the elevator.

Use the
shovel on the dirt and fill the open box with dirt (2 scoops).

Take the
filled box and place it inside the elevator.

Go up to the
top floor.

Take the
filled box from the elevator and click it on the half filled barrel to empty
the box and add soil to the barrel that has 6 scoops now.

Go down once
more and fill the box with soil.

Bring it up
and fill the barrel to capacity (total 8 scoops).

For the
third time, go down once more and fill the box with soil.

Go up. Take
the filled box and place it outside the elevator.

Take the
filled barrel and place it inside the elevator.

Take the
filled box and place it over the filled barrel.

Go to the
hanging chain. Click on the chain above the view of the barrel and be holding
one end of the chain.

Attach the
end of the chain on the side of the elevator.

Stand in
front and outside the elevator.

Use the
shovel on the brake of the elevator. Watch.

Escape:   
Take the hook that fell off the chain.

Combine the
rope and hook to get rope with hook.

Climb up to
the top of the setup.

Use the rope
with hook on the opening in the ceiling.

Click on
rope to climb up. Surprise, Isabel!

Forge:   
Give Isabel the Alquerque board. Exit the
forge.

Candelas
house
:     Go to Candelas.

Automatically talk to Francisco in his bedroom.

Talk to
Francisco. Professor Hunt gives him the original sword.

Alquerque board game:   

The dial on
the screen at top right changed to: E for Exit, R for rules and M is for menu.

Read the
rules.

You can
change the setting of the game to easy or normal at the options in main menu.

Win the game
once and Francisco gives granite plate.

Watch.

Next
destination:    Peking in Tale of the 4 Dragons


This document may not be
distributed without express written permission of the author and the content
may not be altered in any way.


For Questions or Comments
on this Walkthrough,
Please write to:
MaGtRo


Copyright © 2/2008 

MaGtRo