Agatha Christie: The ABC Murders
Agatha Christie
And
Then There Were None
by AWE Games
Walkthrough by
MaGtRo October 2005
Gameplay:
This point and click game comes in 2 CDs. After installation the game can be
played with no CD on the CD drive. The Main Menu has New Game, Load Game,
Options, Credits and Exit. The Options Menu has music, effects, brightness,
captions, shadows, animated water, fog, rain-lightning and anti-aliasing
settings selections. The In-Game Menu has resume, save, load, options and main menu
selections. To save at the save game screen, select an empty frame to save a new
game or click on a picture to overwrite that saved game. The saved game can be
titled by typing in a name left of the saved frame. The cursors are
self-explanatory by the icons seen. The ESC key accesses the in-game menu.
Right click of mouse or
click on the sack at top left of screen will access the inventory. Right click
again will close the inventory frame. The inventory
is made up of 5 screens that can be scrolled using the top arrows on the frame.
To look close at an item, click on the item and bring the item over the
magnifying glass at the bottom of the inventory frame. The gear button right of
the magnifying glass combines items by placing the items on the row above the
gears and then do a click on the gear icon. Combined items can also be
disassembled by doing the same procedure or click the item directly on the gear
icon.
To the top right of the
screen is the journal icon. The journal has general information, guests,
documents and books. Documents or books taken in inventory are entered in the
journal by clicking the documents or books on the magnifying lens icon. The
pertinent information is summarized in the journal.
The ESC key skips the
intro and cutscenes. Double click makes Narracott runs.
Judge Lawrence Judge Wargrave is seen with a mother and child in a private car. Vera Claythorne is
sitting across Phillip Lombard. General John Mackenzie wakes up from a dream about
his wife, Leslie. Across him is Miss Emily Brent. Anthony Marston passes Dr.
Edward Armstrong’s car and stops to take a packet from a man at a side of the
road. Back at the train, William Blore reads his checklist. At the dock, Davis
the harbormaster greets the guests after the arrival of Marston. Blore
recognizes Patrick Narracott. Thomas Rogers and his wife Ethel await the guests
arriving on the boat.
Note:
This game is non-linear and most side puzzles can be done anytime as long as the
items necessary have been acquired. This walkthrough shows only one way of gameplay
and the triggers to move to the next chapter.
Chapter 1
Ten Little Sailor
Boys went out to dine,
One choked his self
and then there were nine.
Read the journal by clicking the top right journal
icon.
First
Night – Familiarize with the
mansion:
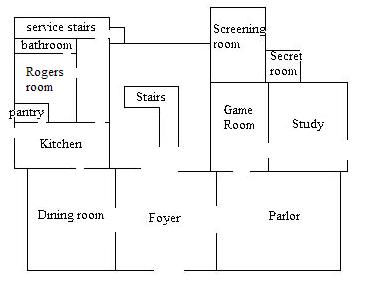
Rogers thanks Narracott
for the help. Try to take the left path but the investigation will have to wait. Go back down to the
pier and
click on the boat. See that the boat was scuttled.
Southside cliff path
– Go back up, turn left on the
path after the steps and meet Marston. Talk with Marston and note what he
is holding. Turn back to go back to the mansion and talk to Rogers.
Kitchen – Enter
the mansion and follow Rogers to the kitchen. Enter the dining room and then
through the kitchen door. Hear an argument between Rogers and Ethel Rogers. Talk to Rogers.
Look close at the press right of Rogers. Exit through the door right of the
refrigerator.
Rogers’ room –
Enter the door in the hallway. Take the
letter for Rogers, the sewing needles and Roger’s letter of invitation. In
inventory, take the letter of invitation and click it on the magnifying lens to
enter it on the journal. Do the same for the letter to Rogers. Read the letters
from U. N. Owen in the journal. You can check the bathroom also. Exit and take
the service stairs.
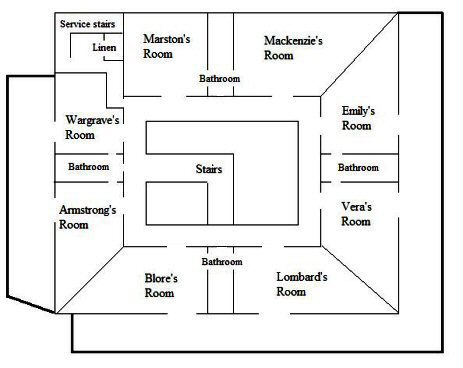
This map is for
location reference only and is not to scale.
Linen closet – Talk to Mrs.
Rogers. Help Mrs. Rogers with the silk sheets. Exit the service room and check
the rooms around the second floor. Note that all
the clocks in all the rooms do not work.
Dr. Armstrong’s room –
Turn left from the service door and enter the room left of the bathroom. Take
Dr. Armstrong’s letter of invitation.
Click it on the magnifying lens to enter it in the journal. Look inside the
doctor’s bag on the dresser.
Blore’s room – Take Blore’s letter of invitation and enter it in the journal. Try to take the diary
on the bedside table and get stopped by Blore. Talk to Blore. I’m Patrick Faine
not Fred. You were taking the Purcell’s bribes for years. After the Landor case
people began to ask questions. The Purcells needed what the yank detective
novels call a fall guy.
Lombard’s room – Look
through the keyhole and see Lombard with a gun. Knock on door and talk to
Lombard.
Vera Claythorne’s room –
Talk to Vera. Emily Brent’s room –
Talk to Emily Brent. General Mackenzie’s room
– Talk to the General. Go downstairs to the game room.
Game room – Listen to
the conversation between Judge Wargrave and the doctor. Dinner bell is heard.
Search the mansion:
Kitchen – Eavesdrop
through the dining room door and note the conversation. Take the
copper fruit basket from the table.
Pantry – Go to the
pantry right of door to the outside. Take turkey baster, cheese wheel
covered in cheesecloth and scoop. Use the scoop on flour sack to get
flour. Use the scoop on flour sack again to get battery. Exit the
kitchen using the door right of the refrigerator and climb the service stairs.
Linen closet – Take silk sheet from linen closet.
Marston’s room – Take
the coded message from the dresser and look close at it using the
magnifying lens. Take the code-breaking cypher from drawer right of
the bed with lion statue. Take the Marston letter of invitation and enter
it in the journal.
General’s room – Take
Mackenzie’s letter of invitation and enter it in journal. Look close at
picture beside the bed.
Emily Brent’s room – Take Brent’s letter of invitation and enter it in journal. Take the
King James Bible. Look at the contents of the makeup case. Exit through the
bathroom door.
Emily and Vera’s
bathroom – Check the table and take the medical alert card. Read it in
inventory. Take the stem to an old pipe wedged between the wall and the
table. Enter the room next door.
Vera’s room – Look at
the bear clock on the table beside the bed. It is not working as all the clocks
in the whole mansion are. Open the makeup case on the side table. Take the newspaper clipping and
enter it in the journal. Look at the picture on the dresser and on the wall.
Take Vera’s letter of invitation and enter it in journal.
Exit through the
patio door. Take the telescope and metal tripod at the corner
beside the hawk. Enter the next room.
Lombard’s room – Take Lombard’s letter of invitation and enter it in journal.
Blore’s room – Take the
diary and enter it in the journal.
Judge Wargrave’s room –
Take the tobacco pouch and pipe bowl from dresser. Take
Wargrave’s letter of invitation and enter it in journal.
Read everything entered
in journal. Go downstairs and take the bear walking stick on stand left
of main door. Eavesdrop on dining room door again.
The accusations:
Listen to the absent
host’s speech accusing all the characters except Narracott. Mrs.
Rogers faints. Get doctor’s bag from Dr. Armstrong’s room upstairs. Go to
Rogers’ room that can be accessed through door behind the main stairwell and give
the bag to Dr. Armstrong.
Parlor – Listen to the
discussion of the accusations. Dr. Armstrong reports that Mrs. Rogers is sedated. Talk to all 9
characters in the parlor completely. Check on Mrs. Rogers in her bedroom. Her
feet are twitching. Go to the gramophone at the foyer and take the
record.
Marston chokes:
Listen to next discussion. Marston chokes to death or
is poisoned. Talk to all the characters in the parlor
again.
Chapter 2
Nine Little Sailor
boys sat up very late:
One overslept
himself and then there were eight
Do
some sleuthing:
Parlor – Look close at and click on the Ten Little Sailor Boys rhyme on top of the
fireplace. Take the matches from the mantle. Look close at radio by the
window. Look close at the liquor table behind the couch. Take 3 glasses,
Marston’s glass and cocktail shaker.
Study – Enter the
door to study. Look close on map on wall and click on Shipwreck Island.
Books – Look at bookcase left of door and see Judge Wargrave on Justice
book. Take the
Birding on Devon Shores book on the next left bookcase. Take the book on chair,
A History of the South Devon Coast and the book on table under the map,
A diary.
Enter the 3 books on the journal and then read the journal. Look close at the
picture right of the map of the former owners of the mansion.
Desk – Go to the desk and take the desk lamp with bulb. Take the
sellotape from middle drawer and the inkpad and inkstamp from
top side drawer. Take the map of the island the card at bottom side
drawer. The top left drawer is locked. Read the powerful friends card –
Powerful Friends: Want to
shine light on the matter? Flowery speeches may win you a few friends. Study the
map in inventory – note the different places. Place cursor above desk to exit
close up.
Gramophone at Foyer
– Take the record from the gramophone. Look close at record in inventory. Turn the record and see a label of ‘goodbye’.
Play the goodbye part on the gramophone by placing the record on the gramophone
and clicking on the flip switch. After listening to the host’s game explanation,
click on side panel and take large vacuum tube
UX-201A and small vacuum tube 807-H.
Dining room –
Take the
flashlight on top drawer of the table under the painting.
Upstairs – It’s too dark to search upstairs. In inventory, combine the flashlight taken
from dining room drawer and the battery from the flour sack by placing the
battery and flashlight on area above the gear icon. Click gear icon to combine
the 2 items to make flashlight with batteries.
Climb the stairs and
check each room. Click on the General, Dr. Armstrong, Lombard and Emily Brent in
bed. It’s getting to be morning, best to get back to bed.
Mrs.
Rogers overslept:
Dining Room – Enter the dining room and listen to the breakfast discussion. Learn about Mrs.
Rogers. Emily Brent still insists on her promised apple juice. Talk to everybody. Give
the bear walking stick to the General and talk to him again about Lombard. Find a way to get off the island or make a signal
fire.
Chapter 3
Eight Little Sailor
Boys traveling to Devon
One said he’d stay
there and then there were seven.
Look close at the sailor
boys on the dining room table.
Roam
outside:
Game room – Go to Game room and
overhear the Doctor and Judge’s discussion. Talk to Judge and Doctor. The door
to the screening room is locked.
Exit the mansion through
the front door and talk to Emily Brent. Go down the steps and take the left path.
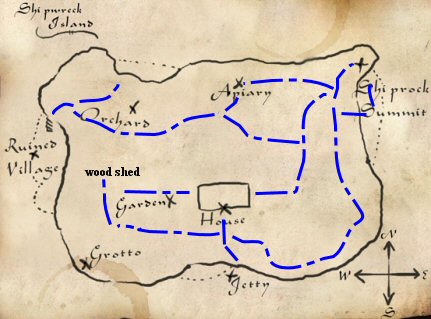
Shed – Go forward twice
and enter the shed. Try to take the axe. Take the shovel, lamp and
the card. Read the card – Empty promises: Dark memories haunting you? The
fuel for pleasant thoughts must be found before all lie in ruins. Go down of
screen and take bucket and ladder. Look close at generator.
Garden – Take the right
path around the garden. Take the garden hose close to the pump. Click the
bucket on pump to get a bucket full of water. Go left, forward and left
to get back to the front part of the mansion.
Southside cliff path
– Look at the map of the
island in inventory. Go to bottom of screen and take the left path that
surrounds the island. Meet and talk to Blore and Lombard. Lombard gives a
parachute plan. Read the parachute plan in journal.
Go forward and click on
Shiprock Point and note that it is the highest point in the island.
Beach – Go forward
and go left to the beach. Go left and talk to the General. Click at bottom of
screen twice to go to the secluded part of the beach where the waves are
crashing with particular violence. Go back and up to the path. Take the right
path twice to go up to Shiprock Point.
Shiprock Point – Talk to Vera. Exit the
point area and take the path going up at the crossroad. The path to the left
leads directly to the study door of the mansion.
Apiary – Go forward 5xs to get to
the apiary. Take the fermented apples. Look at the beehive. Go forward and take the left path.
The right path goes back to the mansion.
Orchard – Look at the
apples on both side of the path. Place the ladder under the apples on the right
side. Click on apples to get fresh apples. Go left and take the top right path
on the split in the path.
Billy goat – Look at the
sunflowers then go forward to meet Mr. Billy Goat. Click on Billy and he won’t let
you pass. Click the bucket of water on the water trough. There you go – he was
just thirsty. Go left to the ruined village.
Ruined village 1 – Check
all the houses. Take the gas can from the first house. Take the
leather goat harness from the second house. Exit the ruined village and go
forward until the split in the road. Take the bottom right path and see that the
path is blocked by thorny thicket. There are 2 hungry goats there.
Go back to the mansion by
going forward until the split in the road in front of the apiary. Take the right
path. Click on the windmill. Take the left path after emerging from the rock
wall. Go left to get to the study door. The right path goes to Shiprock Point.
Enter the door to the study.
Study – Secret room –
Bookcase at far wall – Go to the bookcase left of the desk. Take the 3 misplaced books on
the shelves of the middle bookcase – dark
red book at top, light colored book in middle and light red book at third shelf.
Read them if you want – not necessary. Place the 3 books back in their proper places based on
the color – light red book (Panama Locks) on top shelf, dark red
(South Sea Island) at second shelf and the light colored one (Florida
Keys) on third shelf. Hear a click when you place the correct book at the
correct place.
Admiralty area:
Radio room – Enter the secret room. Take and read the
talk card from the chair – Talk is cheap:
And rumours can be ugly. Keep your secrets safe. Look close at poster – Rule
Britannia! Britannia – rule the waves. Look close at shortwave radio and note
the slots for lamps and the power cord. Take the 305GT vacuum tube from
the panel.
Safe – Look close at
safe.Remember the statement by the
judge concerning Marston, Marston’s suspicious acts and the 2 papers taken from
Marston’s room.Combine the coded message, the code breaking cypher and the King
James Bible taken from Emily Brent’s room to get decoded message. Enter the decoded
message on journal by clicking it on the magnifying glass. Read the decoded
message and note the homing beacon on buoy and the combination to the safe.Save game here. Open the
safe by clicking left arrow to get 28 to be under the top arrow, right arrow to 11
and left arrow to 49. Hear a click and then click on safe handle. If mistake is
done, go back to saved game.
Safe Room – Take the rubber raft. Click on wall right of drawers and note a sliding panel.
Drawers – Look close at drawers and open (click
twice on) E to get raven earring, H to get
document piece, S to get microphone and V to get boat card. Read
boat card – Row your boat – Gently down the stream. Unless it’s a fishing boat and
the sea is mean.Anagram sliding panel
puzzle – Form a known phrase. Arrange the drawers by clicking on 2 drawers you want to change
positions. The drawers will interchange position. Form a known Admiralty phrase – Rule the Waves. The panel opens.
Grotto – Enter the
secret door and flip the switch to get light. Go forward to the grotto.
Go to the right and look at the one man submersible. Take the propeller.
Go back and take the other metal bridge to the other side of the grotto. Look
close at the barrels right of door. Take oars.
Underground passageway – Enter the door. Take the pliers on ground in front of the out of
place panel on opposite wall. You might need to move Narracott to get him out of
the way. Click on panel and enter. Look at indentation on the
ground. Use shovel on the active ground. Take the air pump. Go down to
the end of the underground passageway and see that the door is locked fast. Go
back to the grotto.
Paddle to get off the
island – Go to the grotto and inflate the rubber raft.In inventory, combine
the rubber raft, air pump and oars. Place the inflated rubber raft with oars on
the water in front of the metal walkway close to the opening to the grotto and
sea.
Ruined village 2 – Click
on the far houses on the other side of the ruined village – that is the area
after Mr. Billy Goat. Go to the closest
house and open the wood box. Take the fishing net. Exit the house and go
to the left of the house. Take the Bones card by the Celtic cross. Read the card –
Old
Bones: Are left undisturbed. Not new bones however, if you’re game. Go back to
the underground passageway by entering the storm door by cliffside. Go
back to the mansion.
Game room – Take the
dice box on the table – this is seen only after getting the Bones card. Click
the dice box on the gear icon in inventory and get desk key.
Study – Go to the desk
and use desk key on left drawer. Take the bee book and enter it on the journal.
Read the journal to learn how to make a smoker.
Get honey: (not
necessary for completion of game)Go to apiary. Make a smoker based on
the bee book.In inventory, click
tobacco pouch on gear to disassemble it to empty pouch and tobacco.Combine hurricane lamp
and tobacco to get lamp with tobacco.Combine lamp with
tobacco with garden hose to get unlit smoker.Combine unlit smoker and
matches to get makeshift smoker.Use makeshift smoker on
a beehive. Open beehive when they are now asleep.Take a honeycomb
frame.Combine honeycomb frame
with cocktail shaker to get cocktail shaker filled with honey.Combine cocktail shaker with a glass to get a glass with honey.
Upstairs in the mansion
–
Check for fingerprints:
(not necessary for completion of game)Make a finger print
testing tool – In inventory, combine turkey baster and flour to get turkey
baster with flour. Use the turkey baster with flour on items that might have
fingerprints. Once the flour is applied. Use the sellotape to get the finger
print.Use the turkey baster
with flour on Marston’s glass in inventory. Use sellotape on floured glass to
get print taken from Marston’s glass.Go upstairs and do
this procedure on the doctor’s bag in Dr. Armstrong’s room. Get reference print for Dr. Armstrong.Do the same for the
makeup kits of Emily Brent and Vera in their rooms. Get reference print for Vera Claythorne
and Emily Brent.Do the same on the
handle of Marston’s attaché case in Marston’s room to get Marston’s reference print.In inventory, combine a
character’s reference print with that of the print from Marston’s glass.See that only Marston’s
print is a match.
Talk to Rogers in the
kitchen. Exit the kitchen door to go outside to the garden.
Kitchen –
Fruit press – In
inventory, separate the cheese and the cheesecloth.Place cheesecloth on
press bucket.Place apple on bucket
with cheesecloth.Place glass in front of
spout.Place the propeller on
press.Click on press to get
fresh apple juice.Now do the same for the
fermented apples to get glass of apple cider.
Go to the woodshed and
talk to Blore and Lombard. Talk to Emily Brent
at front porch about sewing the parachute. Automatically give her the silk sheets. Give her the
needles from Roger’s room. She needs strong thread.
Talk to Blore
and Lombard for the third time at front steps to end the sequence.
The
General stayed in Devon:
Dinner – Learn that
General Mackenzie is dead. He stayed in Devon
Chapter 4
Seven Little Sailor
Boys chopping up sticks,
One chopped himself
in halves and then there were six
Dinner – Listen
to conversation. Talk to everybody including Rogers in kitchen. Listen to Judge Wargrave’s summation.
Another set of interrogations:
Talk to Emily Brent in parlor.
Give Emily Brent apple juice to sweeten her up and talk to her again about Vera. Talk
to
Dr. Armstrong in his bedroom. Then give him the honey in glass for his sweet
tooth. Talk to him again and learn about the Judge.
Talk to Judge Wargrave in General Mackenzie’s room.
In inventory combine the pipe bowl and pipe stem to get a pipe. Give pipe to the
Judge. Talk to him again and learn more about Marston. Talk to Blore in Roger’s bathroom.
Talk to Rogers by dining room door.
Screening room –
Go to the now opened screening room and talk to Vera and Lombard.
Another night passes,
talk to Vera in her bedroom and have 2 knights arrive to protect the lady.
Rogers
is chopped:
After the discussion, be
outside with Blore. Go down the steps and meet Emily Brent coming back from her walk.
Go to the woodshed and find Rogers.
Chapter 5
Six Little Sailor
Boys playing with a hive,
A bumblebee stung
one and then there were five
After the discussion at
breakfast, time to thoroughly search for clues.
Search for more
clues:
Try to talk to Dr.
Armstrong in his bedroom. Talk to the Judge at the game room.
Screening Room – Look at all the posters of
Gabrielle Steele.
Projector – Go to the projector and
open the drawers. Take the 2 Empire Studios film canisters from second
drawer. Take the untitled reel and projector bulb from third
drawer. The top drawer is locked.Place the projector bulb on the panel beside the flip
switch of the projector. Flip the switch to watch a torpedo that was fired.Replace the reel on the
projector with the untitled reel and watch a home movie of some sort.In inventory,
disassemble (click item on gear icon) one of the Empire Studios film canister to get
a Last of the Borgias film and the Air card. Read the Air card –
Taking the Air:
A breath of fresh air is rare when buried in windowless rooms and scarcer
elsewhere. Disassemble the other film canister to see a handwritten note and the
Queen’s Handmaiden film by Gabrielle Steele. Read Gabrielle’s note.Try to watch the Steele movies by placing them on the
reel and Narracott refuses. They will be gone from inventory.
Dr. Armstrong – Go outside through the
front door and eavesdrop on Dr. Armstrong and Emily Brent. Talk to Emily Brent. Go back inside
mansion and
check on Dr. Armstrong. Look through the keyhole and see the good doctor take a
freshener.
Shiprock Point – Go down
the steps from the mansion and go forward until the lights. Take a left at the
path by the cliff’s edge and forward to Shiprock Point. Take the right path
twice to get up Shiprock Point. See Vera and Lombard. Talk to Vera.
Protected cove – From Shiprock Point, take the path going up
on the crossroad, pass the apiary and the orchard. Go
forward and take the path at lower right and see the hungry goats. The path
forward is blocked by thorny thicket. Pour the apple cider on the thorny thicket
and the goats will eat them.
Go forward towards the
beach. Take the fishing line at right by the rocks. Look at the horizon
and see a blinking red light. Use the telescope on the horizon and see a homing
beacon on a buoy. Ah, remember Marston’s decoded message.
Wood shed – Go to the wood shed off
the mansion’s kitchen or garden. Talk to Blore.
Get
off the island:
After the vocal determination to get off the island, go back to the
mansion and
give the fishing line and needles to Emily Brent at the front porch.
Enter the mansion, go to
the study (see Vera) and to the shortwave radio in the secret room.
Shortwave radio:
(not necessary for completion of game)Insert vacuum tubes
80-7H and 305GT in panel on the left. Close panel.Click the microphone on
shortwave radio.Disassemble the desk
lamp to get desk lamp without bulb.Click the desk lamp on
shortwave radio. (Thanks, raven07)Click on shortwave radio
and listen to fisherman talking.Use the microphone to
make a distress call. What was that? Owen!
Take all the vacuum
tubes from the shortwave radio. Go to the radio by the parlor where Dr.
Armstrong
and Judge Wargrave are talking by the fire.
Radio: (not
necessary for completion of game)Insert all 3 vacuum
tubes in panel on the left. Close panel.Combine the copper
basket and the pliers to get copper wire.Place copper wire at
back of radio.Turn the radio on. Some
light music might help soothe Vera’s nerve.
Time to make that
parachute. Go back to Emily Brent and ask if the parachute is done after having given
her the needles and fishing line. Automatically get the parachute.
Parachute:In inventory, combine
sewn silk sheets, fishing net from ruined village, metal tripod of the telescope
and the goat harness to make a parachute.
Go to Shiprock Point and
click the parachute on the horizon. Waaaahhhh!!!
The homing beacon is now
in inventory.
Emily
Brent is stung:
Lombard yells that Emily Brent
is heard screaming from the apiary. Go to the apiary via the path by the study
door and forward until the hole on the rock wall on the left. Enter the hole on
the rock wall and go forward until the apiary. Lombard and Dr. Armstrong are
there.
Chapter 6
Five Little Sailor
Boys going for law,
One got in the
Chancery and then there were four
Missing gun:
Listen to Judge
Wargrave. After Lombard and Blore leave to get Lombard’s gun, talk to Vera and
then talk to the Judge. Talk to the doctor seated on the couch.
Go up to Lombard’s room
and see that the gun is missing from a forced drawer. The body search is done on
the 3 characters.
Exit through the balcony
door, go right and talk to Vera by the hawk statue at the balcony corner.
Go down to the game room
and overhear part of the conversation between Judge Wargrave and Dr.
Armstrong – A
dangerous game, if it fails…
Poisoned:
Solidamide is written on
the back of Narracott’s plate. Narracott is poisoned. The antidote is turpentine oil found in Bellman’s
Universal Embrocation. The Embrocation causes
nasty rash when over applied.
Lights out for the Judge:
The power goes out and
Vera leaves to get her wrap. Later, Vera screams. Go upstairs to her room. Narracott is hit and falls down the stairs. Go to the dining room and a see the
Judge shot.
Generator – Go to the
wood shed. Use gas can on generator. Click on switch on the square panel at
right to get the generator going.
Antidote – I’m not
feeling so well. I should do something about it. Go to the apiary and take the
bottle of embrocation on the grass left of the path before the curve to
the apiary. Click the bottle on Narracott.
Chapter 7
Four Little Sailor
Boys going out to sea
A red herring
swallowed one and then there were three
Listen to the
discussion. Talk to all and learn what Blore knows about the history of the
island and Lombard’s knowledge of the voice in the recording. The judge was
wearing a wig. Watch the other characters hiding in their bedroom.
Who was that?
A shadow crept out of
the mansion. Blore went to investigate. Time to check the others in their bedroom.
Judge Wargrave’s body is missing from his bedroom. Only Vera is in her room. Go
outside and search. Come back and check the bedrooms again. Lombard is back in
his bedroom. Look around some more and check on Vera. Vera said that Lombard
went to start a bonfire.
Dr. Armstrong is swallowed by a red herring:
Go to Shiprock Point and
see a bonfire. Look around some more and go back to mansion. Talk to Blore,
Lombard and Vera by Vera’s bedroom door. Dr. Armstrong is missing. Lombard
states that only 3 sailor boys are left.
Chapter 8
Three Little Sailor
Boys walking in the zoo,
A big bear hugged
one and there were two
Dr. Armstrong and Judge Wargrave’s
body are still missing. Lombard will man the bonfire and Blore will stay in his
room with an axe. Vera will also stay in her room with the gun.
Blore is hugged by a bear:
Go to the screening room
and find Judge Wargrave’s body. Dead and warm but not shot.
Go outside the study
door and see Blore dead. His head was bashed in by a marble shaped like a bear.
Talk to Vera. Take marble.
Go outside and check the
bonfire at Shiprock Point. Go back to the beach below Shiprock Point and then to
right at the cove beside the beach. Find Dr. Armstrong’s body that has been
washed ashore. It has been in the water for quite a while.
Chapter 9
Two Little Sailor
Boys sitting in the sun,
One got frizzled up
and then there was one
Vera locked in her
bedroom repeated the last rhyme about needing the sun to frizzle up the next
victim.
SAVE GAME HERE. Here is
where you can get 2 choices:
1. Look around the mansion
– check the bedrooms. Check outside (apiary, orchard) to waste time and then go
to Shiprock Point and find Lombard dead when the bonfire exploded.
2. Go immediately to
Shiprock Point and talk to Lombard. Save Lombard before the bonfire explodes.
Lombard is really Charles Morley.
Chapter 10
One Little Sailor
Boy left all alone
He went and hanged
himself and then there were none
Hear voice – voices
coming from upstairs. SAVE GAME HERE. Climb upstairs and see a hangman’s noose.
Watch and listen to Vera
and the elusive ‘Unknown – Owen’.
Again, here is where you
can do 2 choices:
1. Go to the bathroom door at end of the talk
and Vera is shot.
2. Save Vera by getting
the marble from inventory and clicking it on the hand of ‘Unknown – Owen’.
Different Endings are seen depending on
who is saved and who dies:
Narracott, Lombard and Vera are saved.
Narracott and Morley (Lombard) are saved.
Narracott and Vera are saved.
Narracott alone is saved.
Original Ending by Dame Agatha Christie
Listen to the record. Go
to the dining room and take the last little sailor boy.
Go to the screening
room. Place the last sailor boy on the small footprint at bottom right corner of
the cabinet holding the projector. Open the formerly locked top drawer. Take the
Hello Again film. Place it on the reel. Click the switch and watch the
original ending.
And Then There Were None
This
document may not be distributed without express written permission of the author
and the content may not be altered in any way.
For
Questions or Comments on this Walkthrough,
Please write to:
MaGtRo
Copyright © 10/2005
MaGtRo