Agatha Christie: Murder on the Orient Express
Part Two: The
Evidence.
After a brief cutscene marking the
beginning of this Part, a dialog follows between the heroine and Michel.Open your scrapbook and look under M.
Poirot’s Instructions to learn our two immediate objectives: (1) restore heat
to the train, and (2) obtain keys for the various train cars.Enter Calais Room 10 Ratchett.Move further inside this room and see Hardman
through the window.Click on the
Follow-this-Person icon appearing around him to go after him.A cutscene follows, bringing us into the
Athens-Paris Coach through its backdoor.
So long as
we are in this car, let’s see what we can find here.[Don’t worry.There is no timed sequence to restore the heat, so we can get a few
things done along the way.]Feel free to
check the bathroom on your left, but there is nothing of interest there.There is no use trying to talk to Matteo, because
you will not get anything useful out of him until the heat is restored.So click on the footprints-icon at the bottom
of the screen to go left in the train. Enter the vacant Athens Room 16.Move further
into the room and close up on the radio equipment.But there is nothing we can do with it yet,
so step out of the close up and return to the corridor.
Click on
the footprints-icon in the upper part of the screen to move down the
corridor.Enter Athens Room 15 Matteo.Step
further into the room and pick up Matteo’s passport from the bedside table.A passport page will appear on the screen and
linger for a while.
Note: If you
would like to see this page again, open the inventory and click on the passport
icon in the right column.A passport page
will appear.Click on Matteo’s picture
at the top of the screen to see his passport information below.More importantly, however, open the scrapbook
and click on Suspects.Note the tiny
passport icon in front of Matteo’s name.This is important because one of the tasks that Poirot assigned us in the
cutscene before the beginning of this Part was to collect everyone’s
passports.The passport icon next to
Matteo’s name tells us that we have collected his passport.Thus, this page serves as a checklist to see the
passports we have collected and those yet to be collected.
Pick up the Morse Code Book from the
berth on your right.Step out into the
corridor and enter the vacant Athens
Room 14.[You could have also used
the connecting door in Matteo’s room to enter this one, but it is easier to
keep track of the rooms by going through the corridor.]Close up on the berth on your right.Click on the mattress to lift it and expose a
pair of snowshoes underneath.Pick up
the Broken Snowshoes.
Return to
the corridor and enter Athens Room 13
Constantine.Close up on the coat
hanging on your right, to get a brief cutscene of its label: "Petite."Click on the suitcase in the carrier above
the coat.Click inside to recover an Announcement
card and hear Poirot’s comment in the background: "Quite interesting."[This is probably the only time when this
comment does not indicate the presence of a fingerprint.]Examine the card by placing it on the
magnifying-glass icon and clicking; and then, by clicking on the Eye icon (note
the special sound-effect in the background as you do this).Move further into the room and pick up the
doctor’s passport from the bedside table left of the berth.
Return to
the corridor and enter the vacant Athens
Room 12.Pick up what looks like a
crumpled white rag from the floor, lying slightly to the left-front of the
bedside table.It turns out to be a torn
note.As you pick it up, the heroine indicates
that we must piece it together.We are
presented with an assembly area. The
pieces of the note are on the left and must be put together in the frame on the
right.At the bottom of that frame,
there are two arrows.When you click on
a piece, it will turn yellow or is "activated."You can then use the LEFT and RIGHT ARROWS at
the bottom of the frame to turn the activated piece around until it appears to
be upright.With your thumb still pressed
on the left-mouse button (the so-called "click-and-hold" technique),
drag the piece to the frame on your right.Hint: It will be easier to assemble the note if you first try to
arrange the corner-pieces of the note, as shown below.
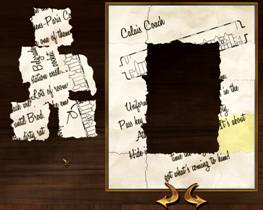
As soon as you correctly place the last piece in
the frame, all the pieces will fit together and the heroine will indicate that
she will put the note in her scrapbook.Step out of the close up, open the scrapbook and go to the Documents
section where you will find the above note under the heading: "Torn
Letter."The completed note reads
as follows:
Calais Coach
[Diagram with
an asterisk and an "R" marking Ratchett’s room in the train.]
Uniform in Belgrade station
washroom.
Pass key in
the pocket.Lots of rooms in the
Athens-Paris
Coach will be empty.
Hide in one
of them until Brod.It’s about
time the
dirty rat
got what’s
coming to him!
Click on
the screen to exit the message.Step out
of the close up.Return to the
corridor.Click on the footprints-icon
at the lower-left portion of the screen to go further left in the train.Try to enter Athens Room 11 Michel, to find it locked.Enter Athens
Room 10 Engineer.Step further into
the room and pick up the passport from the bedside table.Return to the corridor and enter Athens Room 9 Klaus (the cook).Click on the suitcase up in the carrier on
your right.As the suitcase is opened
for you, click inside to retrieve Klaus’s passport.
Return to
the corridor and click on the footprints-icon at the bottom of the screen to go
further left in the train.Enter the
vacant Athens Room 7-8.Move further into the room and close up on
the bedside table.Click on the silver
vase to hear Poirot say, "Quite interesting," in the background. Step out of this close up and into the one on
the two vertical brass-handles left of the heroine.Click on the left brass-handle to hear Poirot
repeat the same remark, indicating the presence of fingerprints in both these
cases.Step out of the close up and
toward the front of the room.Click on the
first door on the heroine’s right (just left of the brass handles) to enter the
bathroom.Click on the down-arrow to get
a close up of the cabinet under the wash basin. Open the cabinet and pick up the Pliers
inside.Click on the up-arrow to return
to the wash basin area.Click on the
left door to return to the vacant room.
Return to
the corridor and enter the vacant Athens
Room 5-6.There is nothing of
interest in this room, so return to the corridor and enter Athens Room 3-4 Fireman.Step further into the room and pick up the Fireman’s Gloves from
the berth on your right and the passport from the bedside table.Step to the front of the room.Feel free to check the adjoining bathroom,
but there is nothing of interest in there.Click on the left door to return to the room.Return to the corridor and, finally, enter Athens Room 1-2 Lucien (the
waiter).Step further into the room, but
there is nothing of interest here.So
return to the corridor.Click on the
footprints-icon at the upper-left portion of the screen to move further down
the train.Feel free to check in the
bathroom on your right, but there is nothing of interest there.Click on the door "To Calais
Coach," but it is locked.
Move your
cursor to the top of the screen and click on the Calais Coach in the sketch of
the train, to see the heroine in Ratchett’s room (having arrived through the
window, of course).Go all the way to
the right of the Calais Coach and click on Michel.Retrieve the keys to both the Baggage Car and
the Athens-Paris Coach from him.[Check
M. Poirot’s Instructions, in the Documents section, to see the second objective
now crossed out.]Use the key on the
connecting door to the Athens-Paris Coach to unlock it, so that you would be
able to use the shortcut (the train’s sketch at the top of the screen) to enter
that car in the future.
There is still something that we need from the
Calais Coach, however, so let’s check out its rooms while we are here.Feel free to check the bathroom on your left,
but there is nothing of interest there.Return
to the corridor and click on the footprints-icon at the bottom of the screen to
move down the corridor.Enter Calais Room 16 Hardman.Check the suitcase up on the carrier on the
heroine’s left and click inside, to retrieve a Leather Sap and hear
Poirot’s voice in the background: "Regardez,
Mademoiselle!"Step forward in the
room and close up on the brief case, on the berth on your left.Pick up the Typewriter Ribbon.
Return to
the corridor and click on the upper-central part of the screen to move further
down the corridor.Try to enter Calais Room 15 Arbuthnot, but it is
locked.So enter Calais Room 14 Princess Dragomiroff.Click
on the suitcase up in the carrier on the heroine’s left.Click inside to find a puzzle box.Click on that box to start the puzzle.
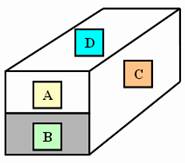
Note: The front of the box is divided into two
parts, marked A and B in the above diagram.The other two movable parts are marked C and D.If you click on either A or B, a set of four
arrows will appear pointing up, down, left and right.If you click on C, a pair of arrows will
appear pointing up and down only.If you
click on D, a pair of arrows will appear pointing to the front and the back of
the box.In order to move a part in a
certain direction, you must first click on it (to bring the directional arrows
in view) and then, click on the arrow pointing in the direction in which you
would like to move that part.Thus,
follow the directions below.
1.Move A to the RIGHT
2.Move B to the LEFT
3.Move C UP
4.Move A back to the LEFT (closing it)
5.Move B back to the RIGHT (closing it)
6.Move C further UP
7.Move A to the LEFT
8.Move B to the RIGHT
9.Move A or B DOWN
10.Move D to the FRONT
The box will
open and the heroine will automatically retrieve Dragomiroff’s Locket.Step out of the close ups.Step further into the room to see Princess Dragomiroff
sitting on the berth. But it would be
better to ignore the guests for now because you will not be able to obtain any
useful information from them until the heat is restored.
Return to the corridor and try to enter Calais Room 13 Count Andrenyi,
but it is locked.Try Calais Room 12 Countess Andrenyi,
to find it locked as well.Click on the
footprints-icon appearing in the lower-left corner of the screen to move further
down the corridor.Enter Calais
Room 11 Hubbard.Click on the
suitcase up in the carrier on the heroine’s right.Click inside to retrieve a document.Open your scrapbook, click on Documents, and
read the "Chatty Letter."Click
on the letter to put it away, close the inventory and step out of the
close-up.You will find Ms. Hubbard on
the berth further inside the room but, for the reasons explained earlier,
ignore her for now.Return to the
corridor.
You will
find nothing new in Calais Room 10 Ratchett
and there is no need to go in Calais
Room 9 Poirot either.So click on
the footprints-icon appearing at the bottom of the screen to go further down
the corridor.Enter Calais Room 7-8 Ohlsson & Marceau. Step forward in the room and pick up Greta’s
Bible that you will find under the ashtray, on the left side of the bedside
table.Close up on the suitcases up in
the carrier on the heroine’s left.Click
on Ohlsson’s suitcase, but it is locked.Click on the heroine’s suitcase, but she will say that she does not need
anything else from it.Step out of the
close up.Greta is seated on the berth
but, again, there is no use talking to any guests at this time.
Return to the corridor and enter Calais Room 5-6 Schmidt & Debenham.Step further into the room.Ms. Schmidt is seated on the berth but, for
the reasons explained earlier, ignore her for now.Close up on the suitcases up in the carrier
on the heroine’s right.Open Schmidt’s
suitcase and click inside to retrieve a Small Latched Box and hear Poirot
say, "Quite interesting."[But
this remark has nothing to do with the presence of fingerprints.]Step out of the close up and open Debenham’s
suitcase.Click inside to retrieve a Dainty
Handkerchief and hear Poirot say, "Regardez, Mademoiselle!"
Step out
of the close ups and return to the corridor.Try to enter Calais Room 3-4 MacQueen,
but it is locked.Try Calais Room 1-2 Masterman & Foscarelli,
but that is also locked.Click on the
footprints-icon appearing in the upper-left portion of the screen to approach
the end of the car.Feel free to check
the bathroom on the heroine’s right, but there is nothing of interest in there.
Return to Calais Room 10 Ratchett.If you haven’t done so already, take a moment
to examine the items you have not yet examined, using the two-step process
described at the beginning of this walkthrough.When you click on the Eye icon in examining Greta’s Bible, the
heroine will indicate that she has noted the relevant passage in her
scrapbook.You will find it under the "Bible
Passage" in the Documents section of the scrapbook.
When you
are done, step out of the inventory and close up on the window.Click on the footprints-icon to step outside
the train.A brief cutscene
follows.Close up at the heroine’s
feet.You will see a footprint, but we
can do nothing with it at the moment.So
step out of the close up and click on the footprints-icon appearing in the
lower-right corner of the screen to get a full view of where the heroine is
standing.Take two steps to the right to
arrive at the front portion of the train.Click on the Eye icon appearing between the two front wheels of the gray
car behind the engine, to get a close up of the damaged area under the
car.Click on the short chain in the top-central
section of the screen to hear the heroine’s comment.Step out of the close up and click on the
footprints-icon appearing at the back of the engine to enter.
Talk to
the engineer.Feel free to proceed
through the dialog as you like.At the
end, the heroine will automatically give Ratchett’s False Teeth to the
engineer.Feel free to address the
engineer again, but you will not get any useful information.Pick up a Lump of Coal from the pile
behind the heroine.The engineer will
happily allow you to take it.Click on the
Hammer on the heroine’s left and the engineer will tell her that he
needs it to check the boiler pressure, but that he would let her have it if she
can find him an adequate replacement.So
bring out the Leather Sap from your inventory and give it to him.Take the hammer and step outside.
Take two
steps to the left to reach the Calais Coach.Click on the footprints-icon at the car to get a close up of Ratchett’s
window.Click on the footprints-icon at
the window to enter Ratchett’s room.Feel
free to use the shortcut (the train’s sketch at the top of the screen) to go to
the Restaurant Car.Go all the way to
the back of the car to reach the connecting door to the Baggage Car.Use the Baggage Car Key to unlock the
door.Enter the Baggage Car.
You can
click on the footprints-icon on either the left or the right of the central
panel, to arrive in the same general area.Close up on the square crate sitting on top of one filled with green
vegetables, to the right of the window on your left.(See Below)
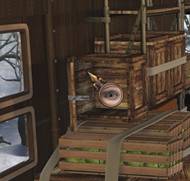
Click on
the Eye icon on the crate’s plain surface and you will hear Poirot say,
"Quite interesting," indicating the presence of a fingerprint.But we don’t have all the materials to take any
fingerprints yet.So step out of that
close up and into the one on the diagonally-placed, reddish square crate, with
a white label on it, in the lower-left portion of the screen.Close up on the label and click on the plain
surface, to hear Poirot say "Quite interesting" again.Step out of the close up and it will bring
you out of the close up on the crate itself.So close up on that crate again and, this time, click on the hand icon
at the top of the crate, to hear Poirot point out the fact that the lid has
been secured by four nails.Use your Hammer
to remove those nails; and then, remove the lid and pick up the Bound
Snowshoes.Feel free to replace the
lid or just step out of the close up and the heroine will replace the lid
automatically.
We now
have everything we need to venture out into the woods to see if we can find
anything there to help us restore the heat in the train.Feel free to use the shortcut at the top of
the screen to take us into the Athens-Paris Coach.Go all the way to the back of that car and click
on the door "To Exterior of Train" to step outside.
Take two
steps to your right, to arrive at a kind of fork: you can go either left or
right.But if you click in either
direction, you will hear Poirot warning you that the snow is too deep for you
to cross without snowshoes.So open your
inventory and place the Bound Snowshoes and the Pliers, one by
one, in the left column of the Gears section.Click on the gears icon in the middle to retrieve Copper Wire and
the (now-unbound) Snowshoes.Bring out the Snowshoes and click on the heroine to have her put
them on.
Go to your
right and see the wolf standing in your way.Bring out the Gun and click on the wolf.Poirot will comment and the heroine will fire
up in the air, frightening the wolf away.Go to your right.If you try to go
left left, the heroine will inform us that we have reached a dead end.Pick up the silver-colored Metal Spout
that is sticking out of the tree on the left side of your screen (you will find
the spout just above the short branch, on the right side of that tree).
Go to your
right, and then to your left, to arrive back at the fork in the road.If you click on the footprints-icon at the
bottom of the screen, you will be on your way back to the train.But we are not done in the woods yet.So click on the footprints-icon in the upper-left portion of the
screen.Disregard the heroine’s rather
disparaging remark about being unsure what she expects to find wandering around
out here, and move forward by clicking on the footprints-icon in the UPPER-LEFT
portion of the screen.You will see a
deer grazing at a distance.
Click on the footprints-icon in the lower-left portion of the
screen.Disregard another disparaging
remark by the heroine, and go left.Go
left again.If you try to go further
left, the heroine will inform you that you have reached a dead end.Pick up another silver-colored Metal Spout
that is sticking out of the tree on the left side of your screen (you will find
this spout on the right side of that tree as well).
Go
right.Then, click on the
footprints-icon in the upper-right
portion of the screen.Click on the
footprints-icon in the upper-right
portion of the screen again, to find another wolf blocking your way.Bring out the Gun and click on the
wolf, to hear Poirot’s comment in the background.Once again, the heroine will shoot in the
air, frightening the wolf away.Go right
and click on the Eye icon
in the left portion of the screen to get a close up only of lots of ice and
snow.Move your cursor around the bottom-center
of the screen until you get a hand
icon (you will find it on a hole in a thin stretch of white snow surrounded by
ice).Click on the hand icon to see a
cutscene in which the heroine will retrieve a Steak Knife.Examine the knife using the two-part process
described at the beginning of this walkthrough, to find that it is just a knife
from the train with nothing remarkable about it.
Click on
the footprints-icon in the upper-right
portion of the screen to arrive before a hut and hear Poirot’s comment in the
background.Approach the hut, to hear
another comment by Poirot.Click on the
door icon to get a close up of the front portion of the hut.The door has a padlock on it and the window
is barred.Click on the Eye icon on the
window, to hear Poirot tell you that one of the bars is loose.Use your Hammer on the window to
retrieve an Iron Bar.Use this Iron
Bar on the padlock, to retrieve the Broken Padlock.Enter the hut.
Pick up
the Attendant’s Uniform.Examine
it by using the two-part process explained at the beginning of this
walkthrough, i.e., place the uniform on the magnifying-glass icon in the right
column of the inventory, click and read the information in the box at the
bottom of the screen.Then, click on the
Eye icon to retrieve the Second Pass Key.
Move to
the other side of the hut.Pick up the Stiletto
sticking out of the seat of the chair. Examine the Stiletto as well, to learn
about the stain of dried blood and a smudge.[But we don’t have all the materials yet to take a fingerprint.]Use your Pliers to loosen and retrieve
a piece of Stove Pipe sticking out of the "antique stove" on
your left.We are done here, so move to
the other side of the hut and step outside.Bring out your Snowshoes and click on the heroine to have her put
them on.
Step to
your left and then, to your right.Click
on the footprints-icon in the lower-right
portion of the screen (to arrive at the spot where you had met the second
wolf).Step to your left and then, click
on the footprints-icon in the lower-right
portion of the screen (to arrive in the area where you can see the deer in the
distance).Go right, then right again,
to reach the fork.Click at the bottom
of the screen and then, go left, to reach the train.
Go all the
way up to the front of the train, and close up on the underside of the car just
behind the engine.Attach the Stove
Pipe to the damaged section in the top-central portion of the screen.[Note:This is where the Fireman’s Gloves come in handy.You do not have to get the heroine to
actually put them on, but you will not be able to repair the damaged pipe
unless you have the Fireman’s Gloves in your inventory.]A brief cutscene follows, bringing us back
into the train and in front of Poirot’s room as the heroine announces that the
heat has been restored and we must now get on with the murder investigation.[Check M. Poirot’s Instructions, in your
scrapbook, to find that the instruction about the heat has been crossed off and
a host of new instructions have been added.]
Go to the
Salon Car.Take three steps forward and
pick up the Punch Bowl and the Ice Bucket from the counter on
your left.Now go to the Restaurant
Car.Take three steps forward and close
up on the large table of food on your left.Pick up the Blank Menu Cards and the Butter Knife.Step out of the close up, take another step
forward and click on the Kitchen Door on your left.A short cutscene follows in which the chef
rudely tells the heroine that he does not have enough vinegar or olive oil.
Go to the
Baggage Car.Take two steps forward and
close up on the clipboard hanging on the left wall.It is the Cargo Manifest.Click on the Eye icon to have the heroine
read it.Step out of this close up and
into the one on the large barrels on your right.Bring out a Metal Spout and attach it
to the small round opening at the bottom of the Barrel of "White Wine
Vinegar" on your left.Now bring
out a Water Glass and place it under the spout, to retrieve A Glass
full of Vinegar.Next, bring out the
other Metal Spout and attach it to the small round opening at the bottom
of the Barrel of "Salonika Olive Oil" in the middle of the three
barrels.Bring out another Water
Glass and place it under the spout, to retrieve A Glass full of Olive
Oil.
Return to
the Restaurant Car, step forward and click on the Kitchen door on your
left.A cutscene follows in which the
heroine will give the vinegar and the olive oil to the chef.As he storms off, enter the Kitchen.Open the top drawer on the heroine’s left,
and retrieve the Turkey Baster.Close up on the refrigerator, open its door and retrieve the Carafe
of Orange Juice.Step out of the
close up and pick up the Meat Cleaver from the cutting board on your
right.Move further in the kitchen and
pick up A Bowl Full of Cake Batter from the stove on your left.
Go to
Calais Coach and enter Ratchett’s Room 10.Step out of the window and close up at the heroine’s feet.Use A Bowl Full of Cake Batter to fill
the footprint with the cake batter.Use
the Ice Tongs to retrieve the Footprint Cast.Combine the Footprint Cast with the Ice
Bucket in the Gears section, as described at the beginning of this
walkthrough.[Note: If you don’t
put the cast in ice, then it will melt as soon as you re-enter the train, and
you will have to go back and make a cast all over again.]
Go left to
the back of the train and enter the Athens-Paris car.Open your inventory and combine the Lump
of Coal and the Hammer in the Gears section, to retrieve Coal
Dust.Now fill the Turkey Baster
with the Coal Dust by combining them also in the Gears section.We are now ready to take fingerprints from
items, starting with those in our own inventory.
Note:You take
fingerprints from an object by combining that object, the Turkey Baster
Filled With Coal Dust and the Sellotape in the Gears section.[The idea, of course, is that you are
spraying the coal dust on the object with the turkey-baster and then,
transferring the print on to the sellotape.]If a print can be taken, the heroine will announce that she has taken it
and filed it.You can then find that
print by clicking on the Fingerprint icon in the right column of the Inventory
section.
Using the above
method, take the fingerprints from the following four objects:
(1) Thick Tumbler
(2) Broken Snowshoes
(3) Broken Padlock
(4) Stiletto
Talk to Matteo.Exhaust all topics, starting with the top
line in the dialog box.At the end of
the conversation, the heroine will take his fingerprint.[You will not have to do anything but in
order for the heroine to ask for and take any fingerprints, you must have the
following items in your inventory: Paper Napkins, Typewriter Ribbon,
and Blank Menu Cards.The idea,
of course, is that the heroine uses the ribbon to apply ink to the person’s
finger, transfers the fingerprint to the menu card, and hands the napkin to the
person to clean his hand.]The
fingerprint will appear momentarily on the screen and can then be found in the
Fingerprint Section by clicking on the Fingerprint icon in the right column of
the inventory.Note also that if you
check the Suspects section of your scrapbook, a fingerprint image now appears after
Matteo’s name, indicating that his fingerprint has been taken.
Feel free
to check out the bathroom on your left, but there is nothing of interest
there.So step outside and move further
down the corridor.Enter Athens Room 16 Vacant.Step further into the room and check the
shoe-closet in the upper-right portion of your screen, but it is empty.So step out of the room and go further down
the corridor.
Enter Athens Room 15 Matteo.Step further into the room and check the
shoe-closet in the upper-left portion of the screen.Bring out the Ice Bucket with Footprint
Cast from your inventory and click on the pair of shoes inside the closet, to
see if the shoes match the footprint-cast; but Poirot’s voice tells you that there
is no match.
So step out of this room and enter Athens Room 14 Vacant.Check out the shoe-closet at the bottom of
the screen (left of the bedside table), to find it empty.Return to the corridor and enter Athens Room 13 Constantine.Step further into the room and talk to the
doctor, only to retrieve his fingerprints.Check out the shoe-closet in the upper-left portion of your screen and use
the Ice Bucket with Footprint Cast on the shoes in the closet, only to
hear Poirot tell us that the cast does not match these shoes either.
Return to
the corridor and enter Athens Room 12
Vacant.Check out the shoe-closet at
the bottom of the screen (left of the bedside table), to find it empty.Return to the corridor and go left.Enter Athens
Room 11 Michel.A brief cutscene will
follow in which the heroine will retrieve a Small Key from Hardman.Talk to him, exhausting all topics, starting
from the top line in the dialog box.
Check Michel’s suitcase up on the luggage-carrier
on your left.Click inside, to retrieve
Michel’s passport and a Family Photograph.Examine the photograph using the two-step
method described at the beginning of this walkthrough.Step out of the close up and check out the
shoe-closet in the upper-left portion of your screen.Apply the Ice Bucket with Footprint Cast
to the shoes in the closet, to hear Poirot tell us that the cast does not match
these shoes.
Return to
the corridor and enter Athens Room 10
Engineer.Step further into the room
and check out the shoe-closet in the upper-right portion of your screen.Use the Ice Bucket with Footprint Cast
on the shoes in the closet, to hear Poirot tell us that the cast does not match
these shoes either.So return to the
corridor and enter Athens Room 9 Klaus.Step further into the room and check out the
shoe-closet in the upper-left portion of your screen.Apply the Ice Bucket with Footprint Cast
to the shoes in the closet, to learn that there is no match.
Step out
of the room and go further down the corridor.Enter Athens Room 7-8 Vacant.Check out the shoe-closet immediately right
of the entrance, to find it empty.Step
further in the room and close up on the bedside table.Apply the Turkey Baster Filled With Coal
Dust, and then the Sellotape, to the flower vase.The heroine will announce that she has
obtained and filed a fingerprint.Step
out of this close up and into the one on the two brass handles in the wall on your
left.Apply the Turkey Baster Filled
With Coal Dust, and then the Sellotape, on the left handle to take a
fingerprint from there as well.Once
again, the heroine will announce that she has obtained and filed a
fingerprint.You will now find the
fingerprints from both the "flower vase" and the "handle" in
the Fingerprint section of the inventory.
Return to the corridor and enter Athens Room 5-6 Vacant.Check out the shoe-closet immediately left of
the entrance, to find it empty.Step out
into the corridor and enter Athens Room
3-4 Fireman.Check the shoe-closet
immediately right of the entrance.Apply
the Ice Bucket with Footprint Cast to the shoes in the closet, to hear
Poirot tell us that the cast does not match these shoes.Return to the corridor and enter Athens Room 1-2 Lucien.Check out the shoe-closet immediately left of
the entrance.Apply the Ice Bucket
with Footprint Cast to the shoes in the closet, to learn that there is no
match.
Step out
of the room and go down the corridor.Feel free to check out the bathroom on your right, but there is nothing
of interest there.So return to the
corridor and enter the Calais Coach.Talk
to Michel, exhausting all topics, starting from the top line of the dialog
box.Feel free to check out the bathroom
on your left, but there is nothing of interest there.
Go down
the corridor and enter Calais Room 16
Hardman.Step further into the room
and pick up the passport from the bedside table.This passport identifies Hardman as a
salesman.Close up on the bedside table
and then, close up again under the top edge of the table.Pick up another passport, which identifies
Hardman as a P.I. (private investigator).Pick up Hardman’s credentials and examine the card using the
two-part method described at the beginning of this walkthrough.Finally, pick up the taped white packet in
the front.The heroine informs us that
she will put it in her scrapbook and examine it later.Open the scrapbook and check Ratchett’s
Letter in the Documents section.Step
out of the close ups and check out the shoe-closet on the heroine’s right.Apply the Ice Bucket with Footprint Cast
to the shoes in the closet, to hear Poirot tell us that the cast does not match
these shoes.
Step out of the room and go down the corridor.Enter Calais
Room 15 Arbuthnot.Check the
suitcase up on the carrier right of the heroine.Click inside, to retrieve a Packet of Pipe
Cleaners and hear Poirot’s comment.Conduct the two-part examination of the packet.Step out of the close up and move further
into the room.Talk to the colonel and
exhaust all topics, starting with the top line of the dialog box.As he leaves the room, check out the
shoe-closet on your left.Once again,
use the Ice Bucket with Footprint Cast on the pair of shoes inside the
closet, to learn that there is no match.
Return to
the corridor and enter Calais Room 14
Princess Dragomiroff.Step further in
the room and pick up the passport and the Copper Bracelet.As soon as you pick the bracelet, the heroine
will step back and Princess Dragomiroff will walk in.Talk to her, exhausting all topics as usual.Then, conduct the two-part examination of the
bracelet.
Note:Since it was obvious that the footprint found
outside Ratchett’s window was made by a man’s shoes, we do not need to check
any of the ladies’ shoes.
Return to the corridor and enter Calais Room 13 Count Andrenyi.Check out the suitcase up on the carrier on
your right and click, to find nothing of interest there.Step further into the room and check out the
shoe-closet on your left.Use the Ice
Bucket with Footprint Cast on the shoes inside the closet, to hear Poirot
tell us that there is no match.Step
outside the room and enter Calais Room
12 Countess Andrenyi.Check out the
suitcase up on the carrier on your left and click inside, to find nothing of
interest there.But click on the Eye
icon on the label in the top-center of the suitcase, to find the initials
"H.M.K." inscribed under the label.
Feel free
to step further into the room but there is nothing of interest there.As noted earlier, there is no need to check
the ladies’ shoes.So return to the
corridor and go left.Enter
Calais Room 11 Hubbard.Step
further into the room and talk to Mrs. Hubbard, exhausting all topics starting
with the top line in the box.As she
leaves, step back to the front of the room and close up on the doorknob to the heroine’s
right.Apply the Turkey Baster Filled
With Coal Dust, and then the Sellotape, to obtain a fingerprint from
the doorknob.Since we don’t need to
check any of the ladies’ shoes, you can leave the room now.
Enter Calais Room 10 Ratchett, step forward
and check out the shoe-closet on your right, but it’s empty.Close up on the window and click on the Eye
icon appearing just above the silver handle.Apply the Turkey Baster Filled With Coal Dust, and then the Sellotape,
to obtain a fingerprint from the window sill.Step out of the room and enter Calais
Room 9 Poirot. Step forward and
check out the shoe-closet on your left, but it is also empty.So leave the room and go further down the
corridor.Enter Calais Room 7-8 Ohlsson & Marceau.Step forward and talk to Miss Ohlsson,
exhausting all topics.Check out the
suitcases up on the carrier on your left.Close up on Ohlsson’s suitcase and click inside, to retrieve a Postcard
and hear Poirot say, "Regardez, Mademoiselle!"Conduct a two-part examination of this postcard.Then, check out the heroine’s suitcase, but
she will say that she doesn’t need anything from it.So step out of the close up and return to the
corridor.
Enter Calais Room 5-6 Schmidt & Debenham.Step forward and pick up Debenham’s passport
from the bedside table.Talk to Miss Schmidt,
exhausting all topics starting with the top line in the dialog box.Step out of the room and enter Calais Room 3-4 MacQueen.Step forward and talk to MacQueen, exhausting
all topics.Check out the suitcase up on
the carrier on your left, but there is nothing of interest there.Step back to the front of the room.Close up on the brief case on your left and
click, to hear the heroine say that she has retrieved something that she will
put in her scrapbook.Open the scrapbook
and read the "Threatening Letter" and the "Second Threatening
Letter," one by one, in the Documents section of the scrapbook.Check out the shoe-closet on the right of the
entrance and use the Ice Bucket with Footprint Cast on the shoes inside the
closet, to hear Poirot tell you that there is no match.
Return to
the corridor and enter Calais Room 1-2
Masterman & Foscarelli.Move
further into the room and talk to Masterman, exhausting all topics.Check out the suitcases up on the carrier on
your right.Close up on Masterman’s
suitcase and click inside, to retrieve the Book, Love’s Captive and hear
Poirot say "Regardez, Mademoiselle!"Step out of that close up and into the one on Foscarelli’s
suitcase.Click inside, to retrieve a Chauffeur’s
License and hear Poirot say "Et voila!" this time.Conduct a two-part examination of both the
book and the license just retrieved from the two suitcases.
Step back to the front of the room and check out
the shoe-closet left of the entrance.Use
the Ice Bucket with Footprint Cast on the two pairs of shoes inside the
closet.The pair at the bottom does not
match the cast, but the one at the top does.Be sure to check both pairs of shoes, however; otherwise, you will not
be able to report to Poirot later that you have checked all the men’s shoes and
get points for having done so.Step out
of the room and go further down the corridor.Feel free to check out the bathroom on your right, to find it locked.
Go to the
Salon Car.Step forward and close up on the
colonel, on your left.Try to talk to him,
but he has nothing else to say.So step
out of that close up and into the one on Foscarelli, on your right.Talk to him, exhausting all topics.Step out of the close up, take two steps
further into the car and talk to Lucien (the waiter) on your left, exhausting
all topics.Step out of the close up,
take another step forward and try to speak with Mrs. Hubbard, on your
right.But she has nothing else to say.So close up on the Count and the Countess, in
the lower-right portion of the screen.Speak to them, one by one, exhausting all topics.Step out of the close up, move forward and
close up on Miss Debenham, on your left.Speak to her, exhausting all topics.Step out of the close up.There
is no one in the Restaurant Car, so go to the Baggage Car.
Step
forward and close up on the crate (sitting on top of the large one filled with
green vegetables) to the right of the window on your left.Apply the Turkey Baster Filled With Coal
Dust, and then the Sellotape, to obtain a fingerprint [listed as "Empty
Crate" in the Fingerprint section of the inventory]. Step out of this close up and into the one on
the reddish, square crate sitting diagonally in the lower-left portion of the
screen.Close up on the white label in
the lower side of that crate and apply the Turkey Baster Filled With Coal
Dust, and then the Sellotape, to obtain a fingerprint [listed as
"Small Crate" in the Fingerprint section of the inventory].Step out of the close up, move forward and click
on Klaus (the chef) to obtain his fingerprint.You will not get anything else out of him.
Step
forward.Try to open the door behind the
heroine, to learn that it is a security door and that it is locked.Close up on the door-handle and click on the
Eye icon to hear Poirot say, "Quite interesting."Apply the Turkey Baster Filled With Coal
Dust, and then the Sellotape, to obtain a fingerprint [listed as
"Security Room" (not as a
handle or a door handle, as you might expect) in the Fingerprint section of the
inventory, no doubt to distinguish it from the fingerprint we took earlier from
the brass-handle in one of the compartments.]Step out of the close up and use the Small Key (that you had
obtained from Hardman in Michel’s room) on the door.A brief cutscene follows.Enter the Security Room.
Close up
on the large crate at the bottom of the screen.Use the Iron Bar to open the lid.Pick up the Attendant’s Uniform lying on the mattress on your
left.Examine it using the two-part
process described at the beginning of this walkthrough.Feel free to click on the mattress, to hear
the heroine’s comment about the "makeshift bed."Close up on the books in the lower-right
portion of the crate.The heroine will
read the titles of the books.As she
finishes, click on the Eye icon to hear Poirot say, "Quite
interesting."Apply the Turkey
Baster Filled With Coal Dust, and then the Sellotape, to obtain a
fingerprint [listed as "Books" in the Fingerprint section of the
inventory].
Step out of this close up and into the one on
the latch at the top-center of the crate.Click on the Eye icon appearing on the latch, to hear Poirot say,
"Quite interesting."Apply the
Turkey Baster Filled With Coal Dust, and then the Sellotape, to
obtain a fingerprint [listed as "Ratchett’s Crate" in the Fingerprint
section of the inventory].Step out of
the close up and click on the stool (with a lamp and dishes on it) behind the
books, to hear the heroine’s comment.Step
out of the close up on the crate.The
heroine will replace the lid automatically.
Close up on the safe in the back of the room.The clue to the combination was inside the Hat
that you had found in Ratchett’s room after the murder: "Rev. 13:18."The reference was, of course, to the Book of Revelations,
chapter 13, verse 18.We have already
copied the relevant text from Greta’s Bible [listed as the "Bible
Passage" in the Documents section of the scrapbook].Note the "number of the beast" at
the bottom of that page: "Six hundred threescore [and] six."Thus, the combination for the safe is 666.
Note the white knob in the center of the dial in
the upper-left portion of the safe.If
you click to the left of this knob,
the dial will rotate anti-clockwise.If
you click to the right of the knob,
the dial will rotate clockwise.Keeping
this in mind, proceed as follows.
Step 1: Click to the LEFT of the knob to move the
dial anti-clockwise until it reaches 6.
Step 2: Click to the RIGHT of the knob to move the
dial clockwise until it reaches 6.
Step 3: Click to the LEFT of the knob to move the
dial anti-clockwise until it reaches 6.
The heroine will exclaim, "I think I heard
a click!"Click on the horizontal
brass-handle on your right, to open the safe.Pick up the document inside, to hear the heroine say that she will put
it in the scrapbook so that she can examine it later.Open the scrapbook and read Ratchett’s
Confession in the Documents section.
Step out
of the close up and go to the Calais Coach.Enter Ratchett’s Room 10 and step outside the window.Go right along the train.You will find the Fireman standing in front
of the gray car behind the train’s engine.Click on him to take his fingerprints.Enter the back of the engine and talk to the engineer, exhausting all
topics.Step outside and go left along
the train.Use Ratchett’s window to
re-enter the train.
Open your
scrapbook and click on Suspects in the Documents section, to find that you are
still missing Lucien’s passport.Recall
that we couldn’t find it when we checked his room.But when we spoke to him, he told us to get
it from his room.That is when the
passport appears.So go to the
Athens-Paris Coach, enter Lucien’s room 1-2, and pick up his passport from the
bedside table.You should now have the
fingerprints and passports of all the suspects.
We must now try to determine the identity of the
person(s) whose fingerprints we found on various objects.So open the Fingerprints section of the
inventory.The fingerprints of the
Suspects are at the top of the screen, and those found on objects are at the
bottom.There is a magnifying-glass icon
in a box in the center of the screen.In
order to compare the fingerprint of a suspect with that found on an object, scroll
through the top row to bring the name of that suspect above the box with the magnifying-glass icon.Scroll through the bottom row, then, to bring
the name of the object below that box.Then, click on the magnifying-glass icon in
the box to see if we have a match.You
should get the following results from the comparison:
1. Thick Tumbler ——– Masterman
2. Broken Snowshoes — Colonel Arbuthnot
3. Padlock —————- Matteo
4. Stiletto —————– No Match.*
5. Flower Vase ———– Debenham
6. Handle — ————– Colonel Arbuthnot
7. Doorknob ————– Ohlsson
8. Window Sill ———– Foscarelli
9. Empty Crate ———– Foscarelli
10. Small Crate ———— Foscarelli
11. Security Room ——– Michel
12.
Books —————— No Match.*
13. Ratchett’s Crate ——- MacQueen
*Note:In case of a No-Match, you must align each suspect with that object (Stiletto or Books) and click,
to get the heroine to tell you that there is no match.This can be tedious, I know, but it is the
only way to let the computer "know" that we did not get a single
match for that object, and to proceed further in the game.
Return to
Calais Coach and enter Poirot’s Room 9.Talk
to him.Once again, be sure to click on
the left mouse button as the heroine reports to him, or else that
"muffled" cutscene can go on indefinitely.Exhaust all topics, starting with the top
line in the dialog box.At the end of the
conversation, Poirot will say, "And so, we advance in our investigations!"A cutscene will follow, taking us to the next
Part of the game.
Part Three:Hercule Poirot Sits Back and Thinks.
Once
again, we find the heroine standing outside Poirot’s room.Save
your game, enter Calais Room 10 Ratchett, and exit the train through the window.A cutscene follows.[You could have also used the door at the
back of the Athens-Paris Coach to leave the train, but the same thing would
have happened.]Close up under the bed
and pick up the Elegant Parasol.Step
out of the close up and move forward in the hut.Open the window and click on the Eye icon there
to look outside.Use the Elegant
Parasol on the padlock on the door.Move
back to the other side of the hut and step outside.Pick up the Broken Padlock from the
ground in front of the door.Click on
the brown chest on your right, to retrieve your belongings and hear Poirot’s
comment.[If you saved the game before
exiting the train, compare your earlier inventory with what you just retrieved,
to note that the only thing missing is the Small Key (to the Security
Room) that you had recovered from Hardman in Michel’s room.]
Bring out your Snowshoes and click on the heroine to
have her put them on.We must return to
the train, but the blizzard makes it difficult to see very clearly.Don’t worry about that.Just follow the same directions you took the
first time you had returned to the train from the hut.Thus, step to your left and then, to your
right.Click on the footprints-icon in
the lower-right portion of
the screen (to arrive at the spot where you had met the second wolf).Step to your left and then, click on the
footprints-icon in the lower-right
portion of the screen (to arrive in the area where you had seen the deer in the
distance, although that deer is gone now).Go right, then right again, to reach the fork.Click at the bottom of the screen and then,
go left, to reach the train.Step into
the Athens-Paris Coach.
If you check M. Poirot’s
Instructions in your scrapbook, you will find that one of them tells you to use
the ham radio to get more information about the suspects.We must fix the radio, however, before we can
use it.So go to and enter Athens Room 16 Vacant.Step forward and close up on the radio.Bring out the Punch Bowl from your
inventory and place it on your right.Pour
the Carafe of Orange Juice and then, place the Small Statuette,
in the bowl.Next, combine the Copper
Bracelet and the Pliers in the Gears section, and place the
resulting Bent Copper Bracelet in the bowl as well.Combine the Butter Knife, Hammer,
and Large Nails in the Gears section, and place the resulting Makeshift
Telegraph Key on your left.Finally,
combine the Copper Wire and the Pliers in the Gears section, and
attach the resulting A Cut Length of Copper Wire to the telegraph
key.Turn on the radio, to find that it is
ready to be used.Click on the telegraph
key, however, to learn that we still don’t know who to contact.So turn off the radio and go to Calais Coach.
Go to Calais Room
7-8 Ohlsson & Marceau.Step
further into the room and close up on the luggage-carrier on your left.Open the heroine’s suitcase and click inside,
to retrieve the Scarlet Kimono!Step out of the close ups and go to Calais
Room 9 Poirot.Step further into the
room and talk to Poirot.As before, be
sure to click on the left mouse button to get out of that "muffled"
cutscene.Exhaust all topics, starting
from the top line in the dialog box.*
*Note: When Poirot asks you what does Masterman’s
book, "Love’s Captive," reveal to you, click on "He was in
the military!"Poirot will
compliment you with a "Well done!" and you will get a point for this
deduction in The Challenge section.
After the dialog ends, close up on the luggage carrier on
your left.Click inside the suitcase to
retrieve a document.Read the Letter
From Poirot’s Friend in the Documents section of your scrapbook.Step out of the close up.
Go back to Athens
Room 16 Vacant.Close up on the ham
radio, turn on the power and click on the telegraph key.Poirot will compliment and a cutscene will follow.Exhaust all topics, relaying a lot of questions
to Barnaby who will promise to get the answers for us.After the dialog ends, turn off the power and
then, turn it back on again.Click on
the telegraph key and exhaust all topics.Barnaby will now answer the questions we had asked him the last
time.We will ask an additional question
at the end and Barnaby will promise to get the answer to that as well.So turn off the power and then, turn it back on
again.Click on the telegraph key, ask the
question, and Barnaby will give us the answer to that last question as
well.We are done for now.So at the end of this dialog, turn off the
power and step out of the close up.
[Note: You will find the above information – the questions
that we asked Barnaby and the answers that he provided – in the Barnaby
Dispatch section of the scrapbook.]
We must now question the suspects.Note that the train employees either seem to
have disappeared somewhere or will not have anything to say to you.But you can find the guests in the Salon Car
and the Restaurant Car.So go to the
Salon Car.Close up on MacQueen, on your
right.Talk to him and the colonel, one
by one, exhausting all topics.Step out
of the close up and into the one on Foscarelli, on your right.Talk to him, exhausting all topics as well.Step out of the close up and take three steps
forward.
Talk to Mrs. Hubbard on your right.Close up on Hardman, in the lower-right
portion of the screen.Talk to him,
exhausting all topics.Then, step out of
the close up and move forward in the car.Close up on Miss Debenham, on your left, and try to talk to her.But she is not in the mood for
conversation.So step out of the close
up and go to the Restaurant Car.
Step forward and close up on Dr. Constantine immediately
left of the heroine.Talk to him,
exhausting all topics.Step out of this
close up and into the one on Masterman, on your right.Talk to him, exhausting all topics
again.Step out of the close up and into
the one on the Countess on your left.Talk to the Count and the Countess, one by one, exhausting all
topics.Step out of the close up and
move further into the car.Close up on
Miss Schmidt, on your left, and talk to her.Step out of that close up and into the one on Princess Dragomiroff, on
your right.Talk to her and then, step
out of the close up and move further down the aisle.Close up on Miss Ohlsson, on your left, and
talk to her.Step out of the close
up.You can try to talk to Lucien, the
waiter, but he has nothing further to say.Take another step forward and feel free to enter the kitchen, on your
left.The chef, Klaus, is by the sink
but has nothing useful to say.
Warning:Do NOT
try to SAVE in the kitchen with BOTH the heroine and the chef in view because
there is a bug in the game here: when you RELOAD, the screen will be black, the
footprints-icon will be neither visible nor otherwise functional, and you will
see only a dim image of the chef by the kitchen sink.If you are already experiencing this problem,
Solution:Move your cursor to the top of screen, and
the train’s sketch will appear.Click on
any car you like.That will take you out
of the kitchen, and you can then save and proceed without any further problems.
Go and talk to Poirot in Calais Room 9.As before,
click on the left mouse button to get past the "muffled"
cutscene.Exhaust all topics.Note:
When Poirot asks "What course do you suggest?" (i.e., to determine
whether Schmidt was in fact the Armstrong cook), select "I will radio to
Barnaby," to gain a point in the Challenge section of the scrapbook.
After your conversation, go back to the Salon car and close
up on Miss Debenham.She will speak to
you now.Exhaust all topics.Go to Athens
Room 16 Vacant.Step forward, close
up on the radio and turn on the power.Click on the telegraph key and talk to Barnaby, giving him two more
questions to research.Turn off the
power and then, turn it back on again.Click on the telegraph key, to learn that Barnaby has the
information.Ask your questions and
Barnaby will answer.In the end, Barnaby
will ask the heroine for a date.This
marks the conclusion of our interaction with Barnaby.[You can confirm this by clicking on the
telegraph key again and Poirot will say, "We have learned all we can here."]
[Note: Once again, you can check the Barnaby
Dispatch section of the scrapbook to review the questions that we asked Barnaby
and the answers that he provided.]
Go and talk to Poirot again in Calais Room 9, to present your final report.
Note: After this conversation, you can interrupt the
sequence of events that follows only by asking Poirot for a moment to
decide.While it is hard to tell how your
performance is actually assessed at the end of the game, an interruption during
that sequence of events might have a bad effect on that assessment.So it might be best to avoid an interruption then and interrupt the present
dialog instead by clicking on the last sentence (thanking M. Poirot or
something) before exhausting all topics.You can then check your own progress in the Challenge section of the
scrapbook.Note also that, after
you click on the topic: "I have all the pieces, all that remains is for me
to assemble them properly," Poirot will ask you to imagine under what other conditions an assembly
of so many classes and nationalities of people is likely to take place.Click on "In America?"Apparently, you will not get any points in
the Challenge section of the scrapbook for choosing this answer on your very first
attempt but, again, it might have
some affect on the final assessment of your performance.
A brief cutscene will follow the above conversation.Poirot will then present three possible solutions:
the first one was devised for the Yugoslavian police; the second one reflects a
mastermind’s plot; and the third one explains facts that even the mastermind
did not know.In presenting these
solutions, Poirot will prompt us to supply the missing information.A shortcut reference to those questions and their
correct answers is given below.
Re: The First Solution
1.Threats from an unknown enemy:Threatening Letter.
2.Detective Ratchett hired to protect himself:Hardman.
3.Description fits only two men in the train: Matteo & Constantine.
4.Enemy came aboard the train in 1 of 2 ways:Door
left unbolted by MacQueen.
5.Disguise:Attendant’s
Uniform.
6.Dosage:confirmed by Masterman.
7.Murder weapon:Stiletto.
8.Evidence that killer had planned to leave at the
next station: Torn Letter.
9.Killer hid himself in:Shepherd’s
Hut.
Re: The Second Solution
1.Ratchett
met his end at:1:15
a.m.
2.Under
what conditions is such an assembly of people likely?In America.
3.The
nine passengers connected to the Armstrong case:
(i)Countess Andrenyi
(ii)Colonel Arbuthnot
(iii)Debenham
(iv)Princess Dragomiroff
(v)Foscarelli
(vi)Macqueen
(vii)Masterman
(viii)Ohlsson
(ix)Schmidt
(x)None of the above
4.Who had said that the trial-by-jury was a sound
system?Col.
Arbuthnot.
5.Which of the given clues point to the First
solution?All
of them.
6.Suggestion of Hardman’s complicity:when
he said the snow was bright.
7.Uncle’s name:M. Ferrier.
8.Real murder weapon:Steak Knife.
9.2 so-called clues in dead man’s compartment:Pipe
Cleaner & Handkerchief.
10. Clue found in
Shepherd’s Hut with incriminating fingerprints:Broken
Padlock.
11.Red-herring which was red but not a herring:Scarlet
Kimono.
Re: The Third Solution
1.Independent witness who saw a
small, dark person boarding the train:the Engineer.
2.Clues associated with the crate:Second
Attendant’s Uniform.
Note: If
you like, you can ask Poirot for a moment to decide before giving the above final
answer.You can then check the Challenge
section of the scrapbook to review your own progress before Poirot gives his
overall assessment of your performance.
After presenting the three solutions, Poirot will pause
to review the heroine’s progress.But he
will not indicate any scores, only compliment.He will then ask the heroine to choose the "correct" solution
(i.e., the one that should be presented to the authorities) from the three that
he presented.But you don’t have to
worry about that because it will in fact be the heroine, not we, who will make
that decision.So feel free to click on
the three choices in the dialog box in any order you prefer.And then,
Sit back and enjoy the ending!
* * * * * * * * *
* * * * * * * * * * * * * * * * * * * * * * * * * * * * * * *
Have a Safe and Happy Holiday
Season!
* * * * * * * * *
* * * * * * * * * * * * * * * * * * * * * * * * * * * * * * *
View this guide raw, exactly as the archive holds it