Agatha Christie: Evil Under the Sun Walkthrough
Act 4
Poirot’s Office – Present time:
Automatically be back at Poirot’s office.
Poirot summarizes the progress in the
investigation.Finger of Suspicion
– The fourth clue is Drawer.Click on Hastings icon
on the taskbar.
August 25, 1940
Morning
Seadrift Island
Poirot’s room:
Exit the room through the main door.Stephen Lane:
Meet Lane outside his room.Talk to Lane. Lane wants to go to St. Patrick and was happy with the brochure
given by Poirot.Learn about the murders,
the murderer and his state of mind.Linda Marshall:
Go to her room at first left in the hallway at left.Talk to Linda
completely. Learn about Gideon Fell, voodoo and the movie Curse of the Island.The Lookout tower:
Go up the stairs.*Use the binoculars and see that Blatt’s boat now has white
sail. Turn right and use the binoculars and see the periscope again.Bathing beach:
Exit through the front door and go to the bathing beach.Go down the stairs and
close to the water’s edge.Talk to Arlena. She knows the writer of the
threatening letters. She used the float given by Poirot to a rendezvous.Climb up the stairs. Meet
Kenneth and then Patrick.North:
Go back to the front of the hotel and down the path.Saved game here. *See
North and follow him.There will be several choices of action given by Poirot.
Select ‘Ask Mrs. Redfern to make a sketch of him".Smuggler’s Inn Pub:
Enter the pub.Look close at the
dartboard. This is a map of Tom Cutter’s treasure. Exit the pub.Hotel foyer:
Go back to hotel.Talk to Christine sitting at right. She will make a sketch of North for Poirot.
Talk to Rosamund that
arrives after Christine leaves. Poirot gives the stolen typewriter.Treasure Hunt 1:
Enter the bar and exit through the outside door.Go forward until the
crossroad and climb up to Island Summit. This is the highest point in the
island.*Watch Poirot pace the
area. At the tennis court, dig, dig, dig… Hahahahah!Pick up the tennis
ball left of path.Stopwatch timing
(can be done anytime):Go to a place stated by Poirot to be the best place to
do the timing. Use the stop
watch. Get the time to reach Cutter’s Cove.Tennis court – 20
minutes; Monastery ruins – 12 minutes, Sanctuary Cove by base of ladder – 15
minutes, Ledges entrance – 6 minutes; Bathing beach by base of ladder – 18
minutes and entrance of hotel – 25 minutes.Landing:
Call for the sea tractor. Listen to clues given by Will during these crossings.
Leathercombe Bay
Monk’s Hood Pub:
After having the tennis court fiasco, talk to the
bartender. Learn the original place of the island high point. The grassy path in
front of the hotel was the highest point then.Go to the
bottom screen and take an old corned beef sandwich from the table.Go back by the
door and talk to Barry about Baskerville, the Great Dane.Proceed! See
how Baskerville is trained. Ah, he doesn’t want to enter the store.Enter the
store and automatically place the sandwich on the floor. Watch Baskerville and
Chloe interact.Store:
Post Office – Click on the mail behind the mail cabinet twice.
Pick up the missing mails. Give the missing mails to Adelaide.
When asked for
a choice – Ask to use the testing equipment.Chemist:
Click on the book behind Adelaide. *Open the book.Place the
tablets taken from Lane’s medicine cabinet in a test tube.Take the test
tube with tablets and click it on the ‘drugs’ word in the Table of Contents of
the opened book.Automatically,
the test is done by Poirot. It is Trional.Exit the
store.Police station –
Home Guard: Go down and to the end of the road. Enter the door
by the fountain.Talk to
Colonel Weston about everything.Typewriter –
After talk about Arlena, test the typewriter.Place a blank paper on the typewriter.
Click on keys of
typewriter to get a sample. *Take the typed paper and see that it does matchthe threatening letters.
Answer ‘Was it Linda
Marshall’ to the question.Talk to
Colonel Weston about Mrs. Castle and the 2 murder cases.The answer
after reading the report of the Milly Parson’s case:1. The film
and the time (3rd).2. Then the
title of the movie.Exit the
village and go back to the garage.Jenk’s
Garage: Go inside the garage and talk to Will.Will wants
Barry’s points cleaned.
Clean the car’s engine pointsRead the
magazine in inventory and learn automatically how to clean points.Go to the work
bench and take the screwdriver, spanner (wrench) and flat file.Spanner-Wrench – Poirot gets stabbed by a
magnetic fragment when he picked up the spanner-wrench.In inventory, look close at spanner-wrench.
Automatically a magnetic fragment is in inventory.Go to Barry’s
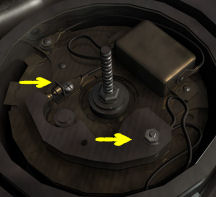
car at left. See the engine of the car.Open the
distributor cap – the big middle pan at center.Look close and
see the ignition system.Use the
spanner on the bolt holding one contact point at bottom of the system. This gets
the dull point.Use the
screwdriver on the screw holding the other contact point close to center. This
gets the other dull point.In inventory,
use the flat file on one dull point to get shiny point. Do the other dull point.*Place the 2
shiny points in their original places. Well done, old man!
Exit the
garage and meet Will. Go back to Seadrift Island.
Seadrift Island:
Original high point of the Island: Go back to
hotel.Go to path going to the cliff side. *At the lounge
chairs, automatically start pacing to the different directions.The Gardeners are close by.
Dig, Poirot,
dig. The treasure is found at side of the hotel where the spiral stairs are
located and on the path going to Rocky beach.*Get 3 gold darts.
Smuggler’s Inn Pub: Go down the road and enter the pub.Go down the cellar and look close at the dart target
on the brick wall. Place the gold darts in the 3 holes under the top 20, thus
getting a ton-eighty.Enter the
tunnel and look at the footprints on the ground. *Take the luminescent coat
left of the entrance.Go forward until the intersection. Poirot refuses to go ahead.
Exit the
tunnel and then the pub. Go back to the hotel.Rocky
beach: Take the path on the right side of the hotel.Go forward
and talk to Emily Brewster. Something was thrown at her.Gardeners:
Talk to the Gardeners at the lounge chair area close to the wall in front of
the hotel.Patrick
Redfern is not in a good mood.Sanctuary
Cove: Go to Sanctuary Cove.Talk to Christine Redfern
sitting on the deck. *She gives the sketch of North.Talk to her
again and see that she too is not in a good mood. Look at the sketch of North
in inventory.Kenneth
Marshall: Go back to the hotel and up to the rooms.Check the
inner door of Kenneth Marshall’s room. Use the stethoscope on the door and
hear typing.Landing:
Use the phone to call for the sea tractor.
Leathercombe Bay
Police –
Home Guard: Go down and to the end of the road. Enter the door
by the fountain.Talk to
Colonel Weston about North’s sketch.
Seadrift Island:
Automatically, be back at the side of the
hotel on the path going to Rocky beach.Hear the pipes on the wall making gurgling noise. Somebody is having a bath.
Act 5
Poirot’s Office – Present time:
Automatically be back at Poirot’s office.
Poirot shows the map that will point
where the suspects were last seen. It will be updated as the suspects are
questioned.Finger of Suspicion
- The fifth clue is Magnet.Click on Hastings icon
on the taskbar.August 25, 1940
Late Morning
Seadrift Island
Watch as Patrick and Emily row to Cutter’s Cove at
11:40 AM and find Arlena’s body.Hotel office: Exit Poirot’s
room.Go down to the office behind the reception counter.
Talk to Hilary Castle. Find out that Arlena has been
murdered. The police have been here for an hour.Exit the office and go to the hotel foyer.
Hotel foyer: See and try to
talk to Gladys.Go outside and take the path going to the cliff side
and beaches.See the Gardeners by the lounge chairs. Carrie is too
distraught to talk.Bathing beach: Go down to the
Bathing beach and close to the water’s edge.Talk to Emily. She will row Poirot to Cutter’s Cove.
Cutter’s Cove:
Colonel Weston: Talk to
Colonel Weston. Poirot will lead the investigation.The time of the murder was somewhere between a quarter
to eleven and twenty of twelve.The cause of death was strangulation.
Arlena’s body: *Look at
the body.Pick up the coffee flask. Click on her and
Poirot states that she died of strangulation by a very strong pair of hands.Look at the coffee spill on the sand. Look at the hat’s
ribbon.Patrick Redfern: Talk to
Patrick. He remembered hearing a clatter from rocks near the ladder.Rocks by ladder: Go towards
the ladder. Pick up a broken pipe on the sand.Cave: Go to the right of the
ladder.Pick up a *torn piece of fabric from the rocks.
Go inside the cave. Pick up *smashed perfume bottle
on the ground at right.*See something mud covered on the wall. Look close and
use spatula or tennis ball or brush to remove the clay covering a 6 side metal receptacle used to hold a
mast winch handle. (Thanks, Lee!)Arlena’s body: Go back to
Arlena.Look at the
ribbon on Arlena’s hat. Use scissors on ribbon to get cut piece of fabric.Emily Brewster: Talk to
Emily.She corroborated the rowing time and incident. They turned to the cove at
11:40 and arrived at the cove at 11:45. 11:30 was the time they started to row
out of the island.Now that everything is investigated, talk to her
again. Poirot asks to be rowed back to Bathing beach.Gardener’s: Climb up the
ladder and go to the Gardener’s at the lounge chair patio.Talk to Gardeners. Check the time line. He left Carrie
around 11 to get the thread and was gone for 15 or 20 minutes.Hilary Castle:
Go to the reception desk inside the hotelTalk to Hilary. She
gives the hotel’s master key.She was making sure that
the dining room was cleared after quarter to eleven until noon.The only request for
coffee flask was by Lane going hiking and Arlena. They are put out no later
than half past nine.If you did not get a
floor plan of the hotel earlier in her office, ask her for one now.
Hotel Rooms:
Climb upstairs and open the door. No need to use key.
Arlena’s room:
Enter the first door on the left side of the inner balcony and look around.Go to the bottom screen
and take the *JN letter. Read it in documents.Take the *3 Redfern
letters by the curtains at left. Read it in documents.Bathroom – Go to the bathroom left of the bed.
Open the cabinet above
the toilet.Take the *perfume
bottle and the *unmarked bottle.Go to the left and take
the bath salt bottle. Poirot cannot open the bottle.Take the hairbrush
from the table on the right. Look close at the hairbrush in inventory and get
*sample of hairs.Exit the room.
Kenneth Marshall’s
room: Enter the next room.A shadow is seen in the balcony.
Talk to Kenneth. From
twenty to eleven until twelve, he was in his room.Barkett and Applegood
are Arlena’s solicitors.Linda Marshall’s
room: Enter the next door on the left.See a box on the dresser
with zodiac signs in rings lock.Look close at the hat on
the bed. Take the *fancy stickpin on the ribbon band.Go to the fireplace and
take the *burnt piece of fabric on the logs and *burnt hair on the right side.Take *Linda’s watch
on the fireplace mantle.Rosamund Darnley’s
room: Go to the next room.Go to bottom screen and
talk to Rosamund. She is a childhood friend of Kenneth Marshall.She was at the Ledges from 25 past ten to ten minutes
to twelve. At around eleven, she went back to the hotel to get her sun hat.On the choice of
favors to ask, select to compare some pieces of fabric.The cut piece from
Arlena’s hat is fine silk. The torn one from the rock is rayon and inexpertly
dyed. The burnt piece from the fireplace is from the same rayon as the torn
fabric.The Redfern’s room:
Enter the last room on the left hallway.Open the suitcase on the
dresser. See a *photograph of the Redferns.Go to bottom screen and
check the bag on the floor beside the table – sketching supplies.Go outside to the
balcony and talk to Christine Redfern.She was at Sanctuary Cove at half past ten and left at
quarter to twelve. She was playing tennis at twelve.Go back inside through
the door at the other end of the balcony.Emily Brewster’s
room: Enter the room that is first on the right side of
the balcony.Take and read the
*Millie Parson’s letter on the top of the dresser.The Gardener’s room:
Enter the next room.Look in the trash can
right of the dresser.Letter of regret
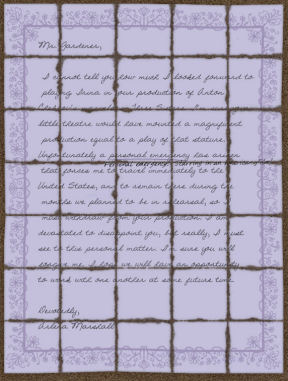
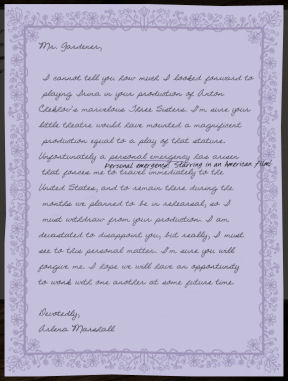
puzzle: Take the pieces of paper and put them
together.Click on a piece and
then click on the other piece that you want to replace.*Read the merged letter of regret in
documents.
Take the *handbill
from the desk. Read it in documents.Exit the room.
Horace Blatt’s room:
Enter the next room.Open the suitcase on top
of the bed. Take clothes off and see an oily spot.Use the spatula on the
oily spot on the suitcase and get *oil sample.Gladys Narracot:
See Gladys at the balcony. Talk to Gladys.If you have not checked
Montague Barry’s and Stephen Lane’s rooms earlier, do so. Take the *bottle of
pills from the medicine cabinet of Lane’s bathroom.Exit the hotel.
Tennis Court: See George
Strumm rake the tennis court. Wonder why he’s doing that? <wink> Poirot says
don’t bother him.Linda Marshall:
Go to Sanctuary Cove.Talk to Linda. She got Trional prescription earlier.
George Strumm – Go to Bathing
beach.Talk to George. Ask him
to dive down and get what was thrown to Emily at the Rocky bath. He needs liquid
courage.Liquid Courage:
Go to the hotel bar.
Talk to Henry Bailey, the bartender. Order Planters Punch, George’s favorite.They run out of rum and
grenadine. Poirot gives the cough syrup taken from the chemist. Look at the bottle of cough syrup in inventory and see that it is
made from pomegranate.In inventory, combine
the cough syrup with the empty bottle of grenadine taken earlier from the trash
can by the door of the bar to get a full bottle of grenadine.Go to Smuggler’s Inn
Pub. Go down the cellar. Use the glass taken from the Dining room on the tap of
the barrel left of the opened secret brick wall to get a glass of rum.Go back to the hotel’s
bar. Give the glass of rum and full bottle of grenadine to Henry to get Planters
Punch.Dive:
Go back to the bathing
beach. Talk to George.See George dive in Rocky
beach twice. He gives an *empty bottle to Poirot.
Landing:
Go to the Landing. Use the phone to call the sea tractor.
Leathercombe Bay
Will’s Garage:
Talk to Will. Lane came across at about eight.
Barry took his car before 10. Blatt came not too long ago.
Learn about North’s movements.
Poirot asks about a
handle for a sail winch.Store:
Talk to Adelaide. Barry needed a private phone. Linda filled a prescription just
a little while ago.*Test various
substances that may relate to the murder: Click open the
book on the chemist’s counter behind Adelaide.Empty bottle –
Click empty bottle on test tube. Click filled test tube on cosmetics on book. It
contained artificial suntan.Arlena’s coffee flask
- Click coffee flask on test tube. Click filled test tube on drugs on book. It
contained trional, a sedative.Blatt’s oil sample:
Click oil sample on test tube. Click filled test tube on oil and waxes on book.
It came from oil used to protect a gun.Smashed bottle from
cave – Click smashed bottle on test tube. Click filled test tube on
cosmetics on book. It is perfume.Unmarked bottle from
Arlena’s bathroom – Click unmarked bottle on test tube. Click filled
test tube on drugs on book. It contained hair coloring.Chicken feathers
- Click chicken feathers on test tube. Click filled test tube on blood on
book. The blood came from a chicken.Stick pin from
Linda’s hat – Click stick pin on test tube. Click filled test tube on
oil and waxes on book. It contained candle wax.Microscope:
*Use Arlena’s hair on microscope; then click burnt hair on microscope. See that
the hairs are similar.Post Office:
*Click on paper on
the counter and send a telegram to Miss Porter School for Young Ladies.*Click on paper on
the counter and send a telegram to Barkett and Applegood, Solicitors.Monk’s Head Pub:
Horace Blatt:
Talk to Blatt at lower screen. He was out from about nine until after one. He
said he lost his life ring buoy during a storm.Play dart to win life
ring buoy: Go to the dart buoy. Click on board and play
for the Life Ring Buoy.Automatically, do the
dart game and win. The life buoy is in inventory.Give life ring buoy to
Blatt. When asked for favor, borrow his compass. Get a *compass in
inventory.
Hastings and Poirot
discuss the possibility of a woman strangler. The women in the island should be
put to a test.
Police Station:
Talk to Colonel Anthony Weston.*Learn about John North.
Read the report in documents later.*Get the report on Alice
Corrigan case. Read the report in documents later.*Poirot asks Weston to
check on the JN of the letters and the Redfern photographer, Jimmy Nash.Will’s Garage:
Go back to Will and then go back to the island.
Seadrift Island
Gladys Narracot: Find
Gladys at hotel balcony by the rooms.
*Women strength test:Talk to Gladys to help with the test to determine
if any woman has the strength to strangle. Hahahahah Phobia!Use the baths salt bottle or the boat varnish
bottle for the test. (Thanks, Lee!) Select Miss Brewster on the list. Walk around a bitand then go back outside Poirot’s room. I go outside the left
balcony exit (by the spiral stairs), down the stairs, to the Rocky beach and
back to inner balcony by Poirot’s room.Talk to Gladys. She tested all the women in the
island. Emily Brewster opened the jar easily.
Act 6
Poirot’s Office – Present time:
Automatically be back at Poirot’s office.
Poirot discusses the mystery.
Select each of the choices and Poirot will explain.
Listen well to what Poirot says. Eliminate the other suspects.Finger of Suspicion
– The sixth clue is Telephone.Click on Hastings icon
on the taskbar.August 25, 1940
Afternoon
Seadrift Island
Hotel Office:
Go to the hotel office behind the reception desk.Look close at safe. Use
the safe key to open safe.See that the signal
lantern is gone. *Take the radio and code book.Gladys Narracot:
Go back to the second floor inner balcony.Talk to Gladys cleaning
close to Kenneth Marshall’s room.She saw Kenneth Marshall
during the time he stated to be in the hotel.The Linda Marshall’s
fireplace was clean when she cleaned the room this morning.She also heard someone
take a bath around noon.Kenneth Marshall’s
room: Enter the room.Take the papers left of the typewriter on the desk.
*Read the Letter to
Kenneth Marshall and Kenneth’s response in the documents.Horace Blatt’s room:
Go across the balcony and enter Blatt’s room.Check the suitcase and
take the clothes on the right.See and take a revolver.
Blatt comes in and the revolver is returned. Exit the room.Patrick Redfern:
Go down to the foyer and enter the hotel bar.Talk to Patrick about
everything. Learn about Jimmy Nash.Henry Bailey:
Talk to Henry.Stephen Lane:
Go down to the Landing by the phone to call the Sea Tractor.Meet Stephen Lane. Talk
to this sick man.Call the Sea tractor.
Hahahaha. Phobia talk!
Leathercombe Bay
Will’s Garage:
Montague Barry:
Talk to Barry.Will Jenks: *Will gives the winch handle he found.
Store:
Enter the store and go to the Post Office.*Get the Letter from Barkett and
Applegood. Read it in documents.Arlena took out ten
thousand pounds last week.Police Station:
Go forward to the end of the road and enter the police station.Talk to Col. Weston. *Get
the background checks on the suspects. Read it in documents.*Also get a packet
from Miss Porter. Look close to open the packet in inventory. Get 4 index
cards.Read Miss
Porter’s letter in documents. Learn what the 4 students did to cause
expulsion.Go back to the Island.
Seadrift Island
Bathing beach:
Go down to the bathing beach and ask Emily Brewster to row you to Cutter’s Cove.Cutter’s Cove Cave:
Go to the cave.See seaweed on the
left. *Take the sandwich tin. Open and see that it is loaded with packets
of white powder.Look close at tin in
inventory and *get a packet of powder.*Use the winch handle on
the metal thing on the wall.See an entrance open.
Now that you have the compass, enter the tunnel.Monastery ruins:
At the intersection, take the right passage.*Just before the exit to
the monastery ruins, do stopwatch timing.Turn around and go back
to the intersection in the cave.Smugglers End Pub:
Take the bottom passage.Go forward until the
entrance to the cellar. *Do the stopwatch timing from here.Go forward to the
cellar. *Pick up the broken compass from the floor in front of the open
secret door.Go up the Pub and exit
to the road. No problem leaving Emily, she’ll be back at Bathing beach.Linda Marshall’s
room: Go up to and enter Linda’s room at the hotel.Zodiac puzzle box:
Look close at the puzzle box.Use the 4 index cards
sent by Miss Porter as clues.Linda Marshall – born
November 28, 1927. She is a Sagittarius.Doris Chapman – born
December 13, 1927. She is a Sagittarius.Virginia Price-Waverly –
born January 3, 1928. She is a Capricorn.Estella Haversham – born
April 15, 1928. She is an Aries.Arrange the zodiac signs
above the arrow based on the oldest girl on outer ring to the youngest girl in
the inner ring.*The box opens.
Automatically get the Voodoo book and the key.
Monastery ruins:
Exit the hotel and go to the monastery ruins.Use the key just taken
on the monk’s door left of the arch.*Take the wire
recorder that was taken from the hotel office.

Go to Leathercombe Bay.
Leathercombe Bay
Store-Chemist:
Click open the book on the chemist’s counter behind
Adelaide.*Click packet of powder on test tube. Click filled test
tube on drugs on book. It is heroin.
Watch Kenneth Marshall
call and tries to wake up Linda. She took Trional.
Act 7
Poirot’s Office – Present time:
Automatically be back at Poirot’s office. Poirot discusses Linda and gave advice
on how
and what to do.
The smugglers have to be apprehended and taken out of the way.
Q & A:The smugglers are North and Blatt.
The clues to their plan: color of Blatt’s sails. White tells North the heroin is
ready to be picked up.The means to stop them is the compass. Throw it off with the sliver of magnet
found in the garage.
Finger of Suspicion
– The sixth clue is Telephone.
Q & A:Power – the thing is
powered by electricity.Lamp – The finger of
suspicion is powered by the same circuit as the lamp.Desk – the wires from
the lamp to the Finger of Suspicion are in the desk.Drawer – You close the
drawer every time you operate the Finger of Suspicion.Magnet – The finger is
controlled by a magnet you hold.Telephone – The telephone is disconnected.
Code – Enter the code on
the telephone.
Click on Hastings icon
on the taskbar.
August 25, 1940
Late Afternoon
Seadrift Island
Linda Marshall:
Go to her room. Talk to Linda.Set the trap:
Compass – If you have not done it yet, look close at the
spanner in inventory to get magnetic fragment.*Combine the magnetic
fragment with the working compass to make a disabled compass.Horace Blatt – Go to hotel’s bar.
Talk to Blatt at the piano in order to give him the
disabled compass.Cutter’s Cove cave – Go to Cutter’s Cove via the tunnels entering through the Monastery ruins or the
Smuggler’s End pub or ask Emily Brewster to go there.*Place the sandwich tin
back on the shelf in front of the cave. Automatically, it gets covered in
seaweed.Landing:
Call for the Sea Tractor.
Leathercombe Bay
Garage:
Talk to Will. Learn that a guest at the hotel is paying him to help him play a
joke on someone.Will is to see a signal
from the tower and he will pick the guest up from Cutter’s Cove and take him to
Thurlestone.The signal is 3 short
flashes (pickup required high tide).Select a code to answer:
3 long (fire on this position).Police Station:
Go to the Police station.Talk to Colonel Weston.
Learn about Mrs. Castle and Fell.
Seadrift Island
Bathing beach:
Go down and talk to Emily to row you to Cutter’s Cove.Cutter’s Cove cave:
Go to the cave.The heroin is gone.
Enter the cave.Talk to Blatt and North.
Select sails in the multiple choice question. Learn about the ghost. Someone stole Blatt’s gun.
Act 8
Poirot’s Office – Present time: Poirot
knows who is the murderer and will reveal it.
Seadrift Island
I recommend that you do this by yourself and not
look at the walkthrough from here on.
Dining room:
Poirot faces the suspects.
You are given the chance to have help from Poirot or
do the summation on your own.2 bottles: Perfume bottles.
Next comparison: 3 pieces of
fabric.Thrown bottle: Artificial suntan.
Content of Mrs. Marshall’s flask:
Trional.Reason for perfume, suntan and hat:
Impersonate Arlena.Sound clue: Sound of running water.
Reason for bath: Remove artificial
suntan.Reason for impersonation: Provide an
alibi for the murderer.Connected murder: Murderer of Alice
Corrigan.Clue that demolishes the perfect alibi:
Linda’s watch keeps perfect time.The liar is: Christine Redfern
True motive lies in 2 documents:
Arlena’s solicitor and Letter of JN.Kind of person Arlena was: Arlena
was taken advantage of by men she was attracted to.Tower:
Follow the murderer to the tower.
Select: I told Jenks the lie.
Poirot’s Office – Present time: Select
the code that unlocks the Finger of Suspicion.
The clue is from the dedication of Bill Nicholls in
the book The Sorcerer’s Apprentice that is on top of the bookshelf.Dial: 4 3 6 4 8 7 – GENIUS.
The End
This document may not be
distributed without express written permission of the author and the content
may not be altered in any way.
For Questions or Comments
on this Walkthrough,
Please write to:
MaGtRo
Copyright © 10/2007MaGtRo