Sherlock Holmes: The Silver Earring – by Frogwares
by Frogwares
Walkthrough by
MaGtRo September 2004
Gameplay:
This is a point and click game. The main menu has new, load, save, resume, exit
game, options and credits. Pressing ESC during gameplay bring back the Main Menu.
The options menu has graphics and sounds controls as well as preferences
selections for anti-aliasing, subtitles, slow reading and shadows.
The inventory bar is
at the bottom of the page and can be accessed by right click of the mouse. Move
the hand cursor over the items and the label of that item is seen. Some items
have further action that can be done, like read or unpack. The notebook on the left of the inventory bar
shows the dialogue-testimony page (Sherlock with witness), reports-evidence page,
documents page and the map page. Access these pages for help during
gameplay. To add items to the notebook the items’ ‘read‘ should be clicked.
To save a game, click
on a blank frame and see the graphics of the saved game. Click the jewel at the center to go back to main menu. The
bar above the graphics has the scroll and arrow jewels to see the different
games stored. Saves can be overwritten by another saved game. To load a game, click on a graphics of choice. The scroll feature is
similar to the save page.
To quit the game,
press Alt-Q, go to main menu or click on Exit at the map page in the notebook. Press enter to skip
the introduction. CD1 is needed in the CD-ROM drive to play the game.
The cursor for Sherlock
is a pipe and the cursor for Watson is quill pen and paper. Exhaust all dialogue
until the selections are grayed out. You can repeat the dialogue by clicking on
any of the gray selections. Pressing the spacebar skips the dialogue. Double clicking
will make the main characters run.
Dr. Watson reads a letter from Lord
Cavendish-Smith asking Sherlock Holmes to attend a party given by Melvyn Bromsby
for his daughter. Lord Cavendish-Smith asks Holmes to pay attention to Gallia, an Italian
diva that will be performing at the party. She is of concern to the government
because she will be one of the performers in the birthday party of an
important government personage.
Guests arrive at Sherringford Hall.
At the ballroom, listen to Holmes’ deduction of the character of Melvyn Bromsby. Bromsby
will say something of importance about the future of his business during the
opening address. As Bromsby starts to address his guest, he is shot. Lavinia
Bromsby comes out of the right door beside the columns.
Day
1: 14th of October, 1897
The inventory bar has the
magnifying glass, tape measure and test tube. Check the documents page of
the notebook at bottom left and read the letter and birthday program. If a hand cursor is seen,
click on it or use the magnifying
glass, tape measure or the
test tube.
Sherringford Hall
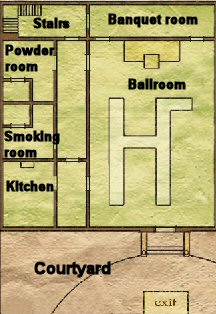
Ballroom :
Pick up the paper on the floor. Right click and click on the blue ‘read’ of Bromsby’s note.
There are 2 kinds of handwriting. Open the notebook and read the entire note in
documents page. Note the words in blue about peasant and a snake. Click the
notebook again to close it.
Talk to the doctor checking Bromsby about everything. The bullet is still in the body. Talk to Grant Sweetney standing right of
the stage about everything.
Let’s check the direction of the
shot. Go left of the ballroom and talk to Major Lockhart standing by the
columns. Go down the aisle and
before the door close to the window, pick up the piece of dirty white clothes off the chair.
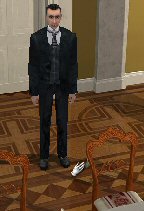
Go left to the front entrance and
talk to Scott Brimms, sweeping the floor. There are 5 on staff: Mary and Sue are
the maids. Carl is the chef, Lamb, the coachman and Brimms. Talk to Colonel Patterson
standing by the
bar. Come back later when he will talk to Sherlock.
Go back and exit the door in front
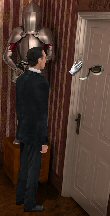
of the chair you got the piece of cloth from. Sherlock notes that the handle is
twisted down.
Hallway with armor:
Sherlock notes that it smells of gunpowder. Note the footprints on the floor and where they lead to. Look on the floor behind the base of the armor and pick
up black sheet. Click on handsome suit of armor.
Look on the doorframe and see spots. Use
tape measure on the powder smudge. It is 1 meter 65 from the surface (5.4 feet).
Turn around and use the magnifying
glass on the mirror table. Take black hair.
Kitchen:
Enter the door across the armor. Use the magnifying glass on
the floor left of the stool by the central preparation table. Take the poor
copy of the uniform button. The cannon insignia are hand drawn.
Check the wood covered
dustbin on the left. The lid is diabolically heavy. Check the sink and the
cabinets – nothing of interest here.
Go to bottom right of central table
and talk to Carl Pannister, the cook. Learn about a squint-eyed Frenchman chef and
white tablecloths. Learn about hearing the dustbin opened before and after the
shot was heard. Exit the kitchen.
Hallway with table and
paintings: Exit through the door left of armor. It is noted
that there’s a greasy substance on the door handle – a sauce.
Smoking Room:
Enter the room on the right. Note the footprints on the floor – like
the one on the other hallway by the door to the ballroom. Use the tape measure on
the footprints – it is a size 7. Nice sound of the tape measure being rolled up
Use magnifying glass on
ashtray on table. Take flaky ash from ashtray. The flaky ash does not come
from the cigar.
Go to left screen
following the footprints and enter the bathroom. Use magnifying glass on bottom
corner of the sink below the soap dish sink. Take red greasy hair below
the scissor. Who has red hair? Exit and go
back to the hallway.
Hallway with table and
paintings: Go to middle of the hallway and use
magnifying glass under the table. Pick up small box with white powder.
Go down the hallway. Pick up the red bag off the
floor in front of the right door leading to the ballroom. Unpack the bag to get Lavinia’s passport,
train and boat tickets from Geneva to London and a gun (small caliber
Wright model pistol). Read the
tickets. Use the test tube on the dust on the floor beside the bag. It
is in inventory as white powder.
Ladies Powder Room:
Enter the left door. Take the photo of pretty young woman on the mirror.
She is wearing a very nice earring. Open the document page in the notebook and look at the photo by clicking on
it on the left page. Veronica Davenport, hmm… Use the test tube on the circular spot on the table. What’s
this? White powder is in inventory.
Look close at the
notebook
on the table by the sofa. Take the visit (calling) card written in French
sticking out of The French Salons book. Read card, open the document page in
the notebook and see that it is Louis-Philippe de la Musardiere’s calling card. What
impressive titles.
Staircase:
Go back to hallway and through the door at end of hallway. The handle has
greasy sauce also like the other door handle.
Talk to Mary about
everything especially about the trash bin. Go left to next screen, forward to the cabinet right of the chairs
and see shorter blue tablecloths. The stairs going up is inaccessible.
Banquet room:
Enter the other door. Take and read the Guest list from the table. Read
it in the documents page in the notebook. Note that some names are marked with Xs, dots and circles.
Go to bottom screen
and talk to Herman Grimble. The will was drawn with Horace Fowlett’s advice. Where could
he be? Talk to Lavinia. A military man (Lt. Herrington – nice hair) defends Lavinia.
Ballroom:
After that defense of Lavinia and being told that this man is with Colonel
Patterson, the scene jumps to the bar at the ballroom.
Talk to Colonel
Patterson. His eyesight is very bad but good hearing. He states that Bromsby was
killed by a Wright revolver of small caliber. Talk to Lt. Herrington. Move the cursor to the
left of the bar and talk to Hunter, the barman. He came from the Hartford
agency.
Talk to Brimms,
sweeping the floor and ask about the Frenchman.
Banquet room:
Talk to Lavinia. To reveal one of ‘my hints’ – Click on gun from inventory and click
the cursor with the gun on Lavinia. The gun was given to her by her
father. The explanation about the gun was to be given after the reception.
Holmes finished
everything on this side and wonders about what Watson has done. The game is
automatically transferred to Watson at the courtyard. You can access Watson
anytime by using the map in the
notebook and clicking on the brown courtyard area to change to Watson.
As Doctor Watson:
Courtyard:
Meet Lamb, the coachman. Go to right screen.
Talk to Miss Lambert
standing on the steps. An Inspector from Scotland Yard will be coming. The
notations on guest list were for seating arrangement. A circle is marked for
important people, point for guest with poor eyesight and cross is for guests
with poor hearing. The French chef went to visit his Harley St. Physician for
his glasses. Check the guest list in the notebook’s document page and note that
Colonel Patterson is marked with poor eyesight and bad hearing. He did know the
sound of the gun.
Go left and talk to Satterthwaithe
sitting on the bench. His costume is torn.
Go to bottom left and
talk to the 3 inebriated men by the coach. Hurley talks about Miss Roundtree.
O’gohan is Satterhwaithe’s man and Spencer is Lt. Herrington’s.
Go to the right and
talk to crying Miss Roundtree. Talk to Sue, the maid.
Watson has finished
questioning everybody. Sherlock comes and talks to Watson.
As Sherlock Holmes:
Go to where Lamb is
standing and use the magnifying glass on the white speck in front of the service
door. Take the cigarette butt "Chirr". While in close-up view, use the
tape measure on the footprint next to where the cigarette butt was found.
It is a size 7.
Inspector Lestrade
arrives. Holmes deduces that Lestrade just came from his mother’s home after a meal.
Return to Baker St. by
clicking on the map.
Baker Street
Holmes is waiting for
a report Wiggins is to get. Holmes will do experiments to check some of the
items collected. Watson is to check the books for more information.
As Doctor Watson:
Go to the bookcase behind Watson and click on any book at second from
top shelf. Check the notebook’s document page to read the book about footprints.
Click on any brown book on middle shelf. Check the notebook’s document page
and read about Ballistic Science. Note the comment about add 15 cm to the height
of the powder to get the shooter’s height. Click on any book at second from the
bottom shelf. Check the notebook’s document page and read about Study of tobacco.
Learn about the calming effect of the herb in tobacco made by Chirripaqui Co.
and that the tobacco is found only in Brazil.
As Sherlock Holmes:
Time to examine the white cloth, small box, various powders and hairs collected
from Sherringford Hall. Click on work table in front of Holmes.
Analysis
White cloth:
Click on piece of dirty white clothes
in inventory.Soak cloth in soap
and water:Take the bowl of water
and place it on the metal plate over the tripod above the alcohol burner.Click on the green
soap bottle, 4th from left at bottom shelf and then click soap on bowl of
water. Yellow film over water is seen.Click to light the
alcohol lamp.Take the piece of dirty white clothes
from inventory and click it on the bowl with soap.Soak cloth in
solvent:Take the bowl of water
and place it on the metal plate over the tripod above the alcohol burner.Click on the blue
solvent bottle, 5th from left at bottom shelf and then click it on the bowl
of water.Click to light the
alcohol lamp.Take the white clothes
from inventory and click it on the bowl with solvent. The stains are sticky but
not oily.Microscope:
Take the white clothes
from inventory and click it on the glass plate on the microscope.Fine white cotton… The
cloth is done and disappears from inventory. Read the result under the notebook’s
reports page. It is fine white cotton characteristic to army officer gloves.
Powder taken from the
door frame:
Take the dark powder
from inventory and place it on the metal plate over the tripod.Click to light the
alcohol lamp. Burnt gun powder is said and is seen. It is gone from inventory.
Read the result under the notebook’s reports page.
Black hair: Place the black hair
under the microscope – A man’s oily hair.
Small box with white
powder:
In inventory, click the
magnifying glass on the small box with white powder. The white powder is now in
inventory and the box is gone.Place all 3 white
powders on the glass plate of the microscope. They are all the same and became one pile of white powder. Take the
white powder and place it back in
inventory.
Combined white powder:
Heat white powder:
Take the combined
white powder from inventory and place it on the metal plate over the tripod.Click to light the
alcohol lamp. It has no effect.Powder with water:
Click on combined powder
in inventory.Take the bowl of water
and place it on the tripod above.Click to light the
alcohol lampPlace combined white
powder on water – A glue pasty substance like starch. The powder is now gone from
inventory. The reports page states rice powder.
Red hair: Place red hair on
microscope. Light feminine perfume…
Quiz
Answer each question Yes
or No and justify the reply with evidence and testimony gathered during the
investigation. The color of the question chapters to check: red – reports, green
– documents, blue – testimony. Click on a selected colored answer and then click
on the similar colored frame to enter it as evidence. Click the bottom ornate arrow to go the
next page.
Click on elaborate arrow at bottom of the Quiz page to start the quiz.
1. Do we have an idea
of the weapon used for the crime? Answer:
Yes.Justify:
Click the dialogue (Sherlock with man) tab and select Colonel Patterson dialogue
second time. Click on blue quiz frame.2. Could the murderer
escape through the stairs going to the second floor? Answer:
No.Justify:
Click the dialogue (Sherlock with man) tab and select Mary’s dialogue and click
it on quiz blue frame.3. The ashes found in
the smoking room are from English cigarettes? Answer:
No.Justify:
Red frame – Cigarette butt in front of service door report.
Green frame – Study of tobacco.4. Was the side door
going to the kitchen open after the shot? Answer:
No.Justify:
Satterthwaite’s dialogue.5. Did Miss Lambert
choose the tablecloths and arrange the tables? Answer:
No.Justify:
a. Carl Pannister’s dialogue.
b. Miss Lambert’s dialogue.6. Do we have an idea
of the murderer’s height? Answer:
Yes.Justify:
Red frame – 1.65 cm report on the corridor to the kitchen.
Green frame – Ballistic science.7. Among the
interrogated people, did any others than Colonel Patterson have bad eyesight? Answer:
Yes.Justify:
Blue Frame – Miss Lambert’s dialogue.
Green Frame – Guest list.
Click on notebook when
done with the list.
It simplicity itself.
We have answered all the questions.
Day
2: 15th of October, 1897
Baker Street
Inspector Lestrade
brought a copy of his notes. Inventory has the test tube, magnifying glass, tape
measure and photo of pretty young girl.
As Doctor Watson:
Read Lestrade’s notes found in the notebook’s document’s page: The crime,
instrument of the crime, The motive, The development of the crime,
Scotland Yard
report and Melvyn Bromsby.
Sherringford Hall
Click on Sherringford Hall on the map. Talk to Miss Lambert outside the
residence.
Ballroom:
Talk to Grimble and learn about the relationship of Lavinia with her father.
Leave the ballroom through the door to the corridor to the kitchen. The 3 other
men talks about polo.
Kitchen:
Talk to Pennington and learn of the missing 2 18 yr. old whiskeys.
Smoking room:
Take the white gloves from the table.
Ladies Powder Room:
Look close at the table and take the red handbag of Lavinia Bromsby.
Unpack the red bag in inventory to get program of London opera (will
disappear) and Herrington’s letter. Click on Read of both documents and
then read Herrington’s letter at the documents page. Exit to the ballroom and
see Lavinia has joined the gentlemen.
Ballroom:
Talk to Lavinia. She powdered herself before going to the ballroom.
Bromsby’s Office:
Lestrade has an encounter with one of Fowlett’s security inventions. Look close
at the table. Click on the picture of Bromsby and Grimble. A third person
with a ring on his left hand is cut off from the picture. Use magnifying glass
on the ring – a Masonic symbol. Check the picture of young Lavinia and
see that she is holding a rifle in the notebook. Click on letter from Fowlett
to Bromsby in front of the men’s picture. Read it in the notebook. Click on
the brown book. Read the marked page of Medieval French art in the
notebook and learn about the method of hiding a picture inside another in a
woodcut. Open the top drawer. Take and read all the burnt items: piece of
newspaper (Indian newspaper), burnt paper with a code (55 is the
number to add) and piece of
book. Pull back from table and click on middle picture on the wall of Sir
Bromsby in front of Kalidassa Abyss.
Lestrade reports that
Fowlett was last seen going to north country. Click on Sir Bromsby’s large portrait
right of door and see a safe.
Flatham
Flatham Station:
Talk to Constable Fletcher.
Outside Fowlett’s
house: Talk to Graham, the neighbor of Fowlett and get a
key to Fowlett’s house. Talk to Constable Fletcher. Watson departs to go
talk to the stationmaster.
Fowlett’s House:
Walk in front of the gate to the house. Use key on door.
Living room: Inside the house, click on the dragon’s
claw’s left of door to get matchbox. Click the matchbox on the lamp on the table to
get light in the room. Look at the shoes on the floor and learn that it is size
6. Use the measuring tape on the footprint on the floor – it is a size 7.
Hmmm…Epinal woodcuts: Go down to
bottom
screen. Click on the 4 woodcut paintings on the wall. Examine the Town of Epinal
paintings carefully to for hidden pictures.Left picture has a
hidden deer on tree trunk in a valley.The second picture has a
reclining bear in light shade on the middle hill.The third picture has a
crab on the foreground on the rocks by the river.The rightmost has a head
of an eagle with the waterfall coming out of its beak.Look close at the
automaton in the corner and see that a token is needed to play.Back up and take the
wood toy on the carpet under the coffee table. Move to right part of room
while facing the door and
click on book at bottom shelve of the bookcase. Read the Villager and the
Serpent Poetry in notebook. Note the circled moral of the Aesop’s Fable.
Is this what Bromsby is referring to in his aborted speech?Kitchen: Enter the door on the left of the bookcase. Use the
magnifying lens on the ashtray on the counter left of the stove. Take the
white flaky ash. Look close on the table and see a bottle of gin, blood on
the cork and broken glass. Exit the kitchen.Hallway: Go forward to the door right of the bookcase.
Use the matchbox on the lamp on the floor just in front of the broom. Click on
the rug beside the broom – the blood was cleansed with this mop. The first door
is closed. Enter the second door (foreground)Bedroom: Look at the automatic shoe brush under the
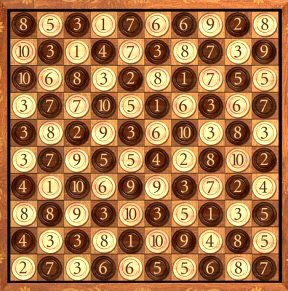
mirror.Numbers puzzle:
Look close at the board with numbers on the table. The object of the puzzle is
to place the missing numbers on the indentations to make a horizontal, vertical
and diagonal X sum of 55. This is based on the burnt paper with code that states
55 is the number to add… Note that the buttons are alternating dark and light
colored. When done correctly, take the coin-counter from bottom of
puzzle.
Click on the machine
above the table. Examine the screwdriver inserted on the window sill. Look at
the certificates on the wall. They are received from all over the world,
particularly South America. The safe and the ark beside the bed ‘need
something’.
Move to bottom of the
bed. Click on bed and note that the pillow is missing. Check the washbasin in
the corner. Take the greasy (balls) substance on left part of the sink.
Look close at Fowlett’s picture on wall – not quite tall and is obese. Go
back to the living room.
Living Room: Now that we have the coin-counter, look close at the
automaton.
Automaton-cards
puzzle: Insert the coin on the slot. The object of the puzzle is to find the cards that
show a logical sequence of the cards displayed. The coin is returned to
inventory for reuse.Click the left hand of
the automaton to see what cards are shown.First deal: ace of
hearts, ace of diamonds and ace of spades. Click-hold the ace of spades from
your cards and place it on the automaton’s right lowered hand. The ace of spades
is the 4th ace in the deck.Second deal:
3 of hearts, jack of spades and 7 of clubs. Click-hold the 4 of diamonds from
your set of cards and place it on the automaton’s right lowered hand. The 4 of
diamonds is right
flanked by those 3 cards on the card arrangement.Third deal:
2 of hearts, 7 of clubs and queen of hearts. Click-hold the 4 of clubs and place
it on the automaton’s right lowered hand. There are 2 cards in between the queen
of hearts and the 2 of hearts. There are 2 cards in between the 4 of clubs and
the 7 of club.You won. Take the piece
of paper and read. Read the text about Noah in the book.Go back to the bedroom.
Bedroom: Click the ark above the safe.
Noah’s ark puzzle: The animals must enter the ark in the proper order. Click the animals to get
them in the ark.Based on the Noah’s text
clues taken from the automaton and the hidden drawings on the Epinal
pictures on the wall, place in order:First: crab. The first animal came to
shore, it was afraid of the powerful waves. It is seenclinging on the rocks on third Epinal picture.
Second:
deer. The second came from the
valley, it was afraid of the river with fast streams. The left picture shows the deer hiding in the tree trunk in the valley.Third:
bear. The third came from the
hills and was hiding from the downpour. The light colored bear is seen on the middle hill in the second Epinal picture.Click on all other
animals to get them in the ark except the eagle.Last:
eagle. The last one that Noah
welcomed came down from the mountains. It wasn’t afraid of water but it heard
the wrath of the Lord roaring. It is seen in the right Epinal picture and has a waterfall pouring out of
its beak.
Safe: The safe door opens. Look at the door damage from
someone using force to open the safe. Take the papers and read: letters from
Bromsby to Fowlett about Wyatt, the ungrateful nephew, Audience text about the
verdict and sentencing of Simpson, Collins, Miller and Kirby and all the letters
referring to what
happened to Wyatt Collins, the nephew in Caracas, draft of Bromsby’s will,
letter from Bromsby to Fowlett 11/12/96 and the code.
Hear Watson say that
Murray has just found a key in the garden. Exit the house.
Outside the house:
Watson tells about the key and the key is now in inventory. Go back
inside the house using the first key.
Basement:
Use the new key on the first door in the hallway that was closed. A dead man is under a pile of potatoes. Use the measuring tape on the dead man’s
feet – size 6. Take the white paper-visit card from the floor. It has the
same handwriting as Musardiere’s card. Look at the Antiques dealer (de la Vega)
card in the notebook. Click on door and find Holmes outside.
Outside the house:
Go to
the side and back of the house. Use the measuring tape on the footprint on the
barrel outside the bedroom window – size 10. Go back and talk to Constable
Fletcher. Watson informs Holmes that the stationmaster definitely saw Fowlett
leave and that the Constable identified the dead body as Fowlett.
Baker Street
Quiz
1. Did Horace Fowlett
receive a caller the evening he was supposed to leave? Answer:
Yes.Justify:
Click the dialogue (Sherlock with man) tab and select Murray Fowlett House
dialogue. Click on blue quiz frame.2. Were all the guests
in the ballroom at the time of the shooting? Answer: Yes.Justify:
Select the Development of the crime (Lestrade report).3. Did Sir Bromsby and
his daughter have a good relationship? Answer: No.Justify:
Select Hermann Grimble, Sherringford Hall, 15th of October, 1897.4. Was Horace Fowlett
aware of the problems between Hermann Grimble and Sir Bromsby? Answer:
Yes.Justify:
Select letter from Bromsby to Fowlett 11/12/96.5. Was there anything
missing from Horace Fowlett’s house? Answer: Yes.Justify:
Select Fowlett’s bedroom. The bed is not made, pillow is missing.6. Did somebody enter
through the window at the Fowlett’s house? Answer: Yes.Justify:
Fowlett’s bedroom:
outside window have no bars and is kept closed with a screwdriver.Garden: footprints with
traces of soil of size 10 size on barrel under the window.
Click on notebook when
done with the list.
It simplicity itself.
We have answered all the questions.
Day
3: 16th of October, 1897
Analysis:
Click on Holmes’ working table.
Examine the wood trinket, substance found on washstand and gloves at
Sherringford hall.
White gloves: Use
the magnifying lens on white gloves in inventory. A very fine white cotton.Wood toy: Use
magnifying lens on wood toy. Holmes recognized this style of trinket.Greasy balls: Place
greasy balls on glass plate of the microscope. Greasy substance – very
interesting.
When done, pull back from table.
Holmes discusses the case and what Watson found in his discussion with the
stationmaster.
Flatham
As Doctor Watson:
Flatham Station:
Talk to stationmaster. Mr. Fowlett was muffled up and coughing. The other man has a
bandaged hand. The carriage the men used is still at the station.
Train: Enter the
train carriage. Go to bottom screen and check the ash stand at the corner. Go
back to door and take the side aisle. Check each set of benches. Take the
white feather from the right first set of benches. On the third set of
benches from top, take the cap under the left bench. The hairs on the cap
are red. Go down to the end of the carriage and look at the ash stand. Take a Chirripaqui
cigarette butt.
Baker Street
Holmes checks the red hair from the
cap. Holmes calls to the Baker St. Irregulars. He gives Wiggins the cap and
whispers some orders to find a man. A knife is now in inventory.
Sherringford Hall
Ballroom:
Talk to Miss Lambert. Wyatt Collins is very tall, slender man. Talk to Sue and
learn more about the Lieutenant. Go to room by the staircase.
Staircase:
Talk to Mary about Wyatt Collins. Climb the stairs.
Bromsby’s Office:
If you have not opened the secret safe yet – click on the large portrait of Bromsby right of the door.
Safe puzzle: Find the
code to open the safe using the code found in Fowlett’s safe.Read the code found in
Fowlett’s safe from left to right and see that it describes the set of numbers
above it.1 – read as one.
1 1 – read as one 1 –
see above number.2 1 – read as two 1s –
see above numbers.1 2 1 1 – read as one
2 one 1 – see above numbers.1 1 1 2 2 1 –
read as one 1 one 2 two 1s – see above numbers.So the next number
description would be: three 1s two 2s one 1.The code would be – 3
1 2 2 1 1.Hear a click. It is
simplicity itself! Uhhuh!Take all that is in
the safe. Take the key and read Richard’s letter and money transfer
to Sherman’s bank.Holmes has no interest
on the keyhole on the closed cabinet top of the safe.
Talk to Inspector Lestrade.
Bromsby Cementworks
Click on Bromsby
cementworks on the map.
Gate:
Talk to Mr. Goblet, man at the gate. Marty and the dog are the regular night
watchman. He gives a set of keys to Grimble’s office. Right of the
entrance is the office, at the center is the worker’s cloakroom and further on
is the storehouse for raw materials. The only key to Fairfax theatre is with Mr.
Grimble.
Yard:
Go left of cart. On
the next screen go to building at bottom right. Use set of keys to Grimble’s
office on the door.
Office
building: Climb the stairs. Pick up the gold Grimble’s
office key under the table by the left pictured wall. Click on pictures at
left wall from stairs. Grimble and Bromsby in India Picture, in
front of Waters and Grimble and Grimble with brother will be in the
notebook.
Click on bridge replica
by other wall. Note that one of the models of a man is missing.
Grimble’s Office: Use
the set of keys or Grimble’s office key on the double doors at other side of the
room. Check the old souvenir from India at top of the hutch left of door.
Safe:
Go to bottom screen and look close at picture on the wall. Use the key found
in Bromsby’s safe on the keyhole of the wall safe. Take the account book
and read. Check the documents in the notebook and compare the amount of money
transfer on the money transfer to Sherman’s bank found in Bromsby’s office to
the Account March-April 1897. Somebody is skimming money here!Grimble’s desk:
The drawer is closed.Take the paper
under the table with a tiger on top. It is the Threat WC in the notebook.Ganeesh:
Look close at the statue of the elephant God, Ganeesh. Click on the trunk and
hear something click. Take the figurine of Bromsby from the mouth. Go
back outside to the large replica of the bridge.Bridge replica:
Place the figurine of Bromsby on the hole. Take the silver key from the
floor under the bridge. Go back to Grimble’s office.Desk:
Use the key taken from the floor under the bridge on the closed drawers. Try to
take the key. Take the papers. Read the Threat W. and the about Captain Lowrie
in the notebook. The papers and the key cannot be taken because Grimble might
come back and notice. Holmes arranged` everything back to order.
Baker Street
Lt. Herrington
arrives and inquires about the case. Wiggins of the Baker St. Irregulars reports
that the man entered the back gate to the cementworks.