Tony Tough and the Night of Roasted Moths Walkthrough
By Prograph
Research
Walkthrough by
MaGtRo November, 2002
Gameplay:
You have a choice of minimum (300 Kbs) or full install (150 Mbs). In full
install, the game runs faster. The main menu shows New game, Load game, Options,
Credits and Exit. In Options, there are 3 file folders or screens, which can be
accessed by clicking on the upper left tab. The first blue folder has a spanner
icon. The top bar gives a choice of how long you want the text to appear and the
lower bar, the choice of speed Tony moves. The bottom left screen
frame gives a choice of where you want the inventory bar to be located, at
top or bottom. The middle screen gives a choice of whether the inventory bar is
seen or hidden. The left screen is a choice of scroll or pop up when the
‘hidden’ inventory bar is selected. The clock is the length of time the text
appears. Clicking can skip the text. The next pink folder with a brush icon on
the top left tab is for subtitles (book), lower left Tony is for object
translucency, top right Tony is for anti-aliasing of the shape of the
characters, bottom right is for the text on the action interface (examine, talk,
etc.) and the center screen is to change the screen of gameplay from color to
sepia. The last yellow folder gives a choice for the character’s voice, music
and sound effects volume. During gameplay, pressing ESC or clicking at the very
top left corner will show a menu that shows: The skull and bones icon at bottom
left is to exit the game, the 2 arrows on a diskette is for load and save game
and the right bottom X brings you back to a previous screen. The first slot in
the Load game screen is the autosave (done when Tony changes screen). There are
95 save slots and can be scrolled using the side arrows. Press enter after
typing the label of the save game. You are given a choice of Easy (Baby Tony) or
hard (Adult Tony) gameplay. The game is simple point and click. Point and click
and Tony will go there. Once an item or character is left clicked or selected
(label seen), right click-hold-choose will give the options of examine (Tony’s
eyeglasses), use (Tony’s gun), take (Pantagruel’s hands) and talk (Pantagruel’s
mouth). A flying duck shows exits to another screen. By right clicking, the
items in inventory can be examined, used or talk to. Try doing the
improper action on an item just to hear funny quips from Tony.
Check everything using the
examine, take and use actions. Select all the dialogues in order to enjoy the
funny dialogues. Only the actions that are significant are stated
below.
This walkthrough is written
for hard mode with comments on the easy mode in parentheses.
30 years ago on Halloween night, a
bully who hit him with a slingshot preys upon a young Tony. In the end – the
bully got what he deserved – a pumpkin on his head. See him angry with the moon
as backdrop on… Halloween night.
Wallen and Wallen
Investigations Building
October
31st: Tony introduces himself and Pantagruel, his ‘dog’
who is actually a tapir. He will show the world (with your help, of course) that
his speculations of alien plot to conquer the planet by stealing candies from
children is not just ravings of a paranoid PI. He was given the critical case of
a swollen headed maniac who goes around stealing candy from the children years
ago.
Tony’s
office: Examine and talk to Pantagruel. Pantagruel wants
to go to the fun fair. Tony sends Pantagruel in search of a wig at the upper
floors while he searches in the basement. A good wig is the first step to the
road to success. Take the bag of candy from the desk. Use door to
exit and a flying duck shows an exit to a next screen.
Hall outside Tony’s
Office: Take the waste paper on the floor. Try
examining the door… oh well, open the door and enter.
Storage
room: Close the door. Take the flowered
smock. Read the torn brochure on the wall. Click the waste paper taken
outside on the torn brochure to make a complete brochure. Read about illiterate
shepherd girl costume kit made up of cheery country style outfit, fake flowers
and a typical folk scarf. That’s a thought in case you need a costume. Open the
cabinet and oops… you fall down the floor.
Sewer: You
hear Pantagruel scream. You need to get back to him. Take the blond wig.
So this is the cleaning lady that was lost in the maze. Check the sign (bologna
and shoes!!). Read the Latin inscription – Vitam Egit Nitidam. Check the sewage.
Enter the blue tunnel and out the grate by the hall outside Tony’s office.
Upper
hall: Look at the trophy, back end of a cow and then
use-pull the tail. See Old Betsy release the flowers. Go back down to the office
and pick up the flowers. Go back up. Try pulling the tail again. Now talk
to Dudley and Butch, the 2 inspectors. After the insults, you find out about the
Halloween party at the Dudley mansion. Read the plaque under the ‘head of the
founding father’. Take the scarf of Pantagruel’s and the letter
from the floor by the door. Read the insulting letter in inventory. Pantagruel
is kidnapped! Tony has to go to Halloween Park tonight, signed by Jack
o’L.
Halloween
Park
Roam the Park for
clues:
Entrance:
Try taking the bush. Enter the park on the left side of the booth and will be
stopped by the old lady. Talk to old lady in the booth and if you have the time
ask her about everything. Admission to the park is in the form of glucose, like
suckers or candy. Gossiping is the justification of my existence……..
To get in the park – Be
sure that you’ve read the complete brochure in the storage room at the W &
W building. In inventory, combine smock with flower to make part of a
costume. Then add the scarf to the partial costume to get costume.
Use costume. Tony will go to the bush, change and come out like an illiterate
shepherd girl complete with a blond wig. Give the bag of candy to the old
lady. Go to the exit left of the booth.
Inside the park by
entrance: Tony removes his costume. Listen to the convict
talk to the young cowboy. The gates to the park slam shut. Hear a voice that
says to welcome the Guest of Honor, Tony Tough. Now, everybody is locked
in.
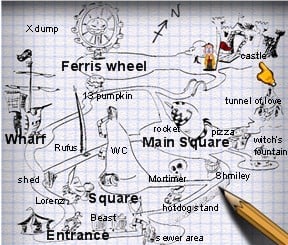
Tony will start a map in his
notebook that can be accessed in inventory. You can use the map to jump from
one place that is already visited to another in case you don’t want to walk
around anymore. I highly recommend that you walk around first and to get Tony to
map the place.
Note: Do
not chase the mouse you see roaming around the park until you are ready later in
the game.
Bearded Lady
tent: Enter and talk to the sleeping man. Take
carrot by chair in the audience area, tomato by curtain on stage
and onion on stage floor. Open stage door.
Bearded Lady’s dressing
room: Talk to weeping bearded lady and find out that
she’s sad because of her loss of feminine
grace. Let’s make the bearded
lady feel feminine – Give her the flowers. She perks up. She still has her
mother’s smile, that is.. her mother’s false teeth. She gives the false
teeth to Tony. (easy mode – no false teeth is given). Exit the tent.
Big Head and Hole on Circus
tent: Take
the left exit (Lorenz and Pirates arrows) beside the bearded lady’s tent. Use
the trashcan by the arrow at left path – if only it has wheels! See a boy
peeping through a hole in the tent. After the boy runs away, take Hole in the
tent and now there’s an opening to the tent. Look at the big head and the
slot machine that takes a dollar. (easy mode – no hole in the tent) Exit to the
left.
Crossroad:
Check the door of the shed, the keyhole and the crack at the bottom of the door.
The key is still in the keyhole. Take the stick leaning on the signpost.
Take the left exit.
Pirates:
Check the swordfish. Examine the hole in the barrel by the stairs and then take
the fishsticks that cats love. Talk to Captain Cornelius Woodward IV of
The Wimpy Whale. Find about how he lost his leg. harr! Take right exit up the
stairs.
Moustache Walrus
Inn:
Polly the Parrot – Talk to Polly, the parrot.
Try opening the door with a C on it. Polly snitched on you with the captain.
We have to find a way to get in the captain’s cabin.
Anchorman – Enter the Inn. Talk to the
anchorman. He cannot leave until the employee of the month arrives and then he
can go home. We have to find an employee of the month. Look at the picture of
the employee of the month.
Sad Pirate – Talk to the sad pirate with red
bandana. He cannot shed real tears.
Make
the sad pirate feel emotion – Give him the onion and it didn’t work. Go
back down to the swordfish by the Captain. Use onion on swordfish to get
chopped onion. Go back to sad pirate and give him the chopped onion.
It worked – he’s now weeping! The weeping pirate buys you
rum.
Biff, the guard – Try taking the keys from
Biff, who wants his chicken dinner. We have to find a way to get those
keys.
Exit the Inn and take the right exit by the
Captain.
13 Pumpkins Game:
Talk to the genius. Whoever gets to the 13th pumpkin first
wins. Each player takes turns. You can place one or 2 pumpkin in order during
your turn. There is no way to lose in this game – just press the top left
pumpkin for your turn and then click the bottom pumpkin for the opponents turn
until the 13th pumpkin is lit by top left pumpkin. Get a stuffed purple
tapir as prize. (easy mode – no prize) Go to the castle.
Bridge by
castle: Try talking to the fisherman. Take an
earthworm from the bait can beside him. (easy mode – no earthworm bait)
Note the shadow cast on the moon. Go north.
Castle:
Talk to the gatekeeper. He won’t let you pass and if you don’t go away, Fluppy
will tear you in shreds. Look at the hole in the tree trunk and the tuft of
grass around the tree. Go to the left exit to the Panoramic Wheel. Look at
notice about lost cat to be returned alive or embalmed to old lady at
room 207. We have to keep an eye out for a cat.
Ferris
Wheel: Enter the blue booth and use the lever for a ride
in the Ferris wheel. It works! Leave the door open. There’s a bowl here. Place
the fishsticks on the bowl and see Speedy Gonzales of a cat zoom in and gone
before you can catch him. You can entice the cat on any bowl seen throughout the
park but to catch him is another matter. Go back to the 13 Pumpkins area (use
notebook map) and go to the central-main square.
Rocket from Outer
Space: Enter the open door of the elevator to go up to the
rocket office. Wait when Randall covers his face with the Frederickhs of
Hollywood catalogue and then take the skateboard by the aliens.
Talk to Randall and then exit. Go to bottom path.
Rufus:
Talk to the snowman about Pantagruel and learn about Pantagruel being seen at
the hotdog man’s place. Then talk to devil and learn from snowman about how he
got his fragile ego. Talk to Rufus. We have to teach him a lesson in humility.
Go back to the park entrance via map or take the left path and then take the
right path.
Convict and
Timothy: Read the sign behind the convict. Use the organ
reassembler and it shakes and throws you out. Whew that really shook Tony up!
The convict refuses to talk to you. Talk to Timothy, young cowboy about
everything especially about Pantagruel. Timothy saw Pantagruel tied up and
muzzled when they were by the beast. Take right exit to the beast.
The Beast:
Take the chewing gum stuck to the beast’s cage. Talk to the beast and
learn his history. He wants to be free. He saw Pantagruel and a cursing
man headed for the main square. The beast’s name is Wel, short for welcome.
Mortimer is his friend. We have to set him free. See another handbill about a
lost cat with reward offered.
Sewer pipe:
Take right exit to Romantic Corner. There’s a mouse that ran away. (easy mode –
no mouse is seen) Take the path going down. See a sewer pipe coming out of the
side of the cliff. Take the sharp stone and find out it is a plaster
cast. Look at plaster cast in inventory. Use to open and examine the plaster
cast again – still don’t know what it is. Leave it open.
Shmiley the
clown: Go back up and turn right at arrow. Watch the clown
and his audience runs away. Talk to the clown and he hits Tony with a hammer.
Try talking to the vendor. See the mouse here again. Check it and it goes to the
right exit. Use the trashcan and Tony will push it towards the clown. Examine
and then use the trashcan again. It goes back to the hotdog vendor stand. (easy
mode – no meeting with Schmiley the clown)
Get the clown an appreciative
audience – Note that the trash can has a smiling mouth. Use the hole in
the tent on trashcan and then use the false teeth on it. Use the trashcan
again to move it close to the clown. Mortimer has a captive audience now. Take
the hammer.
Mortimer’s
Bazaar: Go north to Mortimer’s bazaar. There’s another
notice about the lost cat. Take the chicken hanging left of the door.
Enter the bazaar. See Mortimer and Antelope, the crow on his head. Take the
rope by the door. Look around (it’s the truth!). There’s a trap door that
is locked from below. Exit and go north.
Phot-o-matic and small
fountain: Note the fountain in front of the photomatic and
that the photomatic takes only coins. Go north to the WC.
WC: Talk
to Wally, whose father runs a cucumber plantation and needs to use the WC bad.
He saw a monster carrying a warthog over his back at the Witch’s fountain and
then head northwest from the central square. Open the creaking gate and an
alligator jumps out from the WC. Look at the red mat and enter the enclosed area
from an opening on the fence.
Let us help Wally get
relief – Enter the enclosed site through the opening on the fence. Place
the skateboard on the red mat. Go out through the opening on the fence. Open
the creaking gate from outside and watch the alligator go into orbit. See
Wally’s discomfort released through the sewer pipe.
Da Carminuccio a
Zuzzuso! Go back to the clown and then take the right
exit. Try talking to Carminuccio. Check the mouse by the table and it goes into
the pizza parlor. Look at trashcan and take a crust of bread from it.
(easy mode – crust of bread is on the ground in front of the trashcan) Enter the
pizzeria. Check the mouse and it goes to the mouse hole. Take hot pepper
from the table. Exit the pizzeria.
Witch’s
Fountain: Take the down exit right by the trashcan.
There’s bowl, water and cauldron.
To get the cauldron – Use
the stick on the cauldron. It just tilted the cauldron. (easy mode – cauldron
falls off) Use the notebook map and go to square by Photo-o-matic. Use the
purple tapir won from the 13 pumpkins game on small fountain. See that the
water flow of the witch’s fountain is increased. Go back to Witch’s
fountain. Again, use the stick on the cauldron. Take cauldron that
falls off the witch’s hands.
Tunnel of
Love: Go back to the Pizzeria and take the exit above
Carminuccio. Talk to Isabella. Find out that only couples can ride the swan.
Putting the puzzles
together:
Hot Dog
Stand: Go to the hot dog stand by taking the middle bottom
exit from the main square (rocket and pizzeria area). Enter the stand using the
entry on the right side. Use the freezer to open it and then place the earthworm
inside. Take frozen earthworm. Open the oven and place the chicken inside
to cook it. Take cooked chicken. (easy mode -earthworm is already in
freezer) Go to Rufus.
Teaching Rufus
humility: Take the master hammer beside Rufus. Rufus does
not like that. Then answer Rufus about wondering if there could be anyone
stronger that I am in the world…. The challenge is done and bet is set (even
without money). Use your own hammer (from clown). Watch how Tony won the contest
and get a dollar. Go to Big Head.
Big Head and Lorenz:
Click the dollar on the slot machine. Big Head’s eyes and
mouth open and a red carpet is rolled out. Enter and have a talk with Lorenz,
the wizard. After a long discussion, you are given a formula for a potion
to make finding Pantagruel easier for Lorenz. Make the potion by mixing
thoroughly in a cauldron – milk, coffee, fruit juice, gall bladder, pepper and
cherry. Try taking the top hat with a rabbit in it. Go to the shed at the
crossroad.
Shed:
Place the formula on the crack of the door. Place the frozen earthworm on
keyhole and get a key. Tony releases the earthworm. Use key on
keyhole.
Inside shed: Take the
bottle by the door. Look at knot… How do we get it untied? Use bottle
on marble bust. Then use broken bottle on knot of rope holding a ham
over a piranha. Take the bone of the eaten ham spat out by the piranha.
Use lever… c:..> oops! See that the other metal bar doesn’t have a lever.
Use bone on other metal bar. Use bone lever. Door opens. Enter this mysterious
place in another dimension?
Upper floor of the shed:
Take the milk white paint. Go up the stairs.
Room 206: Enter the room.
Take doll from chair. Open the drawer and take the sleeping
draught. Exit the room.
Room 207: Use the door and
talk to the old lady. Go back down and exit to the right of the hallway.
Wharf: Get
another fishstick from the hole in the barrel. Go up to Polly the
parrot.
To get in Captain’s cabin
– In inventory combine chewing gum with crust of bread to get bread
with chewing gum. Give bread with chewing gum to Polly. Enter the
Captain’s room (with the C on the door).
Captain’s cabin
– Take journal from bed. Read in inventory about how the Captain
lost his money and his leg to Admiral Wallen. Take a piece of wallpaper
from under the window. Look at the wallpaper in inventory and realized
its a map. Look at treasure map again, Tony extrapolates and places where the
treasure (X) should be in the map – to the left of the Ferris wheel area. Look
at treasure map for the third time and Tony says the X that marks the spot is
er… weird.
Dump:
Use the notebook-map and click on dump. See a clock that is set at 6:30, a
lever and a fridge. If you pull the lever – the clock moves, if you pull the
lever a second time – the clock stops. Look close at treasure map-wallpaper
and see that the X is really XI. Move and stop the clock to 11 o’clock. Open
the fridge and take the deck of cards. Go back to the Captain. (easy
mode – the fridge is already open and the deck of cards is seen).
Captain – Show the cards
to the Captain and he got so scared he gives a gemstone to keep you
quiet about the challenge. Go up to the Inn.
Get the keys from Biff the
guard – Biff with the keys is still waiting for his dinner. Use the
sleeping draught on the still hot cooked chicken. Give the drugged
chicken to Biff. 2 Chickens!!! Take the keys from drugged
Biff.
Set the Beast
free: Use the keys taken from Biff on the door of Beast’s
cage. The Beast is free!! Examine the bowl inside the cage. Now is the time and
the place. Place the fishsticks on the bowl. Cat comes in. Use-close the door.
Tony closes the door, the cat slams on the door and gets knocks out. Tony takes
the speedy now zonked cat. You can see and talk to the Beast at Romantic
Corner by the sewer area.
Cat, Shed and Room
207: Give the old lady the cat. About your cat.. and get
nickels as reward. Use notebook-map and go to the Phot-o-matic at square.
Phot-o-matic:
Place nickels on slot machine. Tachycardia time! Tony takes the
photograph from the photo delivery slot.
Anchorman’s Employee of the
Month at the Inn: Place Tony’s photograph on the signboard
to be the Employee of the Month. Talk to anchorman. He gives Tony a bag
the prize for being the employee of the month. Look inside the bag in inventory
to get a plaque.
Collecting the rest of the
ingredients for Lorenz’ potion:
Coffee – Go to sewer area.
Look at nasty liquid sewage and then take some in a drinking glass. Go
back up and then turn right following the red arrow.
Fruit Juice – Go to
Isabella at Tunnel of Love. Show Isabella the doll. The family entertainment
park would not allow nakedness. In inventory, use smock on naked doll to get a
dressed doll. Now, show the dressed doll to Isabella and to make the
trip down the tunnel of love sweeter, she gives you a lollipop. Tony
and the inflatable doll go for a ride in the swan. Place the lollipop in
the rum to make a fruit juice.
Kamaro gall bladder – Go
to Mortimer’s Bazaar. Talk to Mortimer and ask for kamaro’s gall bladder.
<that’s the truth> Tony will do anything for it and will do something
for Mortimer. He wants the Captain to pay for the leg the Captain took from
Mortimer, as a matter of principle of course. Then, give the gemstone to
Mortimer and pick up the kamaro gall bladder.
Mixing the ingredients –
Go to Organ Reassembler at the Entrance. Now that we have all the ingredients,
it’s time to make the potion. Place kamaro gall bladder, paint (milk),
lollipop in rum (fruit juice), sewage in drinking glass (coffee), hot pepper
from pizzeria and tomato (cherry) from bearded lady’s tent in cauldron from
witch’s fountain. Now to mix it – use organ reassembler and come out with a
cocktail.
Big Head and Lorenz the wizard:
Enter big head and give the cocktail to Lorenz. I see… I see
a tapir… between the moon and the sugar… tons… your friend.. castle in
park… tons of sugar… Lorenz bubbling green in the mouth disappears. Use
carrot on top hat to get rabbit.
Chase the mouse (to get to the
bonus level): ……Thanks, Yapette! …… The mouse can be
seen all around the park. Now is the time to chase-herd him. You can find him
either by Romantic Corner, hotdog stand or by the pizzeria. If by pizzeria, do
not herd him inside the store. If you do get him in the mouse hole, just roam
around and he will eventually come out. Click on the mouse for it to go to –
Beast cage area – by bearded lady tent – Big Head Area – Shed area. At Shed
area, place Tony to block the path to Rufus and Test of Strength area. Then
click on mouse to herd him to the pirate area and then to the 13 Pumpkin area.
Do not go near the mouse at 13Pumpkin Area. Use the map to go to the main square
and take the path to the left to the 13 Pumpkin area. Click on mouse standing by
the path to the fisherman and castle. Herd the mouse over the bridge and right
smack on to the Fluppy the dog held by the guard. Yummm! Pick up the
spider that the ravenous dog spits out. This will not work if Fluppy is
loose already.
To get into the
Castle:
Pizzeria: In inventory, use the
plaster cast to open it. Place the brass plaque in oven. The brass melts after
Tony pushes it in the oven with the shovel. Take the melted brass. In inventory,
place melted brass on opened plaster cast. In inventory, use the plaster cast to
open it to get a whistle. If the brass solidifies, redo the oven
process.
Castle – Ferris wheel –
Tree: Go to castle area via the Ferris wheel location in
the notebook-map. Be sure that the door to the blue stand is open.
Go to the tree between Ferris wheel and castle.
Place noose taken from Mortimer’s bazaar on the tuft
of grass.
Place the rabbit in the hole on the tree.
Go back to Ferris wheel area and see that the other
end of the noose is there. Use the end of the rope and Tony will tie it on the
Ferris wheel.
Go back by the tree. Use-blow the whistle.
Fluppy hears it, runs to the rabbit in the hole and
gatekeeper stands on noose.
Go back to the blue stand at far left of the Ferris
wheel, open the door if you haven’t yet and use the lever inside the stand.
Watch as the gatekeeper takes an unorthodox trip on
the Ferris wheel. Harr… fishing’s good. Now the way inside the castle is
clear.
Castle Proper
Castle ground
entrance: Enter the castle grounds and see that Fluppy is
back on sentry duty. No way out that way. Note a catapult and a machine that is
attached to a colossal vegetable with a hatch. Go North.
Clock: See
a clock that reads 5 minutes three. The clock’s hands are tied with
rope. Go to the right exit.
Lean-to:
Go right and take watering can and jerry can from the lean-to.
(easy mode – no watering can is seen) See a blackthorn tree loaded with fruits
on the right. Use the hammer on the tree and take plum. Go up the
path.
Barn: Look
at antenna on roof sending signal to the structure by the machine close to the
castle gate. Enter and talk to the sheep. I think that is magnificent! Bravo!
Take the green pipe found above the sheep. Exit the barn and look at the
haystack. Go right.
Statue and
Simulacrum: Talk to statue and find out that they are Ham
and Actor. They get off at 3:30 but the clock is stuck. Talk to Ham. Chuck will
give the knife he’s holding to Tony after his shift. We should untie the clock
then. Go right.
Castle:
Open the door to the castle.
Foyer: Talk to
the housekeeper and say you’re a Parapsychologist-scientist, Professor. The
park boss was on top of the pumpkin patch when she was at the control room at
the top of the colossal vegetation. The machine attached to the colossal
vegetation uses facial recognition to gain entry. Tony would need her to help
in an experiment concerning eyes in the back of the head. Ask her to turn
around and try to see what he is doing. Take the blue washing-up liquid
on the detergent cart. Behind the housekeeper is a closed door with an
ornamental dog’s head. Look at the vampire mirror explained by the playbill.
Open the wardrobe doors and take the bellows.
Cake: Go to next room.
Look at the programmer’s version of Boticelli’s Aphrodite Rising From the Sea
(also called The Birth of Venus). Take the only white candle on the
cake that is moving.
Kitchen: Go to exit above.
Look at cabinet that is perfect for storing stuffed animals and a few sets of
eggcups. Take loudspeaker by cabinet. Look at loudspeaker in inventory
and see that it has no batteries. Go to left side of room. The pigeons fly
away from the fountain. Use watering can on water to get water-filled
watering can. (easy mode – no watering can) Take pastry tube. Exit
and go to room on the left of the cake.
Gwendel: Open the cabinet
doors and see a rubber zombie that roared once. Talk to Gwendel, the jester
that is dunking his head on a tub of water twice. He was given the task of
setting up the grand finale for the morning show. He is practicing holding his
breath for the illusionist act.
Room with a box: Go to next
room on the left and see a box on the floor. There is a mouse hole by the
doorway. Look at window.
Gear room: Climb up and see
a key on the shelf on the right. Using the stick doesn’t work. (easy mode – no
key is seen)
Gargoyles: Climb and examine
the gargoyles. The gargoyle on bottom right has an unstable merlon holding it
up.
Gwendel: Go back to Gwendel
and use the blue washing-up liquid on the tub. Gwendel’s eyes get soap and he
goes out screaming. Use the tub to move it away and open the trap door. Go
down.
Dragon’s Den:
Dragon – Read the note above the red
pushbutton. Press the pushbutton and see smoke come out of the dragon’s
mouth. Immediately click the bellows on the smoke to get smoked filled
bellows. (easy mode – no smoke is seen) Check the mechanical dragon and
note a panel by his left rear leg. Open the door and look in hole. It must
lead to the dragon’s tank. Place green pipe on hole. Place jerry can on
green pipe to get jerry can filled with gasoline.
Wishing well – Talk to the well and see that
an old man is at the bottom collecting all the goods dropped in the well.
There are candles lighting his prosperous endeavor. Use jerry can on the
well. Flames shoot up – get the candle from inventory and light it on the
flame getting a lit candle.
Haystack:
Go out of castle and on the way out the housekeeper asks about Gwendel. Go left
to the haystack. Use lit candle on haystack. A metal door is revealed. Pick up
the needle in front of the door. Use-open door.
Castle again:
Storage Room: Use the weights from the floor. Tony feels
as strong and as bold since he was seven (traumatic time, Freud!).
Cake – Go to cake room inside the castle. Use
needle on cake. Talk to the girl in the cake. The birthday boy is named Jack.
Ask her about batteries (only if you have looked at loudspeaker and see that
it doesn’t have batteries) and she gives you battery from her Walkman.
Place the battery on the loudspeaker.
Zombie – Go to left room, open cabinet and
give the loudspeaker with batteries to zombie. Wait until the door closes and
open the door of the cabinet again. This time when the zombie growls, it is
loud enough to move the key from the shelf (easy mode – no key) and shake a
foot off the boar.
Kitchen – Go to the kitchen and take the
boar’s foot.
Gear room – (easy mode – not done) Go to room
left of zombie and up the stairs to gear room. Use stick on key. It falls off,
down the stairs and into the mouse hole.
Gargoyles – Go up the stairs to the gargoyles.
Use-push the bottom right gargoyle. Tony didn’t make it but the alligator from
the WC finally falls from the sky dropping on the gargoyle from the roof. On
the way down, the gargoyle removes the rope stopping the clock. The 2
statues-actors go off shift. Did I do that!
Box room – Go down to the mouse hole. Use the
smoke-filled bellows on the mouse hole. If this doesn’t work, go back up and
see if the key miraculously return on the shelf. Dislodge it again. The mouse
spits the key out of the hole and out the window on top of the kitchen roof.
(easy mode – not done) Use the boar’s foot on the box and get boulder.
See the rope with the gargoyle attached hanging from the
window.
Statues’
pedestal: Go out of the castle and turn left. Take the
knife left by the actors. See a hollow in a shape of a spider on the
pedestal.
Bonus level:
……Thanks, Yapette! …… Place the spider (taken
after herding the mouse) on the hollow of the pedestal. A cavern opens on the
left with a rolled out red carpet. Enter and see a wall filled with pictures.
Read the plates of quotes of the brains who did this wonderful game. Love has
reason but reason does not love – Valerio Massari. Check the bearskin also.
Go to the left screen and see a guard and giant monitor that you will see later
on in the game. Go out to the castle courtyard.
Gwendel and
dog: Go back to the right and see Gwendel sitting with a
dog on the castle ground. Try to take his dog and see Gwendel for what he really
is. Tony asks us to give Gwendel a lesson. Look up at the clock. Hmm… Go to
the room with the mouse hole and box. Use the knife on rope holding the gargoyle
seen hanging on the window. ‘Illusions of Omnipotence’. Go back to Gwendel and
take the dog. Go to path at bottom of screen.
How to get the Hole on the roof
and Key: See the kitchen roof just in
line with the catapult. Place the boulder on the catapult. Use knife on
catapult. See the boulder go down the kitchen and drops the key-latch from the
hole (easy mode – no key) in the roof.
How to get a facial
impression:
Kitchen – Go to kitchen and pick up the
key-latch. (easy mode – no key) Open the cabinet and look inside – hear
what Tony say again – perfect for storing stuffed animals. Place the dog in
the cabinet and then use-close the door. The leash hangs out of the cabinet.
Place the plum in the water by the fountain. The pigeons fly in and one of
them eats the plum. Drive the pigeons away by going near them. When they
come back and sit on the rafters by the hole in the roof and does the usual
prune ingestion effect – immediately use the leash. Tony will string it out
and hide by the boar. The housekeeper comes in, trips over the leash and makes
a facial impression on the floor. Now how do we get that
impression?
Barn – Use knife on sheep to get wool.
Pour water from the watering can on the shivering shorn sheep. (easy mode –
water not done) The sheep coughs up phlegm. Take phlegm using the pastry tube
to get a dripping pastry tube.
Kitchen – Go back to the kitchen and the
impression on the floor. Place the dripping pastry tube with phlegm on the
hole on the floor. Hear Tony’s explanation (so that’s the rationale). Then use
the bellows on phlegm. Take mold.
Colossal
Vegetation:
Machine – Go to the machine by the catapult.
Use the mold on machine – The power of phlegm!
Going up – Go up on the Jack and the pumpkin
stalk high up in the sky, see a giant pumpkin at the other end of the
vegetation. Go up.
Pantagruel – Go forward until you see
Pantagruel muzzled and hanging on a rope. See a video surveillance camera
above Pantagruel, a lever by door and a lock (easy mode – no lock) on the
bottom right of the wall. Examine the video camera, see a guard watching the
giant monitor looking at Pantagruel’s head.
Use wool on Pantagruel. Use-push Pantagruel to
hypnotize the guard watching the monitor. Then pull lever to release
Pantagruel. Pantagruel warns of a trap but Tony does not understand. Tony
tells Pantagruel to wait for him down there. Use key on lock (easy mode –
not done) and exit right. See Jack o’Lantern working on a
rope.
Watch the end
sequence.
POW!!!
I’m free! Free! The pumpkin’s
gone! Well, not for
long. Uh Oh! Tony is in
orbit!
Smile my friends, if for no
other reason because it is not happening to you!
This document may not
be distributed without express written permission of the author and the content
may not be altered in any way.
For Questions or
Comments on this Walkthrough,
Please write to: MaGtRo
Copyright ©
11/2002 MaGtRo