By
Paulo Coehlo and arxel tribe
Walkthrough by MaGtRo
October 8, 2001

Game play: Right click of the mouse will show on top of the
page – “Bag”, that
contains things that are collected during game play; “Actions”, has
objects needed for fast action, “Shield of the Templars”, contains the
possible dialogues and the “Main Menu Icon”. To move back from a close-up
view, move the pointer at the bottom of the page and click the closed eye
icon. Another icon is used to move Save often, especially on action scenes
because you can die.
The
Secrets of Alamut is part 2 of The Legend that started with The Legend of
the prophet & the assassin, The Legend 1. The prequel to these is
Pilgrim, the story of Simon de Lancrois.
The
introduction in game play gives a description about Tancrede de Nerac also
known as As-Sayf. In the main menu, “resume” gives an account of what
happened at The Legend, part 1.
………So continue the story of As-Sayf in search of Simon de
Lancrois.
This story starts in an oasis after As-Sayf defeated the ghouls and
had dreamed being attacked by a Jinni. He carries first talisman part
and lighter. Talk to Kyot, An-Nab, and Caradoc about the old man of the
mountain.
Alamut
Upon entering the
opening in the rock wall, several pools are seen before the
door.
Acid
pool puzzle
To get to the door at
the other side of the pool, several pools have to be passed. Some of them
are filled with acids and knowing which ones can enable a safe path.
Throwing the stones at each pool will produce a hissing sound if it is
filled with acid.
Turn around and pick
up 3 stones to check for
acid pools. Move to the left pool, forward to next pool, right
pool, left, right, get empty flask, left pool and the door.
The door has a padlock. Turn around and use the empty flask to get
acid from the right pool getting acid in
flask. Use the acid in flask on the
padlock. Enter.
Color
puzzle in Spiked room
There are 3 stands
with red (center), blue (left) and yellow (right) liquids. At the door on
the other end is a contraption that have funnels for 2 circles of red (top
left), 2 for purple (bottom left), 4 for green (top right) and 1 for
yellow (bottom right). They have to be filled with required amount and
color from the color stands. Yellow + Blue = Green. Blue + Red = Purple.
This is a timed puzzle, so be quick or else, spiking is
inevitable.
Fill empty flask with
yellow liquid, making 3 yellow in flask and
place one on the yellow funnel and the rest in the green funnel. Fill
empty flask with blue liquid, making 3 blue in
flask and fill the green funnel 2x and once on the purple funnel.
Fill empty flask with red liquid, making 3 red in
flask and add to purple funnel once and the rest on red funnel.
Enter.
Lava
river puzzle
Look down and read
the inscriptions.
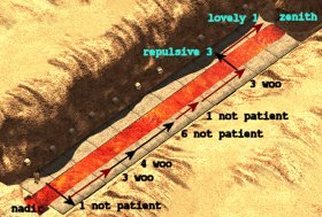
Left tile – From Zenith to Nadir, live 5 sisters, the 1st is lovely, and
you can touch the 4th but don’t stay close from the 2nd and the 5th, and
fear the repulsive 3rd one.
Right tile – Nadir to Zenith live 6 sisters. The first and the last are
not so patient. Don’t trust the second but you can woo the 2 younger ones.
Be careful with the 5th, she will repulse you.
Save game here!!
Every time you hear a ticking sound – be QUICK! Go left to first slab,
jump across to 1st right, quickly skip 2 and jump to 3rd and 4th. Skip 5th
and go to 6th. Start over the clues from right tile. Immediately go to
7th (1), skip 8 (2), go to 9 (3), cross over to the other side (3), skip 2
and go to 1.
Fire
Room
Enter. The room is
heated by squares of fire. A square column with a face at each side stands
at the center. Click 3x at the south side, the one facing the door and
note that the vertical grill on the window on the left is now removed.
Click the west side face 3x, the panel rises and automatically enter a
dungeon.
Dungeon
puzzle
Pick up the oil in bowl at the right side of the room. Look in
the mouth of the sarcophagus to see the next room. Look at the left water
bucket and click/hold it and down to scoop some water – the sarcophagus
opens. Look in and see that the back is still closed. To raise the bucket
lever, removal of the water is needed. Place the oil in bowl underneath
the bucket of water and light it with lighter.
Go in the sarcophagus, wait until the water evaporates to raise bucket and
closes the lid and opens the back door of the sarcophagus.
Weekday
puzzle
Look close at
tiles on floor. Read the inscription on top – If Monday belongs to the Moon, Sunday to the Sun, rewrite the
Order of Time, O Believer and you will darken the light and shine in the
dark.
In this slider
puzzle, place the colored tiles on the top row, in reverse order –
starting with Sunday (Sun) and ending with Monday (Moon). Click each tile
to move it.
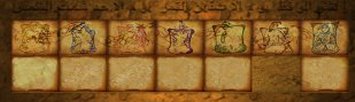
Sunday (Sun, yellow),
Saturday (Saturn, dark blue), Friday (Venus, pink), Thursday (Jove,
purple), Wednesday (Mercury, green), Tuesday (Mars, brown) and Monday
(Moon, light blue). A door replaces the puzzle wall. Enter.
Valley of Pleasure
puzzle
Go to the palm tree
area and see entrance, 5-lighted caves and one blocked by vines. The
puzzle constitutes opening the lighted caves and unblocking the last one.
Once the lighted caves are opened, houri statues are seen. They have to be
awakened by giving them items collected from other caves. They will kiss
As-Sayf. Every time a houri awakens some vines blocking the cave will be
removed.
To open the lighted
caves – Go to the center mound and look at the stand, pick up the jewels
and place them on the carving. Ruby – heart,
emerald (although, it’s a
blue stone) – eye, jade -ear, sapphire (?green stone) –
nose and coral – heart.
Collect the jewels again.
Waking the
houris – Collect items and give them to houris. They will awaken and kiss
– but make that short,
please, by clicking closed eye icon at bottom of frame – because that is a
kiss of death. Check the hourglass for time left. Exit through
unblocked cave.
left to right houris
from entrance |
1 reclining with
mouth open |
2 reclining with
hand open |
3 kneeling with hand
on ear |
4 reclining left
with nose in air |
5
sitting |
items to be taken |
incense branch on
hanging tray at left side, veil behind statue |
peacock feather on pot
at right side |
spatula on left
side |
bird cage on
stand |
grape on right
side |
items to be
given |
grape on
mouth |
collected jewels from
center stand placed on hand |
bird cage placed on
stand at left side and then cover with veil |
collect embers from
center stand with spatula, place in bowl and then add incense
branch |
peacock feather placed
on hand |
Top of
Alamut
Talk with the old man
of the mountain. When he asks you to join them, answer either yes or no –
the conversation will end the same way. Complete all other dialogues. Meet
Hadjar, the Circassian.
As-Sayf is poisoned
and is on his way to kill a man in order to be given the
antidote.
Oasis
The enemy
of our Order whom you must kill is a caravaneer called
An-Nab. NO!
Talk to Kyot and
An-Nab. Exhaust dialogue with An-Nab. He gives you second talisman part.
Dream
puzzle – As-Sayf dreams again of the Jinni. This time
he is attacked with metal spikes. Who can help with metal? – Tahib, the
metal/blacksmith.
Talk to Kyot and
depart to look for Procles Phytalos at the Monastery of St. Catherine at
the foot of the mountain where Moses gave the 10
Commandments.
Cd
2
Temple
Ruin
Upon arriving by a
well for a much-needed drink for himself and Phorbas, his horse, a voice
from nowhere starts asking questions. Say yes or no to showing leg. Click
on well to clean leg. Pick up rope and linen bag. Pick up apple core.
Ask about Procles Phytalos. He won’t answer – flea elephant. So talk face
to face with him.
Move
toward column where he is and look up. Throw rope on protruding branch.
Attach linen bag on ring at one end of the rope. Since As- Sayf is too
weak from the poison, look for a way to raise him with little effort on
his part. Turn around, move forward and get the stone just in front of the
ruins. Attach the stone to the other of the rope. Push stone into pit
above it. Talk to crazed hermit. Turn around and click the
sun.
Monastery of St. Catherine
Outside the
monastery, turn to the right and see a bird circling. Save Game here!
Quickly move forward once and right towards the wall of the monastery.
Pull rope. Exhaust dialogue with monk. Talk to the archimandrite again
upon getting inside the monastery. He said the summer equinox would shine
the light on the Chapel of the Burning Bush today. Talk to him again in
the room of the tomb of Procles. Read the inscription on the tomb of
Procles Phytalos.
To the East of the
West of the West of the North, in the shrine of the wild boar and sow, the
fawn and the doe, the son and the mother, the warrior of light will find
the path to heaven, the earth shall be his if he covers with white, the
bare hand of the Pantocrator, a pupil with eight shining
rays.
Then, on the first
day of spring, he shall in the center of the temple, preside over the
wedding ceremony just before the sun broaches the place of the burning
bush. Thus, he shall receive that which is his by
right.
Turn around to the
back wall, pull the ring and get 12 red sticks
and 30 white sticks. Go out the door and enter
the door across the hall.
Library
Look at left wall and
note cavalier mural, sun disk, door with 4 keyholes on the sides and a
ladder mural.
Go to the bookcase.
Look at open chest on the extreme left of the bookcase. Pick up magnetized rosary and read the letter of Proclos to
Simon.
Red and white
sticks puzzle
Turn left and click
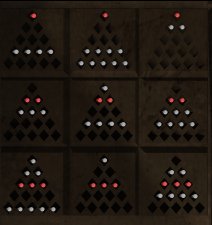
on carpet. Look close on drawings on the lid of the coffin. 3 triangles of
red and white sticks are already done. The puzzle involves placing red and
white sticks on each triangle that will total 21 vertically and
diagonally, each stick counts as one. The sticks must fill up a row in
that pyramid. 1 to 9 white sticks should be placed in each square and the
number placed NOT duplicated. Since 4, 5 and 6 are already on the preset
triangles – 1, 2, 3, 7, 8, 9 white sticks need to be placed on the
remaining triangles. The red sticks placement can be found in a diagram in
a book on the shelf, found on the right and above of the chest. The
diagram shows pyramids with one red dot on each pyramid on the top row, 2
red dots on second row and 3 red dots on the third
row.
Place 1 red stick on
each pyramid on top row, 2 red sticks on middle row and 3 at bottom row.
For white sticks: 9 – top middle row, 2 – top right, 3 – middle left, 7 –
middle right, 8 – bottom left and 1 – middle bottom. Pick up the bone key.
Ladder mural
puzzle
Pick up skull off shelf and use it on the enclosed glass stand to the
right. Get rung. Look close on ladder mural. Place rung on the empty
space on top of ladder. Pick up copper
key.
Cavalier mural
puzzle
Look at cavalier
mural and see a key on the pennant but it cannot be picked up. Use
magnetized rosary on it and get iron
key.
Sun disk
puzzle
Read 2 books on top
left shelf from the skull shelf. One has a picture of ladder with
text:
Christ, Sun of
Justice, welcomes to his breast the six and
ten and nine and
eleven and four
martyrs before the doors of Paradise open for
them…
On the shelf above
the skull, a book has figures of astrological signs under a sun disk on
the right page. Note location of the astrological signs on the disk at the
left page, counted from the top pisces I – 6, capricorn I – 10, capricorn
II – 9, sagitarius II – 11 and pisces II – did not find match, possibly
5.
Look close on sun
disk on wall. Click on 6, 10, 9, 11 and 4. Pick up the gold key from the 12 o’clock position of the
disk.
Door
puzzle
Go to door and place
the keys on keyhole positioned in relation to their puzzle locations:
copper key – top right, bone key – bottom right, iron key – bottom left
and gold key – top left. The center circle of the metal on the door
protrudes out and it looks like a cross-slot. Collect all the keys from
the keyholes and it will form into a secret
key. Insert the secret key on cross slot on door.
Enter.
Church
Coming out of the
stone door, 2 wooden doors are seen. Enter the double door on the
right.
Procles’ first
riddle puzzle
Now, follow the
inscription on the tomb of Procles – To the East of the West of the
West of the North – E of W of W of N means the go N, W, W, E. Move
forward once, turn left, forward 2x and turn around. Look at the icon on
pillar – the warrior of light will find the path to heaven by the earth
shall be his if he covers with white the bare hand of the Pantocrator, a
pupil with eight shining rays. Click on icon and get square box.
Tiles in side
chapel
Go forward 2x, turn
left, forward 2x, turn right and enter the curtained door. Look on the
tiled floor. Use dagger on second from the bottom, extreme left tile.
Insert the dagger on the bottom edge of that tile. Move the dagger left to
right by click/hold several times to pry off the tile. Pick up the round
ball and together with the square box makes secret
box.
Procles’ second
riddle puzzle
Go back to the room
adjacent from the library – the one with the 2 wooden doors and the stone
door. Enter the other wood door left of stone door and across from the
double door going to the church proper.
Chapel of
Burning bush – Two tiles on the floor and a sunray from the open window is
seen. The rest of Procles’ tomb inscription states – Then, on the first
day of spring, he shall in the center of the temple, preside over the
wedding ceremony just before the sun broaches the place of the burning
bush. Thus, he shall receive that which is his by right. Remove the
tile on the right using the dagger and place secret box on the hole. Wait
for the sunray to come down and touch the box. Pick up third talisman part. Go back to library and As-Sayf
faints.
Talk to the
archimandrite and he tells As-Sayf that he is cured.
Dream
puzzle – This time in As-Sayf’s dream, the Jinni
attacks using words coming out of its mouth. Get Kyot to help since he uses words as tool of
trade.
Mines
Turn around and go up
the incline. Exhaust all dialogue with the woman who stayed behind because
her daughter, Khteis went down in the mines looking for her brothers and father and got sealed in. Help
her.
Mine gate
puzzle
Several numbers on
the lock combination is preset and from that can be derived the movable
tumbler numbers. The numbers on the top row are 1 + 1 = 2 + x = 5. From
the top row, x + 5 = the first number on the bottom row and so
on.
First room in
mine
In this room find a
way to go down the square mine shaft to main mine
pit.
Turn around and pick
up the 3 pieces of rope. Facing the room again,
on the right pick up the jug. Go right and pick
up the wooden platform. Pan left and pick up
gutter. Pan left and go forward to the water
wheel next to the square mine shaft entrance. Notice that it is missing
one of the jugs. Combine rope and jug making jug and
rope. Place jug and rope on water wheel. Go back to entrance and
face the room. Notice the scaffolding that is attached to an opening on
the top of the mine is missing a connection from the top left to the right
poles. Place gutter on left poles. Push the scaffolding with gutter
towards the water wheel by clicking on bottom of right poles. Go to wall
tied rope attached to the top of scaffolding and untie it from the wall.
Water flows and runs the water wheel raising the rope of the square mine
shaft. Go to the square mine shaft entrance. Attach platform to end of
hanging rope. Ride down the shaft.
Mine
shaft
Go forward the mine
until it splits in to left and right. Go left until the caved in end and
pick up the chain. Go back and turn on second
right. Pick up crowbar by the wooden gate. Go
back to intersection and then turn right to the bridge.
Bridge
puzzle
Move forward once on
the bridge. Turn around and use crowbar on boards of bridge. Turn around and place board on
bridge, move forward again, repeat the procedure until the rock platform
using the 2 loose boards.
Pick up lamp from the right pedestal. Look close on raise
platform and see the chain holding the rest of the bridge up. Light lamp
with lighter making lit lamp and combine it
with chain making lit lamp attached to chain.
Click it on the chain holding the bridge up. Move forward and turn back
and look down and see the slot on the bridge.
Main Mine
Area
Enter main mine, go
left, pan left and pick up hook. Turn around,
go forward, turn left and see sifter. Use dagger on sifter to get net. Turn around, move forward, pan left and pick up
pulley behind the basket.
Key
puzzle
Turn around and go to
the stone entrance decorated with eyes at the other end. Look at writing
on steps – In the true eye, the true key. Look close and pick
letters O, C, U, L and O. Place the letters on the sand – the last O, then
L, O, C and U. Pick up key.
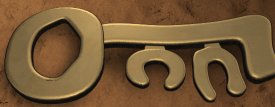
Go back out on the
bridge, look close at slot and use key on slot. The stone entrance is now
open. Go there and pick up gold from crate on far right to get gold bars.
Battering ram
puzzle
Go to battering
ram on right of stone eye entrance. Save game as soon as you hear a call
for help – timed puzzle!! Place hook on hanging chain at end of ram and
place pulley on metal clasp just behind it. Combine net and gold bars
making net with gold
bars and gold bar. Attach net with gold bars on hook. Attach rope on pulley. Look
close on rope. Pull rope to break wood gate – click/hold and move as far
right as possible and release, may have to do several
times.
Body
eater
Exhaust dialogue with
body eater who has taken the semblance of Khteis. Look at urns on the
left. Go to statue on the right, get salt rose
from the hand and look close on base of statue – rose and Simon. Go look
at view of the sun – that got her talking again. Exhaust dialogue with
body eater again. Turn down her offer of marriage!!
Her ghost sisters
surround As-Sayf. Nothing can be done to them. Exhaust dialogue with body
eater again. Yes, Tancrede de Nerac is mad enough! The men have souls like
torn rose, hmmm!
Well of
souls
There are 4 Assyrian
looking statues with markings on the forehead – water on left, earth on
back left, fire on right and air on back right. At the center is a Giant
bird ?Roc statue with tongue protruding. Underneath the Giant bird is a
place of broken crystal funerary urns (salt pit) – only one is standing
upright. Give the statues what they want.
Upon entering the
room, go down the steps, go left and look at metal gate with a horned face
and mask. Talk to imprisoned Khteis sitting on
throne.
4 Elements statues
puzzle
Go towards the Earth
statue at the far back and left of the Giant bird and get soil from second tomb between earth and water statue.
Place soil in mouth of Earth statue. He will turn yellow for a while. Go
to Air statue, at the back right of Giant bird and use crowbar on his
closed mouth. He will turn blue for a while. Go behind Fire statue and get
jar with oil. Go in front of Fire statue, turn
around and get cloth beside an open tomb. Place
cloth on Fire statue’s mouth, place oil on cloth using the jar with oil
making empty jar and light it with lighter. The
Fire statue turns red briefly. Go left of Fire statue and fill empty jug
with water from pool making jar with water.
Refresh the Water statue with jar with water and he turns dark blue. From
Giant bird statue’s tongue, a warrior’s mask
slides out into the tomb in front of it. Pick it
up.
Traversing the
graveyard
Go back to the metal
gate. Look close and place the warrior’s mask on the metal face. Pull down
the horns. Talk to Khteis. Go out and fight the awakened warrior with
sword. All the other warriors awaken and Khteis screams – crush the rose on the statue before we all die!!
Quickly traverse the graveyard towards the stone steps of Giant bird.
As-Sayf starts on lower left of screen. Click on gray areas in the sand
for the fastest way he can get to the stone steps.
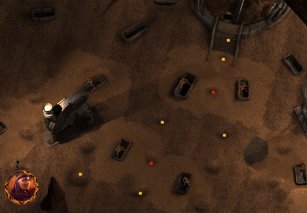
Break the salt rose
on stone ramp. Collect the broken pieces of rose to get rose leaves.
Will the real
Khteis, please stand up?
Go back to Khteis and
finds 2 of them. Ask same questions to both Khteis to determine the real
Khteis. Are you Khteis? Spectre, why are you not resting like your
sisters? Do you have any brothers or sisters?
That’s the right question!!! Use sword or dagger on the Khteis
on the right. The other sisters want you to bring her back to the salt
pit. Go to the salt pit underneath Giant bird, forward to the only
standing crystal urn and place the rose leaves in it. The false Khteis
disappears. Go back to Khteis.
As-Sayf gives the
widow the gold bar and departs.
Cd
1
Hamas
Aware now of what he
is or what he wants, As-Sayf goes to Hamas and to Caradoc.
Talk to woman about
Simon and Jebus. She joins the 3 parts of the
talisman.
She tells As-Sayf –
Leave this house and face your fears.
Go out through
curtained door. Jinni appears and fights As-Sayf.
As-Sayf has faced
his fears.
FINIS
The old man of the
mountain talks to An-Nab, the caravaneer.
So Simon is
………….
What happened to
Tancrede de Nerac or As-Sayf, as he is well known in the Arab world? Kyot
says the rumors are he died in Hamas, he got married – maybe to Hadjar or
some say that during a sandstorm, the youngest member is shown a safe path
by a strange apparition.
This
walkthrough will be updated frequently.
This document may not be
distributed without express written permission of the author and the
content may not be altered in any way.
For
Questions or Comments on this Walkthrough,
Please write to: MaGtRo
Copyright ©
10/2001 MaGtRo |