The Moment of Silence Walkthrough by MaGtRo
The Moment of Silence
by House of Tales
Walkthrough by MaGtRo
November, 2004
Gameplay:
The game comes in a DVD-Rom disk. After installing, an optional GameShadow
program, a PC patching system for automated patching of games and drivers is
seen. It is up to you, if you want it installed. The StarForce disk protection
program is also installed. For Starforce to take effect, the computer has to
reboot. Before the game can play, enter the Starforce disk registration number
that is found in the inside front cover of the manual. The DVD disk has
to be in the drive to pass through the Starforce program. You have to do this
every time you quit the game. Once the game is going, the disk need not be in
the drive. There is a
patch version 1.01 available that fixes the problem that has been
encountered with the elevators on the platform and the diary.
The title frame has
choices for start of game, type of installation, hardware settings, updates and
internet forum. The hardware settings have option changes for anti-aliasing and
speaker systems.
After the introduction,
the main menu can be accessed by using the ESC key. The main menu has new,
load, save game, settings, control and quit. The load frame has the graphic as
well as the time-date of the saved games was done. The save game page has the
blank graphic frame and the label of the saved game to be entered. Click ‘save’
to save the game in progress. There is a switch on the right to go ‘back’ to
previous page. The settings page has the music, dialogue, SFX volume controls
and the gamma correction. A red button below allows for subtitles option. The
controls page shows the default keys: ESC is menu, M is Messenger and H is
hints. The left mouse button is for interaction and the right for look. The look
feature of the right mouse button makes your character look at things. Each actable
item shows a label when pointed at by the cursor.
The inventory bar at the
bottom of the screen is accessed by moving the cursor to that black bottom part
of the screen. Clicking on an item makes the item attach to the cursor. Items
in inventory can be combined by placing an item over another. The inventory bar
can be scrolled for hidden items by placing the cursor at either end of the bar.
Dialogue options are
seen when the talk cursor is clicked on an NPC (non-player character). Dialogues
that have been used are darker colored (bold) than new dialogues. Pressing the left
mouse button skips the dialogue. Double clicking makes Peter run.
Note:
This is a dialogue based adventure game. Exhaust all dialogues or some clues and
triggers might be missed. Use the ‘can I ask you something’ dialogue repeatedly
until all the dialogues have been highlighted.
Peter Wright is a
communications designer. His wife and child have been killed in a plane crash
that caused him to lose interest in things. The introduction shows a satellite
over planet Earth and the target zooms in on a street in New York City. A police
SWAT team enters the 23rd floor of Peter’s apartment. Through the peephole,
Peter watches as the police take the man from next door. He sees the wife and
the child left behind.
September 29, 2044
Brooklyn, New York:
Hall: The inventory has a
Zippo lighter. Pick up the teddy bear dropped by the little boy.
Right click on the bell nameplate of the neighbor’s damaged door. The family’s
name is Oswald and the wife’s name is Debbie. Enter the apartment and right
click on damaged door. Click on inner door. Try several times and then go back
to your apartment.
Peter’s apartment:
Go to bedroom at lower screen. Open the side table drawer and take the
Messenger.
Messenger:
Right click the messenger in inventory. The scroll arrows access the Info
Center. Click on green phone icon to call the info center #111.
I need the
messenger number of a family named Oswald at NY, Tillary St, 352.Click the down arrow
and Mrs. Oswald’s number is highlighted. Click on green phone to call Mrs.
Oswald. Talk to her and then ask to give her the boy’s teddy bear. Click on red
phone to close the messenger.
Oswald’s apartment:
Go next door. Knock on door. Talk to Debbie. Graham is the
husband taken away and Tommy, the young boy is in shock. The police know nothing about the
incident. Peter will check with the police. Go back to your apartment.
Peter’s apartment:
Let’s check the place out. Click on left side of cupboard. Use the man
closing door icon outside the cabinet to close the door. Look at drawers at
bottom of cabinet to see toys. Go to room below the
screen.
There’s a rental shelf
beside the bed. Click on computer on the table. Click on chat message to talk
to Christine.
Click on the left 2
drawer to get your business card from the top one. Look out the window.
There’s a whiskey bottle on the table in front of the Telescreen.
Use the messenger to
call Info Center to get the NYPD number. Call the police yourself #999 using the
green phone icon. Learn that there’s no operation in Brooklyn West in the last
week what more the last few hours.
Click M on your keyboard
or take the messenger out of inventory. Call Mrs. Oswald and tell her that you will check
things tomorrow. You will talk to Bob at Kiosk.
Day ends.
September 30, 2044
Brooklyn:
Oswald’s apartment:
Go out to the hall and to the Oswald apartment. Talk to Deborah. Learn about
Graham’s work. Then talk to Tommy. Learn about Virtual Palace and the alien toy.
Tommy is interested in Mr. Nuke. Talk to Tommy again about dad’s picture. Get
Graham’s picture standing in front of a structure.
Go back to your
apartment. Open the drawer below the cupboard and take the action figure.
Go back to Oswald’s apartment and Give Tommy the action figure. Get the alien
doll. Exit the apartment.
Check the locked Floor Toilet
(WC) by elevator. Click on touch switch of elevator to go out the
building and to the street.
Bob’s Kiosk:
Go to Bob at kiosk bottom right of screen. Talk to Bob and exhaust all
dialogue. Graham Oswald yelled something before he was taken by the police.
There were 2 young guys – placing a sticker of Alien Attack Club on the telescreen. The police drove towards Downtown over the Brooklyn Bridge. Click
the alien toy on Bob and he says they look like the posters of the 2 guys.
There’s Essex St. on the posters. Click out of the scene.
Brooklyn Park:
Go up the stairs to go to Brooklyn Park. Once at the park, hear a man preaching
some alien ideas. Go to park exit at middle of park under the city highway. Talk
to the screaming guru. Look at -right click the ‘place to sleep’. Take the wire
that holds the bar under the skull (totem) in the foreground. Look at – right
click the casket by the water outlet on the left. Talk to guitar player by the
tree and exhaust all dialogue. The guitar player can’t hear the guru because he
is deaf. The guru was possibly a former physicist who won
a contest to go up to orbit. Nuclear Cafe, at lower East side is the place to
get ‘smoke’ but you need to change your outfit first. Take the park entrance
exit. Then take the Tillary St exit on the left. Talk to Bob again about the
guru.
Click on SatCar, yellow
cabs at top left of the screen. Click on
destination input at bottom of screen. Go to work at Downtown Manhattan.
Downtown Manhattan:
Great Central Plaza: Go left a bit and talk to the
man up the stairs. Enter the main entrance of the GCP building by using the
messenger on the terminal button.
Claire, the guard
robot: Click on
Claire, the robot guard with a woman’s face at the center of the floor. Exhaust
all dialogue. Wright, Peter, 73rd floor, Greenberg and Winter. Any other way to
identify myself? Chose to let Claire issue you a temporary password after an
audio-visual connection. Mr. Greenberg verifies your identity. Write down the
password given – pl56f9olp4r. Talk to Claire again and select
the correct password. Press the elevator button and it should open after Claire
verified your password. You do not need to go through this with Claire again.
Just go directly to the elevator next time.
Agency: Click on
Brenda, the receptionist. Look around the Agency. Talk to Brian in one of the
cubicles for some personal and work dialogues. Learn about the Luddites that blew out the
plane that carried Laura, Peter’s wife and son. He should have been with them.
Talk to Brian in the kitchen on personal matters. Find out that Brian was an
ex-con – ex-hacker. Talk to Bill at the upload monitor by the far wall for more
agency
bickering and work dialogues. Learn about the slogans the company puts out all the telescreens.
Go the management floor
up the stairs at the end of the room. Talk to Mr. Greenberg. Ask him about few
business related questions. Learn about the upcoming vote of a proposition and
the anxiety propaganda. Be sure to get a few more days of vacation until next
Friday.
Go down the Agency
floor, out of the Agency and out of the building. Take a SatCar to Lower East Side.
Lower East Side:
Theft:
Hear foul taunts shouted at you. Right click the Essex
street sign. Go down Essex St and click on the Obey art on the left. Look (right
click) on
the car wreck left of the poster filled shed. See 2 guys sitting on the bench. They are the ones shouting all those foul language. Talk to Juan. After
you select the angry dialogue, Juan steals your messenger. Watch Juan run to a
building at upper Essex St. He knocks on the door and comes out with a game
console.
Talk to Big Mike that is left in the ‘park’. Follow Juan and knock on the door
of a colorful building where Nuclear Cafe is situated. Nobody’s home.
Rita: Talk to the streetwalker
standing in front of the telescreen left side of the street. Learn
that the knock code for the door to be opened is 3 short and 2 long. Go back to
the door of the Nuclear Cafe and knock. The door opens after the code is
knocked.
Nuclear Cafe:
Talk to Lou, the man until you get your messenger. Take the messenger
in front of a computer on the table behind you. The table is the one at the
center of the room. Look around the place. Then talk to Lou about everything.
Learn about the cryptographic method and alien conspiracy. Luddites center was
here. The Luddites, who are against all technology escaped through underground
tunnels. Cypher, the genius master programmer is his partner.
Cypher: Show Lou the picture of
Graham Oswald. The background is a parabolic dish. Cypher finally allows you to
the backroom. Go to the right side of the cafe. Take the hall left of the stage
and forward to the backroom. The backroom is Cypher’s office. Talk to Cypher.
Learn about the commandos that took Graham. Talk to him over and over until all
the dialogues are highlighted – bold. Bill’s code is sexmachine_bill_2044. Be sure that you
talk to Cypher about analyzing Graham’s photo. Cypher’s payment is to upload a
slogan on the telescreen at Essex St for one hour showing. The AAC CD
is in inventory. Look around the office and look close at the work bench with
the solder at right top corner of the room. Go to top of screen above Cypher and
left to leave the office. Exit the building and take the SatCar back to the
Agency in Manhattan.
Downtown Manhattan:
Agency:
Go to the right side of the Agency. Talk to Bill, still standing in front of the
upload monitor at right wall. Talk to Bill again about something to eat. He
wants Litelife
microwave meal. Exit the building and take the SatCar to Brooklyn.
Bob’s Kiosk: Talk to
Bob. Buy the Litelife meal from Bob. Go back to the Agency.
Agency:
Go to the kitchen which is the first door on the left side of the Agency.
Microwave – Try
placing the meal in the microwave and find out that there’s no power.Go to the
right side of the reception desk and open the fuse box above the magazine rack.
Flip the ‘off’ switch to ‘on’.Go back to the kitchen. Place the plug right of
door into the socket and place the meal in the microwave.Click the arrows to
show 2 minutes and then press start.Look around the Agency while waiting for
the meal to get warmed up. Tell Bill his food is ready.
Now that Bill is gone,
look close at the Upload Terminal. Insert the AAC CD on disk slot at bottom left
of the terminal. A4325. Exit the building and go to Lower East Side.
Following Graham’s tracks to SETI:
Nuclear Cafe:
Check the telescreen for the uploaded slogan of Alien Attack. Knock on the door
of Nuclear Cafe. Go to the backroom and talk to Cypher about ‘I did it’. Talk to
him again about the picture. The parabolic dish is in SETI in Aracebo in Puerto
Rico.
Call Deborah Oswald using the messenger. Talk to her completely about
‘your husband’. She will also mention Terminal B at JFK as the flights departure
place for Puerto
Rico.
Agency:
Talk to Brian and find out Mr. Greenberg is in Beijing. Go upstairs to the
management floor. Look close at Mr. Greenberg’s desk. Click on the ‘piece of
rubber pad sticking out at right of the desk. Take the key and use it on
the keyhole of the drawer. Take the flight check-book. Leave the building
and take the SatCar to JFK Airport.
JFK Airport:
Enter through the departure door. Click to look close at the clock and see the
present (your computer’s) time and the game’s date. Go up the stairs and look around.
From the left side going right: the Information Center, terminal A for Space Elevator as shown by
picture on sign, Air Lounge, terminal B for planes, Locker and terminal C for
Zeppelins. Go forward to terminal B. Click the flight check-book on check-in of
terminal B.
October 1, 2044
SETI:
Research Center and Dr. Price – Enter the Research
Center. Talk to Dr. Price, the man standing by the stairs. Learn about SETI
operation and how the scientist does not know what the weekly checks done by the
technicians of the Communication Services do to their system. They are up on the
second floor now doing their hardware checks. Talk to Dr. Price again about
visitor here. Learn about ‘Drake’ forgetting his bag and it is with Paul at the
Gift Shop.
Radio telescope – Go around the raised
walkway above the showcases. Then click at bottom right below the man looking
out the window. Exit the building through the open door. Look at the parabolic
dish, hanging radio telescope and the mysterious steel door.
Children’s Observatory – Go to and look around
the observatory left of the research building. Look around and look close at one
of the virtual telescope. You can enter a galaxy number and have your
picture taken. Let’s see, click to get 3342.4768, press enter, look
through the ocular and see the galaxy just entered. If you want a picture of the
galaxy, press ‘print’.
Bag at Gift Shop – Exit the building and go to the gift shop. Click on
shop door and the bag is thrown out. Right click the bag
in inventory and the contents are taken out – knife, old videocam and a
thread.
Right click the thread and ‘Where did I see this thread before?’ is said. Click right of
gift shop (pass the clothes rack) and forward to get to the front of the
research building. Take the SatCar and arrive at JFK.
Brooklyn:
Talk to Bob at the kiosk.
Oswald Apartment: Talk
to Deborah completely. Learn about Graham’s box at the airport. Show the thread
to Deborah. Talk to Tommy about his Teddy. Use the knife on the teddy in
inventory. A videotape is taken. Talk to Deborah about the tape. Take the
SatCar to the Agency.
How to play the
videotape:
Agency:
Go to the empty cubicle at the set closest to the stairs. Take
the magnet holding the XperiMental paper. Talk to Bill still standing at
the upload screen about the magnetic tape. Bill mentions about Huntington at
Greenwich Village.
Greenwich Village:
Check the building just across from you at right side of MacDougal Road.
Antique shop door
– Click on door of the Antique
Shop. It is locked. Look close on door window and see that a metal sign fell
off. In inventory, click the thread with the wire and then click the ‘fishing
rod’ with the magnet taken from your desk. Use the ‘fishing rod’ with
magnet on the mail box on the door.Right click the caught sign in
inventory – this places the number of the Antique Store in your messenger. Call
the Antique shop using your messenger (right click) and talk to Mr. Huntington.
Inside the shop, look around. Climb the ladder to take a close look at the pigeons. Look close at
the books in the corner shelves by Mr. Huntington. Take the radio play – The War of the World tape
from the book shelves.
Go to the cash register and talk to Mr. Huntington. Learn
about the pigeon and the Unions. His wife disappeared during the Luddites riots.
The NYPD was looking for Geoffrey Stein, the computer programmer. A man named
Emerson has supposedly taken his role. Keep on talking to him until you get
‘looking for certain device’ dialogue.
Go to the right side of
the shop while you are facing Mr. Huntington in a far view screen. There is a
table by the wall that has an electronic device. Click on the VCR –
electronic device and you take it on a promise to pay cash later.
How to complete the
setup of the VCR:
Nuclear Cafe at Lower
Eastside: Talk to Lou about Rita. Talk to Cypher in the backroom. Ask about the
cable on the work bench. Give Cypher the radio play Orson Wells tape. Pick up
the cable at workbench with solder at top right of room. Go back to Brooklyn.
Now how do we use the
VCR?
Peter’s Apartment:
Place the VCR on
living room table. Connect cable to VCR on telescreen. Place VCR tape on the VCR.
Watch the telescreen. See the airport clock at 1:46, a dirigible-blimp-zeppelin
and coordinates like the ones at the Children’s Observatory – 8227.9347 and
2234.6621. To watch the tape again, click on the VCR.
Use the computer and see
a chat message. Talk to Christine.
Oswald’s Apartment:
Talk to Deborah and look for the safe deposit key. Take the key on the
table on your left.
Coordinates in the videotape:
JFK airport: Go to terminal B and
click the flight check on the check-in terminal B.
Observatory at SETI:
Take the path right of the research center (left of the tower) to the children’s
observatory.
Use a virtual telescope.
Press 8227.9347, click ‘enter’. Look through the ocular and see a satellite.
Print and take this picture.Press 2234.6621 and
click ‘enter’. Look through the ocular and see another satellite. Print and take
this picture.If you make a mistake in
the numbers – you see stars in the ocular and the picture is not placed in
inventory.
JFK airport: Turn
right before terminal B and click on lockers. At the close up view, click on
‘view’ right of the lockers to see the zeppelins. Right click the locker key in inventory. Which locker?
Get the locker number
and code:
Go to the left side of
the terminal, pass the Air Lounge. Left of terminal A is the Information Center.Enter the Info Center
and talk to Ms. Evans at the desk. Learn about the Space elevator and lottery
winners.Go to the glass entrance
doors but do not exit. Click on window right of exit door. Make a comment about
homeless people. Mrs. Evans leaves the desk.Go behind the desk and
look close at the surveillance system. See at bottom right monitor – Cam 6 watch
on 9-20-2044 at 2:23:00, Graham Oswald walked to the lockers. The locker code
seen is 2543.
Diary: Go to Lockers and insert
silver key on 2367 keyhole. Press 2543. Take the diary. Right click on
diary in inventory. Read the diary. Delbridge in Greenwich Village is the
Luddite contact. Learn about Mary, Graham’s chat friend; the plane crash of
Emerson and the missing Delbridge. Emerson’s plane crash is the same incident as
that of Peter’s family. Reread the diary for clues for upcoming puzzles.
Who can explain the
satellite pictures? Cypher at Lower
Eastside: Show Cypher a satellite photo. They are communication
satellites. All the data are filtered through these satellites.
Who can tell us about
the eavesdropping possibilities? Mr. Huntington at
Greenwich Village: Notice the baldheaded man in black
trench coat that stopped right by you, it’s the same man that appeared when you
first visited here. Use the messenger to get Mr. Huntington to open the door of
his Antique shop. Talk to Mr. Huntington about all your discoveries and he will
open the backroom. Follow him to the backroom. Talk to him completely.
Learn about Echelon II and the Luddites.
Look around the room.
Enter the aisle behind the magazine pile by the door. Turn on the light switch.
Read (right click) about all the magazine articles – news tacked on the wall.
Note the ‘interesting’ photo at the bottom of the wall that shows a zeppelin on
an offshore platform. Talk to Mr. Huntington again and learn about the
platform – Bermuda Research Station. He wants you take carrier pigeon. Read the
magazine cutting on the wall beside you.
Go to the shop and take
a carrier pigeon from the cage. Climb the ladder and click on a pigeon. The rod
will pull out and a pigeon is taken.
Brooklyn:
Go to Peter’s apartment and go to bed. See a cutscene of a machine scanning
Peter. Just like Graham’s experience in the diary.
October 2,
2044
Look out the window. Use
the computer and see another chat message from Christine. Hmmm… Remember Mary
of Graham’s diary.
Oswald’s Apartment:
Talk to Debbie about the diary. Actually, I think I do. Debbie promises to be
quiet about the findings.
Peter’s Apartment:
Talk to Christine again. Temper was lost! Click on computer again. Apologize.
Doorbell rings. Listen to a black suited man say that you won the Lunar 5
lottery for a luxury week in orbit. Talk to
Christine via computer about the lunar lottery. Christine bought the ticket for you.
Talk to Bob at the
kiosk.
JFK Airport:
Go to terminal A and click the Lunar 5 ticket on check-in for terminal A.
<Wonder
how the pigeon will take the ride gravity wise.>
October 3, 2004
Learn
about brainwashing at Lunar 5:
Lunar 5 Entrance: Talk
to Hostess Linda. Your habits are known. You are given a cocktail.
Room 28:
Look around and press switches 1, 2 and 3 from the Lunar 5 entertainment wall.
Check the window to see earth.
Exit room 28 and go down
(way down of screen) the long corridor. Go left and then right to the entrance
area. Right click on the engine door at right side of the pool door. It is
locked.
Linda: Go left, down across the
pool and back to entrance area. Talk to Hostess Linda again by the elevator.
Learn about the experiment at Sector B, CubiChem and the cocktails. Dr. Jenkins
is the person to talk to in order to adjust the er… dosage of the cocktail.
Learn about Linda and how she got here. Also learn about Guru and the ventilator
unit in your cabin.
Recreational Area: Go to the recreational
area at top of screen passing the spacesuit.
Talk to Mrs.
Winter, the elderly lady holding a dog on the left side of the pool. That cocktail is
something. She is your boss’ wife.
Ask Hostess Linda about
the woman with the dog. Lollites?
Go back to the pool and
talk to Dr. Jenkins by the pool completely. The cocktail is meds for
schizophrenia. Whew! Sir!
Go down to the
foreground pass Mrs. Winter and further down the pool to the other end.
Talk to Mr. Stiller
standing by the window beside the bar at the end of this area. He is a
telecommunications engineer. He is brainwashed. He got a gift from a friend too.
Go to the left end of
the bar and take a cocktail. Right click the cocktail in inventory and see that
there’s something at the bottom of the cocktail. Walk down the bar and see Dr.
Jenkins’s favorite place at the bar.
Talk to Hostess Linda
again and ask about the guy in the jogging suit.
Go to
Sector B:
Room 28:
Go back to your cabin pass the other pool, up the hallway and then up again to
room 28. Click on the hand scanner. Take the toothbrush glass and the towel from the sink
area. Look
close at table. Place the glass on the table. Place the towel over the glass.
Pour the cocktail over the towel. Take the capsules. You have
someone in mind.
Place the towel on the
air shaft above the door. That took care of the aerosol drugs. Press button
3 and learn that the normal setting is 21% Oxygen, 1% Carbon dioxide and 78% Nitrogen.
Recreational Area: Go back to the bar at
other end of pool area. If you see Dr. Jenkins on his favorite place at the
other end of the bar, go back to the space suit or elevator area and then come
back until you see him standing on guard at the other end of the pool. If Dr.
Jenkins is now standing guard, go to his empty favorite place at the bar at the
other end of the pool.
Look close at his plate
and cup. In inventory, use the knife on the capsules. Place the opened
capsules in the cup. Go back to the spacesuit or elevator area and then go back
to see if Dr. Jenkins is having his coffee break. Watch. See him feel not good
and leave. Look close on his favorite spot and take the radio transmitter.
Go to the locked door
right of the pool door close to the cabin area. Use the radio transmitter on the
cover right of the locked door. Press the red button-touch switch that appears
when the cover slides out.
Pressure chamber:
See a locked door at one end. It’s dark in there. See a switch panel turned off
on the left of the bulkhead door. At the other end is the locked door to Sector
B where those ‘experiments’ are carried out.
Open the Sector B
door – Look close at the blue display panel. Enter the normal setting as
stated in your room: Bottom left – 21 for oxygen, top left – 78 for Nitrogen and
top right – 1 for CO2. Press the now green square central button. There you go –
that’s the elevator.
117 Sector B: What is
this a plant? Machines make machines. Go down the plant and see a discarded
object at the top of the assembly line on the right. Take the tool and
energy stick at the center of the discarded object. Right click to learn
about this flying objects with red lights (Omni-maneuverables).
Sabotage a spybot: Go to the
bottom left assembly line and see the objects launched in different pads. Stand by Launch
A22 and take the energy stick from the discarded object in inventory and click
it on object ready to take off. A new energy stick will be in inventory.
Exit to the elevator at
other end and then out through the red door to reception area. A hostess meets
you and says there has been an incident; the station must be evacuated
immediately.
October 4, 2044
Back at
airport, talk to Lou standing at corner before the left stairs. A UFO crashed in
Nevada. Guess which UFO crashed and who caused it – your sabotaged ‘object’.
Get to Bermuda
Station:
Air Lounge:
Enter the Air Lounge and talk to Gerald, Cargo tech. Listen to Gerald’s story.
His ID card was stolen due to knockout drugs at Lower Eastside. ‘Interesting’.
Aha – Zeppelins! Today must be Tuesday and as noted in Gerald’s diary, the day
the government Zeppelins leave from JFK.
Agency: Talk to Brian.
He’s mad. In the kitchen, he let’s you have it. He got in trouble because of the
upload you did. He’s really mad. Try to talk to him again.
Lower Eastside:
Talk to Rita in front of the Nuclear Cafe until you get her business card
and learn about Gerald. Talk about and get the Cargo security ID.
JFK Airport:
Go to terminal C at right side of the waiting area. Use the security ID on
check-in terminal C. But you mention leaving your stuff in a safe place. Go to
the open locker and automatically leave some inventory items in the locker.
You
are left with Gerald’s security ID, Oswald’s diary, the locker
key and the pigeon. Combine the locker key with the pigeon and go
outside by the SatCar. Automatically, let the pigeon fly away.
Go back and use the
security ID on check-in terminal C. Watch the zeppelin fly to the offshore
platform.
October 5, 2044
Bermuda platform:
Follow the walkway and see 2 elevators and chains. Go further to the right and
see more chains, fuel tank and generator.
Yellow elevator: Go back to the elevators
and take the open yellow elevator.
Elevator Codes – Read the September 12,
2044 entry in Gerald’s diary. At
the bottom it says the code is TR, M, BR, B – BL, B, BR.TR, M, BR, B = Top right, center,
bottom right, bottom. BL, B, BR = Bottom left, bottom, bottom right.Look close at the
control unit: Press the touch switch.Left panel:
Click the top arrow on the left 5xs to make TR, M, BR, B = Top right, center,
bottom right, bottom.Right panel:
Click the bottom arrow of the right panel 10xs to make BL, B, BR = Bottom left,
bottom, bottom right.
Press the yellow switch.
Enter the yellow elevator and press the inside yellow touch switch.Rise up and see a door
with a similar control unit. The known code doesn’t work here. There’s a panel
left of the door that is high voltage. The locked door uses electricity. Go back down.
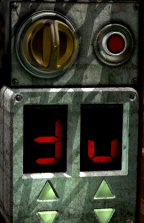
Corner elevator: Go to the corner
enclosed elevator. Do the same coding: Look close at control unit. Press the red
touch switch. Press the left panel’s top arrow 5xs and the right
panel’s bottom arrow 10xs. Press the yellow switch.
Enter the elevator and
press the inside yellow touch switch. You go down the elevator.
Exit the elevator, go
down the stairs on the left and see a rubber boat.
Diving gear: Climb back up and look
close at the control unit of the elevator. Enter the same coding: Press the
touch switch Press the left panel’s top arrow 5xs and the right
panel’s bottom arrow 10xs. Press the yellow switch.Press the outside yellow
switch that is right of the elevator. The elevator goes up empty and a door
opens behind where the elevator was.Look at the opening on
the left – depot for equipment. Take the diving gear.Dive under the
platform: Go back down the stairs
to the rubber boat. Enter the rubber boat. Click the diving gear on Peter.Click on top right
pillar. Look close at the sign – high voltage – main power supply.Move cursor to top left
of the rubber boat to get diving arrow to dive down. Dive to the switch box.
Click on flap. Lower the handle. Pull back and swim to the surface.Click on top left
pillar. Take the floating mine. Automatically, be on the platform and lay the
mine down.
Verify that this is a
Relay transmitter: Go back to the yellow
open elevator. Again, look close at control unit. Press the green touch switch.
Press the left panel: top arrow on the left 5xs and the right panel: bottom
arrow 10xs. Press the yellow switch. Enter the elevator and
press the inside yellow touch switch. You go up the elevator.
Now that the power
is off, the door can be opened. Enter the computer room. Look close at the
signal display of the left panel to learn that this station is a powerful
transmitter. The next panel shows that it is focused on North America. The
middle panel shows coordinates display: N minus 50023 degrees. SEL 2, M 1
3. Right click on the cable drum at the foreground. Hmmm… The place was built
during the 20th century. With the view looking at the exit door or the left panel,
take the rope below the fire extinguisher left of door.
Destroy the North
America transmitter: Exit the computer room
and go down the elevator. Time to leave. Attach the rope to the mine and then
the rope to the cable of the Zeppelin.
Inside the Zeppelin, go
down the back end of the blimp. Look up, click on the
flap and climb up.
October 6, 2044
Watch the arrival of the
Zeppelin in NY, the search for Peter, the run at the airport and the telescreen broadcast.
Brooklyn is swarming with SWAT team also. Now, you are at Greenwich Village. Go
to the shop. Watch the men take Mr. Huntington. He shouts… The light, the
light… Peter is also caught. Watch the arrival at Governor’s Island.
Governor’s Island:
Cell: Watch the arrival and
Admission part 1. Peter, prisoner 1478 undergoes a dental process – Z-12. There
are 2 guards, one is the nervous sort. Exit the cell during your allotted time
outside.
Go to the right side and
talk to the other prisoner Brett.
Go to the left. Talk to
Officer Smith, the nervous, soft spoken guard completely. Officer Burton is the
strict one. Officer Smith was in Lunar 5.
Exercise yard: Go back to the right
side and out to the exercise yard. See a magpie by the door. Note
the tree in one area. Right click the watch tower beside it and Peter will note
that it is run by bots. They must detect you with the dental treatment. Go
back to the cell wing and into your cell.
Escape
out of Alcatraz:
Cell: Take the
bread on the
table. Note: If you seat on the plank bed, it will be the next time to
have the cell door open.
Sit and wait for the
cell check by Officer Smith. Exit and go to Brett’s cell. Look close at table
and take the ketchup.
Thread – Go back to your cell and
seat on the plank bed.Wait for Officer Smith’s check of the cell. While he is
checking under the bed, place ketchup on his hat.When he leaves and the door
slams, he touches his forehead thinking it is blood, Officer Smith faints.Click
to get a key. Use the key on the trellised gate on the left end of the
corridor.Enter and take Mr. Longneck
hanging above the monitors.Exit, close the
trellised door and click the key back on Officer Smith.Mr. Longneck and
thread is now in inventory.Tooth – Enter Peter’s cell and sit on the plank bed
again.As soon as able to move cursor, click the thread on the middle door bar
of the cell door.Watch at a novel way of pulling tooth. The tooth with
string is now in inventory.Bird – Exit to the exercise
yard.Go back to your cell. Do not sit down.
The doors are opened again.
Go back
out to the exercise yard and it should be nighttime.Entice the magpie
with the bread and click the tooth on magpie.Click the magpie with tooth at the
night sky.Run to the tree at the
corner of the exercise yard and ‘it’s now or never’ time. Click on the tree.Watch. Oh!
October 8, 2044
Brooklyn:
Talk to Bob at the kiosk. Get a MagTrain ticket. Click the MagTrain
ticket on the MagTrain station above the SatCam cars.
Greenwich Village:
Enter the antique shop. Remember Mr. Huntington said lights, so click on the crystal
chandelier to get the locker key. Exit the shop and automatically be at the
airport.
JFK Airport:
Enter and use the key on the locker. Take all you inventory back. Automatically
see that there’s a voicemail from Mr. Huntington but no sound.
Brooklyn Park: Use the
SatCar to go to Brooklyn. Then walk to the park where the guitar player is. Show
the messenger to
the guitar player. Watch!
Sewer, part 1: Go up to
the passage, go across the bridge, left at the corner and then forward to the
very end, passing 2
side aisles. Go down 2 flights of stairs and exit through
the metal door to Fulton St.
Fulton St: Flip the switch right of the Emergency door you
came out of. You can see your way now. Go forward until a broken showcase. Take
the subway map from the broken showcase.
Sewer, part 2: Go back through the emergency
door and return to the bridge at the start of this sewer jaunt. Climb the steps,
left to the passage and down to the very end. Cross the bridge and go left to
the new passage.
Enter the passage through the opening and see a shoe on the floor. Take shoe.
Go down the screen, down the steps to the very end and exit through the door.
Lafayette station is the familiar. There are people here.
Lafayette St.:
Go forward to the people heard. Charlie is not in the mood for a chat. Enter the coach
and talk with the Professor completely. Find out about Graham, the Professor and
Emerson. Go to ‘passage in coach’ and talk to Graham. He wants to see Debbie and
Tommy. Talk about the center of the system and that one of the coordinates is in the computer.
Doublethink is the password. There is a private plane at the airport.
Watch a cutscene of
Debbie being told that they are in house confinement.
Back at the coach, talk
to the Professor about the connecting tunnels in the subway. Talk to Charlie
outside the coach. Talk to the professor again. Then talk to Charlie again. It
turns out that Rodriguez, the guitar player was a friend of Charlie. Talk to
Charlie again about Rodriguez. Go back to the Professor and ask about Juri now.
Learn about the lost shoe. Go to the far end of the tunnel and talk to Juri. In
inventory, combine the thread with the shoe. Give the repaired shoe to Juri.
Since you have the subway map, Juri will automatically take you to your
apartment ventilation duct.
Ventilation ducts: Peter gets to the
basement of his apartment. Take the plank leaning on the wall. Peter
automatically places it across the bars. Climb up and enter the ventilation duct
on the ceiling. Peter climbs up to the 23rd floor WC. Click on the door and
watch Peter give instructions to Tommy. Watch Tommy and Debbie.
Debbie: As Debbie, click on the
computer and automatically get the map with the coordinates. Go to the Children’s room. Take the
Jungle Bears pack from the box under the window. See that some are
expanded in water. Exit the room and go to bathroom. Place the Jungle Bears in
the toilet. Wait a bit. Flush the toilet when the gums are swollen enough.
Talk to Number 1
completely until he gives permission to take Tommy to the communal bathroom.
Click on door. Watch the escape and the meeting with Graham. Watch Peter get to
the airport and then Alaska.
October 10, 2044
Alaska:
Look at the ice hole. Follow the string of the fishing pole to the snow path at the
foreground. Look at the window on the side of the house and see the fishing pole
ends here. Enter the Polar Station – Ice Lake Inn. Talk to the Eskimo
behind the counter. Learn about the white man’s temple up north – Domain of
Darkness. There’s a bell that tells when a fish is attracted to the bait. The
Eskimo made a comment about the lumber tangling the fishing lines. Walk
around the shop. See the string from the window is attached to a golden bell.
Get the Eskimo out of
the Inn to get the jet ski keys – Go outside and see the jet sleigh left of
the stairs.Go behind the inn. Go
forward to the plank pile behind the inn and second pine tree.Click on plank pile and
see you throw one to the water. The plank tangles the fishing line and alerts
the Eskimo. The Man untangles his fishing line.Go back inside the inn.
Click on the metal cabinet- keybox on the shelf on the wall behind the counter.Take a key from
the keybox.Exit the inn. Click key
on jet sleigh. Peter drives to the Domain of Darkness.
Pentanet Building:
Enter the building: Look close at the snowmobile. Flip the latch of the cover and take gas
canister and rag. Go left around the Pentanet building to Entrance A.
Place the canister on the snow in front of the entrance. Use rug on gas
canister. Use lighter on rug-gas canister. Go to entrance and look close at the
camera. The door opens.
Go forward to the
bulkhead. See the dead body of Johnson at the side of the corridor. Take the
disk from his hands. Right click his name tag and take the note from
his pocket. The note seems to be blank.
Bulkhead: Go forward to the
bulkhead. It is the main monitor room. Go down to the central area. Click on the computer monitor.
Meet the cause of all your and the world’s woes. Talk to the Computer – AI about
trial. Learn all about the how, the why and the when of all these events. Listen
to hear the events seen from 2 different point of views.
Click on left bottom to
get out of the close view with the AI. Look close at the control panel
right of the stairs. The lower right shows no signal input because of the
destroyed Bermuda Triangle relay station.
Exit the bulkhead.
If I want
to shut it
down, I need SILENCE.
Go back to the dead
Johnson. See that he is lying under the Evacuation Area door.
Parabolic dishes: Go to the door across
the hall
and see a world map. Take the blank note taken from Johnson’s pocket. In
inventory, use the lighter on the note. The top part of the note has the
letters: NA EU AF AU SA. They are
abbreviations of continents. Press the continents in sequence: North America,
Europe-Asia, Africa, Australia and South America.
Enter and see a
parabolic dish. This is one of the 5 shown on the drawing at last page of
Graham’s diary.
To silence the
transmission, the receivers-dishes should not get any signal input.
Based on Graham’s diary,
only 3 stations are needed to be turn off to sabotage the whole system. Based on the Bermuda
Relay Station, #2 is the one that is receiving signal input from North America.
Since you have destroyed that relay station, also verified by the ‘no signal
input’ on the stand by the stairs in the bulkhead – no adjustment is needed.
The other 4 parabolic
dishes will not receive any transmission if they are all adjusted to receive
input from North America via the destroyed Bermuda Triangle relay station.
So, the object of the
puzzle is to adjust all the dishes to point at North America.
1. To know which dish
receives transmission from which continent: Familiarize
yourself by going down the stairs and make a whole rotation back to Dish 1. Note
that each dish room has a stand that is used to rotate the dish. In between, the
stairs is a map that shows the continent that a dish is receiving data from.
Since we know that #2 dish is for North America, then we know which map shows
where that dish is pointing to.
To verify that #2 dish
is for NA, take note of the setting – 108 on the #2 stand. Move the dish using
the arrows to either right or left extreme. Go to the North America map and see
that the highlighted area has moved. Go back to the stand and enter 108 again on
the stand. Now, we know #2 is for reception of North America transmissions.
Based on the layout, a
dish points to a continent shown by the map across it.
Parabolic dish |
Points to: |
|
1 |
South America |
|
3 |
Africa |
|
5 |
Australia |
|
2 |
North America |
|
4 |
Europe-Asia |

2. Turn the dishes to
point to North America: Go to the stand on each dish
room and click on the arrows to turn the dish. Turn the dish to extreme right or
left – ‘as far as it goes’. Look at the map that shows its target and see
if it points to North America or to a continent that is adjusted to point to N.
America in its relay. 3 dishes are needed to be silenced.
| Dish |
Setting change (as far as it goes) |
Target Continent | |
| 1 | extreme left | 006 |
North America & South America |
| 3 | extreme right | 210 |
North America & Africa |
| 5 | extreme left | 294 |
Australia & South America |
| 2 | no adjustment | 108 | North America |
| 4 | extreme left | 282 | Europe & Africa |
| 1 | extreme left | 000 | North America |
| 3 | extreme right | 216 | North America |
Dish 1, 2 and 3 are
now pointed at North America.
Bulkhead:
Watch the monitors in the bulkhead go down
and then silence. The stand shows the adjustments for dish 1 and 2 as no signal
input. A fly did a world shattering act – it landed on the #3 pad of the control stand thereby
checked the system. The system crash alert blared. Evacuation is a necessity.
Evacuation area:
Go out to the corridor, run to the evacuation door by Johnson and run down the
steps. Go over the bridge to the left and down the long bridge to the evacuation
pods.
Only one evacuation pod
is live – #3. Click on #3 stand. See missiles are released.
To change the target
of the missiles: Inside the evacuation pod, look close at
Rocket Control panel on the right. Insert the CD taken from Johnson’s hand on
the slot.
To get the evacuation
pod out of here: Pull out of close up view, pull the red
lever and press the red button.
If you are late in
reprogramming the target of the missiles – watch the destruction of New York.
You are given another chance.
If you are in time to
reprogram the missiles – watch the missiles change direction and back to Alaska,
to the main transmission center – Domain of Darkness. The Pentanet Building,
thus the AI is destroyed.
Debbie and Peter depart
to go to the funeral.
Hi, my name is Susan.
I’d like to get to know you.
This document may not
be distributed without express written permission of the author and the
content may not be altered in any way.For Questions or
Comments on this Walkthrough,
Please write to:
MaGtRoCopyright © 11/2004
MaGtRo
View this guide raw, exactly as the archive holds it