Just Adventure original
The Day the World Broke Walkthrough
The unaltered guide: no contents list, no checkboxes, no page breaks. This is what the archive holds. Back to the reading view
This is a delightful
children’s game that easily appeals to adults with its conversation-based interaction
and logical inventory-based puzzles. This walkthrough explains the essential tasks
that must be completed to successfully complete the game. There are other amusing
conversations to have, documents to read, and items to click on that will further
your enjoyment. By no means is this the only order to complete this adventure.
Unfortunately, due to random freezes and crashes, there were some points where
I had to do something rather than what I wanted to do. If you find you are having
problems running the game, ignore what you are trying to do until a later time.
Overall
Tip
Read everything you can!
Overall Warning
There
are several potential crash points in this game, and it also has the unfortunate
tendency of locking up at other points. Save often!
Introduction
Watch
the news video to learn there are unusual events occurring on Earth but localized
to Old Country Lane.
Old Country Lane
You start on the lane.
Turn around to face a gate leading to a property. Proceed straight until you enter
an elevator in a tree(!). Click down once to go to the World Works level. (The
border level is below this but is not involved in play at this time.) Click the
elevator door to exit. Go straight ahead to enter World Works.
World
Works Foyer
Turn left after entering World Works. Proceed up the stairs
to the Control Room.
Control Room
Click on Bud and Julius,
the engineers of World Works. They tell you they are currently conducting the
great “Tune Up,” hence explaining the unusual events on the surface.
Click on them until they tell you to go downstairs and learn about what they do.
Go back downstairs to the foyer.
World Works Foyer II
Click
on the four panels around the archway. Then proceed to Bud and Julius’s living
areas.
Bud and Julius’s Living Areas
Go straight to the blackboard.
Click both buttons at the blackboard to read about the Anti-Magnetic Medallion
and learn more history. Turn left to Julius’s area. Go to his computer. Look at
all the pictures and documents and watch the video. Turn around and examine the
items in Bud’s area. When you have looked at everything, go back upstairs to the
Control Room.
Control Room II
When you return, they will begin
the “power down” and reboot the computer. The world ends up worse
than before! Natural disasters show up on every screen. They choose you to
help rectify the situation and tell you to go to the Border Room, go down the
Pole to the Four Elements Room. They give you an Emergency Kit containing the
Anti-Magnetic Medallion and the code to use on the videophone in the Four Elements
Room. Return to the elevator. This time, go down to the Border Room.
Border
Room
Go straight ahead until you reach a large magnetic door. Click
on it to receive an out of order message. Turn around, return to the elevator.
Click on the panel at the right of the elevator to open it. Go straight ahead
until you reach another panel (marked “236”). Click on the button to
open it to reveal the Pole. Click on the Pole when the hand cursor is pointing
down. Travel down the Pole until you hear a buzzer. Click on the panel to exit
into the Four Elements Room.
Four Elements Room
There are four
energy valves in this room. Each one has a Mechanimal sitting on it. The source
of the destruction on the surface.
The four characters refer to this room
as the Oracle, which has some religious significance for them. They believe you
are the “Grand Mechanic” come to grant them their wishes. Each of the
four needs something–hence quests for you. The four are:
- Carbine–a
journalist for the New Torque Times with a cracked photo lens. He needs a new
one to work again. This is only available from the Glass Works. - Phlange–a
musical performer and curator of the Mechanimal Historical Society. She has lost
her inspiration and wants to know about the surface. (Note: Complete talking to
Phlange before using the videophone. The game crashes consistently otherwise.) - Diode–a
mad scientist desperate to see the legendary surface for himself. He wants an
Anti-Magnetic Medallion. If you give him yours, he (and Julius and Bud by videophone)
realize that because he is part metal, the glass parts and the metal parts must
be transposed. - A spaced-out derelict that cannot tell you who he is. He
mentions a “glowing orb” and says “tell Sprocket.”
Use
the videophone. Press “1” (written on the paper in the emergency kit)
to speak with Julius and Bud. Your goal is to get each of the four off the energy
valves to restore the Earth above. When conversations are complete, head up the
stairs to New Torque. Go to the Glass Factory.
Glass Factory
After
entering the Glass Factory, turn left and head up the stairs. Immediately turn
left to talk to Prism, a glass worker. He tells you most of his work is for Lugnut.
Turn right. From the pile of uncut glass, pick up a piece of glass. Continue up
the stairs. Meet Sprocket, a Master Glass Worker. She (?) mentions a prodigy she
once had called Ohm, who disappeared after tragic events involving mind copying
and living glass. Exit and go to Lugnut’s.
Lugnut’s
Lugnut
is the resident entrepreneur and runs a bar serving crude oil. In conversation
with him, he mentions Diode has been mysteriously rusty and required many replacement
parts from Manny, at the Spare Parts Store. He knows the derelict and notes he
was fascinated by glass sculptures. In an overheard conversation, you may hear
that Lugnut is out of glasses. Note Ratchet on the left as you exit Lugnut’s.
She is a musical performer. When complete, go to the Hall of Records foyer.
Hall
of Records Foyer
At left is the New Torque Times offices (inaccessible).
At right is Manifold’s Spare Parts Store. Straight ahead leads to the Hall of
Records proper. Head right to Manny’s.
Spare Parts Store
Talk
to Manifold behind the counter. He tells you some tidbits of information. Some
years ago, he made an archeological find in the Iron Factory, which is now kept
at the Mechanimal Historical Society. He remembers that Diode was different years
ago and thinks his mind is affected by magnetism. Approach the “head machine.”
Choose a new head. Manny will secure it and suggest you take it for a test drive.
Go to the Hall of Records.
Hall of Records
When the attendant
sees you “are” a Mechanimal, he lets you into the records. There are
three important records that mention the following.
- Carbine: his
lens is a special one made only in the Glass Factory. - Ratchet: she is
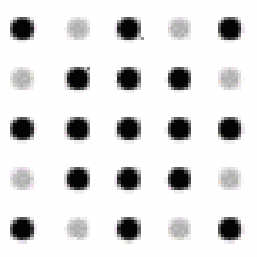
always asking Manny for new musical instrument designs. - Ohm: his brain
pattern is shown:
Exit
to the Mechanimal Historical Society.
Mechanimal Historical Society
Take
some time to examine all the information in the MHS. One item has been stolen–a
hot plate that is suspiciously the same shape as a design on Diode’s torso …
Before leaving, ensure you pick up the postcard of the Master Glass Worker apprentices.
Further on in the MHS is the Glasshouse and an Elevator. Proceed further into
the Glasshouse. With a warning, walk beyond the Glasshouse to a flooded cavern
into an area with a waterfall. Note a rock at left with an imprint of a hot plate.
Back in the MHS, take the elevator upstairs hot the chamber on the other side
of the door seen in the border room. It requires a code word. To the right of
the door, you find Diode’s secret area. In addition to some photos and articles,
listen to the tape-recorded journal: Diode broke Carbine’s lens! Go to the Iron
Works.
Iron Works
After entering the Iron Works, turn right
at the end of the entrance hallway. Take the stovetop cover from the display.
Go in to the foundry area. At the intersection, turn left and enter a room to
talk to Cathode. He tells you he stamps ingots into shapes. He mentions Carborium
X, a metal he discovered with properties of crystallization with extreme cold.
Turn around and head back to the intersection. This time go right. Go into the
ingot making room. There are five Mechanimals working here:
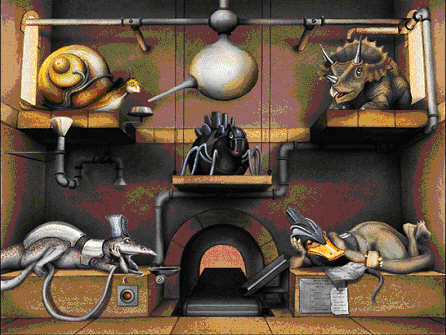
The
top left Mechanimal is the mixer. The bottom left adds the oil. The middle is
the heat source. The top right handles the voltage. The bottom right produces
the ingot. By talking to the first four, you can alter their behavior (binary
choice) to make Carborium X. Note the recipe at bottom right:
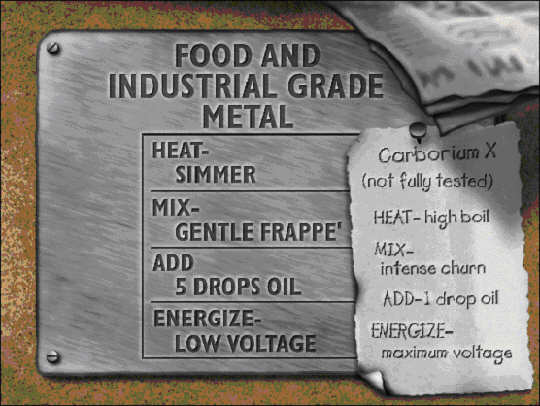
When
the Mechanimals are correct, push the button to start the process. The ingot will
end up with Cathode. When you approach Cathode, make sure you give him the stovetop
cover. He will talk about Diode’s deceptive ways and then give you the reversed
Anti-Magnetic Medallion. Return to the Four Elements Room.
Four Elements
Room II
Give Diode the reversed Anti-Magnetic Medallion. He flees up
the Pole, leaving much of his mechanical covering, including the hot plate. Take
the hot plate. Return to the chamber beyond the Glasshouse in the Mechanimal Historical
Society.
Mechanimal Historical Society II
Go back to the chamber
and place the hot plate in the rock with the imprint. The waterfall stops, and
a chamber is revealed. This is Ozzie’s chamber.
Ozzie’s Chamber
In
this chamber is the legacy of Ozzie. There are a number of newspaper articles
and a video that tells the story. In addition, there is a note that reads “I
M SAR EE”. This is the code to the magnetic door at the border. As you leave
the chamber, note the discarded and rusted limbs at left. Diode was here! Return
to Sprocket.
Glass Factory II
Show Sprocket the photo. She
mentions that Ohm is in the picture. This is similar to the picture of Ohm in
the Hall of Records. The derelict is Ohm! Return to the Four Elements Room.
Four
Elements Room III
Show Ohm the picture of himself. He slowly recognizes
himself and remembers who he is. He gives you a circuit board. Return to Sprocket
with the circuit board.
Glass Factory III
Give the circuit
board to Sprocket. He tells you find Ohm’s brain pattern and meet him at the Sculpture
Garden. Having collected the brain pattern earlier from the Hall of Records, go
to the Sculpture Garden.
Sculpture Garden
Click on the machine
that Sprocket is hooked up to. Program Ohm’s brain pattern into the board. The
process begins and Sprocket is transmutated into the living glass. Pick up the
circuit board and return to the Four Elements Room.
Four Elements Room
IV
Give Ohm the circuit board. He leaves. Go to the Glass Factory.
Glass
Factory IV
Ask Prism to make you a lens for Carbine. He refuses but
then concedes if you get permission from Lugnut. Go to Lugnut’s.
Lugnut’s
II
Mention lens to Lugnut. He agrees if you can get him some prime sludge,
the “Chateau Toxique,” from Decanter in the Oil Shop. Go to the Oil
Shop next door.
Oil Shop
Decanter initially refuses to give
you anything for Lugnut, but changes his mind if you can get a recording of an
old song from Phlange. Return (again!) to the Four Elements Room.
Four
Elements Room V
When you ask for the song from Phlange, she says she
requires an XJ6 (musical instrument) from Ratchet. Return to Lugnut’s.
Lugnut’s
III
Ratchet agrees to give you the XJ6 in exchange for the XJ7, which
she believes Manny at the Spare Parts Store has. Go and see Manny.
Spare
Parts Store II
Manny, unfortunately, tells you there is no such thing
as the XJ7. However, he agrees to make a fake XJ7 for Ratchet if you can have
a hat made at the Iron Works for his wife for their anniversary.
Iron
Works II
Cathode offers to make a hat but needs a picture. He tells
you to get one from Carbine.
Four Elements Room VI
Ask Carbine
for a photograph of a hat. He gives you one. Return to the Iron Works.
Iron
Works III
Return to the Iron Works. This time, make a normal ingot.
Take it to Cathode and ask him to make a hat. He ships it to Manny.
Spare
Parts Store III
Manny received the hat and ships the XJ7 to Ratchet.
Lugnut’s
IV
True to her word, Ratchet gives you the XJ6. Take it to Phlange.
Four
Elements Room VII
Phlange makes a recording of the song you want in
exchange for the XJ6. Take the tape to Decanter.
Oil Shop II
Give
the tape to Decanter. He is so happy that he gives you the Chateau Toxique, even
though it is for Lugnut. Return to Lugnut.
Lugnut’s V
When
you give Lugnut the sludge, he phones through to the Glass Factory and gives you
a card for the lens. Return to the Glass Factory.
Glass Factory V
Give
Prism the card from Lugnut. He makes the lens. Return to the Four Elements Room.
Four
Elements Room VIII
Give Carbine his lens. He gets off the energy valve.
Talk to Phlange. She mentions she needs inspiration in the form of tales about
the surface. Julius and Bud contact her through the monitor and show her the human
world, thereby reaffirming her purpose in life. She leaves her energy valve. Now
it is time to leave. As you no longer have the Anti-Magnetic Medallion, you must
leave through the door to the border. Return to the Mechanimal Historical Society.
Mechanimal
Historical Society III
Go back up the elevator. Go down to the door.
Use the code word found earlier:
I M SAR EE
Conclusion
You
return to your own world. The world is saved. And then we see poor Diode, frozen
and crystallized at the North Pole!
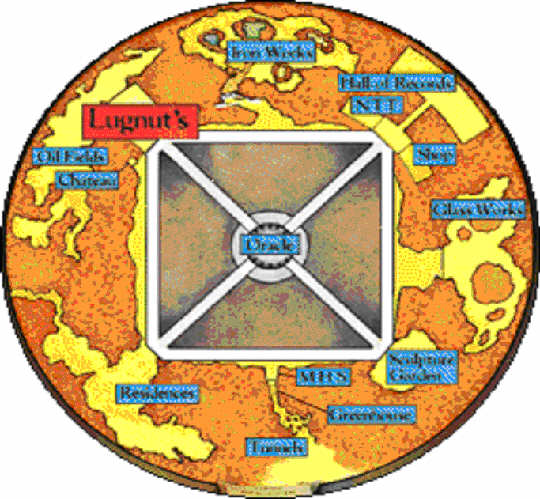
Map of New Torque City