Just Adventure original
Tex Murphy: Overseer Walkthrough by Dan Kennedy
The unaltered guide: no contents list, no checkboxes, no page breaks. This is what the archive holds. Back to the reading view
Tex
Murphy Overseer: A Walkthrough

By Dan Kennedy
December 2001
Introduction
You can’t help but admire
a long, complex game that throws the kitchen sink at you: a futuristic
San Francisco with a 1940’s feel, inventory puzzles, the guy who played
Basil Exposition in Austin Powers, full motion video cut scenes, Jack
Nicholson’s ex-girlfriend in a bad blond wig, lots of logic puzzles,
a dark political conspiracy, VR environments, and Ron Howard’s brother
Clint playing a mutant.
Here are some handy hints
for playing the game:
- The plot consists of
Tex Murphy, a private investigator, recounting his first case to
his sort-of-girlfriend. So, although you can’t technically “die”
in the story, there are points in the game when incorrect actions
or choices will get you kicked out. This includes getting shot/
killed, taking the wrong dialogue path in a conversation, or blowing
a timed sequence. Be sure to save often. - While interrogating
various characters, always ask about every item on your topic checklist.
Sometimes clues and further discussion topics can be generated in
this way. Additional information can be found using Tex’s vidphone
in his office by consulting the American Information Database, which
generates faxed reports on a variety of submitted topics. - Always examine every
object that gets deposited into your inventory – sometimes other
clues or items can be found that way. The inventory is accessed
by placing the cursor over to the extreme right side of the screen
– an inventory panel will scroll out for your perusal. You will
also need to combine some items in order to fashion tools and solve
puzzles. Be sure to examine any items that you create this way. - You will need to travel
between game locations as the game progresses. The location interface
is accessed by positioning the cursor on the far left edge of the
screen – a location panel will scroll out for your enjoyment. Note
that the location pictures with a small green dot displayed nearby
can be accessed without having to change CD’s. - Movement in the VR environments
is controlled via keystrokes, or a control pad that pops up at the
bottom of the screen. Always look around very carefully – inside
shelves, behind and under furniture, and in garbage cans. A green
cross indicates that Tex can examine that particular item – he’s
got a sarcastic comment for just about everything. The fun is in
the details – if you skip looking around, you’ll miss a lot of the
charm that makes this game so enjoyable. - Gameplay has two modes:
Entertainment (for adventure beginners) and Gamer modes. The entertainment
mode sports easier puzzles and a hint system. Both modes operate
on a points system, with a maximum attainable score in Entertainment
mode of 2500, and 4000 in Gamer mode.
This walkthrough has
been written for Gamer mode, since I feel most game players can complete
the game at this level. However, if you are looking for a walkthrough
that will maximize the number of points awarded to you during the
game, you best look elsewhere – this one concentrates on simply getting
you through the game.
Beginnings
Begin by watch the opening
credits – some of the themes present here will be repeated throughout
the game, including time, chess, crazy old men, screaming people….general
mayhem! The game begins with at a cut scene involving Tex being woken
up from a nightmare by a call from his sort-of-girlfriend Chelsee.
Have fun with the conversation that follows – any choice of dialogue
path will get you safely over to Chelsee’s apartment for your hot
date. The next cut scene sets the stage for the story: Chelsee wants
to have a serious relationship with Tex, but is bothered by a girl
from Tex’s past. Tex agrees to give her all of the details about Sylvia
Linsky, and his first case as a private investigator. The scene shifts
to a younger looking Tex looking lonely and bored in his empty office.
We are then placed into the office environment.
Office Space
Tex’s office is a great
place to practice the keyboard / movement overlay controls for exploring
the VR environments. The movement allows you to look under furniture,
around corners, and get different perspectives on the same object.
The kicker is that you really have to ferret out the clues; for instance,
unless you are correctly positioned to see into each of the filing
cabinet shelves, you may miss the clues and items hidden within.
There are several objects
to examine and pick up in the office environment. Pick up and examine
the magazine located on the floor by the main office door. Any item
that can be moved or picked up will have a “moving chess-piece”
symbol on it in addition to the “magnifying glass” look-at
symbol. Notice that the item does not stay in inventory after you
have looked it over – whenever items are unimportant, or lose their
usefulness, they will automatically be deleted from inventory. Pick
up Tex’s PI guidebook off his desk and examine it. Also grab the tape
measure located on the bookshelf immediately to the right of Tex’s
bedroom door (the door to the right of the desk). Be sure to play
with Tex’s perpetual motion machine over by the fax machine.
Have a look through the
two filing cabinets to the left of Tex’s desk. Notice that each shelf
has to be opened separately using a “chessboard set” symbol.
Look in the bottom drawer of the left-most cabinet – pick up and examine
the toy mouse. The filing cabinet to the right of Tex’s desk also
has a note from Tex’s former employer in the bottom drawer – it’s
an amusing read.
Tex’s vidphone is located
on his desk – click on it and hit the “turn on/off” symbol
to start it up. If Tex has any messages waiting, his “Message”
button will be flashing red. Access the American Information Database
by clicking on the name in the top right panel, hit the dial button,
and upon connection hit the “Ask About” dialogue path. A
notepad with a selection of topic choices will be displayed. Click
on the topic (in this case it’s Tex Murphy), and hit “Done”
when you are finished. To exit the database, hit “End Conversation”,
and then the Exit button. A fax will arrive a few seconds later, with
an accompanying voice message – click on the fax to place it in inventory
and examine it. Faxes are always disposed of immediately after reading.
Take a trip into Tex’s
bedroom next, and look around at his stuff – yikes, what a meager
existence. Check out his stellar wardrobe in the cabinet, and drawers
below. Click on the Parcheesi game lying on his cot to initiate the
next cut scene, which involves Sylvia Linsky hiring you to investigate
her father’s death. Isn’t that dress a bit snug? Your next step is
to visit the police station and speak to Detective Eve Clements. Open
the location panel (on the left side of the screen) or open Tex’s
front door and click to leave – and proceed to the police station.
All About Eve
After a short cut scene,
you strike up a conversation with Detective Eve, who as a friend of
your old boss the Colonel, is a little belligerent. However, don’t
worry about the conversation path – each thread leads to her allowing
you to ask a few questions. Remember to ask about everything – for
instance, a question about Carl Linsky will lead to further information
about his suicide note and some mysterious surgery. Once you have
exhausted the lines of questioning, end the conversation, and go to
Carl Linsky’s apartment.
Another scene with you
and Sylvia leads into an opportunity to ask a few questions. She then
leaves to pick up her father’s effects from the police station, leaving
you to look around in the old man’s apartment.
Apartment Hunting
Begin in Carl’s living
room – a comfy couch, a roaring fire, and ….a game of dominoes?
Grab and examine the piece of paper on the coffee table. The note
suggests combining blackjack and dominoes, and the reverse side is
even more explicit – 21 horizontal, vertical and diagonal. Now pick
up and examine the domino set – this sends you into the first puzzle
of the game. Simply follow the instructions on the note – the dominoes
must be placed so that the sum of all dots in each row and column,
and the two diagonals, must equal 21. Ignore the two different numbers
on each domino – just add up the total number of dots on each when
adding the totals together.
There are a number of solutions
to this puzzle, one of which is displayed below. Don’t let the time
counting down in the upper left corner of the screen freak you out
– this is not a timed puzzle. The amount of time you take to complete
the puzzle affects the number of points that is allotted to you upon
completion.
| 4 | 9 | 8 |
| 11 | 7 | 3 |
| 6 | 5 | 10 |
After completing the puzzle,
Tex notices that lights are flashing next to the dominoes with 4,
9 and 8 dots. Remember this for later.
Try the kitchen next. There
are a lot of shelves and cupboards to look through, but there are
actually one two items of interest. The first is within plain sight
on the counter just to the left of the fridge – looks like Carl may
have had a “hard habit to break”. The other item is in the
fridge – notice anything that shouldn’t be there? That’s right, Carl’s
bananas are going to go all brown and funky unless you take them out
of there. Examine both items before proceeding to Carl’s bedroom,
located across from the kitchen.
Go directly to Carl’s desk,
and pick up the note on the surface. Looks like he was writing a “Dear
Delores” letter. Have a peek in the middle desk drawer for a
note from Carl’s publisher demanding his manuscript. Proceed over
to the left bedside table, and pick up Carl’s address book from the
drawer. This provides Delores’ address for a later visit. Walk around
the bed, and examine the chess set on the other bedside table – note
that it’s missing a chess piece. Be sure to check out the dresser
drawers for the opportunity to grab some new…underwear!
Go to Carl’s attic next
– from the living room, open the door just to the left of the bedroom
door. Proceed up the ladder to the attic. Carl’s attic contains lots
of furniture, boxes, crates and soiled mattresses, but there really
isn’t anything of interest here. Proceed around the corner (watch
those horns!), and enter Carl’s home office.
Have a listen to the tape
recorder on the table to the left – experiment in process I guess.
Look through the two filing cabinets – there’s a threatening note
in the third drawer (from the top) of the right hand cabinet. Note
that the credenza is locked – we’ll have to come back to open up this
one. Open up the top of Carl’s desk, and peruse Sylvia’s credit rating
– yeeecccch!
Now its time to interrogate
the mysterious Delores Lightbody (sic).
She’s Not Heavy, and
She’s Not my Sister
Again, just sit back and
enjoy the conversation with Delores – all conversation paths end with
her allowing you to ask as many questions as you like. She doesn’t
think much of Sylvia, and suggests that Carl’s daughter is untrustworthy.
Once done, it’s a good time to head back to Carl Linsky’s apartment
to have a word with Sylvia.
The cut scene involving
Sylvia yields Carl’s effects from the police station, although you
manage to make Sylvia pretty angry. She’ll get over it. Examine the
effects – the manila envelope contains 2 keys, a copy of the suicide
note, and Carl’s wallet. Go back up to the attic, proceed to Carl’s
office, and use the small key (marked 1024) to open the locked credenza.
In the top left drawer you will find a lease agreement for some warehouse
space complete with address. None of the other drawers contain anything
of note.
Before proceeding to the
warehouse, you might take this opportunity to go back to Tex’s office
and use the database to gather information on some of the names and
places you’ve heard about during the investigation. The search yields
a number of faxes to look over – none of the information is critical,
but adds some detail to the characters and story.
Best Little Warehouse
Not in Texas
A virtual treasure-trove
of items to examine and take! Start with the conspicuous-looking cardboard
box in the centre of the room. Open it up and pick up the circuit
repair kit inside – as Tex says, this may come in handy later on.
Next, proceed to Carl’s cot, and move the pillow to reveal some sleeping
pills hidden here – these could be useful.
Is that a letter sitting
in Carl’s in-box on the table next to the cot? Pick it up and examine
– someone named Wanda Peck was causing some trouble for Carl. Have
a look through the drawers on the drafting table behind you – there’s
a bunch of deposit slips credited to Carl’s account, indicating someone
has been sending money. In the top drawer you’ll find a newspaper
article about the poisoning death of Ronda Morgan, a former employee
of a company named Gideon Enterprises. Carl must have been interested
enough in this to clip and save the story.
There are a bunch of notes
and messages on the bulletin board between the tables, but none of
it is relevant. However, move the board over and grab a note with
“HIP S.O.P.” scrawled on it. Could this be another password
or code? Have a quick look at the computer – we’ll need to find a
pass-card reader (and a pass-card, of course) to operate this equipment.
Both the middle and bottom drawers of the filing cabinet located left
of the computer contain interesting notes. The first is a hand-written
fax to Linsky from “SF” concerning the deaths of people
on an unknown list. The second note is a memo about the use of the
pass-card reader for information and transmission security, and something
about a project. Carl’s notes at the bottom mention “SF”
again, and refer to someone named “Overlord”. The mystery
deepens.
Proceed to the first-aid
kit on the left wall, and open it to reveal a container of Band-Aids.
Examine the container, and pieces of a pass-card will fall out. There’s
a piece missing, so we’ll need to keep an eye out for it later on.
Now look at the boxes on the top shelf of the shelves behind the step-ladder.
The boxes can be moved to reveal….a swimsuit calendar!….which
in turn can be moved to reveal….a safe! The safe is protected
by a numerical password.
Now, do we have any numerical
codes in our inventory? Well, the domino game gave us “498”.
Try punching in 498 and hit enter. Success! The safe contains a pass-card
reader (hmm…useful) and the much talked about life insurance
policy listing Sylvia as the benefactor.
Putting it to Bed
Since we don’t have an
operational pass-card right now, there isn’t much more we can do here.
Open up the location panel, and proceed back to your office. Your
vidphone should be indicating that you’ve got a message waiting. Just
hit the message button to replay a drunken “come hither”
message from Sylvia. This action sends you into several cut scenes
that play out without any interaction needed. Of course Tex goes to
Sylvia’s place to take care of her, and afterward we get to see a
touching scene in which Tex and Chelsee first meet. Next Tex tells
us that he’s gotten an appointment with Arnold Sternwood at the North
Hill Clinic, and we are transported directly there.
Your conversation with
Arnold Sternwood is idiot proof – all conversation paths end with
his approval to be questioned. Depending on your path, you may find
out what Arnold thinks of Sylvia – she really isn’t the most popular
of people. Be sure to exhaust your questions for Arnold. He gives
you information about Wanda Peck, and her organization C.A.P.R.I.C.O.R.N.
Once you are finished, proceed to C.A.P.R.I.C.O.R.N.’s headquarters
to interview Wanda Peck.
No need to worry about
the introductory conversation with Wanda – no matter how many times
Tex hits on her, she is still receptive to some serious questioning.
We learn a little about the Law and Order party, and a few other tidbits.
Now what to do? Who would
be close enough to Carl Linsky to know who or what “S.F.”
is? Well, Delores Lightbody knew him best over the last few months
– try visiting her once again. Choose whatever conversation path you
want, and ask her about all available topics, including “S.F.”.
Turns out it stands for Sonny Fletcher.
Go back to your office
now, and access the vidphone database. Do a search for all available
topics, and read the faxes for some in depth information. You must
read the fax on Sonny Fletcher – looks like he’s been in some trouble
with the law, but we still don’t know where to go to find him. Who
would have information on a felon? Why, Detective Clements!
Proceed back to the police
station and talk with Eve – select any responses you wish, and be
sure to ask about everything, particularly the questions about Sonny
Fletcher and his checkered past. The detective is kind enough to supply
Sonny’s address. Go on over to Sonny’s place.
10 Easy Pieces
Sonny lives is a real nice
place. Choose whatever conversation path you like with Sonny, and
watch the extended cut scene with Tex interrogating the broken down
P.I. Sonny finally gives Tex a bishop that Carl had given him. Back
at Tex’s office, examine the bishop – looks like the final piece of
the pass-card is hidden in the chess piece’s base. Grab the lone piece
out of inventory, and click on the rest of the pieces to combine the
two together. Then examine the completed set of pieces.
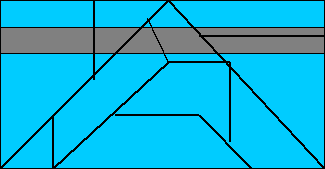
This puzzle requires you
to assemble the 10 pieces of the pass-card so that they form a rectangle.
Use the black strip as a guide to placing the pieces. Turn each piece
around by clicking the left mouse button on the piece and, while holding
the button down, hit the left or right arrow keys on the keyboard.
The solution is shown below:
Examine the “E”
pass-card that you have now created. Pass-card plus pass-card reader
equals COMPUTER ACCESS!!! Proceed back to the warehouse and attach
the pass-card reader to the computer (just hold the pass-card reader
and click on the computer, its that simple). Then grab the pass-card,
and click on the reader. Now we need a password. Remember the letters
on the note we found behind the bulletin board: HIP S.O.B. Think about
where we found the last piece of the pass-card while you are re-arranging
the letters…that’s right, BISHOP.
Type the password into
the computer, and read Carl Linsky’s message from beyond the grave
(ooh, scary). He gives us the name of another lead – Bosworth Clark
– and the address of an office in Fresno which may further the case.
Proceed to the office at
the Fresno address. This place is pretty empty, but notice the electric
bill by the door – mail is still being delivered (this is important
later). There is an address book located on a packing box near the
wall map. Examining it will reveal three appointments in three cities
(San Francisco, Paris and Sydney) on three different days, plus a
cryptic message (3 sets of 3). The map on the wall reveals more information
– Sydney time (10PM) is 9 hours ahead of Paris time (1 PM), which
is in turn 9 hours ahead of San Francisco time (4 AM).
Moving the bookcase along
the opposite wall reveals a safe attached to the commemorative plate
display hanging on the wall. Click on one of the plates to start another
puzzle. The object here is to enter each appointment time on the appropriate
clock, with the corresponding times on the other two clocks. Set the
time on the first clock (the picture of the Golden Gate Bridge indicates
that this is San Francisco) to the San Francisco appointment time
(6 PM). Paris is 9 hours ahead, so set the Paris (Eiffel Tower) clock
to 3 AM. Sydney is another 9 hours ahead, so set the Sydney (Opera
House) clock to 12 PM. The light above the San Francisco clock should
turn red.
Repeat this operation for
the other two appointments in Paris and Sydney:
Paris appt.: 2 PM San Fran:
5 AM (9 hours behind) Sydney: 11 PM (9 hours ahead)
Sydney appt.: 9 AM San Fran: 3 PM (18 hours behind) Paris: 12 AM (9
hours behind)
The safe should now open
revealing a photograph of Carl Linsky with an unknown man. Who can
we get to identify this person? Why not Sylvia? Head over to Carl’s
apartment and listen to her hangover-slurred apology for slobbering
over you the night before. Ask Sylvia about all of the topics on your
list – she will identify the man in the photo as John Klaus, Carl’s
old friend.
Now, let’s try tackling
that Bosworth Clark lead. Sonny Fletcher might know something about
the guy since his name was likely on that list he was investigating.
Go over to Sonny’s hotel – he’s not around, but he’s left a note for
you. Looks like he was looking for Bosworth Clark at an Anasazi ruin
near Tucson. This is a good place to pick up the trail. Open up the
location panel, and speed off to Anasazi-land.
Brick by Brick
Here we are at the ruin
– is Sonny waiting for us, or perhaps Sonny’s nemesis Slade? What
are we looking for here? Your best bet is to proceed off to the right
towards the two blue doors, and go through the further one (the closer
one is locked). One you are through the door, head straight for the
leafless tree visible off in the distance straight ahead. Once you
get to the tree, pick up and examine the guidebook on the ground.
Read about the 8 bricks that, when placed correctly, will reveal a
“deep secret”. Time to collect your bricks.
The first brick is located
quite close by – turn around and look behind the staircase leading
up to the ceremonial chamber. The first brick is located just to the
right of the base of the stairs. Proceed up the stairs, and enter
the chamber itself. Along the wall to your right you will see another
brick in a small recess – unfortunately a snake is currently guarding
it, and you’ll have to return later. Go and grab the small pile of
sticks on the far side of the room, and be sure to grab the rope hanging
off the wall in one of the corners opposite the snake.
Go back out, climb down
the stairs, and proceed back towards your starting point at the ruin.
As you advance, you will see a “No Trespassing” sign to
your right – another brick lies on the ground to the left of the sign.
Keep heading towards the blue doorway that you originally came through
– a set of long wooden poles, and a wooden box should come into view
to the right of the door (the box is in a small alcove off to the
right). Go over and pick up the poles and the box. Proceed to the
next small alcove to the right of the wooden box – there’s another
brick in here (that makes 4!).
Leaving the alcove, veer
off to the left – you should see another blue door here. Open it up,
and go in – a wooden smoking pipe is located to your right just after
entering the room. Follow the passageway around to the left, and pick
up the clay pot visible on the ground here – surprise, another brick!.
Keep going along this hallway, through the s-shaped turn, and around
another big bend to the left. A vine attached to a stick will be lying
on the ground in the middle of the hallway. Before returning outside,
sneak a peak into the room ahead – the 8 x 8 board where you’ll be
placing your bricks is located in here.
Retrace your steps back
outside, and go back to the ceremonial chamber – its time to deal
with that snake. Combine the vine and stick with the wooden box to
make a makeshift trap, and then add the toy mouse from your office
as bait. Grab this contraption and click on the snake. After the snake
is captured grab the brick, and head back towards your original starting
point.
Back by the entrance to
the ruins, you may have noticed a large well off to the left. Go over
to the well, get real close to the edge, and look down to see another
brick. To get the brick out, combine the rope with the smoking pipe,
and use it to retrieve the brick. Next, head towards the staircase
behind you, go up the steps, and through the blue door. Another brick
will be lying on the ground behind two pots in this room.
Go back outside, head down
the stairs, and turn left towards the painted cogs on the wall. Click
here to initiate another puzzle. The object here is to match up the
three red dots on the wall with the three red dots on the three cogs.
The levers above the cogs turn each cog directly below one full turn
– unfortunately, the other two cogs turn different distances:
When Cog 1 rotates one
turn, Cog 2 rotates (16/7) turns, and Cog 3 rotates (16/17) turns.
When Cog 2 rotates one turn, Cog 1 rotates (9/16) turns, and Cog 3
rotates (9/17) turns.
When Cog 3 rotates one turn, Cog 1 rotates (17/16) turns, and Cog
2 rotates (17/9) turns.
Confused yet? Tired of
this puzzle? From the beginning of the puzzle, pull Lever 1 down 6
times, followed by Lever 3 up 5 times, and the dots will all align.
A panel on the wall opens, and the last brick is yours for the taking.
Now that all of the bricks have been collected, head back to the 8
x 8 board to place your bricks.
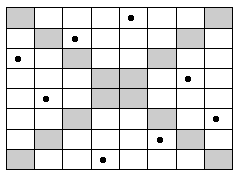
The guidebook mentions
that the bricks must be placed on the grid so that no two bricks lie
in the same horizontal, vertical or diagonal line. Bricks also cannot
be placed on the two main diagonals of the 8 x 8 board. A solution
to this puzzle is shown below (dots represent bricks):
Once you’ve placed the
bricks in the correct locations, the doors at the top of the stairs
to your left open up. Proceed through the doors, down the hallway,
and into a room where you will find a pile of leather strips on the
floor to your right. Pick them up, and continue straight ahead by
going up the stairs. This will trigger a cut scene with Tex checking
out a gap ahead that is too wide to jump. After the scene has played,
combine the short sticks (from the ceremonial chamber) with the long
poles and the leather straps to make a ladder. Grab the ladder and
click on the gap to watch an entertaining clip of Tex trying to negotiate
the gap. Once “safely” to the other side, survey the room
beyond.
There’s no slab in this
lab
Just to the left of the
locked metal doors ahead of you, there is a pair of eyeglasses on
the floor. Pick up and examine the glasses to retrieve the electrical
tape from the nerd-goggles. Turning to your left, past the alternative
entrance to the room (which can be opened), you will find a pocket-watch
on the floor near the corner. Pick up and examine the watch to extract
a spring.
Continue turning to your
left, past the debris from your “entrance”, to the next
corner, where a dime can be found on the floor. Pick up the dime,
and use it to open the metal panel to the right of the locked doors.
The broken wire here can easily be fixed by first applying the spring
to connect the wires, and then the electrical tape to seal the deal.
The doors open to real Bosworth Clark’s secret lab (hey, wasn’t he
on Charlie’s Angels?)
Hmmm…blood on the
floor – that can’t be good. Have a look at Bosworth’s equipment, particularly
the strange colour and tone-coded entry system on his computer. You
can turn on the overhead monitors by clicking the small white panel
on the front of the centre computer console (the big-radar screen-looking
things). Wander over to his living quarters, and pick up the ashtray
on the table. Examining it reveals a burnt matchbook.
There’s a pass-card reader
located in the shelf to the right of the table. Also, look under Bosworth’s
bed – pick up and examine his videodisk player. Where can we find
a videodisk to play? Go back over to the entrance and examine the
chair by the door – Tex thinks it’s in a strange place. Could it have
been used as a stepladder? Look up on the wall, and grab the smoke
alarm here. Examining it reveals that the smoke alarm is actually
a camera, with a videodisk inside (told ya!). Combine the disk and
the player, and examine it to watch a movie of Bosworth’s final moments
(the database fax said he had 5 kids…sadL). That must be the
Evil Big Jim Slade doing the Russian Roulette thing.
Did you notice the tone
password that Bosworth inputted into his computer just before Slade
came in? Watch the movie several times, and try to repeat the password
into the computer entry system. For those of you having trouble, the
correct sequence is red, yellow, blue, white, red, yellow, green.
A shelf opens up revealing a pass-card. But we’ll need a password
too. You will find it on the side of the left console (on the other
side of Bosworth’s empty chair) held to the wall by a magnet. The
note tells us the password is TCAHCMEKE. Can you think of a chess
term that those letters will re-arrange to form? How about CHECKMATE?
Attach the pass-card reader
to the computer, scan the pass-card, and input the password. You’ll
learn a few details about the secret project, and see a visual of
a satellite spinning in space.
Where do we go from here?
Well, we haven’t seen Wanda Peck for a while – maybe she knows something
about STG, and the man in the photo with Carl (John Klaus). Go see
Wanda – she seems very interested in the photo (in fact, she wants
to keep it), and she sure doesn’t like Klaus.
Schimming with Sharks
Now might be a good time
to go back to the office, and check the database for some background
information. Once you are finished, proceed back to C.A.P.R.I.C.O.R.N.
to check on Wanda’s progress with the photo. The only thing she has
learned is that both men in the photo were wearing STG badges (just
like what’s printed on those pass-cards!). She also mentions a letter
from Poison Pawn, and a contact name – Jorge Valdez. Once again, go
back to the office to check the database for these new subjects. Turns
out STG is a company (or was) owned by Gideon Enterprises.
Now, who would know about
STG’s parent company. Errr…Wanda? That’s right, go back to C.A.P.R.I.C.O.R.N.
once more and speak to Wanda (the conversation path here doesn’t matter)
about Gideon, and all of the resulting topics, including J. Saint
Gideon and Frank Schimming.
It’s back again to the
office we go, except now there is a fax waiting for us with (surprise)
Frank Schimming’s direct phone number. Dial the number and speak to
Frank – he may hang up on you if you say the wrong thing (i.e. looking
for hot tips, saying you are a cop), but if he does hang up, just
call him back again, and all will be well. It helps if you are able
to mention anything about C.A.P.R.I.C.O.R.N. and/or Wanda Peck. Be
sure to ask about everything during questioning – Frank doesn’t know
much, but he gives you J. Saint Gideon’s address.
After the conversation
is over, proceed to Gideon’s mansion for a lengthy movie in which
Gideon talks about himself, and his company. After the movie, you
get a chance to ask him some questions. He knows Jorge Valdez, and
after the interrogation is over, you can head over to Valdez’s rank
and File Chess Shop.
Again, don’t be too concerned
about the conversation path with Valdez – all paths lead to the questioning,
but mention Gideon to get some immediate co-operation. Valdez doesn’t
actually know very much – for instance, he has no idea who the Poison
Pawn is. After you are done, go back to your office. That’s your phone
that is ringing. Click on the vidphone and receive a good lead about
Val Davis from a strange looking mutant man. The game takes you directly
to Davis’ lab after the phone call.
Goin’ Ape
Ah, another lead, another
lab. Begin by checking out the computer and the microscope – guess
you’ll need another pass-card and reader. Grab and examine the note
on the counter beside the microscope – it simply says “NEQUE”.
Could this be a scrambled password?
Next, go over to the area
surrounding the examination table. Have a look in the cabinet marked
“Ape Toys” – there’s a toy mouse in here just like the one
you had before. Grab it. You can also look at some of the items on
the counter here, but there’s not much of interest. None of the other
cabinets or drawers open.
On your way across the
room to the animal cages, swing by the big metal doors marked by a
radiation symbol (but don’t go in yet). There will be a big pole resting
up against the wall to the right of the doors. Grab it and proceed
over to the big ape’s cage. He’s awake, and guarding a metal box.
Try using the pole to get the box – no, not gonna work. What do we
have that the ape might want? The bananas of course. But how can we
get the ape out of the way? Try combining the sleeping pills with
the bananas, and give one to the ape. Perfect – he falls fast asleep.
You’ll grab the box with the pole, and retrieve a pass-card from the
box. Be sure to check out the strange looking cats on the second floor
before going on.
Time to check out those
radiation doors. Note: save your game now – timed sequence ahead!!!
Open the doors and proceed in. Suddenly the doors close behind you,
and a big radiation thingie comes out of the ground. Sirens a’ wailin’,
and a voice warns of radiation exposure that begins to rise. You must
act quickly. Head off to the right and turn around to face the wall.
Don’t bother clicking on the button to open the door from the inside
– someone has tampered with the circuits for the override. Grab your
circuit repair kit from your inventory, and click on the black panel
on the wall.
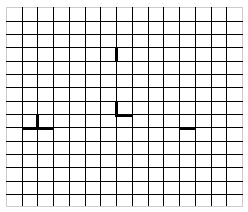
The object of this next
puzzle is to re-connect any two wires (the white lines) crossing the
circuit board: one horizontally, and one vertically. To do this, use
the four kit pieces over to the right. Look for wires that are already
almost connected across the board. Meanwhile, the radiation levels
are getting higher and higher. Remember though, you can’t die – after
all, you’re telling the story here, so you must have survived. If
the radiation levels get too high, we switch back to Tex telling Chelsee
that he did not die, he just did the puzzle a different way. The game
then lets you load up your last saved game to try again.
The puzzle is built on
a 15 by 15 grid – if the pieces are placed in the following way, the
wires will be re-connected:
Remember that you can rotate
each circuit piece by clicking and holding the left mouse button down
on the piece while pressing either the left or right arrow keys on
the keyboard.
Congratulations, you’ve
saved your life. Take this opportunity to go look at the creepy experimental
chair, and be sure to pick up the pass-card reader on the floor beyond
the chair. Proceed back into the main room, set up the pass-card reader
on the computer, and scan the pass-card. Have you unscrambled that
password yet? How about “QUEEN”? Put the password in and
see the “microscopic” view of the pass-card (that’s a pretty
low-power machine!). The symbols (Qxd7) represent the shorthand of
a chess move – essentially, Queen moves to space d-7, and “takes”
(denoted by the x) another chess-piece. Check out the other two pass-cards
in your possession: Card G has Rxe7 printed on it, and Card E has
Rd1 on it. Interesting. Time to head back to the office.
Once back at your office,
check the floor by the front door – there’s a message waiting for
you from Sonny Fletcher, who apparently has some info for us on Big
Jim Slade. Proceed over to Sonny’s hotel, where Sonny has a pass-card
for us, but has been mortally wounded by Slade. Have a drink for Sonny
as he passes on (so that’s when Tex started drinking!). Tex finds
Slade’s lodge location (remember the burnt matchbook from Clark’s
lab?), and you should proceed there next.
Run Runaway
The visit to Jim Slade’s
room at the Big Surf Lodge is a tricky one, since he’s actually there.
You obviously want to avoid him, so remember two rules – choose good
hiding spots, and put everything back the way you found it.
Start by retrieving the
key to Slade’s sliding glass doors by combining the magnet with your
tape measure. Now, look through the window into the kitchen – a key
should be barely visible on the countertop on the right side. Use
your magnetized tape measure to grab the key, and use the key to open
the door. Remember to shut it behind you after you go inside.
Go over to the bed and
examine the briefcase handcuffed here. We’ll need a key for this.
Go back over to the table immediately left of the sliding doors, and
pick up and examine Slade’s wallet. We find two items of interest
– a lottery ticket, and a piece of paper with a scrambled password
on it. Remember to put the wallet back on the table where you found
it. Skip the closet over on the right side for now – we’ll be using
this as a hiding spot later.
Go through the door into
the living room / kitchen, and turn left into the living room. There
appears to be something behind the right hand cushion on the sofa.
Move the cushion, and pick up some sort of word puzzle grid – save
it for later! Remember to put the cushion back the way you found it.
In the kitchen, go to the
set of drawers along the same wall as the fridge and open the second
drawer from the top – you will find a bible here that will be useful
later. Now approach the set of drawers next to the door into the bedroom
– there is a small bottle of chloral hydrate in the second drawer
from the top. Remember to shut both drawers, and any of the other
cabinets that you open in the kitchen. Unfortunately, there are no
bananas in the fridge.
Proceed back into the bedroom,
and open up the closet. Turn around, and close the doors behind you.
Now pick up Slade’s clothes – since this is the last item to look
at, this will trigger Slade’s “old-fashioned” cell phone
to start ringing. Just sit tight for a minute – if you’ve remembered
to cover your tracks, you can listen to Slade’s conversation (if not,
Slade comes out and shoots you, and you’ll have to load up a previously
saved game). Once Slade has gone into the kitchen, examine his clothes
and retrieve a mailbox key from his pocket. Remember to put Slade’s
clothes back before leaving the closet.
Proceed to the bathroom
– open the door and go inside. Have a look in the mirror, open up
the shower curtains by clicking on them, and then turn around and
pick up Slade’s jacket hanging on the back of the door. Examine the
jacket – there’s a handcuff key in the pocket! – and put the jacket
back on the door. Ooops…here comes Slade for his jacket. Quickly
get into the shower, close the curtains behind you, and duck down
as low as you can get. Slade will come in and pick up his jacket.
Once he leaves, get out of the shower and go back into the bedroom.
Use the handcuff key on the briefcase to liberate it, and immediately
travel back to your office via the location panel. Whew!
Going Postal
Back in your office, examine
Slade’s briefcase. We need some sort of combination for the lock.
Did we get anything from Slade that indicates a numerical lock combination?
How about the lottery ticket number? Dial in the number into the lock
in groups of threes; first “6, 1 and 3” (the green light
will flash a couple of times), second “2, 2 and 2”, and
third “7, 3 and 1”. The case magically opens to reveal two
items – a grid object, and a piece of paper with some sort of word
puzzle on it.
The paper with the word
puzzle has some bible notations on it – try combining it with the
(J. Saint) Gideon’s Bible we retrieved from Slade’s kitchen. Click
on the combined object to start a puzzle. Each of the 5 lines containing
a blank space has a bible book, chapter, verse and word code on it;
for example, the first one reads Book of Job, Chapter 9, Verse 25,
Word 8. The appropriate verse is displayed at the bottom of the note,
so counting 8 words along we get “POST”. Type in the word,
and click on the next bible book label on the list. You should end
up with the five blank spaces reading “POST OFFICE BOX NUMBER
969”. But where is this post office?
To use the grid, combine
it with the word scramble puzzle that we found in Slade’s couch, and
click on the combined object to start a second puzzle. The object
here is to place the grid on the rows and column of letters so that
ten hit-list names show up in the “holes” of the grid (plus
the green numbers 1 through 10).
Begin by grabbing the grid
and placing it so that the green number “1” is visible in
the hole closest to the upper left corner of the grid (the 1 is located
near the upper left corner of the letter puzzle). The rest of the
letters form the name “Rona Morgan”, and it appears as the
first number on your list. Now move the grid so that the green “2”
shows up in the hole closest to the bottom right corner of the grid
(the 2 is located about half-way down on the right side of the letter
puzzle). Val Davis’ name now shows up on your list. Follow the rest
of these steps:
- Turn the grid 90 degrees
in a counter-clockwise direction (this is done by clicking and holding
the left mouse button down on the grid, and pressing the “left
arrow” key on the keyboard. Now place the grid so that the
“3” shows up in the hole closest to the top right corner
of the grid – yields Bosworth Clark. - Turn grid 90 degrees
counter-clockwise, and place the “4” on the right side
of the double-square hole near the bottom right corner of the grid
– yields Carl Linsky. - Turn grid 90 degrees
counter-clockwise, and place the “5” in the hole closest
to the top right corner of the grid – yields Sylvia Linsky. - Turn grid 90 degrees
counter-clockwise, and place the “6” on the right side
of the L-shaped hole near the right side of the grid – yields Greg
Call. - Turn grid 90 degrees
counter-clockwise, and place the “7” on the bottom portion
of the double-square hole near the bottom left corner of the grid
– yields Samuel Q. Jones. - Turn grid 90 degrees
counter-clockwise, and place the “8” in the hole closest
to the bottom right corner of the grid – yields Larry Hammond. - Turn grid 90 degrees
counter-clockwise, and place the “9” in the hole closest
to the bottom left corner of the grid – yields J. Saint Gideon. - Turn grid 90 degrees
counter-clockwise, and place the “10” on the right side
of the L-shaped hole near the right side of the grid – yields Tex
Murphy.
Once completed, a hit list
is placed in your inventory. Those red letters that were present on
the grid (you may have noticed that one red letter showed up in each
scrambled name) spell out MILL VALLEY. Open your location panel and
proceed to the Mill Valley Post Office, but not before “taking
care” of Sylvia.
I Fought the Law
After Tex retrieves a Law
and Order Access Badge, and Slade’s coded orders from the post office
box, he goes directly to the Law and Order Party Headquarters. After
entering, he comes face to face with Harry Rice, the night security
guard. The conversation paths all lead to Harry taking the badge away
to check it out, leaving you free to roam in the lobby for a short
period.
Immediately, go over to
the coffee pot on the table to your right, get up close, grab the
mickey from your inventory, and click on the pot. Tex makes a bumbling
attempt at spiking Harry’s coffee, and only barely gets away with
it. Once Harry goes back to check on the badge ID again, immediately
go off to the right from the front desk, down a short hallway, and
into the first door you see on the left – the men’s room. From there
you’ll see the guard drink his coffee, and collapse.
Now its time to look around
the men’s room. Open up Locker Number 11, and grab the Law and Order
Party Credo. This looks like it may be the decoding document for Slade’s
orders. Combine the credo with the coded orders, and examine the two
documents. In order to get each letter in the coded order, simply
count the number of letters from the start of the credo (not including
the title) according to the number underneath each space. The final
message will read “MR. SLADE PRIORITY TARGET: ROBERT KNOTT HIS
OFFICE PASSWORD: PIRANHA”. Before you go to Knott’s office, open
up Locker 5, and grab and examine the Law and Order brochure located
here. Also, try to open Locker 17 – looks like its locked. Proceed
out the men’s room door.
Don’t bother with any of
the other doors on this side of the office – they’re all locked. As
you pass the sleeping guard, grab his keys lying in front of him on
the floor. Go past the desk into the other side of the office, turn
to your left, and pick up your Law and Order ID badge on the small
table here. Use the keys from the guard to open up Knott’s office,
which is located opposite the table. Once inside, Knott’s alarm is
ringing – turn around, click on the wall unit located immediately
to the right of the door, type in “PIRANHA” and then hit
ENTER to shut off the alarm.
This is a pretty nice office.
Move the chair located closest to the painting of the finch, and pick
up the small key lying on the floor (Locker 17, anyone?). Come around
Knott’s desk and grab the Post-it note on the seat of his chair –
a mysterious address to check on later. Knott’s left desk drawer also
has some interesting information indicating he was using Wanda Peck
to check out John Klaus. Notice that Knott’s phone can be dialled
– more on that later. Examine the ugly lizard painting on Knott’s
wall – it can be moved to reveal a safe with a numeric keypad entry.
One last thing: there is a photograph on one of the shelves behind
Knott’s desk chair, near the centre of the room and about halfway
up the wall. It’s a picture of…Sylvia and Frank Schimming?????
Whaaaa?
Proceed back to the men’s
room, and open Locker 17 with the key from Knott’s office. Inside
you’ll find an index card with a strange set of letters and numbers
on it. But is it really that strange? What do the letters spell out
backwards? “MY TELEPHONE”. Go back to Knott’s office and
input the numbers into the phone, but in the reverse order than what
is written on the page (read them right to left – 69835374663). A
message on the phone should read “EMASES NEPO”, which of
course backwards reads “OPEN SESAME”.
Is this the code for the
safe? Not completely, since we can only enter numbers into the keypad
on the safe. Look at the phone keypad, and pick out the numbers that
are represented by OPEN SESAME – 6736737263. Enter this number into
the safe keypad, press enter, and retrieve a CD in the safe. You can
now leave party headquarters, but you will have to go back out into
the lobby, and use your ID badge on the front door to get out (for
some reason you can get extra points for trying the door without the
pass-card first.)
Proceed to the “mysterious”
address, and watch Tex walk into an obvious trap. Someone plays drums
with his head, and he is injected with some strange looking caulking
gun. Do you think he will have MONO later? (heh heh). Tex explains
to Chelsee that he felt terrible afterwards, but manages to get Wanda
Peck to agree to meet him that night. Tex gives her the CD from Knott’s
office, and gets the address of Knott’s secret cabin (gee, how did
Wanda know this? Hmmm…). Time to check out Knott’s cabin for
some answers.
Tangled Knott
Ah, a nice peaceful cabin
in the woods. Turn to the right, and have a peek at the aquarium –
is that a metal box inside? Try grabbing the box out of the tank –
Youch! That’s where Knott got his office password from. Move the horse
picture above the tank, and grab the bent nail sticking out of the
wall. Now turn back to the front door, and open up the skylight by
clicking and turning on the switch. Walk over to the fireplace, and
pick up the log lying in front of the hearth.
Next, proceed over to the
kitchen, and look in the large-sized cabinets across from the stove.
You should find a coil of rope hanging on the right hand side of the
right cabinet. Look under the counter – you will find both a monkey
wrench, and one of those barbeque-lighting mini-torches in two different
spots. There’s also a water purification hose attached to the tap
on the kitchen sink – use the monkey wrench to unhook the metal hose.
Your next move is into
the bedroom, where you’ll find a…ahem….blow-up doll under
the bed. Tex takes this opportunity to blow her up. Proceed back to
the living room, and go to the aquarium. Combine the bent nail and
the metal hose to form a crude fishing tool. Use it to fish out the
metal box from the fish tank. Examine the box – inside you will find
Knott’s Level 4 clearance ID badge for the Law and Order Party headquarters.
Knott isn’t around, so
time to leave. Head out the front door, and go back to your office.
But wait – who’s that waiting outside the door? Looks like Knott with
a cross-bow. Don’t worry about the conversation – just mention Wanda
first chance you get, and Knott will trust you. The cut scene with
Knott reveals some important information, but he is shot before you
can question him.
You end up back on the
floor of the cabin with bullets pang-pinging around. DO NOT GET UP
– IF YOU DO, YOU WILL BE SHOT! Staying at floor level, move over to
Knott’s body and get the key lying on the floor by his foot. Crawl
over to the bedroom door, open it, and using the key, open the closet.
There’s a jacket and hat outfit in here – grab it, and combine it
with the blow-up doll to make a decoy dummy. Take this opportunity
to combine the rope with the fire-log to make a quick anchor.
Now crawl back out into
the kitchen, grab the dressed doll from your inventory, and click
anywhere in the direction of the living room. You’ll see Tex using
the doll to invite the boys in for a party. After they accept, grab
your makeshift anchor, and click on the skylight. The shooters realize
the decoy, but you manage to climb up through the skylight, and using
the torch blow up the cabin good. Real good.
The next portion of the
story is told in movie form, with Sylvia putting a full-court press
on Tex back at his office, and some tender moments with Chelsee (awww…).
After taking Sylvia back to the luxurious warehouse, the phone is
ringing for you when you get back. Its our mysterious mutant friend,
with some advice to investigate the recently departed Greg Call. The
police may know something, so we are automatically taken to Eve Clement’s
office. Mention Slade (The Hitman) to her, and she’s ready to give
you all the help you need. Apparently they found a mysterious chip
in Call’s head. The police can’t make heads or tails of it, so she
gives it to you.
Examine the chip once you
are back at the office – but do it quickly, since we don’t have the
tools necessary to solve it yet. Exit the puzzle. Where can we find
out information on Greg Call, one of the lead researchers at STG?
How about the STG office in Fresno (remember – mail is still being
delivered there)? Follow this rather dubious line of reasoning and
proceed back to the Fresno office. By George! There’s a courier package
waiting for us by the door. Examine the package to reveal two items:
a Braille chart, and a note. Combine the chart with the computer chip
from Call’s head, and fill in the code word at the bottom – you should
get “NEXUS”.
The other note mentions
that we have been exposed to “P333”, and gives us the two
ways that Greg Call uses to encode messages. We’ll need to find out
more about this “NEXUS” word. Who is the only one to really
know Greg Call? Why J. Saint Gideon, his former employer. Proceed
over to Gideon’s mansion and catch him just before he leaves on an
extended trip. He will be happy to answer any of your questions. Gideon
relates that the location of NEXUS is in Washington State, but doesn’t
think anything is there. But we know better. Proceed to Call’s NEXUS
lab.
Call of the Wild
The lab’s scanner all but
confirms that we’ve been outfitted with one of those brain bugs that
is driving everyone to suicide. Once in the lab, go directly to the
examination table, and grab the piece of paper from the clipboard
hanging underneath. The sheet lists all of the different kinds of
implants, as well as the “kamikaze” implants that will neutralize
the original ones. Since Tex has been tagged with a P333 implant,
a “N216” kamikaze should do the trick. Be sure to grab the
access card that is still attached to the clipboard (it was underneath
the paper) before moving on.
Move over to the smaller
table behind the examination table, and pick up the implant syringe.
Nasty looking. Next, proceed back to the entrance, and turn on the
switch immediately to the right of the door. The x-ray examination
light will come one. Isn’t that the shadow of an object near the bottom
of the light? Click on the light to remove the light cover, and grad
the pass-card located inside the light fixture.
Have a quick look at Call’s
computer, and pick up / examine the newspaper article about the death
of Val Davis beside his keyboard. Call knew his time was up soon.
Walk over to the other side of the room, and pick up a pass-card reader
located to the left of the storage containers with the round doors.
We’ll need a password before we can access Call’s computer files.
Notice the card swipe next
to the storage containers with the round doors. Grab the access card
you found on the clipboard and click on the swipe to open the storage
containers. Different numbered implants are stored in each container.
Kamikaze implant N216 is located in the top-right container. Next,
combine the Kamikaze implant with the syringe, and examine the loaded
syringe to carry out this gruesome deed. One question: where’s the
blood?
Before continuing, you’ll
need to go over to the implant removal station (past the examination
table on the far wall) and “guide” the Kamikaze implant
to the bad P333 one inside your own head. When you turn on the station,
a maze of your brain’s blood vessels appears. You first must choose
which blood vessel to inject the implant into, and then find the green
diamond in the middle of your brain, all the while avoiding the little
antibodies trying to destroy the Kamikaze implant.
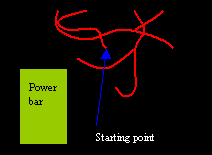
A good place to start is
a blood vessel near the power bar, as shown in this diagram. Once
you’ve injected the implant into the blood vessel (point the little
syringe at the end of the vessel and click) the cursor turns into
a small blue cross that can be moved around the veins.
The following path will
get you to the P333 implant. Note that most intersections are 3-way
junctions, so invariably there is a “left” and a “right”
fork to choose between, although sometimes the configuration of the
blood vessels makes it tough to distinguish between left and right.
For the record, all of my directions are taken from the perspective
of the blue cross travelling within the vessels:
Left, left, middle (this
is a four-way branch), left, right, right and right.
Once completed, you hear
someone coming – turns out its our mysterious mutant friend Larry
Hammond. Larry isn’t nearly as helpful as he made out he would be,
but he does fill in some knowledge gaps, and gives you his pass-card
and an envelope from Greg Call.
Once Larry has departed,
examine Greg Call’s “In case I die…” envelope, on which
Larry has written his pass-card’s password (“WARD” rearranges
to “DRAW”). The envelope contains a note detailing information
about the chess moves available to combat the “Stalemate”
program (make sure you understand the chess notation, but no need
to study this too closely), and a note addressed to Larry.
The note contains a code
indicating Greg’s password. What did the courier message say about
Greg’s coding techniques? Try writing down every third word from the
note starting from the name “Larry”. Comprehensible? Nope,
but try every fourth word – you should get a message that reads “If
you can figure this out my password follows. In the first letters
good am most brain in the”. Huh? Well, the message gives us 6
words after the phrase “In the first letters” – taking the
fist letters of those last six words gives us “GAMBIT” –
our password!
Proceed over to the computer,
install the pass-card reader, swipe Greg’s pass-card, input the password,
and watch the taped message from Greg Call which pretty much lays
out what’s going on – both Gideon and the Law and Order Party are
fighting over a method for controlling people’s minds. Call implores
us to use the Stalemate program to stop the madness.
Time to head back to California.
Tex indicates that the Law and Order Party headquarters is the next
destination.
Rice to See You. Harry
Stellar security guard
Harry Rice is nowhere to be found in the Law and Order Party lobby,
so take this opportunity to go into the open door behind the main
desk (off to the right a bit). You are now in the Reception Hall,
but there’s a security camera mounted on the wall between the two
doors to the lobby. Go over to the wall of windows, and pick up the
music stand located just to the left of the windows (you get a quick
shot of Harry on the prowl). Examine the stand – Tex extends the stem
as far as it will go. Next, combine the stand with the Law and Order
brochure. Now take the brochure/stand over to the security camera
on the wall, and click on the camera to use the photo in the brochure
to cover your tracks.
Be sure to stop by the
side bar for some delicious Law and Order treats (grab the chopsticks
while you’re at it), and note that there is a phone to the left of
the bar that is accessible.
Approach the Law and Order
tapestry hanging on the wall at the back of the room, and move it
aside to uncover a secret door. The pass-card swipe doesn’t seem to
be working though. Use the chopsticks to poke the swipe bar out of
the wall, and use Knott’s Level 4 Law and Order pass-card to gain
entrance to John Klaus’ secret lab.
Note: Klaus’ lab seemed
to have a few graphical and movement bugs in it, so be sure to save
before you go in.
Klaus has been doing some
nasty things in the little dingy room. Grab the paper on the floor
by his desk – apparently Officer Rice has to answer Extension 107
whenever it rings. This may be helpful on the way out. Check out all
of the pictures of mediaeval knights on the wall, and peruse Klaus’
list of movies to avoid – recognize any common words? Could his password
be KNIGHT?
There’s a photo on Klaus’
desk – uh oh, Sylvia and Gideon hamming it up. Open up the first desk
drawer, and examine the Law and Order memo inside – not actually that
useful. Proceed over to the other side of the room, and have a quick
look at the implants list sitting beside the examination table (if
you can get close to it, that is). Have a look at the printout in
the corner – Carl Linsky’s name is displayed here. Was it here that
the implant was inserted into Linsky?
Play the tape recorder
for some disturbing memories of Klaus’ handiwork. Open the drawer
found below those nasty surgical tools to reveal a small framed picture
of a cat, with the title “LESCAT”. Examine the picture,
and then examine the pieces of the cat itself, which are actually
the pieces of a cut-up pass-card like the one from Linsky’s warehouse.
The 7 pieces fit like this:
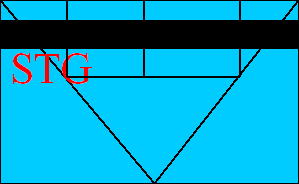
Now, how can we arrange
LESCAT to get a chess term? How about CASTLE?
Since we’re finished in
the lab, go back out into the reception hall. Pick up the phone, and
dial Extension 107 – since Harry has to go answer it, you can make
a break for it. Go back out into the lobby (I’d use the right door,
I had trouble going through the left one) and use the Level 4 Law
and Order pass-card to get out.
Go back to your office
– there should be two phone messages for you from Jorge Valdez (who
has received a message from Poison Pawn for you at his store) and
Wanda Peck (who invites you to dinner…um, I mean thanks you for
the CD you dropped off before going to Knott’s cabin). Time to go
see Valdez at the Rank and File Chess Shop.
Valdez has an e-mail for
you on his computer from Poison Pawn instructing you to come to the
San Tomas Mission at midnight. Off you go!
San Tomas Mission Impossible
After arriving at the Mission,
you end up downstairs below the tower, which is accessible via a freight
elevator. But its not working…yet. First, turn back towards the
door and look around until you see a broom leaning up against the
wall (its located to the right of the door). Do you see the rock in
front of the bristles of the broom? Pick up the rock – you’ll need
it for later. Now turn to your left until the red tool box on a shelf
to the left of the door comes into view. Open the tool box and pick
up the penknife – you’ll need this too.
Now its time to get that
elevator working. Starting at the elevator, turn to your right until
a set of shelves comes into view. Do you see the set of three non-descript
boxes sitting on the second shelf from the floor? Click on these boxes,
and move them aside to reveal an electrical panel. Open the panel,
and switch on the elevator power switch. Now proceed back to the elevator,
and press the button to the left of the door. The next movie shows
Tex travelling up the tower in the elevator, and stepping out to meet
the Poison Pawn.
The sight of Sylvia tied
to a chair with blood on her face is a sure sign that we’ve run into
trouble. Watch the entire exchange between John Klaus and Tex, and
later with Jim Slade. We enter an interactive conversation with Slade
after he’s broken Klaus’ neck in an attempt to get the pass-cards
for himself.
Save your game before starting
the conversation – this is the one conversation where the choices
you make determine whether you live or die. This is a very difficult
puzzle to get through unscathed – be prepared to die at least a few
times. If you choose a conversation path that gets you to another
set of choices without dying, save your game – this way you don’t
have to keep replaying the entire conversation after starting over.
Remember to use the items you collected on the floor below.
The correct and only complete
path through the conversation is as follows: Make a last request;
Kiss Sylvia goodbye; Slip her the penknife; Challenge Slade; Shut
off the lights and hide; Throw the rock; Grab a shield and run to
the landing; Stall for time; and Throw the pass-cards into the clock.
After you and Sylvia take
care of Slade, and she begs you for forgiveness, proceed over to Gideon’s
mansion to find that Overlord computer.
Maniac Mansion
You are transported directly
to Gideon’s bedroom (thank you, Sylvia). The carpet here resembles
a giant chessboard. Move into the centre of the room and grab the
note on the checkered table. The paper describes the alarm in Gideon’s
gallery. We’ll need this later to get through the gallery. Walk over
to Gideon’s bed, and pick up the dumbbell bar lying on the floor to
the right of the bed. Then, go over to the left side of the bed and
open up the box on the floor – it’s a 6-piece chess set. Pick the
pieces up and take them over to the chessboard table in the centre
of the room.
The object of this puzzle
is to place the six pieces in their “proper” spots on the
chess board. But how? Remember how we noted that the rug looked like
a giant chessboard? Have a look at the statues atop the pillars about
the room. Find the larger version of the six pieces on the rug, and
plot out their locations. The correct solution is shown below:
Kn – Knight (horse)
Kg – King (tall piece with cross on top)
P – Pawn (shortest piece)
B – Bishop (taller pawn)
Q – Queen (tall piece with crown)
R – Rook (castle tower)
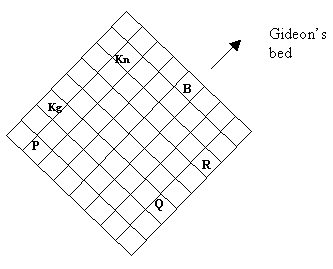
After the puzzle is completed,
the large picture on the wall opposite the bed lifts to reveal an
elevator. If you are trying to maximize points, this is a good time
to go over to Val Davis’ lab to look at the chess moves on the rest
of the cards. Come back to Gideon’s bedroom when you are done. Enter
the elevator, and press the button to the right of the door. You will
be taken to a balcony that overlooks Gideon’s gallery.
The object here is to get
onto the retaining walls down below, and travel along the tops of
the walls until the alarm panel is found. Before we do this, we’ve
got to find something to get us over to the walls. Walk back towards
the two staircases that run down towards the gallery, and click on
the long part of the central hand-rail – it should be loose enough
to pull off. Do the same for the hand-rail on the other staircase.
Combine both rails with the dumbbell bar to form a long pole. Now
go back to the balcony overlooking the gallery. Turn around to your
right and see the small switch on the wall. Hit the switch to lower
the chandelier, and click on the chandelier with the pole. Tex will
shimmy across the pole and land on the top of the nearest retaining
wall.
At this point the entire
floor of the gallery is alarmed, but the walls are not. Tex must now
find the alarm panel to start the alarm sequence shown on the sheet
in Gideon’s bedroom. As you move along the wall, be sure to look down
at all times – a fall will kill you. From where Tex is now standing,
go forward until the wall ends, then turn right and go forward until
the wall ends. Turn left, and go forward until the wall ends. Turn
to your left and go forward, but turn towards a wall going off to
your right at the first opportunity. Go about half-way along this
wall and stop. Looking down, and turning to your right, you should
see the red and black alarm panel once you have turned almost 180
degrees. Go ahead and open the panel.
It’s probably a good time
to look at the alarm pattern sheet, since once you turn the alarm
on, you will have to get off that wall almost immediately. If we assume
that the top of the drawing is north, we’ve travelled from the south
end of the room to the northeastern corner. The inside portions of
the gallery are safe for the first part of the floor alarm sequence,
so a good strategy will be to fall off the wall into the northeastern
interior room immediately after switching on the system. Simply hit
the switch, and then fall backwards off the wall into the northeastern
room.
There are several ways
of avoiding the alarmed portions of the floor – areas that are armed
are lit up, while unarmed areas of the floor are not. Your ultimate
goal is to make it to the door along the north side of the room.
The following strategy
will work:
- Once you’ve hit the
floor in the northeastern interior room (Box 7 on the alarm sheet),
go immediately to the southwestern interior room (Box 10). - Position yourself so
that you can see the floor in the northwestern interior room (Box
6). As the patterns change, you should see the floor in the northwestern
room light up (become armed), and then go grey again (alarm de-activated). - Once Box 6 has been
de-activated, go immediately towards the northwestern room (Box
6), but veer off to the left and go part of the way up the hallway
that leads to the exterior portions of the gallery. - Wait until the floor
becomes deactivated in this direction (Box 5), and then go out.
Immediately turn around and wait for the floor to become deactivated
in the northwestern room again (Box 6); once it does, go back into
the interior of the gallery. - Again, turn around,
and wait for the floor to become deactivated outside the interior
walls (Box 5). Once it does, go back out, turn to the right, and
wait for the northwestern corner of the gallery (Box 1) to become
deactivated. - Move forward when it
does, and make a run for the north wall of the gallery once Box
2 becomes deactivated.
The Longest Hallway
Go through the door into
one of Gideon’s really long hallways. Isn’t it a relief not to worry
about the floor zapping you? Turn to the right, and proceed down the
hallway until you reach a bench located on your left side. Pick up
the CD that is lying on the seat. Keep going straight ahead until
you reach the door to Gideon’s study, and go in.
Proceed straight ahead
to Gideon’s desk, and look at his dinosaur coin holder. Try placing
the dime you got back at Bosworth Clark’s lab into the dinosaur –
out pops (poops) a key. Grab it and have a look around the room. Tex
seems to think that the bookshelves may be hiding something. Go to
the bookshelf in the back left corner of the room (from the perspective
of the doorway) and click on the books that are located on the right
side of the top shelf. Open up the secret compartment, and take the
ornate cross.
Now proceed over to the
stained-glass picture of the sword on the other side of the room.
Grab the cross from inventory, and click on the picture. You must
now place the cross in one of the bronze-coloured squares that surround
the picture. The puzzle flashes the outline of a number of shapes
on the squares every few moments, and you are to find the specific
spot the cross belongs in. The cross should be placed in the bottom
left corner square, with the top of the cross up against the top of
the square, and the left side of the cross up against the left side
of the square.
After the cross has been
properly positioned, a panel will open up to the right of the stained
glass picture. Grab the blue pass-card in the compartment, and go
back outside to the hallway.
Go forward, and take the
hallway going off to the left. Follow this around until you reach
a door, and using the key from the dinosaur, unlock the door and go
in. This is Gideon’s games room. Go over to the pool table, and look
at some of the balls. The solid ones, 8 in all, can be picked up.
Examine the balls, and note the numbers and corresponding colours
for later.
You can try Gideon’s Mean
Streets video game in the back corner of the room. This resembles
the original Tex game back in the 1980’s. If you have the patience,
play for a while – you’ll get some points out of it. Otherwise, forget
the game and head over to the other side of the room.
Have a look at the side
tables next to Gideon’s fire-side sofa – there is a mixed up puzzle
for you to try. Pick up the puzzle and examine it. This is to be solved
like any other jigsaw puzzle – find the edge pieces (the dark blue
ones are water and belong along the bottom, and the light blue ones
are sky, belonging along the top). Rearrange the pieces to form a
picture of…Alcatraz! The puzzle flips over and gives you the
8 passwords for the 8 pass-cards you’ve been collecting.
Proceed back to the hallway,
and retrace your steps back to your starting point at the door to
the gallery (follow the hallway until it ends, and then turn left,
or use the location panel to go there directly). Now travel in the
direction away from the study, and follow this hallway until it ends
at another set of locked doors. Approach the security panel to the
left of the door and click on it. This panel requires that a number
be entered for each of the 8 colours displayed, which just happen
to correspond to the eight pool balls you’ve collected. Go ahead and
enter a number for each colour (press the colour button and then enter
the number): red (1), green (2), black (3), orange (4), burgundy (5),
blue (6), purple (7), and yellow (8). The doors will now be unlocked,
allowing you access to Gideon’s control room.
Gideon has all kinds of
surveillance equipment, cameras, and other doo-dads in here. The only
one you’re interested in is the computer on the right. Grab that CD
from inventory, and click on the CD drive (thin grey strip between
the monitor and the computer). The information on this CD details
robot security at the Alcatraz installation – you may want to jot
this down for later. Cell Blocks B, D and the lower levels are safe,
while there are robots patrolling Blocks A and C. Now grab another
CD sitting on top of the computer’s monitor, and pop it into the drive.
We get some additional background information on Gideon’s secret Alcatraz
lair.
Before going back, grab
your blue pass-card from the study, and press the alarm panel immediately
right of the doorway. This will turn off all alarms in the gallery.
Now open your location panel, and transport back to the gallery (or
get there via the hallways). Cross the gallery and go up one of the
staircases to the elevator. Once inside, you are taken directly to
Tex’s office where a newly insurance-rich Sylvia gets testy when you
announce your planned trip to Alcatraz to stop Gideon. After she storms
out, you are taken automatically to Alcatraz, where a robot immediately
zaps you, and you wake up in a jail cell.
Escape Into Alcatraz
Begin by moving one of
the two bunk beds aside to reveal a portion of the wall that has decayed
to show some of the brickwork underneath. Click to access a puzzle
where the object is to open up a square-shaped hole for Tex to crawl
through. You can take bricks out (as long as the bricks above are
supported), but you must put all of the bricks back somewhere. You
can turn them sideways (press down with your left mouse button and
hit the left or right key), or put them on top of other bricks, as
long as you don’t cover up the lines between the bricks.
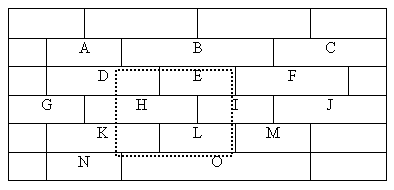
- Move a bunch of the
2-space bricks (A, E, I, and L) over top of the M brick. - Grab the F brick and
put it over top a portion of the O brick. - Grab one of the 2-space
bricks from M and place it in the hole between the C and J bricks. - Grab another of the
2-space bricks from M, turn it sideways and place it in the hole
between the B and M bricks. - Move a bunch of the
3-space bricks (D, H and K) over the O brick (directly over the
F brick). - Grab one of the 2-space
bricks from M and place it in the space directly above the N brick. - Grab another of the
2-space bricks from M, turn it sideways, and put it in the space
above the G brick. - Grab one of the 3-space
bricks from O, turn it sideways, and put it in the last remaining
open space outside the central box.
You’ve made it into the
next cell. Turn around and pick up the one brick left over from the
excavation. Now grab the chain and hook from the bed hanging off the
wall on the opposite wall. Proceed up to the cell bars, and look to
the left. You should see a shelf outside the cell with some items
on it. Throw the brick at the shelf by grabbing the brick and clicking
on the shelf. After the items have fallen onto the tarp on the floor,
use the chain and hook to drag the tarp over to the cell.
You can now pick up the
two items – a roll of electrical tape, and a small torch. Use the
torch on the bars to cut yourself a hole in the door to get out of
your cell.
Once out, immediately head
into the open cell located directly to your left. Remember that none
of the robots can zap you while you are inside a cell. This is a good
place to get your bearings, find out where the robot is, and pick
up a roll of barbed wire hanging from the wall here. Be sure to examine
the wire in order to roll it out for future use.
The robot on Block A is
not too evil – it won’t zap you unless you are very close to it. Head
out of the cell and go left. Make a right turn when the corridor ends,
and proceed over to a set of doors on the right side. This is the
door to Block B. You should see a patch of white beyond the locked
gate. Grab the barbed wire and click on the patch to retrieve a key.
The key can then be used to open up the door into Block B.
You can relax for a bit
in Block B – no robots. Proceed over to the doorway into the visitation
area and open the unlocked door. You should see an overturned chair
immediately to your left as you enter the room. Move this chair, and
pick up the old gas mask sitting on the floor. Continue through the
room, have a quick look at one of the visitation booths, and open
the next unlocked door. Head off to the right, and using the key again,
open the doors that lead to the infirmary. There will be a pass-card
on the floor of this little room. Pick it up, and proceed over to
the doors on the other side of the room – the way into Block C.
The robot in Block C is
more difficult to navigate around, since it can zap you from above,
and from a farther distance away than the robot in Block A. Your destination
in this cell-block is the third open cell on the left-hand side. Proceed
along the hallway, making a bee-line for the first open cell on the
left-hand side. Make your way down the hallway one open cell at a
time (you can save your game within each cell), and use the sound
of the robot to determine whether it is safe to proceed to the next
cell. The key for the door to Block D is hanging on the back wall
of the third open cell on the left side.
After getting the key,
you must make your way back up the corridor to your starting point.
Turn left where the corridor ends – you should see the grey doorway
leading to Block D straight ahead. Use the key to unlock the door
and enter.
Block D (no robots!) contains
a series of ten locked cells, and a stairway leading underground.
Quickly scan the interior of the ten cells – there are some interesting-looking
items in the seventh cell from the Block D entrance. Go back to the
Block D entrance and open the security panel located immediately to
the right of the door. The lever on the right side opens the doors
to the cells, and the two equations on the left describe how the position
of the lever relates to which cell door will open.
Solving the two equations
(e + o = 2, and o – e = 8) yields values for e (-3) and o (+5). What
does this mean? Well, if you put the lever to an even number, the
actual cell door number that will open will be 3 less. Example: Position
8 will open Cell door 5. An odd position for the lever will open the
cell door number that is 5 more. Examples: Position 1 will open Cell
door 6; Position 7 will open Cell door 2 (once you get to 10, go back
to 1 and keep counting!). Using all of this high school math, we can
determine that Position 10 will open Cell door 7. Or, you can simply
try all of the positions until cell door 7 opens!
Once inside Cell 7, open
up the small box on the floor in the back of the cell, and take out
the explosives inside. Next, proceed down the stairs and enter the
underground area.
Searching for J. Saint
Fisher
There is a large metal
door located immediately to your right after you enter the underground
area. Open this door, and grab the new-looking garbage bag located
front-and-centre. Examine the bag, and take out a dirty air filter.
Go back out into the hallway, and moving forward, take your next right.
Proceed to the end of this deserted hallway, and open the door at
the end. Inside is a derelict maintenance robot. Pick up the filter
removal tool lying on the floor next to the robot. Proceed back along
the corridor, and go to the right.
When you get to the first
of the high-powered fans operating up ahead, click on the control
panel to watch a maintenance robot come out and change the dirty air
filter. After the robot departs, make your way down this last hallway
to the storage crates piled near the hallway’s end. Click on the first
crate you come to – it can be moved to access the area behind. Make
your way behind the crates, and check out the live security guard
stationed behind the glass enclosure. Proceed to the back corner,
and pick up the screwdriver located on top of the last crate against
the wall.
To complete our entry strategy,
we will need some gas to take out the security guard. To do this,
we’ll need to get past the robot in Block C again (we needed the screwdriver
first!) Open up the location panel and go back to Block C. As before,
carefully make your way up the corridor running from cell to cell
– this time you want to make it all the way to the end of the hallway.
Once there, press yourself right up against the wall – the robot cannot
detect you here. Look up and find the gas canister hanging from the
wall, and unscrew it with the screwdriver. Now navigate by the robot
one more time, and go back through Bock D to the underground area.
Go up to the fan located
closest to the guard’s enclosure, and use the robot tool to open up
the air filter panel. Next, construct your super-duper gas bomb by
combining the explosives with the gas canister, then adding the electrical
tape, and finally the used air filter. Make sure you have the gas
mask in your inventory (although you don’t have to do anything with
it). Now take your bomb and click on the clean filter currently in
place. The robot comes out and takes your spiked filter back into
the security area. The gas bomb takes out both the robot and the security
guard.
Go ahead and enter the
security area now. Step behind the guard’s desk, and pick up Gideon’s
hairbrush that he conveniently forgot here. Examine the brush to remove
some of Gideon’s hair for later. Next, use the pass-card from Block
B on the wall panel to the left of the glass doors to gain entry.
Proceed up the hallway, and place Gideon’s hair on the DNA scanner
to gain entry to the inner sanctum.
Tex walks into a darkened
area, and finds a computer terminal demanding the 8 pass-cards and
their corresponding passwords. This puzzle requires you to insert
each of the 8 pass-cards into the slot located over on the right side
of the screen (use the arrow keys to turn the cards so they will fit
in the hole). If you forget, the 8 passwords are: A-queen B-draw C-castle
D-gambit E-bishop F-resign G-checkmate H-knight.
You will be taken into
the Stalemate program where you must face off against Gideon in an
already underway chess match with only the 8 moves from Greg Call’s
note to choose from. You must checkmate Gideon in six moves. The trick
is to be aggressive – go after his king in the second move, or he
will checkmate you with his queen. The sequence of moves is: Rd1,
Rxe7, Qxe7, Bf5, Bd7, and Pxe7. Gideon is gracious in defeat, and
takes the only way out. Tex lives happily every after with Sylvia,
for about 15 minutes, and Tex and Chelsee get serious about their
relationship, only to be kidnapped at the end by a dastardly Australian.