Simon the Sorcerer

By adventure soft
Walkthrough by MaGtRo April,
2002
Game
Play: Read the manual, please
do! It’s funny. The game is mouse driven. To skip cut scenes (after you’ve seen
it before for clues or for fun) click the right mouse button. The game
manipulation is by clicking a combination of a verb selection and an item in the
display area. The item is identified on the ID bar above the verb bank when the
cursor is over the item. To perform an action; first select the verb, then the
object you want to use the verb on and then click the left mouse button. The
default verb is “Walk to” when the cursor is over the screen and “Look at” when
the cursor is over an inventory. Double clicking on the screen with no items
identified will return to the default verb. When talking, a selection is given.
Exhaust all possible selection for conversation and it is best to choose a
polite conversation selection since it will lead to a more direct response. The
sound effects and music can be toggled on and off by pressing S and M,
respectively .Using the map will bring Simon automatically to different
places and additional locations will be added once the place is brought
up/seen during game play. Clicking on the center of the map will exit back to
the game. Using the postcard will bring up the main menu of save, load, quit and
continue. To save, type in the name you want to describe the saved game and
press enter. Move the cursor all over the screen to find the active items to
examine or pick up. The inventories that can be
picked up are colored yellow in the walkthrough. I played the game with lowered
graphics and sound acceleration to stop the lines on the screen and the
stuttering of the dialogue.
During Simon’s 12th
birthday, a scruffy dog with a book in his mouth entered his life. He named the
dog, Chippy. In the opening sequence, the dog is in the attic in search of the
book he came with. He found it in the chest. Simon in one of his “boyish sadism”
mood decided to look for Chippy to torture him. In the attic, he threw the book
“The Olde Spell Booke”, an action that opened a portal into another time and
place. Chippy walked through the portal and Simon followed. Simon is now wearing
a wizard robe and has landed in the midst of goblins and trolls invoking a magic
spell for food. He dropped the spell book. Simon became the main ingredient in
their lunch. Chippy arrives to save him and in the next cut scene shows them
entering Calypso’s cottage. Simon reads Calypso’s note. So, the adventure is to
save Calypso, the grand wizard from Sordid, the evil sorcerer. Simon can use
Calypso’s spell book but before he can use it, Simon must first become a wizard.
There are wizards in the tavern in the village of Fleur de lis that can teach
him. Thus the village appears in the map.
In search of the
Wizards
Calypso’s
cottage: Open drawer on the
desk and pick up the scissors. Walk to stuck shut
fridge and pick up the magnet. Go outside and behind
the cottage by clicking on right side of the cottage and see a pile of compost.
Move to the extreme right of the screen and find the blacksmith. 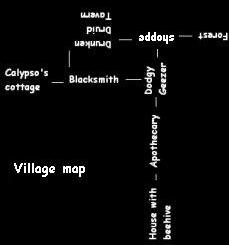
Blacksmith
Shoppe: Pick up the
rope on the left side of the building close to the
barrel. Pick up the clapper on the table. The
blacksmith is too busy to talk. Exit to the top left of the screen and see the
Drunken Druid Tavern. Open door and enter.
Drunken Druid
Tavern: Pick up the safety
matches from the top of the fruit machine on the left
of the screen. Use the scissors on sleeping dwarf and get beard. Talk to the barman about Calypso and Sordid. He tells you that
Sordid lives at the Craggy Peaks. Say hello twice to the Nubile Valkyrie to get
them to talk to you. Then, say that you are taking a survey and ask about
Sordid. Find out that Sordid lives in a tower. Enter the room on the right
of the screen.
Listen to 4 wizard
playing mahjongg. They talk about the mahjongg game their playing, getting the
game from the man with strange eyes that has a wok and talks about “confusion”.
They also talk about Calypso collecting ingredients, searching for 3 months for
the staff, breaking a detecting thingie and about Sordid, the renegade. When
they start repeating themselves, talk to the wizards. Tell them “I want to be a
wizard”, “pointer on wizard” and finally convince them by selecting “I’ll do
anything to be a wizard”. You will be given the task of finding a staff that is
6 ft tall with a crystal sphere in one end and is star-shaped. The wizards will
invest you on the spot once the staff is retrieved. The last person to have it
is the dead Naffin the necromancer. After agreeing to the task, leave the
room and the tavern.
Start search for
the staff
Village:
Outside the tavern, go to right of screen, pass the blacksmith, to the right of
the screen again, ignoring the dodgy geezer or talk to him, go to the left of
the screen. Pick up the ladder. Enter the Apothecary
and pick up the cold remedy that is on the table.
Climb the steps and pick up the empty specimen jar. Exit the apothecary. Go to the right of the screen, pass
the dodgy geezer, to the right of the screen again and then left of the screen
by the Shoppe and to the forest.
Looking around
in the forest
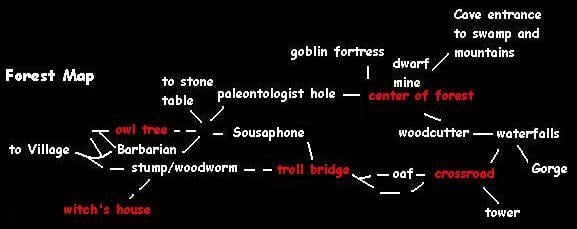
Forest:
From the village, go right,
walk to the right upper path, then the path to the top of the screen and forward
until the owl tree.
Wise
owl: Talk to the wise owl and
pick up the feather that dropped from him. Talk to
him again to pick up hints. You can come back to him anytime and he will give
hints to move on the game. Exit back to the left of the screen and down to the
path going to the bottom of the screen.
Barbarian: See
a crying Barbarian with a thorn on his foot. Talk to him and when you pull the
thorn out, he will give you a whistle, which you can
use to call him when in need.
Exit to the right of the
screen and come to an intersection. Take the path to the upper right.
Paleontologist
dig: Look at sign. Talk to
hole. Find out that the famous doctor is looking for the missing link between
man and vegetable. Agree to watch out for the fossils he is looking for – first
promise to help. Take the right path and enter the center of the forest.
Center of the
forest: The stone steps on
the left of the screen bring you to the goblin fortress. The cave at the center
of the screen is the dwarf mine. The stone steps on the right of the screen go
to the cave entrance to the swamp and mountains and the path to the right goes
to the woodcutter.
Goblin
fortress: Pick up the
paper under a rock that is found on the ground close
to the right side of the landing of the door. It is a shopping list addressed to
the shopkeeper in town. Use the map to go to the village. Go to the Shoppe. Village Shoppe: Give the shopping list
found by the goblin fortress to the shopkeeper. Using the map, go back to the
center of the forest.
Dwarf
mine: Pick up the
rock in front of the dwarf mine entrance. Look at it
and note the writing on it – “Beer”. Exit to the right of the
screen.
Woodcutter:
Talk to the woodcutter until he gives you the metal detector to detect milrith, a hard substance for his axe head – second
promise to help. Go to the right and see the waterfall.
Go back to the path that
goes back to the village. Take the lower right path, pass a dead tree on its
side, to the right of the screen and pass the tree stump.
Tree
Stump: Listen to the voices
coming from the stump and realize that they are woodworms. Talk to them until
you agree to get them “real quality wood” and they decide on “mahogany” – third
promise to help.
Take the path at
the bottom of the screen, pass the wolf that came and left and continue to the
left of the screen to the witch’s house.
Witch’s
place: Move handle of the
well and pick up bucket of water. Open door twice and
enter. You can examine things in the house before touching the broom. Try to
pick up the broom and the witch appears. Leave the house. Go back to the
woodworm stump. Turn right until the troll
bridge.
Troll
Bridge: Listen to the troll
going on strike on his goat employers and won’t let anybody pass the bridge
until he gets satisfaction (a goat to eat). Talk to the troll and he will notice
the whistle you got from the barbarian around your neck. Tell him “to have a go
and find out”. Your friend the barbarian arrives and takes care of the troll for
you. Pick up the placard (did not find any use for
this in the game) and cross the bridge. Walk to the upper fork of the
path.
Oaf: Talk to the oaf and counsel him to water
the beans (that is why he is called oaf). Automatically water the beans and also
automatically leave that scene and be at the crossroad. Go back and pick up
beans from the puddle. Use map to go to village. Go to Calypso’s cottage. Go
behind cottage and use beans in compost to get watermelon. Use map to go to owl tree. Walk to the right of screen, to the intersection and take the
right path.
Sousaphone:
Talk to the musician. Automatically leave because the noise is intolerable. Go
back and immediately use the watermelon on sousaphone. He will give you the
sousaphone after convincing him that you can repair
it.
Looking around
the swamp and mountains
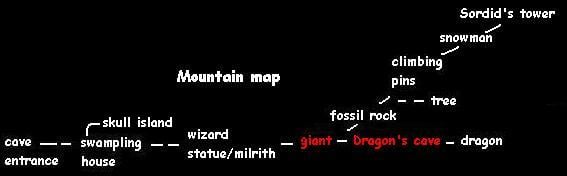
Use map to go to
center of forest and up the stone steps to the cave entrance.
Enter the cave and walk the cave pass to the swamp. Go up to the swampling house
on the top of screen and open door.
Swampling: Talk
to the swampling and find out it is his birthday and no one came to his party.
Eat the stew (secret ingredient – swamp mud), use specimen jar on stew. You can either sneak out the door while his back is
turned or eat as much stew as you can (Yuck!) and wait for him to leave to get
more mud to fix more stew (since you ate it all). Once outside, go to the right
of screen.
Mountains: Move
forward until a small statue of a wizard is seen. Use the metal detector. You
got lucky and leave the detector to mark the spot of the milrith. Exit right to
the sleeping giant.
Giant: You cannot go forward any further but
maybe that tree can make a walkway. Use sousaphone to try to wake the giant. He
moves his arm and breaks the tree. Cross the tree. Move forward until the
dragon’s cave. Note the
boulder on top of the cave.
Dragon’s
cave: Look at sign. Enter the
cave. The dragon has a bad cold and warns you about his lack of control on his
breathing. Simon gets toasted. Click on him and go back in the cave. Give the
cold remedy to the dragon. In the cut scene, Simon will walk out and throw cold
remedy in the cave. Enter and pick up the fire extinguisher. Exit the cave.
Go up the path
behind the dragon’s cave. Pick up the rock with
fossil from the snow. Go right of screen and see climbing pins on the side of
the mountain but one is missing. Click on right of screen to cross the chasm to
the other side. Go forward until the tree.
Tree: Note the pink splodge. Look at and talk
to tree. To get the magic words he knows, you promise (another one) to get white
spirit from the village Shoppe to remove the pink splodge. The pink paint is the
mark that tells the woodcutter that the tree is to be cut
down.
Fulfill some
promises
Use map to go to
the village. Go to the
blacksmith. Give rock with fossil to blacksmith. He breaks it and you pickup the
fossil. Use map to go to the centre of forest. Go left to the
paleontologist dig/hole.
Paleontologist:
Give fossil to hole. The famous paleontologist asks where you found the fossil.
Tell him that it is in Craggy Peaks marked by the metal detector. Free labor!
Use map to sleeping giant
and go left. Pick up the milrith ore found on the
middle pile of dirt in the foreground of the hole dug by the paleontologists.
Use map back to the
village. Go to the
blacksmith again. Give him the milrith ore and he will make an axe head.
Woodcutter: Go
to the woodcutter via the map to center of the
forest. Go to right of screen and forward to the wood
cutter. Give the axe head to the woodcutter. Another promise fulfilled. He
leaves. Enter the woodcutter’s home. Pick up the climbing pin on the table by the window. Hmm, woodcutter must have some
interesting wood. Let us look! Use fire extinguisher on fireplace. Move the hook
of the fireplace stand and find yourself down the hidden cache of the
woodcutter. Pick up the mahogany from the left side,
second from the bottom shelf. Now, go to woodworm at the stump via the map to
the witch’s house and then
take the path to the stump.
Woodworms at the
tree stump: Talk to the tree
stump and automatically the woodworm will have a mahogany feast. The
woodworms jump into the mahogany in the inventory.
Use the map and go to the crossroad. Take the path to the bottom right.
More
walkabout
Tower: Use clapper on silent bell. Move bell and
Rapunzel drops her hair. Pick up hair to climb up. “Piglet”???? After the kiss,
Rapunzel, I mean Repulser is now in inventory. Use
the woodworm on the floorboard. After dropping down to the first floor, use
ladder on hole. Use ladder to climb down. Open the tomb and find a mummy.
Scared, you run out of the tower, opening the stuck shut door. Go back in, down
the ladder and open the tomb again. Pick up the loose bandage hanging at the
back of the mummy and he will unravel and turn to dust. Pick up the
staff. Go back to the crossroad and take the path at the top
of the screen.
Waterfall/Gorge: Look at gorge and see someone fishing.
Click on the vines found at the bottom left of the screen to go down the gorge.
Talk to the fishing Golum. Ask about the fishing rod. Give the swamp stew to the
Golum for the other members of the Tolkienish society (since he did not have any
nibble while fishing and have nothing to feed them). Automatically fish and find
the invisibility ring.
Use the map to go
to village. Ignore the box
of grocery outside the Shoppe for now. Go to arched path to the north, pass the
dodgy geezer and exit left of screen. Again, exit to the left of the screen of
the Apothecary to the house with the beehive.
House with
beehive: Use Repulser, the
pig on the locked chocolate truffle door. Enter the house and look around. Pick
up smoke box off the hutch on the right. Pick up the
netted hat leaning by the hutch. Exit the house. Use
the smoke box on beehive and automatically use the hat. Pick up the
wax from the upper part of the beehive. Go to the
Drunken Druid Tavern.
Drunken Druid
Tavern: Talk to the barman
and ask for a drink. Immediately, use the wax on the beer barrel while the
barman is looking for ingredients for the cocktail. If late, just order another
drink. Simon plugs the nozzle of the beer barrel with wax. The barman thinks the
barrel is empty and took the barrel outside. He gives you a Happy Hour leaflet
and a beer voucher. Go outside and pick up the
beer barrel. Use map to go to the center of the forest.
Dwarf mine: Wear beard taken from
drunken dwarf in the tavern. Enter the mine. The password is “Beer” – the word
on the rock. Try to go down the left stairs and the assayer will wake the
sleeping guard up. Talk to the guard about “bribes”. Give the guard the beer
barrel. You will automatically take it down to the beer barrel room. Find a
drunken dwarf and snoring dwarf lying on the ground in the beer barrel room. Use
feather on snoring dwarf. Pick up key.
Go back up and then go
down the left stairs now that the guard is having a drinking contest in the beer
barrel room. Talk to the sitting dwarf supervisor and he can tell you that about
the door to the treasury and that the key is held by the dwarf that is in the
beer barrel room (you already have it, anyway). Pick up hook
hanging in front of the treasury door. Open the door to the treasury on the left
of the walkway and automatically use the key. Enter and meet the dwarf inside.
Talk to him about “an offer” and “something in the inventory”. Give him the beer
voucher from the Drunken Druid tavern. He gives you a gem. Leave
the dwarf cave. Use the map to go to the village. Go to the
dodgy geezer.
Dodgy Geezer: Give the gem to the
dodgy geezer. The bargaining will start and keep on until you get 20
gold coins for the gem. Go to the village Shoppe.
Shoppe: Enter and buy/pick
up white spirit (on the shelf behind the left head).
Buy/pick up the hammer (below the white spirit) and it comes with a
free nail. Go outside and use box of grocery for the goblins that is
outside the Shoppe.
Goblin
fortress: The box is now in the storage room of the
fortress. Simon wears the invisibility ring automatically. Move/open the box to
show invisible Simon. Look at the empty boxes and get the spell book
that Simon dropped when he first came to this time/place. Look at spell book in
inventory and get a loose paper in it. Pick up the rat bone on
the ground. Look at door and note that the key is left in the lock. Use paper on
door and Simon will slip the paper under the door. Use rat bone on lock. Pick up
paper from under the door and the small key that
dropped on it. Use small key on lock and open door. Pick up the metal
bucket with a hole at the side of it found in front of the cage.
Since the other path is
blocked by the guard, go down the steps and look for another way out. Find a
druid manacled on the rack. Open the iron maiden. Pick up the flaming brand at the center of the room. Pick up the mints by
the door. Talk to the druid and then remove the ring. Try to convince the druid
that you are not evil. Ask him about ideas for escape and eventually, he will
say that he can change to a frog when he sees a full moon. Use metal bucket on
druid. Use flaming brand on druid. The druid changes to a frog. The frog hops to
freedom between the bars. Sounds from the guard room are heard. Go inside the
open iron maiden. After several days, the frog/druid returns. Open the iron
maiden and pick up the hacksaw from the frog’s mouth. Use hacksaw on bars.
Go outside. Use map and go to the dragon’s cave.
Dragon’s
cave:
Use hook on boulder on top of the cave. Walk to boulder (climb) and find
yourself on top of the cave. Look in hole to see the dragon’s treasures. Combine
rope and magnet to get rope and
magnet. Use rope and magnet on
hole until it comes up empty of gold
coins. Go down. Walk up the
mountain to the tree.
Tree: Use white spirit on
pink splodge – last promise done. Talk to tree. He says that the magic words are
alakazam, hocus focus, abracadabra and sausages. Go to the village via the map and then walk to the tavern.
Drunken Druid
Tavern:
Go to the wizards and give them the staff. Answer the question and pay the
subscription fee of 30 gold pieces. Simon is invested as wizard and get a young
wizard starter pack kept in the Wiz Kid
wallet. Ask about Sordid
and leave the tavern. Go to the Apothecary at the left of the dodgy geezer’s
place.
In search of
Calypso and Sordid
Apothecary: Talk to the druid. He will give
you a special potion that he got from a friend from another dimension. His
retired friend talks about rabbits and tea parties. He needs an herb to control
his frog change. It is frogs bane found only in Skull Island. Now, where will we
find that herb? Let us search.
Witch’s
cottage:
The witch will challenge you to a duel. Accept. The rules say to change to
another animal (no fruit, vegetable or dragon). The stronger one wins. Using the
magic words given by the tree, you can change to different animals. If you lose,
just keep on coming back until you win. Select “sausages” frequently until you
win. You pick up the broom but the witch will not let you leave. She
changes into a dragon (foul!) and blocks the door. Select “abracadabra” to
change to a mouse and then click on the mouse hole close to the cat and rocking
chair. The mouse/Simon zooms out of the house. I guess the frog’s bane is not
there. One other place to check, go to the swampling house via the map to the
center of the forest.
Swampling/Skull
Island:
Open the door and enter. If the swampling is still there, consume more stew
until it runs out and the swampling leaves to get more mud. Once he’s gone, move
the chest, open the trap door and climb down. Walk the pier and find out that a
plank is loose. Use hammer on plank. Walk to the end and see a giant skull with
frogs bane on top. Pick up the frogs bane. Use map to go back to the
village and the druid at the apothecary.
Apothecary: Automatically give
the frogs bane to the druid and get the potion. Look close on potion and find
out that it has the words “drink me” on the bottle (Alice in Wonderland?). Let’s
go back to the mountain and search for Sordid’s tower at Craggy Peak. Use map to
go to dragon’s cave.
Mountains: Walk from dragon’s cave to
the climbing pins on the side of the mountain. Use climbing pin on the hole on
the side of the mountain missing a pin.
Snowman: Meet a nasty
snowman, who will not let you pass. Consume some mints. That stuff is hot and
fire comes out your mouth to melt the snowman. Climb the path.
Tower of
Doom
Sordid’s Tower
gate:
Walk towards the gate of the tower. The stone walkway fell to the fiery pool!
Look at door and see a small crack at bottom left panel of the door. Use the
witch’s broom to fly across the chasm. Consume the potion and becomes small. The
entire inventory gets discarded by the door except for the postcard. Enter the
crack and see Chippy, your dog waiting for you inside. He picks you up and takes
you to the next room. You automatically pick a hair off
Chippy while he is carrying you.
Garden: Pick up the
leaf by the entrance. Look in bucket and automatically pick up a
match stick. Pick up the stone on the path. Exit left.
Puddle: Pick up the lily leaf
and fall in the water in the process. Use hair on tap and find out that the tap
is rusted when you try to pick up hair. Use matchstick on lily leaf. Use leaf on
matchstick stuck on the lily leaf – Voila!! A sailing boat! Sail to the seeds
hanging at upper left of screen by clicking on the seeds while on the boat. Pick
up seeds. Use stone on seed to get oil. Use oil on tap. Got a dunking! Pick up
hair attached to tap and water is added to puddle. Get on boat and sail to the
left (puddle center) by clicking on left screen. If you did not add water, you
will run aground here.
Frog: Sail to the frog and dwarf
statuary. If you get close to the frog, the frog will catch you but will spit
you out naked! Look in water and see a tadpole. Pick up tadpole.
Talk to the frog and tell him to “let you pass or the tadpole gets it”. Simon
returns the tadpole in the water after the frog hops away. Look at and pick up
the golden mushroom and find out it is a magical mushroom with
“eat me” written on it. Eat the mushroom then. Now, you are back to normal
size.
Tower first
floor:
Open door and enter. A box with limbs stops you and you run back out. Pick up
the branch hanging on the dead tree. Go back in and use branch on chest. Pick up
shield and spear. Climb down the steps.
Torture chamber:
Walk across
the chasm and pick up the chest. Go back to the other side. Move lever. Use
chest on block and then move lever twice more. Pick up candles.
Use spear on skull hanging on the ceiling at the left side. Pick up skull.
Climb up to 2 floors above.
Bedroom: Pick up the
magic wand off the dresser. Look and talk to the mirror.He brags that he can
spy on anybody via any polished surface. Pick up book about
wands from the pink cushion. The books said that the only way to destroy a magic
wand is to throw it to the fiery pits of Rondor. Pick up green sock off
the floor. Pick up the smelly pouch from
the bed. See a mouse hole at the base of the stairs. Use sock on pouch. Use
pouch on hole and catch a mouse. Climb up to the next level.
Laboratory: Talk to the demons
twice about being dissatisfied, sordid turning people to stone and teleporter.
They need a wizard to send them back to the pit and in return they will tell you
how to use the teleporter. Pick up Sordid’s red spell book
from the bookcase. Open the red
spell book and find a spell to send demons to Hell. The spell needs a double
square with 8 candles, mouse, human skull and the demons true names.
Talk to the demons again
and they will not tell you their true name. They will lend you their chalk when
you say you need to draw squares on the floor. You will automatically draw the
squares, place the candles on its points and place the mouse and skull on it. At
center table; note hook and pick up the chemical, a
magic metal polish. Use chemical on shield. Use polished shield on hook at
center table. Go back down and talk to the mirror. Spy on the 2 demons and find
out their true names – Belchgrabber and Snaffbundigle, I think. Go back up to
the demons and talk to them – we’re ready – Let’s ROCK! They tell you how to use
the teleporter but do not know the password to bring you back.
Go to the teleporter and
automatically press the red button marked self destruct. Your destination is the
Fiery pits of Rondor.
Fiery Pits of
Rondor
Outside the
pits: As
soon as you arrive, pick up the pebble
on your left and the
sapling on your right. Talk to the attendant and he will give you a
brochure. There were only 2 visitors in the past years, Sordid and a
little green fellow. Look at brochure in inventory and get an elastic band. The attendant would not let you in until you pay but you do not
have any money. Use sapling with elastic band to get a slingshot/catapult.
Use slingshot/catapult on bell. The attendant runs and hides. Pick up
souvenir matches from the right side of the desk. Enter the
pit. Pick up floor wax in front of the right entry.
Fiery pit: Enter the fiery pit
and see Sordid. The sprinkler doused the fiery pit when the fire alarm bell
sounded and Sordid is mad about it. Use the Sordid’s magic wand on Sordid.
Sordid turns into stone. Use souvenir matches on doused fiery pit. The pit turns
back into lava. Use magic wand on lava to return all the stone people back to
human form. Wait! Uh Oh! Sordid turns back also. Now, he is really mad!! While
Sordid is about to pounce on you the phone rings. It is for you. Calypso wants
you to delay Sordid so that he can come to the rescue. You run out but the
bridge is gone. Guess we have to go back in and face Sordid. Use the floor wax
on Sordid. He slips on the wax on the ground and while down; Simon gives him a
nudge and falls into the lava. Sordid explodes.
Watch the ending sequence
with the music on!
The End for Simon the
Sorcerer 1 – wait for the sequel!
PS: I did not find any use for the wedge in the
game nor know where it came from.
This document
may not be distributed without express written permission of the author and the
content may not be altered in any way.
For Questions
or Comments on this Walkthrough,
Please write to: MaGtRo
Copyright ©
4/2002 MaGtRo
View this guide raw, exactly as the archive holds it