Nancy Drew: Stay Tuned for Danger

Walkthrough written by Norma Kuderna, Linda Shaw, and Ozma38
Jan 06, 2000

System Requirements:
Windows 95/98
166 MHz Pentium Processor
16 MB RAM
8X CD-ROM Drive
130 MB available hard disk space
16- Bit color graphics video card, 16- Bit Windows compatible
stereo sound card. Mouse and speakers.
This walkthrough was
written from playing the game in the Senior Detective level. There might
be differences if played in the Jr. Detective or Master Detective level.
[If you get stuck in this game, try changing from Day to Night,
check the note pad by the phone in the apartment, and look for new mail and
packages on the chair next to the phone and the table. You can also get help by
calling your friends.] There are a lot of
clues and things to look at which I will not always write in the walkthrough.
BEGINNING:
Nancy Drew is asked to come to New York and stay at her Aunt
Eloisa’s apartment with the soap opera star Mattie Jensen. Her new case is to
find out who is sending the death threats to Rick, Mattie’s costar.
Talk with Mattie at the apartment. Ask her about the
teleprompter, poisoned chocolates and threatening letters. Mattie will leave and
give you a copy of the keys and have a pass ready for you at the World Wide
Broadcasting Company. Search and look at everything in the apartment. You will
pick up a tv remote control in the basket beneath the window.
Read the letters in the Vertical drawers of the desk in the living room and
the card on the desk. Read the note next to the phone and call Ned.
Go to Worldwide Broadcasting. Before signing
in at the front desk, pan to the right and read through the magazine on the
table. Notice the letters have been cut out of the magazine. You can
also look across in front of the sign in desk and read another magazine which
has the letters cut out.
Pick up your pass and sign in.
While going down the hall stop and listen by the door of the
Producer, William Pappas.
Go to Mattie’s dressing room and talk with her. She will
invite you to come down to the set. After she leaves check out her dressing
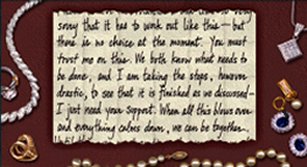
room. Read and look at everything. In the top section of her jewelry box you
will find Rick’s cell phone number and in the drawer of the box you will see a
torn note. To turn the pieces of paper, put your cursor in the left upper corner
until you get a curved arrow, then click on it. (See graphic
below of the torn note.)
Head over to the set and watch the scene as Rory almost gets
hit by a falling lamp. When everyone leaves you can check out the stage. Notice
the broken clock, the teleprompter and make your way over to the workbench. Pick
up the screw driver. Before going to Rick’s dressing room
listen through the door to the Producer’s conversation again.
Go to Rick’s dressing room and talk with him. Pick up the 3D
glasses from the vanity drawer. Notice the threat letters especially the typed
ones. The “Y” is dropped. Go to the Prop room and talk with Millie. She will
tell you to talk with the Director. When you talk with Lillian, the Director,
she will take your pass away.
Go back and talk with Mattie at the apartment and she will
arrange for you to be hired as an extra with her agent Dwayne Powers. You will
now have a new address on your map.
Go to Dwayne Power’s office, Ring the buzzer TWO times to
speak with Dwayne.
Return to WW Broadcasting Studio. You will be given
another pass. Talk with the Director and then Millie in the Prop room. Millie
will give you some riddles to answer:
Give it air and it will live . Give it water and
it will die.
(FIRE)
What has a head and tail but no body
(COIN)
What has teeth but can’t eat
(COMB)
Riddles for Jr. Detective
level:
1) I run all day and never walk, I tell
you something, but I do not talk!
What am I? ………Watch
or Clock
2) When you look at my face it is easy to
see, You’re looking at you when you’re looking at me!
What am I? ……….Mirror
3) Soft as a petal that falls from a
tree, the more I dry the wetter I’ll be!
What am I? ……….Sponge
or Towel
Riddles for Master Detective
level:
1) The more you make the more you leave
behind?
What am I?…….. Friends
(Other answers can be Tracks and
Footprints)
2) What is full if holes but holds
water?
What am I?…….. Sponge
3) What has four fingers and one thumb
but is not alive?
What am I?……. Glove
Now you can enter the Prop room…
Solve the chest puzzle to get a clock hand. 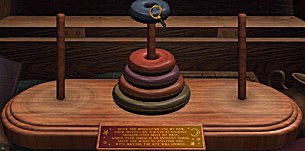
Look at the map in the back of the chest and notice the poem
written around the edge. Pick up the wire cutters under the map. Look at
everything and pick up the door knob, and oil can. Notice the typewriter
and that the “Y” is dropped. Look at the log book on the table and notice the
name in the back corner of the book. It reads Millie
WWB1958
(see graphic: Log book in prop room here)….

Talk to Mattie again. Go back to the apartment and it should
be nighttime. Look at the chair next to the phone and watch the video. Call your
friends for help. You may need to change to Daytime.
Go back to the studio and check Rick’s dressing room. When
you knock on the door it will open slightly. It is a good time to save your
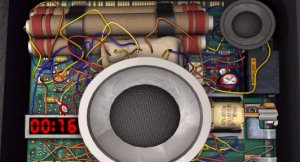
game. Go inside and disarm the bomb. To disarm the bomb, use the
screwdriver from the work bench in the studio on the four screws of the tape
recorder. (You may want to save your game immediately after removing the
screws.) Quickly use the wire cutter on the wires just above the TIMER
CLOCK on the bomb. You need to clip the wires slightly to the left of the
wire you want to cut. See picture below of the placement for the wire
cutters when cutting the YELLOW wire. Clip the wires in the following
order: YELLOW, RED, ORANGE and BLUE.
Return to Mattie’s apartment.
Talk to the Producer on the phone. Check the note pad again
to see a message from George. Look to the left of the phone to see a new letter.
In it you will find the code for the side entry. Now it is time to go to the
studio at night. If you are on Days change to Night and go to the studio. You
will get in the back entrance. Go to the Director’s office and use your pass on
the door knob to enter. If you get caught at any time by the
Security Guard, use your SECOND CHANCE option from the main game menu.
To prevent getting caught by the security guard, don’t loiter in the
hall and go directly to the room you want to go to without making a wrong
turn. Save often because if you do the Second Chance it will
take you back outside and you will have to repeat everything.
Go to Lillian’s office (Director). Use your pass on the
door knob to open the door. Look at the book on the shelf above the desk
to get Lillian’s Personal File Disk.
Look at the Fax Sheet on the Fax Machine.
Look in the trash can below the Fax Machine.
Look in the top drawer of her desk at the Rubber
Cement.
Look at the calendar on the wall and the desk calendar. Note
the numbers in code, written on the right side of the calendar. Now move to the
clipboard underneath the TV/VCR in Lillian’s office. Click carefully on the
paper BENEATH the top paper. Use the 3-D glasses you took from Rick’s Dressing
Room on the paper to read the codes. Make a note of those codes as you will need
that information in combination with the files on Lillian’s Computer in order to
can access to the Control Room. (See graphic of the DECODER
below.)

Use the Personal File Disk you found in the book on the
bookshelf in the CPU of the computer, then log onto the computer using Millie as
your LogIn Name and her password: wwb1958.
On the Computer, click on the Disk Icon and read the personal
letter on the disk.
Also look in the Computer’s TRASH can (Recycle Bin).
Look at the KEY icon and make a note of the codes for each of
the rooms at the station, which are: KEYS for the following CODES:
MAIL ROOM: 3STAR
CONFERENCE ROOM: DARE
ENGINEERING: GA8LE
MAINTENANCE: LEAF
BOILER ROOM: SAIL
CONTROL ROOM: ACTOR
PRODUCTION: SEEK
FILM VAULT: ECHO7
PROMOTIONS: SNEAK
Print the document when you’ve searched and looked at
everything. Then go to the printer (in the corner of the desk) and look at the
document.
After you finished searching Lillian’s office go to the
STAGE. Use the clock hour hand you found in the chest on the clock.
Place that hour hand on the 11 (eleven). You will get a key.
Decipher the code with the clues you found in Lillian’s office to open the
door to the Control Room up the spiral steps. Use the 3-D secret codes
information, along with the Security Codes you found on Lillian’s Computer
(ACTOR is the code word for entry to the Control Room) and the printed document
in order to figure out the Control Room electronic panel. (see diagram below)
Match the letter’s from the code ACTOR to the shape that
it is near on the decoder. For example A is in the shape that looks like
an upside down L …. That corresponds to the shape on the key pad. C is near
the shape that looks like a reversed L …. R is in the square with the dot in
the middle .. etc… (see graphic: Decoder below)
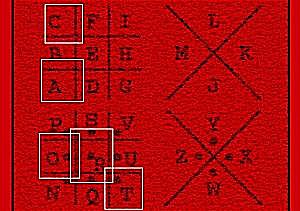
Decoder
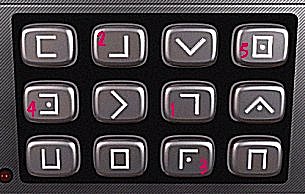
Control Room Key Pad
Using the code from the diagram above open the Control Room.
Use the key from the clock on the High Voltage box on the wall. Turn on the
power switch at the top of the box. Close the Voltage box and then pan left. Get
the Security Video tape off the shelf. Use the cassette in the cassette player
on the right. Adjust the levels 1, 2 and 3 on both sides of the voice/frequency
analyzer to tune in the background sounds and alter the voice. You will never be
able to hear this cassette clearly, but that is not important. The
important things you must do in the Control room is to turn on the power and
pick up the security video.
Leave the Control Room and go down to the far side past the
stage area where you see some comfortable chairs and coffee cups. You will
see a locked panel on the wall which you can open with the key you got from the
clock. Move the gears as the diagram shows.
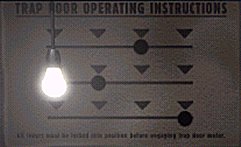
Maneuver the levers to match the diagram and push the button
above the levers to activate the trap door. Move the levers in
the following way: Move the top lever to the right one time. Move
the middle lever to the right one time. Move the top lever to the right one more
time, then move the bottom lever all the way over to the right side.
Move to the stage, behind the sofa and operate the trap door.
Follow the hallway down below to another hydraulic lift. Go up and find yourself
inside the locked area of the Prop Room. Look at the ID for Owen Spayder in the
shirt pocket. Note the ID number: 318-67-2001. Use this number
to find out information about Owen Spayder in Lillian’s computer.
Go back down and up the other lift back on stage.
Leave the stage and return to Lillian’s office. Look up
information on Owen Spayder on her computer.
After finishing your search in Lillian’s office go to Dwayne
Power’s building . On the right side of the buzzer panel ring Hess
Grumbly’s office. He is waiting for pizza and will buzz you in. Go to
Dwayne’s office and use your pass to open the door. Get the wallet out of the
coat pocket and look at the calling card. Use those numbers to open the
briefcase. [4377-6630] Look at everything in his briefcase.
Use the key in the briefcase to open the file drawers.
Inside the Filing cabinet, look carefully at Rick’s Personal File, and
that of Mattie’s and Owen Spayder’s. Note her SKILLS (fire arms, etc.)
Also read the LEMARRON book on the bookshelf. This provides valuable information
and clues to the “coded” messages. Notice, also, the piece of paper in the RIGHT
drawer of Dwayne’s desk. You will see a diagram drawn of the BOMB timer and the
wires (numbered 1-4) in the lower right corner of that paper. Additionally, you
will find a few useful telephone numbers for the WWB Cast and Directors. Look in
Dwayne’s top middle drawer for the adhesive (wonder what he might have used that
for). Look underneath the chess board on the small table.
Return to Mattie’s Apartment. Watch the Security Video
that you picked up from the Control Room. It has the red label.
Look at the chair next to the phone. You should see a
package for Nancy Drew. Open it and read the threatening note.
Then call Bess. Talk to her about everything and everybody.
Exhaust all conversation topics.
Leave Mattie’s and go to the Studio. Talk with Lillian,
Mattie, and Rick exhausting all conversation topics. Return to Mattie’s
apartment and you should hear the phone ringing. Answer the phone.
Change to night time and return to the Studio. Use the side entrance
(3689) and enter. Go directly to the Stage doors. Use your pass card to enter.
Lillian will be standing right there in front of you as you enter the Stage.
SAVE YOUR GAME here.
STUDIO – Final Climax:
Talk to Lillian and exhaust all topics of conversation. Ask
particularly, or suggest that the culprit is Dwayne Powers…. Save your game right after talking with Lillian. The lights
will go off, and Dwayne will appear in the Control Room window up above. After
talking with Dwayne, he will tell you that he is coming down to rid the Studio
of Lillian and YOU. When you regain control of Nancy Drew’s movements, turn
immediately to the right and move forward towards the Fire Alarm. Pull the
alarm, and then back up two times. Immediately click on the Vacuum Door release
button just to the left of the doors that lead out of the Studio. Once you have
pushed the button to release the Studio doors, a small panel opens (see graphic:
EndGameCodes) revealing the Final Puzzle of the game.
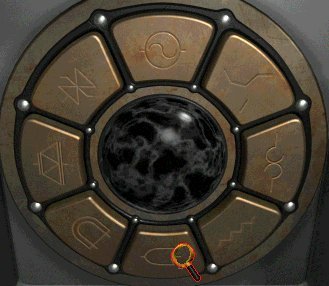
Remember that your time is very limited on this puzzle before
Dwayne finishes you off! Don’t wait. Immediately click on one of the
buttons. IF you have pushed the WRONG button, you
will not see a change in the panel. IF, however, you have pushed a CORRECT button, a white triangle appears in the center, in
the black ball.
Now push another button. If the white triangle disappears,
push the FIRST correct button again (to re-light the
white triangle) and try another button. The idea is to quickly enter the code so
that with each button you push, a white triangle appears in the center of the
black ball. You must correctly push the buttons in the proper order. Any wrong
button and ALL the white triangular lights will disappear, causing you to start
all over again. If you do NOT finish the puzzle before your time is up, use the
SECOND CHANCE option from the game menu. Be FOREWARNED, however, that each time
you use the SECOND CHANCE option, the button sequence will CHANGE. When you have
completed the puzzle, the sequence will appear to be the same as if you’d done
it incorrectly, but the Security Guard will enter through a side door and nab
Dwayne! If you need more time to finish this puzzle please
email me and I will send you some files. Norma
Now sit back and enjoy the final sequence of events as Nancy
writes another letter to Bess…. You’ve solved the mystery and Life goes on at
the WWB Studios! Congratulations!
This walkthrough will be updated
frequently.
Updated 3/13/01
This document may be freely distributed
by any means as long as the context is not altered in any way and
reference/links are provided to this site.
Copyright 01/06/00 – NORMA KUDERNA,
LINDA SHAW, OZMA38
Let me know what you think about our
walkthrough. Send mail by clicking here , here or here .
To quickly zap yourself back to the top
of this walkthrough, click here.
Linda’s Home Page, click here
Background music is titled: What Is
Love