Nancy Drew: Ghost Dogs of Moon Lake Walkthrough

Nancy
Drew: Ghost Dogs Of Moon
Lake
Complete Walkthrough
Written
by:
Linda Shaw & Norma
Kuderna
Authors of the following Nancy Drew
Walkthroughs:
Nancy Drew: Stay Tuned For
Danger
Nancy Drew:
Message In A Haunted Mansion
Nancy Drew: Treasure In A Royal
Tower
Nancy Drew: Secret Of The Scarlet
Hands
This is a complete walkthrough for the game,
Nancy Drew: Ghost Dogs Of Moon Lake. This walkthrough is written
for playing in Junior Mode.
Begin the game by learning that Nancy has
received an invitation to Sally McDonald’s cabin on Moon Lake in Pennsylvania.
When she arrives at the cabin she finds that sall sorts of weird things
have been happening. For instance, a tree falls in the driveway
path, blocking her exit from the cabin and the lake.
Upon completion of the letter, walk forward to
the kitchen area. Turn right and look to the left of the ice chest on the
table. Pick up the bottled water. Zoom out from this screen and turn left towards the
kitchen sink. Pick up the gloves in the sink. Look up in the cabinet above the sink and pick
up the flashlight and the
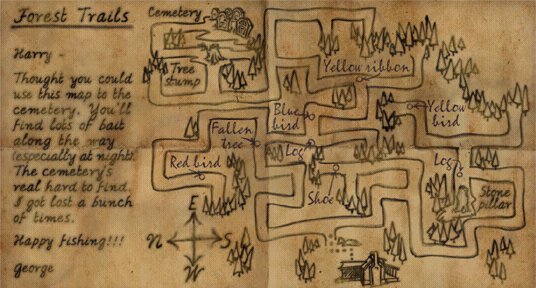
map of the Forest.
Move away from the kitchen area and walk to
the back door by the coocoo clock on the wall. Before leaving the cabin,
click on the coocoo clock and then click on the dial. Watch what happens.
As soon as you move to leave via the door, the phone rings. Answer
the phone and talk to Sally on her cell phone. When your conversation ends
or is disconnected, leave via the door by the clock. As soon as you exit
the door, Red Knott shows up. He’s a birdwatcher and does most of his bird
watching from a nearby tree on Sally’s property. What’s even stranger is
that he does all of this at NIGHT only! Hhhhmmm, something’s odd about
that character!
Speak to Red about everything. When your
conversation ends, walk around to the left of the cabin and enter the shed.
Zoom in on the nut cracker on the shelf and you’ll see an iron and a small
chest. Pick up the small key between the iron and the chest. Zoom
out and turn right. Zoom in on the wooden crate on the table. Use
the key you just picked up on the lock of the crate. The key breaks off!
Darn, there’s got to be another way to get into that crate. Head
back to the cabin. Once inside, turn to exit through the front door.
Ehhhh!! What’s that? Go out the front door and turn left 2
times. Lift the blue tarp and take 1
board. Notice that the cellar is locked.
Also take note of the compass tile in front of the cellar door. Head
back to the cabin, but rather than go inside at this point, and since we’re
having so much fun in the dark, on a night with a full moon, dogs howling, and
strange noises, lets keep having fun! Turn left and head into the forest.
Go on! Don’t be chicken! You’ve got your Forest map, don’t you? Just a few
clicks into the Forest and you’ll see a tree stump on your right. Take
board # 2 on top of the
tree trunk. Proceed forward, then right and use the map in your inventory
to make your way all the way to the Cemetery.
One or two clicks forward into the cemetery
and you’ll see a tombstone on the left. Zoom in on the WALDO tombstone.
More on that much later in the game! Grab board #3 on the ground in the middle of
the path. Now turn around and head back to the house! You should
have 3 boards in your inventory at this point, along with other items.
Now that you’re safely back at the cabin, turn
to go upstairs. Read the plaque on the wall. This will come in handy
later on. As you are headed upstairs, you’ll have the opportunity to
change from night to day. Switch to daytime. Head back downstairs
and move to the cabinet above the sofa by the telephone. Notice the 4 dog
statues. Three of them will move, but one is stuck! We’ll have to
figure out what we need to make that one move! Exit the cabin via the back
door (by the clock) and make your way around the cabin to the well pump.
Zoom in on the well and use your bottled
water to prime the pump. Take the bucket down below the pump. Turn
and make your way to the dock where the boat is. Use the bucket 4 times to
bail out the water in the boat. Grab the screwdriver at the bottom of the boat.
Take the life jacket
as well. The bucket automatically goes back into your inventory.
Turn and go back to the well. Put the bucket down and pump some
water into the bucket. Leave the bucket there for now. Go around the
cabin to the shed (the path leading to the left as you’re facing the dock) and
go inside. Zoom in on the wooden crate on the table and use the
screwdriver you picked up from the boat on the screws that hold the lock in
place. Inside the wooden crate take the hammer/nails and the gas mask!
Gas mask? Oh my goodness, what’s Nancy in store for?
After picking up the hammer/nails and the gas
mask, go back to the house and enter through the rear door (by the dock).
Turn to the right and click on the rotten
boards on the floor. Zoom in a little closer
and Nancy will say: “This doesn’t look very safe!” Use the 3 boards in your inventory and then the
hammer/nails. Walk
to the wall, click on the post-it note .
Exit the shed and make your way back to the
dock. You’ll need to get the test
kit from Park Ranger Akers first. But, how?
We need to get to the boat. Look closely at the outboard motor.
Notice that a sparkplug is missing. We’ll need to get one, but
where? Use Nancy’s PDA in your inventory and note that she recommends
calling Sally and asking about a sparkplug. Turn around and head back to
the cabin. Call Sally and talk to her about the dogs. Ask Sally
about the three people she spoke with before she left. Also ask her about the
sparkplug, sandpaper, wall hanging with the poem and if she’s aware that she
owns her own cemetery. When you’re finished with your conversation, you’ll
know that Red Knotts is your only hope for a sparkplug to fix the motor on the
boat. He only bird watches at night time, so you’ll need to go to sleep
for a little while! All that hiking and walking in nature has tired you
out anyway! Head upstairs, and change to night. Come down and exit
the rear door. Turn right at the dock and go all the way down to the tree
and up the steps. Talk to Red about the sparkplug. In exchange for a
sparkplug he asks you to take digital pictures of birds in the Forest! Oh
brother, one more thing to get involved in! Oh well, say your good-bye’s
to Red and return to the cabin. Get some rest and start fresh in the
morning! Exit the cabin, head back into the Forest (use your Forest map)
and take pictures of an Orange bird, a Blue bird and a Yellow bird. The Red bird and other two birds will elude you for now.
You’re too obvious and scare them off. What now? Return to the
boat, click on the motor. Time to look under the hood, literally!
Look at the diagram showing how each of the 4 sparks should be set in
order for the boat to work right.
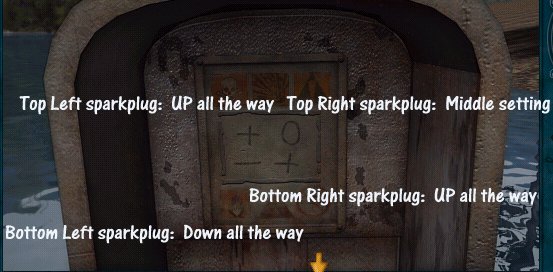
Use your sparkplug from your inventory on the
top slot. Now use the screwdriver for “torque” and adjust each of the 4
sparks according to the diagram under the hood. When all 4 have been set,
close the lid, and pull the cord. You’re off! First stop, Em’s
Emporium. Talk to Em and ask about the cassette
player that Red left there. Put that in your
inventory. Also ask about sandpaper. Appears that Red stocked up on
a lot of things! Exit the shop and head over to the Park Ranger’s office.
Meet Jeff Akers. Talk to him about a test
kit (put that in your inventory, too), the cemetery
and Malone. Ask him if the dogs are buried there. Then take a look
around the Park Office and note the computer
database. Look up some historical facts about
Moon Lake and famous residents that once lived there. Exit the Park Office
and head back to Sally’s. Check your PDA
again and notice that Nancy should listen to the bird
calls now that she has the cassette player. Click on the cassette player in your inventory, then
use the cassette tape with
the recorder. Listen to the various bird calls.
Go back to the cabin area and around the side
of the house to the well. Use the test kit on the bucket of water at the
base of the well tap. Return the test water to Ranger Akers and then get
back to the cabin. All that boating around Moon Lake has tired you out!
Why not take a quick nap? Head upstairs, change to p.m. and then go
out to visit Red Knotts again. Ask him about the sandpaper. Take the
sandpaper and leave him to
the birds (lol). Go back to the house and zoom in on the cabinet above the
sofa. Use the sandpaper on the 2nd statue. This releases the hold
and enables you to move the 2nd statue. Rotate the statues so they look
like the diagram below:
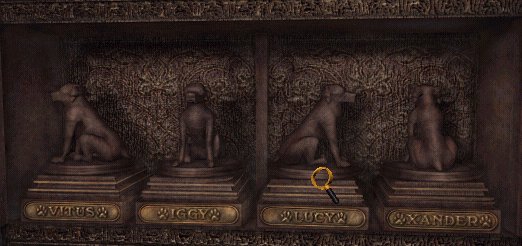
When the
statues are moved into the positions shown above, a secret panel is revealed.
This must lead somewhere. Let’s check it out. Head down the
steps (use your flashlight). Enter the basement, and put
away the flashlight (can’t go around wasting batteries, can we?). Turn
left, and move forward. On the upper right side of that ugly wall there is
a “hot spot.” Click on the hot spot several times and you’ll see a safe.
Nancy says: “Looks like a tiny hole!” Turn around and exit through
the metal door. As you are leaving you will notice a newspaper article on
the steps. Read the newspaper article. Click on the cellar door a couple
of times and exit the cellar. This door is now available to use any time
you want to return to the cellar. Enter the house, get a good night’s rest
and start fresh in the morning with a phone call to Sally. Afterwards,
head over to talk to Jeff Akers about the newspaper article on the step of the
cellar stairs. When you arrive, talk to Jeff Akers about everything.
Offer to help him do some things around the Park Ranger Office. He’ll ask
you to sort out some envelops in a box next to the computer. Roman
numerals! Use the graphic below if you’re not current on your Roman
Numerals!
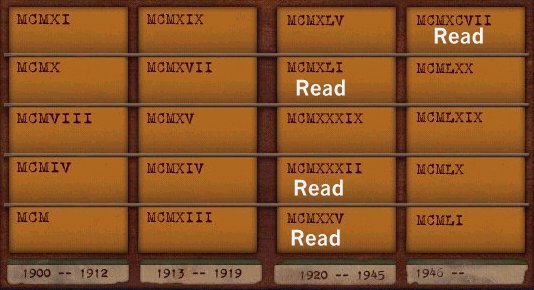
After you’ve sorted the files according to the
correct Roman Numeral sequence, read the envelops that are marked above.
Go back and finish your conversation with Akers. He gives you
an honorary park ranger
pin. Put that in
your inventory. Exit the Park Office and hop back into your boat.
Head over to Sally’s cabin and downstairs to the basement again. Zoom in
on the wall safe. Use the pin Akers gave you on the tiny hole slot
and click on it again. Now, what’s the combination to the safe?
Hhhhmmmm, check your PDA
again and you’ll see that the date of Malone’s death
seems to be appropriate! Click the dial and enter the following
combination: 012932 (for January 29, 1932, Malone’s date of death). Each
time you rotate the dial to a number for the safe, click the button to the right
of the dial. Viola! The safe opens. Better not touch that
journal yet! Remember what Ranger Akers said…..deer mice have been
everywhere! Use the gloves and gas
mask from your inventory
and look through the journal. Read all pages. Nancy learns there’s a
Speakeasy located somewhere on the property. She also picks up a
local map of the area
surrounding Sally Malone’s place. Put that in your inventory, then close
the book and the safe. Put the gloves and gas mask back in inventory and
exit the cellar via the stairs that lead back into the cabin. Head back
over the Park Ranger Akers and ask him for your test results. Also ask him
about the gold buried somewhere on Sally’s property. Visit Em’s Emporium
and ask Em about the newspaper article and the gold on Malone’s property.
Return to Sally’s and check our PDA again. You’ll see that Nancy keeps great notes! Call
Sally and tell her about the well water test results. Also discuss
Malone’s gold. Time to take a quick nap! At night, visit Red again
in his favorite nest and tell him you’re having a slight problem locating the
other birds for the camera shots. He’ll tell you that you need to “blend
in” like him and you’ll need a camouflage outfit from Em’s Emporium. While
you’re there, you might as well ask him about Mickey Malone and William
Akers!
Return to Em’s in daylight and ask her for a
camouflage outfit. She’ll give you one to wear if you’ll collect 12 “bait
critters” for her. A bait box will automatically appear in your inventory. Finish the
conversation and leave for the cabin. Time to go bug hunting! Make
your way into the Forest again, and you’ll notice that when you come close to a
rock, or a log or stump there’s a “hot spot”. Turn over every rock and
stump, branch and tree you can find. You’ll collect some critters alright, but not 12. We
believe that you’ll be able to collect as many as 7 bugs during the day, and
definitely the rest of them at night. Go back to the house and take a
nap. During the night, glow worms appear under rocks and fallen branches. Before heading back
into the Forest, check the compass stone by the cellar doors. You’ll find some juicy and fat
worms. Grab those! Now make your way back into the scary
Forest. When you’ve collected 12
bugs, and worms, head back to the cabin. Go to
bed! In the morning, head over to Em’s Emporium and exchange the box of
critters for the camouflage outfit. Now head back to the cabin and the Forest. If you’ve
seen the 3 remaining birds and tried to take pictures of them, they will appear
on your map. If not, then look at the map posted above. It will
indicate where you can find the remaining birds…all but the RED-TAILED
HAWK. Go into the Forest, find two of the remaining birds (Red Cardinal
and Yellow Bird up by the cemetery). Return to the cabin, take a quick nap and
at night go and visit Red Knotts. Ask him about the Red Tailed Hawk. Rush
back to the house, go to sleep and then in the morning, go out towards the
dock. You’ll see a “hot spot” by the huge tree truck just to the right of
the dock. SAVE YOUR GAME HERE! Click on the tree trunk and Nancy will hear the
Hawk. Turn and look on top of the cabin roof. You’ll see the
red-tailed hawk. As
soon as you’ve taken a picture of the hawk (click the camera several times),
you’ll notice the speaker box the hawk was perched on. You’ll be knocked
out!
You awaken inside the little shed on the side
of the cabin. It’s on fire! Nancy’s tied up but can still kick with
her feet. You need to get the chisel down so you can cut the ropes
around your hands and feet and get outta there before the whole thing burns
up. Here’s how to safely get out:
1) With your feet, kick the nut cracker toy so it falls on top of
the air pump.
2) Kick the shovel that’s standing up between the
shelves on the right and the other shovel on the left. It will fall to the
left.
3) Now kick the compressed air tank to the left of your
feet. You might have to kick it a couple of times, but eventually it will
catch the rag on fire on top of the shovel.
4) Now that the rag is burning, kick the
shovel again. It
will fall towards the shelf and ignite the can.
5) Use your feet once again, and kick
the air pump directly in
front of you feet several more times to cause the can to roll to the rope that
holds the chisel.
6) The rope will burn and the
chisel will fall.
You’re out of the shed now, but the shed is on
fire. Run over to the well where you left the bucket of water. Grab
the bucket of water and use it on the fire. As soon as you have put out
the fire Red Knotts appears (convenient of him isn’t it? You’ve never seen
him in the daytime!) Anyway, when you’ve finished your conversation,
you’ll be in the cabin talking to Sally on the phone. When your
conversation ends, go upstairs, shower and change into some fresh clothes.
Head out to the tree where Red likes to hang out and talk to him. Ask him
about the gas cans behind his seat. Give him the camera with the 6 digital pictures on
it.
The next morning, head over to Em’s Emporium
and ask her where she finds her antiques. Ask her everything else that’s
available. Visit Jeff Akers and ask about Joe Akers and William
Akers. Talk to him a 2nd time (he’ll apologize for his rudeness!).
Ask about his grandfather.
Return to the cabin and notice the
ladder on the left side of
the house. Walk up the ladder and you’ll discover that the speaker box is
no longer there! That’s curious! Must have been those sounds you
heard while sleeping the other night! Take a hike out to the cemetery and
examine the four dog tombstones (close to the crypt). Notice the paw prints on the
crypt. You can open the crypt and step forward if you want, but there’s
nothing to see in there.
Once back at the cabin, go back downstairs to
the cellar door. You’ll see a framed photograph
on the door. Take that and then go visit Jeff
Akers. Ask him about the photograph and if he knows the two people
standing in the photo. He’ll offer to help you find out who the woman is.
Go back and get some sleep. Come back the next day and he’ll give you
Vivian’s phone number. Now we’re getting somewhere! At the cabin,
call Vivian. Ask her
everything. Eventually, Vivian will offer to send you the small key to Waldo’s headstone if
you’ll send her the photograph of Mickey and her. Finish up your
conversation and rush over to the Ranger Station. Ask Jeff Akers to mail
the photograph to Vivian for you. Then return to the cabin and sleep for a
few days (2pms, and 2ams). Return to the Park Office and the key will have
arrived. Take the key and rush back to the cabin. Run through the Forest,
skipping and hopping past logs, fallen branches and yellow ribbons tied around
the ole oak tree towards the cemetery. Once there, use the small key on Waldo’s headstone. You’ll hear a
click. Now the tricky part. You must click on the letters that spell
WALDO to change it to read BALDO. To do that, follow these simple
steps:
1) Click on D 2 times.
2) Click on W 2 times.
3) Click on the U 2 times
4) Click on the E 2 times, and
finally
5) Click on the U 2 times! Viola,
the tombstone has revealed a secret passage to the Speakeasy.
When you’ve done it correctly, the crypt
opens. Go down into the secret passage and you’ll realize quickly that
your flashlight batteries have worn out! Oh no! Now what? Turn
around and walk forward a couple of clicks. Move the mouse cursor over to
the left side of your screen until you get a Left Arrow. Turn left and
then put the cursor on the middle of the page for the “hot spot” to open the
crypt door. Exit and run, don’t walk, through the Forest and back to the
boat. Push that outboard motor to the limit as you rush over to Em’s
Emporium. What better place to get handy little flash light batteries,
right? Ask her for some batteries. She’ll tell you that in exchange
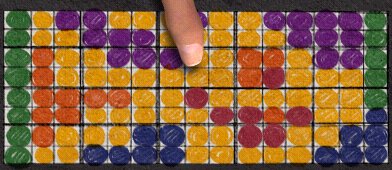
for the batteries, she’d
like you to arrange the coke display according to the illustration she gives you. (see
picture below). When you’re finished, turn back to Em and take the
flashlight batteries. Now skip waves back over to the cabin and make your
way back to the cemetery. Once there, you’ll have to do the “letter
jumble” again on the tombstone.
Back at the cemetery, use the same method as
described above to open the tombstone. With fresh batteries in your
flashlight, you’re good to go on a tunnel search! Once down inside the
tunnel, follow it along until it splits into two different directions, left or
right? Let’s go right! Why not? Take the right path all the
way until the end. There will be a big metal door. Click on the
handle and Viola! You’ve found the Speakeasy. Look at all the
paintings of all four dogs. Zoom in on each one and Nancy will mark the
dog’s favorite locations on the map in the inventory. Iggy’s is already
marked with an “I” on the front porch of the cabin.
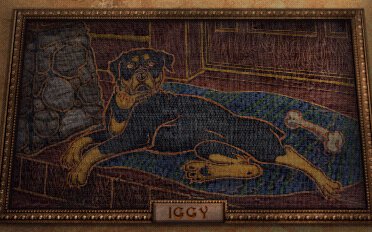
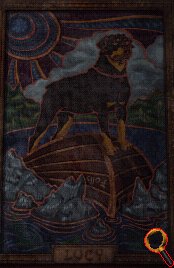
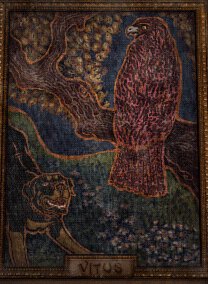
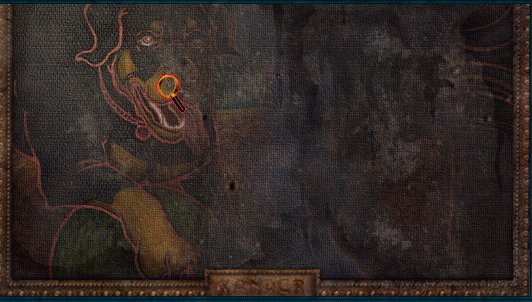
It is VERY IMPORTANT that you make note of
each dog’s COLORED COLLAR. They are: Lucy = Green collar, Xander = Red
collar, Vitus = Blue collar and Iggy = Yellow collar.,
Move to the double-doors with the board across
it, and remove the board. This will allow access from the basement of the
cabin to the Speakeasy in the future. Turn and go behind the bar and look
at Iggy. Turn and face the rest of the bar and you’ll see the spigot
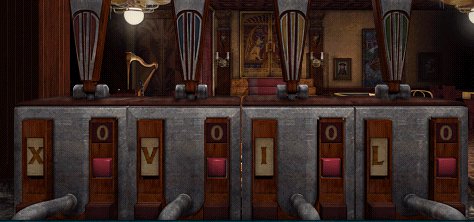
puzzle! Now what? The idea behind this puzzle is to click on the spigots
one at a time and then push the red button. This causes the letters to
rotate. There appears to be no logical explanation for the correct
sequence of letters, but they should be arranged as X, V, I and L (Roman
Numerals: 10, 5, 1 and 50). To accomplish this, make the following
moves:
1) Number the spigots 1-4 going
from left to right.
2) Click on the first spigot one time
and then click the red button.
3) Repeat this process 2 more
times. It will land on the X
4) Click the 2nd spigot 1 time and then
click the red button.
5) Repeat this process 2 more
times. It will land on the V
6) Click the 3rd spigot one time and
then push the red button.
7) Repeat this process 2 more times and
it will land on the V
8) Repeat the same process as the
previous 3 spigots and it will land on the I. A secret passage is
revealed! Oh, no, not another secret passage!
Turn to the left and move to the photographs
of the dogs on the wall. Zoom in on the photo of the 2 dogs playing on the
porch. Click on the photo and you’ll be back in the tunnel. Move 10
steps forward into the tunnel (use your flashlight), and turn right. You
will see a new passageway. Enter here. Move forward one time and
zoom in on Iggy’s Mosaic.
Look, too, at the grid map next to Iggy.
Doesn’t look familiar does it? Move forward again and zoom in on
Vitus. Examine his mosaic and his map grid. Still doesn’t look
familiar. Again, move forward a couple of times and zoom in on Lucy on the
boat. Also look at her map grid. Now move to Xander’s Mosaic and
zoom in. Nancy will mark his favorite spot on the map she holds in her
inventory. Look at his map grid. Familiar? No. Go back
to Lucy’s map grid. Zoom in. It looks almost identical to the map in
your inventory. The key now is to match the four dog’s favorite spots (as
on the map in your inventory) to the map grid next to Lucy. Use the grids
on the map in your inventory and the grids on Lucy’s map grid and click on those
four tiles. You should click on these:
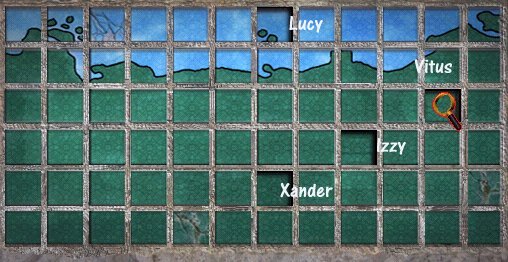
When you’ve done that the map grid will slid
to the side, revealing another secret passage. Enter the passage and go
all the way to the end. There’s another door, but where’s the key?
Turn around and exit this small passageway. Turn right and head down the
tunnel hallway past Xander’s mosaic and map grid. At the intersection turn
right and head up that passage. The left passage is a dead end. At
the end of the right passageway, you will see that you’ve opened another
room. Enter the room and walk around to the left. What do we have
here? Little doggies! Aren’t they just precious?
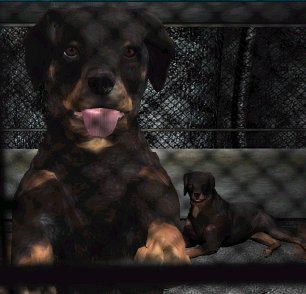
Pet the dogs and then move farther around
their cage and examine the goodies on the tables. You’ll see the
speakers that were on the
roof of the cabin, you’ll find Denti-glow
toothpaste, a silent dog whistle and all sorts of
stuff! Ah, what’s this? A key? Could this key fit that door down the tunnel? Let’s
take it and see! Turn around and head back past the dogs (you can pet them
again, if you’d like). Go back to Lucy’s map grid and punch the 4 tiles
again. Enter the passage and use the key you picked up at the dog kennel
on the door. You’re now in the Well
Room.
Immediately turn around and pick up the
well wheel. Put it
in your inventory. Turn back around and move to the right, where several
wheels are on the wall by the pipes. You’ll see two wheels on the left, a
gap and then another wheel. Zoom in on the space between the 2-1
wheels. Put the wheel on that pipe. Zoom in on the water level gauge and you’ll
see a “hot spot” just behind the wheel you just placed. Something’s
missing! Use your screwdriver to hold the wheel in place. Zoom out and zoom in on the
left-most wheel. Turn that wheel. Turn to the right again, and turn
the newly placed wheel. Now turn the right-most wheel. Watch the
water level gauge go
up. The well is now full. Take out the screwdriver, and put the wheel back in your inventory.
Zoom out and turn left. You should now be facing the well door. SAVE
YOUR GAME HERE. Turn the center wheel and then turn the left
handle. Enter the well. Go down the well and turn around.
What’s this? Another puzzle? Oh, no!
Remember the dog collar colors? Well,
here we go again. We certainly hope you took good notes of the dog’s
tombstones! Do you remember your Roman Numerals? Well, you need to
match the dogs first letter in Roman Numerals to the correct dog collar
color! Confusing? No, not really. Green was Lucy, Red was
Xander, Blue was Vitus and Yellow was Iggy. So, if using Roman numerals,
what would Lucy be? L = 50. What about Xander? He would be
10. And Vitus would be 5 and Iggy would simply be 1. Rotate the
numbers on Lucy’s and set it at 50. Rotate Xander’s and set it at
10. Now move to the blue numbers and set that at 5 (that’s 0 5).
Iggy is just one, so set his at 0 1. Oops, one of Vitus’s numbers
moved. Go back and reset Vitus and Iggy. When you’ve done that, a
pipe will extend from the lower right side of the door. Use the wheel you
picked up and place it on the pipe. Turn the wheel, and enter the
room. Move forward and examine the gold bars. When you’re finished
you have to leave the room and tell somebody! Turn and start heading up
the ladder. What? Company? It’s Em! Turn and go back
into the room with the gold bars. Click on the DOWN arrow and enter the
grate. Go up the other side and through that grate. Turn and shut
the door on Em. Don’t look back! Go up the ladder. Enjoy the
end!
Another Nancy Drew mystery has
been solved!
This walkthrough will be updated
often.
This document may be freely distributed
by any means as long as the context is not altered in any way and
reference/links are provided to this site.
Copyright 11/24/02 – LINDA
SHAW & NORMA KUDERNA.

Updated: November 28, 2002
Background music titled: Ghost