Nancy Drew: Danger on Deception Island
Nancy Drew: Danger on Deception Island
by
Her Interactive
Walkthrough by
MaGtRo October, 2003
Gameplay: After
clicking on New Game, select Gameplay overview to learn how to navigate
throughout the game and the different settings in the game. There are unlimited
save game slot in this point and click game.
This walkthrough is played on the
Senior Detective level.
Nancy Drew is on her way to Deception Island, one of the San Juan Islands. The
vacation was arranged by George and Bess. The cell phone is in inventory.
Nancy is met at the Snake Horse Harbor Dock by Katie Firestone, a Marine
Biologist that researches deep water parasitic growth and who also runs a whale
watching boat tour. A female orca has shown up at the channel.
Katie’s Boat
They walk to the boat and finds that it has been torn down.
Katie finds that the
engine is a mess. Katie does not want the Sheriff involved. She wants Nancy to relax
and gives her some advice. Katie’s advice is to go bike into town or take the kayak out.
She warns to always wear
your life jacket , don’t go pass the channel, be careful about the fog, head to
shore when it becomes thick and don’t go out without the GPS.
Lower Bunk: Turn around and open the suitcase. See a
Beech Hill leaflet (ND Scarlet Hand). There’s an ice chest behind the white door on the left.
Computer Table: There was a Town Meeting about Orca on
Thursday the 16th, 7:30 PM at the Swenson Hall. Check Katie’s business card
with phone # 360 555-2774.
Look
close at the computer and check the journal, mail and DI Portal. Read the news
on the DI Portal about the burglaries, the orca at the harbor and the
election. Check the (ND Ghost Dog) calendar. You arrived the day after the
Orca town meeting.
Use the phone and call George and Bess. Use the arrows at bottom of phone
to scroll the directory and then press dial.
Galley:
Refrigerator: The fridge has fixings for a sandwich
but there’s a sample jar that should not be there. You
can make a sandwich that you keep or better yet discard. Look at the
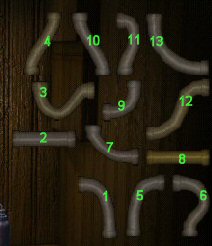
shelf on the left for other sandwich fixings.Sink Pipes puzzle:
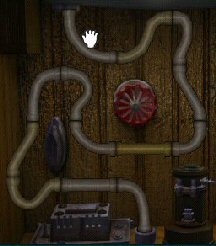
Find out that the sink was also damaged. The pipes are under the sink. All the
pipes need to be used. Start placing the pipes to the pipe at the bottom of
the cabinet. This goes here!
Look at
the business card of Andy Jason of Whale World.
Map: See that the orca is located
between Deception and
Scraeb Islands.
Lower Wheel area: Climb the stairs and find the
microscope. There are slide samples for comparison of flea, onion skin, hair,
meat, feathers and butterfly wing. See that the books have been removed from
the drawer. Open
the bottom cabinet and place the books in the drawer.
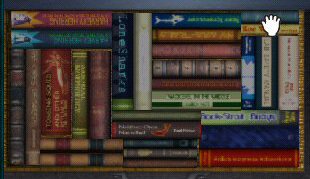
Book
Puzzle: Arrange the books to get them all fit the
drawer.
Upper Deck: Talk to Katie about the orca and the
town meeting. Ask about Andy.
Upper wheel area: Turn right and climb the ladder. Find a
‘Stop
meddling or else’ note and that the GPS is broken. Press the red button
of the wheel and hear a response from another boat. Cool!Tell Katie the GPS is broken. She advises that you bike to Hot Kettle Cafe
and see if Holt Scotto will lend you a GPS.
Get off the boat, left, turn right and up the ramp. Take the helmet,
click on the helmet to wear it and ride the bike to Hot Kettle Cafe – always
wear the helmet when you’re on the bike.
Meet the Town’s People
Hot Kettle Cafe: Check the posters outside and then
enter the cafe.
Talk to the lady behind the counter. Talk to Holt Scotto
and learn about Cadborosaurus is a
snake horse. Learn about shanghaiing. Holt gives a test before he lends
you his GPS. A basket and the quiz are in inventory.
Talk to Jenna Devlin behind the counter again. She’s loaded with information. Eat
some clam chowder. Now, I’m hungry.
Check the Menu board. Look around and see a post card
located to the left of the private area about only male
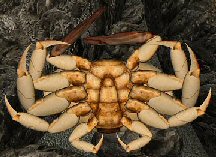
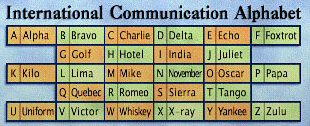
Dungeness crabs are harvested and how to identify them from their skinnier abdomen. Check the Maritime Signal flag chart.
Check all the ornate dark panels around the room and see that there’s a puzzle
behind 3 of them relating to deck cards. Look at the book case and check out the
Sea Monster book and learn more about Caddy.
Whale World:
Talk to Andy Jason. Note the $138.43 fine for clamming without permit (Quiz#2)
poster behind him.
Check the museum to your right. Learn about
whales. All the games need a key card to play.
Go to Gift area by the main entrance door. Look around the gift area especially the boat in the bottle by the exit door.
Ask Andy for the pass for all the
games at the museum. The boat in the bottle was made by Benjamin Hawkins and
Andy bought it from Hilda.
Holt’s
Quiz
Katie’s Boat: Go back to the boat and use the computer.
Check the journal for updates. Call the Hardy boys if you need help. Read
mail.
Quiz: Use the DI Postal to check the answer to the quiz.
Use the scroll bar on the side to see the selections.1. The sun always sets in the west.
2. What is
the current fine for clamming without permit in Snake Horse Harbor?
$138.43.3. The left side of a boat is its port side.
4. The moon always rises in the east.
5. What does this mean in Morse
code: …- — – . ….- …. — .-.. -?
vote4holt.6. The North Star is part of what constellation? Ursa Minor
or little dipper.7. A schooner is a boat with at least two masts.
8. What is the name of the knot below? Fisherman.
9. What kind of is it? Bend.
10. Bring
me a male Dungeness crab? Check the picture to supplement the postcard knowledge
of what a male crab looks like. Now go crabbing.
Lighthouse: Ride the bike to the lighthouse. Go to the
beach and see 2 fishes washed ashore. Turn right and get 3 rocks on the right. Turn left to a big rock and see
a Dungeness crab. Check if it is male or female. Go to the left side of the rocky area towards the
lighthouse and see mores stones, crabs and holes in the sand. Look in a tidal
pool and take S S wood. I found the male crab under a rock one screen before the wood.
It might be under a different rock in your gameplay.
Look to the rocks on the water and see a bottle between 2 rocks.
Skipping stone puzzle:
Throw a stone at the bottle to dislodge it between the rocks. Select a rock, the
angle to throw it and the strength of the throw.I got the bottle using
the flat stone on the left, third from left arrow angle and with the strongest
rightmost power. Check the bottle (first) and see a note – Rosebud 42.517.
Check the lighthouse and Holt kicks you out. Hmmm.
Hot Kettle Cafe: Give Holt the quiz and the male crab
in the basket. Take the GPS and study it in inventory.
Talk to Jenna about the bottle. Learn about Hilda Swenson, a former mayor who
started doing bizarre things when her husband died and now lives in the island
across the channel.
Katie’s boat: Talk to Katie about Holt and Jenna. As her
about the wood and she recommends to contact Casey Porterfield at the Maritime
Library.
Wood sample puzzle: Use the phone while on the
dock
and call Casey. Click on phone, click directory to find Casey’s number and then click on dial. Have a weird conversation.
He wants to know what kind of wood it
is.Go the book drawer you arranged and look up Arboreal Morphology. Call
Dr. Predoviciu whose number is at the back of the book. Talk to her and she needs to have the
description of the wood under the microscope.Microscope: Click on the blade
to get a slice of wood on
the table. Click on glass slide to place the wood on the slide. Click on
wood on glass slide and then look at wood under the microscope. Call Dr Predoviciu.The
answers to her questions are: Brown, brown-reddish, many
holes, same size, pretty sizable – she then comments that it is a tropical
hardwood. There are horizontal lines. The wood is Luan.Call Casey. Tell him Luan. He says to call him in an hour.
Hunt for Bottles with Coordinates
Kayaking: Go to the end of the dock.
Take the bottle
(second)
floating above the kayak. The message reads 08.615.
Take the life jacket,
and helmet.
Click on
kayak to start kayaking. Look at GPS and note 2 existing waypoints – the dock
and the lighthouse.Paddle forward 2xs and take floating bottle
(third). The note states W123.Turn around, forward 1x, right, forward 4xs to red buoy #12.
Turn left, forward 2xs to Danger marker, left and forward to a cave on the
cliff side.Enter the cave, take the left
fork and look at the floating bottle (fourth) at the back
of the cave. The note states N48. Go out of the cave.GPS: Look close at GPS in inventory.
Click on ‘Make New’.
From the
bottle notes data, type in Latitude: N48 42.517. Longitude: W123 08.615.Click ‘Create Waypoint’. A new waypoint is seen on the GPS.
Navigate to the new waypoint close to buoy #6. Go to the beach.
Beach: Go forward on the beach loaded with air holes. Do
not climb slippery rocks yet or you might have an accident. Take a break and build a
sand castle for fun.
Go to the end of the beach and look close at clump of seaweeds. Find a
shell box with a maritime flag lock.
Shell box
puzzle: Deduce
the letters associated with the Maritime Signal Flags using the chart that is on
the wall of the Cafe.Rearrange
the letters to form a word that is seen in the game.Click the
code on the box to open.
R
O
S
E
B
U
D


Letters in Shell Box: The shell box opens and see letters
inside.
The first one shows Port and
Starboard directions.
The second letter is a story which makes no sense.
Story Puzzle: Each line of the story has a word that
corresponds to the Maritimes alphabet from the Signal Chart at the Cafe.
Maritime words in the letter: Alpha, Sierra, kilos, hotel, Sierra,
Alpha, Juliet, Juliet, Delta, foxtrot, Oscar, Romeo, hotel, India, lima, Delta
Alpha Sierra, golf, India, foxtrot, tango.Type the alphabet
that corresponds to the first letter of those words on the lines at the
bottom of the story. If wrong, the game will not let you type it on. ASK HS AJ JD FOR HILDAS GIFT.
The third letter is a letter from
Hilda Swenson, the former mayor who lived at the island across Deception. She
wants you to send something in Morse code at top of the lighthouse.
Pull back and have fun at the tidal
pool filled with starfishes, anemones and a fish. Go back to the kayak, wear the
life jacket and paddle back to Katie’s boat dock.
Hunt for Hilda’s Gifts
HS: Let’s go talk to HS (Holt Scotto)
at the Hot Kettle Cafe. Before Holt will show Hilda’s gift, he wants you to
solve the chess problem.
Chess Puzzle: Look in his duffel bag for the chess book
and study the different moves of the chess pieces. Note the
3-4-7-5 bookmark. Find the 2 moves that can checkmate the King.Senior detective = Move R(ook) to position H5. Move R(ook)
to position H7.Junior detective = Move Q(ueen) to
position D6. Move Q(ueen) to position D8.
Talk to Holt. Holt shows you the scrimshaw with
oneBum etched on it.
JD: Talk to Jenna (Jenna Devlin)
about Hilda’s gift. She needs to go clamming before she can do something for
you. She wants 15 clams and gives you a bucket. Get the permit from Andy
Jason.
AJ: Go to Whale’s World. Andy Jason tells
you that Hilda’s gift is
the design on the key chain given to
customers who goes on his whale tour. Before Andy will give you clamming permit,
he asks that you put together the Caddy model at the gift area.
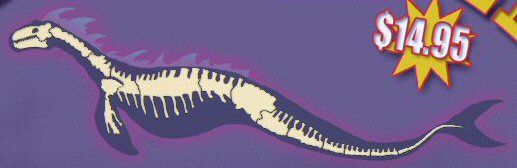
Cadborosaurus (Caddy) puzzle:
Put the bones on Caddy’s outline to form Caddies skeleton.
Talk to Andy
when the puzzle is completed. He gives you the
clam tube and the permit. The clamming directions are: Look for little holes in the sand.
Sometimes water will squirt out of the holes. Center the tube over the hole,
push it down into the sand and pull.
Museum Games: Look at the pass card
and notice that you can win a whale tour if you successfully finish all the
games in the exhibit area. It is a way to get a look at Hilda’s design on the
key chain.
Look at all the exhibits before playing any game. It
will help in some of the games.Dolly the Dall’s game – The object of
the game is to eat as much fish as you can while eluding whales, toxic products,
giant squids and also rising to the surface to breathe. When you have eaten
enough, you win.Swim to Freedom – Answer the questions correctly and the whales will swim
forward to freedom. 2 wrongs will start a new set of questions.It is best to save the game, listen to the questions and if you make a mistake,
go look up the correct answers from the museum exhibit. Then replay the saved
game to answer correctly. The questions changes for every new game started.Whale Sounds: Click
on a button and then click on the name of the whale that made the sound.Killer whale – weeeiiiweeeiii
Minke’s whale – khrdooh-khrdooh
Gray Whale – ohhhhhh… errrrrrr…
urp…Humpback whales –
aoaooo-uuuu-woaoohDall porpoise – prrrrrrrr…
prrrrrrr…Feeding Frenzy: This is a timed sequence puzzle. Feed-click
15 fishes total on the mouth of the whales that pop up from the holes during a
certain time. A sound is heard if the fish gets eaten by the whale.The
whales show up in same order, so try to remember where they pop up. If after 5
tries and still have not successfully finished the puzzle, the machine will
malfunction and punch your puzzle card as game won.Whale of Fortune: Spin the wheel and
win the whale watching tour. The card gets punched for the whale tour.
Talk to Andy about winning the whale
watching tour. He will take you on a tour. When done ask for the key chain. Look
close at the key chain in inventory and see the letters Tren.
Clamming: Look for air holes on the sand. Click the clam tube
over the hole. Click on the sand from the tube to see what is taken and for it
to be placed in the bucket if they are clams. You need 15 clams.
Go to the lighthouse and look for 4 clams. If you don’t find all 4, leave for a
while and come back later.Go to the kayak, wear the life jacket and navigate to the secret beach. Get clams on the beach area. Safely climb a set of rocks at the middle of
the beach area by clicking on the joining of the middle and right rock. Then navigate
carefully towards the sand bar off the beach area. Get 2 clams at the sand bar. If you did
not find any clams, come back later and to find some. Go back to the beach area and locate
some more to make 11 clams. Yay! 15 clams.
Hot Kettle Cafe:
Talk to Jenna. She will take the clams and bucket. The cafe was broken into.
Food, tools and boat parts were stolen. Ask her about the necklace. Her niece
locked it in a toy box.
Toy box puzzle – Look at the first
booth and zoom in on the blue toy box. This is a memory puzzle using 3
screens. Match 2 pictures that are identical until all the pictures are seen.When the box gets open, see a necklace with the words
ELeph.
Hilda’s Gifts Puzzle:
Now that we have seen all of Hilda’s gifts, it is time to solve this puzzle. Go
to the computer at Katie’s boat. Use the Anagram Buster. Nancy types in all the
letters. Move the letters around to form – Telephone Number. So that is
the message Hilda wants in Morse code at the lighthouse – Nancy’s telephone
number.
Tunnel
Casey: It’s time to get an update on the wood we had
Casey check on. Use the phone and call Casey by scrolling the directory
using the arrows. The wood came from the SS Whitechapel Dawn that sank in the deep part of the channel 5
years ago – about a mile and half from the lighthouse. He sent you an e-mail.
Casey’s mail: Use the computer and read Casey’s e-mail. He wants you to
check out www.bombeck.lab/examples/royal.htm. Check the site using the search function
of the DI portal. Find out that the Hot Kettle Cafe was formerly the Royal Flush Saloon.
Hot Kettle Cafe: Go
to the private lounge behind the swing door. Look in the cupboard and see 2 boxes of Save
King boat parts. Read the framed newspaper clipping on the wall left of the
swing door. Hilda Swenson, the then mayor wanted to save the lighthouse.
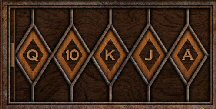
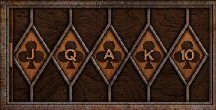
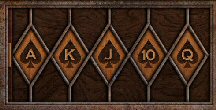
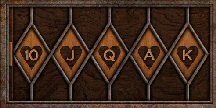
Sliding Card Panel Puzzle – Look in Holt’s bag to
read up on Poker hands. Look at the small sliding panel on the brown part of
the wall: right of main door, the panel to the right of that one and right of
the window by the booths in the main Cafe area. Arrange the numbers and suit to make the highest
possible poker hand – Royal Flush. A Royal Flush is made up of A, K, Q, J, 10
of any suit.Hint – Click on a button that
changes only one number-suit. Note the suit that has any of the A, K, Q, J,
10. Then click on the others to see if there are any of the number-suit to
make a Royal Flush. Then click to make a set of the above cards of that suit.
right of door left of long window area right of window by booth Do the fourth panel by the
left booth in the private room behind the swing door.
private room booth
When the last panel is done a grating sound is heard. Go to adjacent booth
and click on the table. The table slides away and a trap door opens. It’s
too dark to go down and Nancy says she needs a flashlight.
Katie’s boat:
Talk to Katie and learn about Benjamin Hawkins, the boat in a bottle builder.
Katie is hungry BUT do not give her the sandwich you made earlier or else you’ll
give her salmonella poisoning. Go down to the galley and make a plain peanut
butter and jelly sandwich. The fixings are taken from the shelf on the left. Those things in the
fridge are not trustworthy. Give the sandwich to Katie. Take the headlamp.
Hot Kettle Cafe’s Tunnel: Go
to the private room and click on the right booth’s table. Click on the
headlamp. Go down the ladder and note a lever on right side of the trap
door used to open the trap door from below.
Go forward the tunnel and see a cairn. Turn left, go forward
into the other room and up the
wood ladder. See the clothing store that was robbed.
Turn around,
forward until the cairn seen earlier, left and go through
the long tunnel. Elvis was here.
Take a left on the next
cairn. Go forward and up the crates. Open the trap door to the hardware that was
also robbed. Go back to the cairn and take a left.
Go forward and right on the
next cairn. The left fork leads to a dead end. Take the long trek to a metal door. Take an oilcan
from the box.
Go forward and see a door with a lever. Pull the lever.
Sea Serpent puzzle part 1:
Go forward to an etched door – It takes two to make it
disappear. Click on panel and see 4 parts of a sea serpent. It is
missing 4 parts of his body.Move the pictures to where you think the
body parts should be.The 2 middle pieces up and the outer
pieces down.
Go back through the tunnel and back
up to the Cafe. Pull the lever to open the trap door. Talk to Jenna about the tunnel.
Lighthouse
Lighthouse: Go to
the lighthouse and see some pebbles fall from above. Look up and escape being
hit by a large chunk of brick. Go to the left side of the lighthouse and see the source of the
ding-ding sound. The door is closed.
Go back to the main door. Look close
at the number lock on the door. Enter the number seen on the book mark of the
chess book Holt lend to you: 3-4-7-5. Enter the lighthouse.
Top of lighthouse: Climb to the top and see a calendar
with today’s date circled. Look at lamp and see that the bulb is missing. The front lid of the lamp is rusted shut.
The lamp is attached to a Coast Guard Signal Box. Note the Koko
Kringle wrappers.
Go down and look close at the stove’s
pipe. Pull the lever.
Basement of lighthouse: Exit the lighthouse and go around the
back. Click on the door that was closed earlier. Go down the ladder. See a trap
door on the floor. Check the table and see a box of Lightmeister. Take the third
from right working light
bulb. The broken light bulbs will make a ping sound when picked up.
Sea Serpent puzzle part 2: Go to the brown door with an
inscription – Through the efforts of many built the wall seen here. Look close
at the metal panel and see parts of sea serpent similar to the one we saw in
the tunnel. This set of pictures has different missing and present body parts.Flip up the middle two panels and the 2
side parts down.
Sea Cave: The
trap door opens when the sea serpent puzzles are correctly done. Go down and find yourself in a sea cave. On the wall is a
depiction of a sea serpent. We do not have enough data yet to know what to do. Go back up to the
top of the lighthouse.
Lamp: Place the light bulb on the back lid of the
lamp. Use the oilcan on the rusted front lid. Press the button on the base of
the lamp.
Morse Code Message to Hilda: Look close at the code
sender and type in Nancy cell phone number – 523-555-4399.….. is 5, ..— is 2, …– is 3,
….. is 5, ….. is 5, ….. is 5, ….- is 4, …– is 3, —-. is 9, —-. is
9. Press SEND.
See a light beyond respond to your code. Move back and the phone rings.
Talk to Hilda Swenson and learn that she sent you an e-mail.
Hilda’s
New Puzzle
Katie’s boat: See that the ice in the ice chest in the
closet melted and water is on the floor.
Hilda’s mail: Check your e-mail and see new
coordinates.
New Coordinates Puzzle: N 48 42.ABC, W 123 08.7DE
A=
Number of ‘nuns’ surrounding Snake
Horse HarborB = The ID number of the buoy that’s
got the graffiti on it.C =
Number of ‘isophase buoys
surrounding Snake Horse Harbor + 4D = How many dollars Jenna charges
for a cup of clam chowder.E = Number of cairns in the tunnel.
Use the computer. Check under DI Portal,
search, Nautical Definitions and nuns. Do the same for isophase.Nun – a red even numbered buoy that
marks the left side of a channel leaving a harbor.Isophase – a pattern utilized by some
lighted buoys where the light is on and off for equal intervals.
ABC: Take the kayak out and find out that there are 4
nuns (#s 6, 8, 10, 12) and buoy #8 has graffiti. There is only 1 isophase buoy
(buoy #12), 1 + 4 = 5.
D: How many dollars Jenna charges
for a cup of clam chowder.
Bike to the Hot Kettle Cafe and look
at the menu to find out that Jenna charges 3 dollars per cup for her clam
chowder.
E: Number of cairns in the tunnel.
Go down the tunnel via the table of the booth at the private dining area.
There are 5 cairns.
New coordinates:
N 48 42.ABC is N 48 42. 485
W 123 08.7DE is W 123 08.735
Go to the kayak. Make New
waypoint on
your GPS by entering the new coordinates.Kayak to new waypoint and look at the
floating sealed container. Take the Zap waterproof transmitter.The phone rings and Hilda talks to
Nancy.Mission – Below ground is a rock with
a strange anvil look. When you’re near it, behold what’s above. Letters found at
the beach will put a new spot in reach .. letters only a sailor could love.Hilda’s
Last Puzzle
Hot Kettle Cafe: Go down the tunnel
and take the long tunnel to the crossroad. Turn right to do the automatic long
trek. Go left by the cairn to an alcove. Look close at the anvil stone.
Click the up arrow and see an opening top of wall.
Maze in tunnel:
Enter and see another tunnel. Since this is Hilda’s direction, she must have
left clues to help us. Look at the letters found in the shell box at the secret
beach.
P = port and S = starboard. P is left
and S is right. So the directions on the letter is L R R L L R R R L L R L L.Follow the directions and end up in a
dead end. Look close at the boulder and see new coordinates written on it. The transmitter + N48 42.522, W
123 08 .799.
Kayak again: Back
to the kayak, enter the new coordinates to make a new waypoint. Navigate the
kayak to face buoy #8. Take the transmitter from inventory and click it on
either side of the kayak. A sunken buoy floats up. Open the box attached to the
floater and take the binoculars. Pull back and get a call from guess who –
Hilda.
Benjamin Hawkins’ notebook was taken
and is being misused by somebody. The notebook contains all the underground ways
Hilda and her husband found. Look at the boat in the bottle Andy has.
Whale World: Look
close at the boat in the bottle left of the entrance door. Use the binoculars
and see symbols on the sails. These are the symbols seen at the sea cave under
the trap door in the lighthouse. Let’s go there now.
Lighthouse: Code in 3-4-7-5 on the lock of the door.
Enter, pull lever behind the stove pipe and then
exit. Go to the left door with the bing-bing-bing sound. Enter and go down to
the sea cave under the trap door.
Sea Cave:
Look close at sea serpent depiction and see the symbols seen in the sails
of the boat in the bottle – W, Cross, Star.
Sea Serpent Icon Puzzle: Click on star button.
See 2 circles that can be rotated by
clicking on center green button.
Rotate the right circle to have the
cross symbol in the mouth of the serpent.Rotate the left circle to have the W
symbol in the mouth of the serpent.See a lever-gear machinery. Click on
silver lever on right and a secret cove is exposed.
Orca
Take the kayak and go back to the
cave under the lighthouse cliff. Take the left fork and see a new opening
on the wall.
Paddle in
and see where Benjamin
Hawkins used to hide out. Paddle to the end and see crates, balls and frozen
fish. Go forward, hit the yellow container and get a surprise. The orca is
playful and is not wild at all. Play with her with the beach ball.
Take a look at the paper on top of harness box to see a marine animal harness
chart for a juvenile orca. See a pair of gloves on top of the frozen fish boxes.
It has Firestone written on them. Kayak out of here and say bye-bye to the orca.
As soon as out of the cave, the phone
rings. Talk to Bess and discuss the possibility of the smugglers using the orca
to retrieve the smuggled goods from the wreck of the Whitechapel. Kayak back to
the dock and
find out that Katie’s gone. Now what?
Go to the Cafe and talk to Holt and then Jenna. Holt won’t help and same goes
with Jenna. Go to
Andy at Whale world (if you come here before the Cafe, the place is closed).
Andy helps and brings you close to the smuggler’s ship.
Smuggler’s Ship
Evading the smugglers:
Climb up
and hear the smugglers. Turn left, forward, footsteps, left to hide, right (see
animal furs that the smugglers were retrieving from the Whitechapel), forward,
voices, turn right to hide behind the drums, forward, right to boxes, turn
around, forward, footsteps, right, forward to steps going down.
Katie: Go down. Open the wheel door. Enter and see the
orca. Go around to the other side and enter the other hold door. See the back of
Katie sitting on a chair. Take the gag off and talk to Katie. Hear someone come.
End
Run: Go left to hide in the stacked crates. Andy, who else! While he is looking for
Nancy, go forward to the hold door across the room. Go forward as far as the other door
and where you saw the orca the first time. Click on door and it is slammed shut
on you. Face smirky Andy. As soon as able turn left and throw the yellow canister to the orca
or on the water. Watch!
This
document may not be distributed without express written permission of the author
and the content may not be altered in any way.
For
Questions or Comments on this Walkthrough,
Please write to:
MaGtRo
Copyright © 10/2003
MaGtRo