Jazz and Faust – Cheats
Jazz
and Faust
By 1c
Company
Walkthrough by
MaGtRo June, 2002
Game
Play: This is point and click game and is mouse
driven. The Main Menu can be accessed within the game by pressing ESC. The
Main Menu has the Save, Load, Options, Credits and Exit. To go back to the
game from the Main Menu press ESC. The cursor changes over an active item,
location or person to show information (spyglass), move (arrow), hammer
and anvil (use), hand (can be taken) and dragon (to talk to). Right click
of mouse opens the inventory, a second right click closes the inventory
and left click on an item in inventory will place it on a frame for
further usage in the game by clicking the dragon on item or person to use
it with. Arrow keys will scroll to see what is inventory. To save a game,
type the name at the bottom (backspace to retype a new name) and then
press enter. Double click to a place makes the character run towards
it. The game is very linear and exact activities have to be done to
advance in the game (enter a place or pick up inventory).
In a prosperous
country in the heart of the desert, invaders led by Alkaim and his nephew
Selim entered the palace of the Supreme Ruler and killed him. The Princess
Lousa survived and when she grew up became the favorite wife of Alkaim.
After many years, rebellion due to the people’s dissatisfaction drove
Alkaim and Selim in to the desert with loot treasures and Lousa. They
settled in the night at a ghost city, where Lousa induced Selim to kill
his uncle to have control over all the treasure. They left Alkaim alone
with no food and water and traveled to a deserted temple where they hid
most of the treasure. They knew that Alkaim will come after them and
escaped overseas to the coastal city of Er-Elp. Lousa dressed as a man and
acted as servant of Selim, who is hiding behind a merchant’s disguise.
They devised a plan to elude Alkaim. Selim, acting as a merchant went to
the police station and told a story about being beset by robbers in the
desert and the only survivor is himself, his nephew and a slave. The story
continued in finding treasure in a temple in the desert, of having killed
the nephew because of greed and of the fear of revenge from the ghost of
the nephew, Selim. He asked the Chief of Police for protection and was
told to leave the police alone. That night 2 men were decapitated and
found in the country house of the merchant and his slave. The police did
not continue the investigation of the foreigners’ death. Lousa has killed
both Selim and Alkaim and escaped to go back to her tribe in the desert as
sovereign and sole owner of the treasure.
The opening scene
shows Jazz (left) and Faust (right) wave at the gamer and playing a game
of dice. Click on either one to choose the character for a new game. Read
the background of the main characters in the manual.
Jazz
Er-Elp
Police
Station: Jazz in his cell and the guard on his desk
are asleep. Selim, disguised as merchant and using the name Alkaim comes
in and begs protection from the Police. Selim gives the story as described
above and was summarily dismissed by the Police. Jazz kicks open the cell.
Go out, look around and pick up the Whaler gin, the police have
confiscated. Wake the guard up by getting the Whaler Gin from inventory
and clicking it on the guard. The sergeant says that there will be a court
hearing and 150 coins is needed within 3 days or else Jazz’ ship Smokey
will be impounded for smuggling.
Porch of
Police Station: Look around and
pick up the big axe on the left by the stocks. Look in the cell on
the right and talk to the animal trainer with his rat, Lucy who bit a
policeman.
Police Station Square: Look at
the hole under the steps and the an active spot on plants on the
right. Trade
Square: Exit right and talk to the oriental
seller. He recommends for you to go to the tavern and talk to
Hugo.
Tavern
Square: Pick up the cup from the
table. Talk to sleeping Hank and he wants a cigar. Read the note tacked on
the door about the magician at the first floor of the tavern. Enter the
Two Knives Tavern. Look around and say Hi to Miranda, the waitress. Try to
get cigar from the red box on the bar and the barkeep will stop you. Try
talking to the grouchy barkeep. Talk to Hugo sitting at the table on the
right. He buys the Smokey for 50 gold coins (2 bags of gold) and he
takes care of the impounding and other fees. Click on the chair and sit
down. Miranda will come and ask if you want a bottle of wine. Click the
arrow key in inventory and get the bag of coins, click on Miranda and buy
a bottle of wine. If the bag of gold is not placed active on the
screen, a hand will appear and when clicked will get Jazz to not order
anything and stand from the table. Miranda talks about the 2 decapitated
men last night. Go to the balcony and try to open the Magician’s door.
Exit the tavern and open gate on the right.
Port: Pick up a
cannon ball from bottom of the screen and a lantern from the
cart at bottom right. Go left to the berth and was told go away by
a guard from Jazz’ former ship. Go to the lighthouse and look
around. Go to the pier at the bottom right and look
around.
Finding out about the murders:
Trade
Square: Talk to the oriental seller and he
says that it’s hot today and needs refreshment. Give him the bottle of
wine. He talks about the widow who found the dead men (trigger for widow’s
house to appear). For further info from him, he wants more wine but wine
cannot be bought right now.
Widow’s
house: Look around and note the ladder
by the house. There are steps to go under the bridge but Jazz will not go
there. Enter the house and talk to the widow. She does not have time to
talk since she’s waiting for the cloth dealer. Try taking the basket. Exit
and see an exit to bottom right for Widow’s Country House which is not
available at the moment.
Trade
Square: Click on the bolt of red cloth on the
right side of the table and the oriental seller will sell it for a
discount. Buy a bolt of cloth. Use the cup on fountain and get
cup of water.
Widow’s
house: Give the cloth to the widow. As
payment is information to satisfy Jazz’ curiosity. She rented her country
house to 2 foreigners and found them killed this morning. A crowd is there
and the police are looking for clues. Jazz can go find out for himself and
go by canal to first house out of town (trigger to country road).
Widow’s
Country House: Talk to man and find out
2 headless corpses but only one head were found. He blocks entry to the
house and yard. Pick up empty bottle by wall and the hat
(cowboy) by the plant on lower right. See a road to the cemetery on lower
right that is not accessible.
Tavern
Square: Show the hat to Hank but he
wants a cigar first. Enter the tavern and see 2 sailors arm wrestling.
Show the empty bottle to the barkeep and he recognizes it as Whaler gin
and only Martyr drinks it (trigger for overturning mug of wine). He said
Hank knows where he is. We need a cigar for Hank to talk, so start a
diversion. Go to the 2 sailors arm wrestling and click on the mug of wine
to tip it to start a fight. Immediately, click on red box on bar to get 2
cigars. Go out and give a cigar (out of 2) to Hank. Show him the
hat again and he says that it is Martyr’s who live under the bridge
(trigger to bridge).
Under the
bridge: Walk under the bridge. Pick up
dirty rag beside the crate of bottles. Click on the pavement close
to the rope and then use the axe to get rope. Wake Martyr up
by pouring the cup of water on him. Show Martyr the hat and empty bottle.
He tells his story of falling asleep by the house, woke up and heard cries
from house, saw a figure in dark cloak running out of the house carrying
something. Jazz believes him and correlates it with the merchant and the
treasure.
Finding information about the Stork:
Tavern
Square: Ask Hank about the man
with a black cloak. Give him the last cigar and Hank says the man has gone
on the ship Stork. Enter the tavern and ask the 2 sailors about the Stork
(trigger to buy wine). They told you to go away. Talk to Miranda about the
ship and she asks if you want to buy a bottle of wine. Buy a bottle of
wine and then give it to the sailors. The sailor said that he saw the
captain of the Stork coming down the stairs over there. Go to the
magician’s room upstairs. The small apprentice would not let you talk to
the magician unless you give him an exquisite gift, which you can get not
necessarily from a live person (trigger for cemetery). Exit the tavern to
nighttime.
Police Station
Square: Now that it is nighttime,
the plant on the right side is hiding an old jug that cannot be
taken.
Cemetery: Talk to
Martyr. He gives you a gold decoration not to tell on him. Pick up
the harpoon by the fence where Martyr was before (the rope is
automatically tied to the harpoon). Look at the gravestone on the left.
Use the cannon ball on the headstone and get gravestone fragments
in inventory.
Tavern
Square: Go the Magician’s room and give
the gold decoration to the small man. Talk to the Magician. He knows all
about what you want to know. The captain of the Stork is long away at
Black isles. He also said to be prepared to return the favor when you next
need help. Go down and Miranda tells you that Hugo wants to talk to
you. Talk to Hugo. He wants Jazz to be a navigator on his former ship
Smokey to bring goods to Black Isles. One of his men will keep an eye on
you.
Port: Still nighttime,
go to the pier at the bottom right and pick up the empty bird
cage from the bottom right of the screen by the grilled door. Note the
barrel of oil by the stair railing. At the berth, try to get
onboard the Smokey and the guard still will not let you on
board.
Getting on board the Smokey:
Tavern Square:
Talk to one of the sailors about trying to
get on the ship. He said you need to be a magician to do that. Go up and
talk to the magician. He wants a gravestone and a dead man’s head before
he will help you (trigger for country house). You already have the
gravestone and heard of only one dead man’s head today – the murdered
man’s.
Widow’s
Country House: Still nighttime, try
getting to the house by the door but a guard comes out. Jazz hides. It’s
too bright with the lantern. Cover the lantern with dirty rug. Try to
enter the door and hear them talking about the severed head in the well.
Take the lantern and hang it on the well. Look at the head and use the
harpoon on it. Jazz places it back until he can disguise it (trigger for
ladder).
Widow’s
house: It is now close to daybreak. Get
the ladder and Jazz props it by the overhang. Need to distract the widow,
so knock on the door and immediately click on ladder. At the balcony, get
the basket. Climb down and go back to the well at the Country
house.
Widow’s Country
House: Spear the head again at the well
and it is automatically placed in the basket to get a basket with
head.
Tavern
Square: Go the Magician’s room and give
the head to the magician. He doesn’t want gravestone fragments but a whole
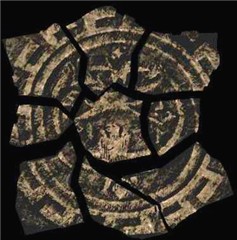
one. Gravestone puzzle – When a fragment is highlighted, it
can be turned around by right clicking on it to the position you think is
right. The positions of the fragment are clues as to where they go, like
on the corners or the cardinal points. To interchange position, one
fragment should be highlighted and then left click on the fragment you
want to change places with. If done correctly, all the fragments close in
and form a complete gravestone.
The magician gives 2
stones, a magical potion – pour one drop on a man and it will
make a man disappear and an amulet that will be needed in an
unexpected way.
Port: At
the berth, click the magic potion on the guard and he disappears. Click on
Smokey and talk with Hank inside the ship. He says that the ship is full
of rats and that they have to be removed before sailing because of the
goods. He also tells Jazz to light the lighthouse (trigger for jug and
oil).
Preparing to
set sail:
Police Station
Square: Finally, pick up the
empty jug.
Porch of Police
Station: Talk to the animal trainer in
the cell. Ask to borrow Lucy, who is hungry after eating all the rats in
jail. He might change his mind about lending Lucy if you see his widowed
mother and get some
food.
Widow’s house: Knock on the door and
Jazz explains about her son being in jail She gives a small parcel of
food. Porch
of Police Station: Talk to the animal
trainer in the cell and automatically gives the food. Give him the bird
cage and Lucy will return to him when Jazz’ problem is solved. Get a
cage with a rat in inventory.
Port: At
the pier, use the empty jug on barrel of oil to get a jug of
oil. At the lighthouse, click the lantern on the top of
the lighthouse to get Jazz to place the lantern on the ground by the
stairs to the lighthouse. Fill the lantern with oil using the jug of oil.
Use the 2 stones to light the lantern and then pick up the burning
lamp. Click the burning lamp on the lighthouse and Jazz climbs the
lighthouse. The lighthouse is now lit.
Black
Isle
Jazz and Hank sail to the
Black Isles. While on the ocean, Hank and Jazz toast to luck but Hank
drugs Jazz unconscious.
Prison
Cell: Jazz wakes up in a prison cell in
the Black Isle. Hank enters Jazz’ prison cell and gives a bowl of
bread. He demands to know about the treasure since Jazz has been
talking to the magician, blackmailing the tramp and saw a stranger. Jazz
remains silent. Hank leaves. Click on the stone in the middle of the
floor. Click on what is hidden underneath and get a scroll. It was
written on a moonless night about a prisoner, a road to freedom and to
read the incantation over a small creature. A rat walks in. Aha! Use bowl
of bread on rat. While the rat eats the bread, Hank walks in and threatens
Jazz. Jazz backs up to the wall by the skeleton. Click on skeleton and
Jazz hits Hank unconscious. Click scroll on rat and Jazz becomes small.
The guard walks in and sees Hank. Go out the door and Jazz locks them in
the cell.
Outside Prison
cell: Note the pot with
spikes underneath. Pick up the poker and keys by the table
and the jug of water under the stairs. Try to pick up the
torch stand and it is too hot. Use jug of water on torch stand and get
torch and torch handle. Talk to the prisoner and find out
that he is the Captain of the Stork, imprisoned because of a tavern brawl.
Give the torch handle to the Captain and then use the poker on the bars.
Click keys on prison door to go outside to the square.
Look around Prison Square.
Go to the Garbage dump on the left and look around. Go to Tavern square on
the left.
Tavern square:
Enter tavern and forward to he bar. Sit on
barstool beside the Captain. The Captain talks about the beautiful female
passenger who wants to go to Khaen but embarked in the Black isle. The
Captain runs off to fight the man that caused him to be jailed. They
apologize to each other after Jazz calms them down. The Stork Captain
invites Jazz to sail with him to Khaen. Jazz meets Faust, Captain of the
Invisible. Faust owes him a favor now for saving his life. Exit the tavern
and click on the ship.
Khaen
The Captain tells Jazz about
the 7 Sorrows, an opium den where they can rest and talk. Exit to the
Lane. If you exit to the port, channel and harem gates, nothing is active,
so sightsee around, OK.
Getting in and
out of the slave market:
Lane:
The Captain moves away to check
the opium den. Meet the 2 sailors met at the tavern in Er-Elp. They said
that Jazz stole the goods and killed Hank. They were going to take Jazz
back to Hugo, the antiquarian. The Stork Captain comes back and stops the
sailors but one of the sailors shot him. Jazz brings the wounded Captain
to the Opium den. The guard says that Jazz is the one that caused damage
to a merchant and that since there is no jail in Khaen, he will be sent to
the slave market.
Slave
Market: Jazz is chained on the slave block
with another prisoner. Faust comes in the slave market and buys some wine
from the vendor. Talk to the other prisoner and Jazz will exchange food
for his plate. Click the plate on the jug of wine Faust bought at the
vendor’s table. Jazz throws the plate to tip the Jug of wine. The guard
beats the prisoners up for the incident. Jazz asks Faust for help. Faust
picks the key off the guard and throws it to Jazz. Faust says see
you at the caravansary. The guard moves away. Click the key on the other
prisoner and he runs off chased by the guard. Jazz stands up and takes the
chains with him. Exit to harem gates.
Finding a way
to get to Caravansary:
Lane:
Note the carpet hanging and barrel of water
by door. Enter the opium den. Try talking to the sleeping man holding a
smoking pipe. Pick up the red hot poker at the center of the room. Talk to
the standing man,merchant about the way to the caravansary. He will be
going there but he wants to drive his sorrows away first. He wants a
hookah (An Eastern smoking pipe designed with a long tube
passing through an urn of water that cools the smoke as it is drawn
through). Exit to the Lane and dip the red hot poker in barrel of
water to get cool poker. Go back to 7 Sorrows and exchange the cool
poker with the hookah of the sleeping man. Give the hookah to the
standing man. He says he is the main eunuch of his Sultan’s harem. He was
to buy a young girl but lost all his money. He wants you to find a young
girl for him and then he will take Jazz to the Caravansary.
Getting a young
girl for the Sultan:
Harem
Gates: Talk to the guard and he shoos Jazz off
. He also wants you to tell the laundress with the carpet to hurry because
she is expected in the palace (trigger for
carpet).
Lane: Try to take carpet but it is too high.
Enter opium den and get poker back from sitting man. Use the poker on
carpet.
Money changer shop: Talk to
moneychanger for a veil but wants something in return (trigger for
clock).
Lane: Enter the opium den and pick up the
clock that appeared on the table beside the sitting
man. Money
changer shop: Exchange clock for
veil. He says to change at the opium
den.
Lane: Enter and exit the opium den, coming
out at night and wearing the veil. This ‘lady’ would not run when double
clicked!!!
Harem Gates: Talk to the
guard.
Harem: Talk to the eunuch. Stay in
front and then walk to the left of the eunuch. He wants you to take
another carpet to be cleaned. Enter the open curtained doorway on the
right. Jazz asks a houri to get in the carpet. Exit to Harem gates. The
Sultan’s eunuch says to hurry to get to the caravansary.
Travel through the
desert.
Caravansary
Forge: Enter and pick
up the pincers by the fire.
Inner
caravansary: Pick up ripe apple from table. Talk to
Faust. Faust fell in love with the girl in Er-Elp who wants to be taken to
Khaen. Faust could not since he already has a passenger that gave him a
crystal as down payment but the passenger never returned. Faust asked the
Stork Captain about her and they got into an argument about it. Jazz
explains about the girl being the murderer and the story behind it from
what he heard in jail. A canopied carriage enters the caravansary square.
The 2 men hear a cry for help because of a leopard.
Caravansary
square: Faust tries to distracts the
leopard while Jazz thinks of something to do. Click the amulet on leopard
when the leopard is closest to Jazz. Then click the chains on the
leopard.
Inner
caravansary: The maidservant tells the 2
heroes that the lady they saved wants to talk to them. The lady is Lousa,
who killed the 2 men in Er-Elp and Faust’s love. Lousa explains her
history, about her father the Supreme ruler of the Red Sands, the attack
on the castle by Alkaim, Selim’s beheading of her father, of being
Alkaim’s concubine, the rebellion, the escape to the City of the Dead,
where they hid treasure and the happenings in Er-Elp. She has a crystal to
open the gates to the City of the Dead and wants the men’s help. Faust is
about to declare himself when Lousa says they will talk tomorrow.
Jazz picks up the
half of a crystal that Lousa left on the chest but only a fool
leaves his treasure unattended. Jazz plans to get to the treasure by
himself. Exit to square.
Merchant’s
canopy: Click on men and hear them
talking about one’s adventure in the desert. They stopped and don’t want
to be overheard. Exit and then go back. Look at lit window above the
canopy where the merchants are now. Look at the embedded pegs holding the
canopy. Use pincers on hot coals to get pincers with a small piece of
coal. Use the piece of coal on the pegs.
Caravansary
square: Look at camel. Use apple on
camel. Jazz brings the camel under the window and climbs on it. He
overheard about entering the City of the Dead by going in the well and
through an underground vault. Jazz falls off the camel. Exit to the
desert.
City
of the Dead
Look around and
go to the caves at right.
Cave
entrance: Use the 2 stones to light the
brazier by the cave’s mouth. Lit the torch on the fire. Enter the cave’s
mouth to the grotto.
Grotto: Take the
pick axe by the cave’s entrance. Talk to the Yehu standing by the
other cave. He captures Jazz and brings him inside to help another Yehu
trapped under a fallen beam. Use the pick axe on the beam. It did not
work. Go to the underground city on the left and talk to the Yehu. Jazz
brings him back to the fallen beam and together they freed the other Yehu.
Go to the entrance to the Temple on the right and then go back to
talk to the saved Yehu. He does not respond. Show him the red half of a
crystal. He goes he, ye, he, he, hoo and gives a luminous mushroom.
Go to the entrance to the temple and get raised to the top.
Meet Lousa, her maid and
Faust. Jazz tries to explain his taking the crystal. Give the red crystal
to a nervous Lousa. Enter the temple but Lousa asks for more light. Give
her the luminous mushroom. Enter the temple again.
Temple:
An ironclad hydra takes Lousa, who drops the
luminous mushroom. Jazz does not have anything in inventory. Go upstairs
and realize that the Hydra is protecting its nest. Click on Faust at the
ground floor of the temple. Jazz goes down and asks Faust to distract the
night beast with light. They both climb up with Faust holding the luminous
mushroom. Stand close to Faust and then click on the brick wall on the
right side of the entrance to climb up to the beam.
Jazz can not get the rope on
the right wall or the cocoon on the other side of the beam. Click on the
net on the right side of the cocoon at the foreground, shaking off some
items that fall on the temple floor. Get off the beam by clicking on the
bricked wall again. Jazz jumps off the beam. Click on items on the temple
floor and Jazz will go down and pick up gloves, saber and a
bone. Click on brick wall again to make Jazz climb back up.
Use the saber to cut the
rope holding the foreground cocoon. The cocoon drops on the temple floor
and the hydra follows it and disappears when the light hits it. Use the
saber to cut the web holding the far cocoon with the princess inside. Jazz
says it’s too high and the drop will kill her. Go back down and talk to
Faust. Faust goes down and holds a net to catch the other cocoon with the
princess. Go back up the beam and use saber again on the web holding the
cocoon. But it’s too slippery. Use glove on web and Jazz pulls the web
releasing the cocoon.
In front of the dragon
statue, talk to Lousa. She says that the crystal is the key to the
treasury and the dragon guards the gate. She gives her half of the
crystal. Talk to Faust and he gives you his half of the
crystal. Click a crystal on dragon at center and Jazz will stand on
a lit carved floor tile. Place crystal back in inventory and talk to Faust
again. Jazz says the dragon moved when the floor tile lit up and asks
everybody to stand on a floor tile. Throw the bone into the dragon’s mouth
and then watch the cut scene.
The door to the treasury
opens up and when all of them are looking at the treasure, Alkaim rises
up. He puts a curse on all of them to go back in time to when they do not
know each other.
Faust
While relaxing at the port
of Khaen, Faust is approached by a red bearded man, Alkaim. Alkaim hires
the ship Invisible and its captain, Faust immediately. They go aboard and
sail to Er-Elp, where the red bearded man asks Faust to wait for his
return. Lousa talks to the Captain of the Stork for passage to Khaen but
was told that he goes to the Black Isle only. Lousa asks Faust for passage
but was reluctantly refused because he was already hired. Lousa goes back
to the Captain of the Stork and they leave for the Black Isle. Faust is
left wishing to find her again.
Er-Elp
Port:
At the berth, pick up the
crystal that might have been dropped by the lady (conflicting
versions). Faust hears a noise. Go to the port and hears the official
close the port because of the murders that happened last night – no ship
can leave without special permission.
Tavern
Square: Talk to Hank, who asks for
a cigar when he chats. Enter the tavern and try to talk to the 2 sailors.
Talk to Hugo, who tries to sell you a weapon. Sit down on the chair and
Faust will ask Miranda about news in Er-Elp. Miranda talks about the 2
decapitation murders that happened and that the murderer took one of the
heads with him. Faust ponders about the involvement of his passenger.
After Miranda left, a policeman asks for the Captain of the Invisible.
Faust admitted that he is the one he is looking for. The policeman is
tripped by one of the sailors.
On the way out, Faust says
it is bad to leave a man in need even if he is a cop. Stay in the tavern
and help the policeman. Go to the bar and pick up a bottle of wine.
Hit one of the sailors with the bottle of wine. Get bottle fragment
in inventory. The policeman tells Faust to leave police business
alone. Faust is told that the Invincible is seen involved in illegal
activities such as smuggling and pirating and that the ship will be
impounded. Further discussion involves showing proof of his innocence in
the charges by giving the policeman a bribe. He still cannot sail because
of the murders. Hugo talks to Faust about knowing that one of the murder
victims is his passenger. He again tries to sell Faust a pistol. Faust
does not have any money. Hugo says that Faust should try proving his
innocence in the murders. Faust needs money to keep Hugo
silent.
Police Square:
Look around. Faust cannot get in the police station to
ask for special permission from the police Chief.
Trader’s Square:
Talk to the oriental seller and give him the
crystal. The oriental trader is happy for Faust to pawn it for 2 bags
of gold. Talk to the boy, who wants candy for information.
Tavern
Square: Enter the tavern and give
a bag of gold to Hugo. He gives a pistol, a coin and his
silence to Faust in exchange for the gold.
Trader’s Square:
Click on the oriental seller’s table (trigger
for boy’s conversation). Talk to boy about distracting the seller with
smooth talk. Give the boy the coin (everybody really wants to be bribed
here!). The boy goes over and chats with the seller. Look at the
merchandise on the table and get the crystal. Oops!! Got caught! Faust
places the crystal back. Now what? Take the bottle fragment and
click it on the table as exchange for the crystal (wonder if that
will fool the seller long). Time to get out of Er-Elp. (Getting the
Crystal is trigger to get in the police station).
Police
Station: Enter and talk to the sleeping
police chief. He is mad to be awakened. Faust asks to leave the port today
and ask for special permission. The police chief asks on what grounds.
Give the bag of gold to police chief as proof of grounds to leave. He
gives the special permission.
Port:
At the berth, the guard will not let you leave
without special permission from the Police Chief. Give the guard the
special permission. Faust sails to Black Isle to find the mysterious
lady.
Black
Isle
Find the beautiful
lady:
Tavern
Square: Talk to the old fisherman by the
tavern door. Nothing is happening yet inside the tavern. Go left of tavern
square.
Warehouse: Talk to the man and
he says the warehouse is still closed. Try to get the net behind him. Note
the barrel of water. Try to touch the cat trapped up the beam of the
hut and the dog. Go right of tavern square.
Garbage Dump:
Talk to young boy. He will tell Faust where
the Captain of the Stork is if Faust can find his cat for him (trigger for
barrel). Prison Square:
Note the shark hanging on the right side of
the screen.
Warehouse: Click
on barrel of water and Faust will pull the cork off the barrel
emptying it. Click on barrel again and Faust will turn the barrel over the
dog. Click barrel again and Faust will climb on it and get the cat.
Wait Faust, what about the dog?
Garbage Dump:
Give the cat to the boy. Matilda, the cat is
now safe and the boy says that the Captain of the Stork is spending the
second day drunk in the tavern (trigger for seeing captain).
Tavern
Square: Enter tavern and approach the
bar. Talk to the drunken man by the bar. The Captain of the Stork gets
rowdy and starts a fight. The policeman arrives and takes the captain to
jail. Go outside and talk to the old fisherman about the beautiful lady.
He needs a net and is worried that he cannot feed his family (trigger for
entry to warehouse).
Warehouse:
Talk to the man. Ask about the net and he
said that they do not sell old nets. The warehouse has new ones but be
careful about fires since there is a lot of cotton in there. Enter the
warehouse. See a man running around. Click on the net hanging up the
ceiling. Faust climbs up the box and checks the securely tied net. On the
way down, Faust accidentally tips the fire stand and the floor is on fire.
Go out and the running man tells the warehouse guard about the fire. They
leave to get water leaving the warehouse unguarded. Get the old net
hanging behind where the guard used to be.
Find a way to have
ship repaired or how to catch a beast:
Tavern
Square: Give the net to the old
fisherman. He tells Faust that the lady left on a slaver ship for Khaen.
Faust cannot follow because he needs to have his ship repaired and has no
money (trigger to talk to barkeep). Enter the tavern. Talk to the woman
behind the bar. She needs someone to remove the beast in the Bamboo woods.
The beast has taken the shaman into the forest. If successful will be
handsomely rewarded. Exit the tavern and pick up the rope hanging
on the right corner post of the tavern.
Garbage
Dump: Pick up the axe on the
chopping block. Get the bone from the dumpster under the bearskin.
It’s too small for the monster but maybe a small animal. Go to Warehouse
and then north to the Bamboo woods.