Harvest Walkthrough by MaGtRo
HARVEST
By Michael B.
Clark
Walkthrough by
MaGtRo December, 2002
Allabaster, your dog vanished in the park.
Park:
Go forward 2xs under the light. Look down and take leash. Go up, turn
right and see a pond, bench and bushes. Turn back to left and forward to skyline
view of the city. Turn around and turn left to bushes. Look close under tree.
See a hole in the ground. Enter the hole.
Tunnel: Turn right and flip switch. Turn
back and enter through door. Turn around and find yourself locked in. Go
forward. Look at words on wall on the left. Tina and Bob married Jan 5, 1989
– Now Dead!!! Look close at panel right of grilled door. Open panel and
enter 1, 5, 8 and 9. Door opens.
House
Blue room – Den: Enter room, turn left and see a radio. Turn the knob
on the radio to show the green cross.
Bookcase – Turn right to bookcase with red, blue
and green balls. Read books by clicking on upper right corner of book. The
Bunker – How to build your very own Fallout Shelter by John P. Mosley. Note
the drawn 4×4 table and where the arrow starts. Bottom left – A Collection of
Short Stories by Michael B. Clark about Robby and Alfie. Bottom right –
Theories on Water Distillation by Johnny Mac Ray. Click on yellow paper
and note the water extraction process of pulverized rock process. The
pulverization process needs extremely high temps of at least 1250 degrees F.,
less than that will produce poison. Note the Diagram – rock crushing chamber
(place rocks on top) to pulverizing and extracting tank to water collection
unit.
Note the painting on upper right of bookshelf.
Turn the painting and note – reversal is the key, one way or the other,
opposite is the way.
Secret room – Press the protrusion at the top upper
right of the bookcase. Enter the secret room. Click on the white switch on the
right. The light doesn’t stay on. Exit the room.
Desk – Turn right and listen to message on machine by
clicking the top right arrow. Dr. Mackie wants to talk Mr. Webb about his
father. Open drawer to see a puzzle of the painting just seen. Read the letter
to Vance from Mark, Stacey’s husband.
Blue
room wall safe (Cat Picture on wall) – Click on picture of
cat and see a wall safe with a 6 button lock.
It is time to explore the other rooms. Before
going out the door, turn off light and see the halo of light. Go out through the
blue door. The red door is locked. Turn left and enter green door.
Green Room – Bedroom 1:
There’s another radio with the same icons – turn the
knob to show the green triangular flower-shaped icon with rounded base. Turn
left and click the blue curtain. See a wall safe.
Green Room Wall Safe Puzzle – The object of this puzzle
is to have all blue circles depressed. Numbering from the top as 1 going
clockwise to 10: click on 9, 10, 2, 3, 7, 8, 5, 6 and 1. Click center of
circle when all small blue circles are depressed. The safe
opens.
Read Journal and note the drawing at upper right
corner of journal cover. Close safe and meet John Webb, father of Vance and
husband to Susan. He gives you a list of things he wants in order for him to
leave the green room. He is stuck here because of unfinished business. Look at
the list in inventory – 1. Find Susan’s locket 2. Cause of his
death 3. Reason for Vance’s anger. John Webb also wants you to stop Vance from
using his Water Harvest Machine to harm people.
Box puzzle – Turn right and look close at
box on top of chest drawer. The object of this puzzle is to open the box by
copying the diagram from cover of John Webb’s journal.
 Inside, there are wedding pictures. Take the key card
inside the white envelope. Exit the room.
Living
Room: Go to the fireplace and play with the
pyramid. Look at the plaque at base of pyramid. Look down at fire in fireplace –
there’s a door behind the fire. Turn right and open the top cabinet door. Click
at bottom left button to turn on the TV. See the Water Harvest Machine room.
Close cabinet and note another active spot at bottom left cabinet door. Turn
right 2xs, forward to chest drawer and look down. Take the sleeping
pills. To the right is a closed door. Turn around, forward and turn right to
the foyer.
Foyer: Go through the wood door and see a
metal door to the elevator. The panel needs a key and keycard. Turn left and see
a mail chute. Look down and read the water disconnection letter by the Water
Company. Turn left, forward and right to kitchen.
Kitchen: Go to the yellow kitchen. Turn the
knob of the radio to show a green inverted flowerlike icon with triangle on top
with leaves. By this time all the radios in the house should show a green
colored icon. Open the top cabinet above the radio. Take Dog Chew Bones
and the bowl. Look close at sink and find out that there’s no water –
already disconnected.
Look close at vase on left side of the counter.
Take the key from inside the vase. Note the 3 blue pins, 1 yellow and 1
red push pins. Note also the squares on the white paper – looks like the key
lock of the safe behind the cat’s picture in the blue room.
Turn left to refrigerator and the panel on the
wall. Open the panel and flip the switch to the secret room. Go back to the blue
room.
Blue
Room: Cat wall safe – Click
on cat picture. Based on clue from kitchen counter – press from L – R, 2, 4 and
5 and then click at bottom rectangle. Click again to open, take CD and
read letter from the bank manager. Look close at Clue 1 of desk painting puzzle.
Close safe and turn to bookcase.
Secret
Room: Press the protrusion on top right of bookcase
and enter the secret room. Press the light switch on the right. Go forward and
see a closed blue door. Turn left and see a blue cabinet on the wall. Use the
key taken from the vase in the kitchen on the lock and then click to open the
cabinet. Press the button on top left and see the master control panel of the
corridors-room aka maze. Play around with the squares. Close cabinet and turn
left. Look close at upper right of the screen and talk to Vance Webb looking at
you from a monitor. He locks you in the room.
Turn around and see wood planks on lower part of
wall. Click on wood planks, enter, take pick axe and go forward to grill.
Use pick axe on grill and enter the red room.
Red
Room: There is another radio here – turn the knob
to show a green inverted triangle. Go forward to desk and look close at
box.
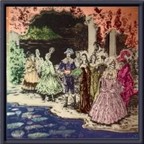
Slider Puzzle: Complete the picture to
make a picture similar to the painting in the blue room. Once completed, click
on picture to open the box.
Take red key and clue 4
for the painting puzzle on the blue room desk. Turn left, forward to dresser and
turn left again. Look close at bedside table and open top drawer. Take
locket and look at it close in inventory – oh how cute! Read Vance’s
journal. Find out that he thinks he killed his mom. Click to tear the September
5, 1995 diary page. Now, we have 2 on John Webb’s list. Open second
drawer and take red knob. To exit the room, click on deadbolt lock above
the doorknob and then click on doorknob.
Kitchen:
Open the freezer part of the refrigerator, take the ice tray.
In inventory, click-hold bowl and release on ice to make bowl of ice. Go
to the microwave on the counter. Press the bottom right rectangular panel to
open the microwave. Place bowl of water inside, close door and press defrost.
Open the microwave and take the bowl of water.
Living Room:
Go to fireplace. Use bowl of water on fire. Use the red key taken
from the red room box on secret panel. Take clue 2 and clue 3.
Close the cover of the panel.
Office:
Turn left from fireplace, forward to chest drawer, turn right and
open office door. Use CD on computer tower under the desk. Look close on monitor
and read the journal. Vance thinks he killed his father when he placed sleeping
pills in his Dad’s tea. Quit the journal and go out of the room.
Mail Chute in foyer:
Look at mail chute and click on
stuck mail. Read the mail by clicking on top left of envelope and find out the
real cause of John Webb’s death. Click on letter to place autopsy in
inventory.
Green Room:
Talk to the ghost of John Webb. Click on yes and give
him (by placing the item one at a time on his out stretched hand) the items he
asks for. Anger of Vance – give him the diary page. Cause of death – give him
the autopsy. Give him the locket. Take the purple key from his
hand.
Blue
room: Go to the desk and look close at the painting
puzzle.
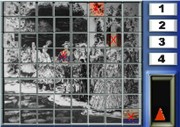
Painting puzzle in the
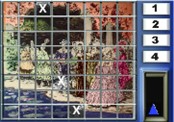
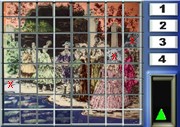
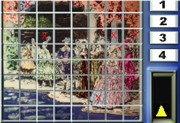
desk: The object of this puzzle based on the clue found
at the back of the real painting is to copy the 4 clues – one set of clues
at a time on the picture. If the clues are uncolored, the others should be
colored. If the clues are colored, the other frames should be uncolored. After
doing one clue, click on the number of that particular clue on the right
panel. If done correctly, a colored triangle will appear at the bottom. Take
the colored triangle. Do the next set of clues.
1.
Click on the frames to change it all to colored frames.
2.
Click on the frames shown by clue 1 to make those 3 frames
uncolored.
3.
Click on #1 on right panel. Take the colored triangle.
4.
Do steps #s 1- 3 using clue 2.
5.
Do the same for clue 3.
6.
Now change all frames to uncolored frames.
7.
Click on frames shown by clue 4 to make those 4 frames colored. Take colored
triangle.
clue 1
clue 2
clue 3
clue 4
Secret Room
Panel: Enter the secret room by pressing the
protrusion at upper right of bookcase (note the clue dots on the protrusion). Go
to the panel on the wall and click on upper left button. Place the colored
triangles taken from the painting puzzle on the corresponding triangles on the
panel. All the squares will light up.
Corridor maze main control panel puzzle
– This panel shows the interlocking corridors and rooms to
get to the elevator to access the basement. The object of the puzzle is to
mark with arrows by clicking on squares, a clear path to the upper right. The
arrows allow entry to doors. The arrows can be rotated to different positions
by clicking on them. By trial and error, go through the blue door and find a
clear path (without blockage behind a door). From the clue in the book in the
Blue room, the starting point is the second from left at the bottom.
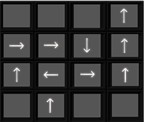
Note that once inside the corridor
maze: blue door is south, pink is east, gray is west and north is marked. Go
through the blue door, N, pink, N, gray, gray, blue, gray, N, N, N. Enter the
elevator, turn around and press down arrow.
Underground
Cell:
Go forward until the purple door. Open the
sliding panel to see Allabaster. Don’t worry, he’s just sleeping. Go to the end
of the hallway and see a closed white door. Go back to the purple cell door.
Close the sliding panel before using the purple key on lock and then click on
door handle. Enter and be greeted happily by Allabaster. Vance will come and
after the dialogue, will lock you in. Turn right and look close at broken part
of right wall. Use pick axe 5xs on hole to make a large opening.
Allabaster is now in inventory. Go through hole after calming Allabaster.
Cave:
Go forward and find a dead end because of
the crevasse. Go back to hole and turn right. Go forward and up the stacked
stone slabs. Ooops, the stone stairs goes unstacked. We’re trapped! Turn around
and climb the ladder. Turn right to the corn field.
Maize Field Maze:
Go f f l f r f r f r (ear of corn)
r r f f f r f l and see a mask on
the wall. Turn around and click on metal plate on ground (left side). Turn
around again and the mask door opens to reveal a cemetery.
Cemetery: Go forward and see John Webb’s
ghost by his wife’s grave. Vance locks you in again. Look close at the plaques
on the 2 crosses. Pick up rocks between the graves. Turn right and see a
laser enclosed well. Note the icons on both right and left wall. Click on icons
that are found on the radios in the house: right wall facing the laser, click on
top left and middle right. On the left wall, click on top center and bottom
icons. The laser disappears. Go forward to well and pick up more rocks
around the well. Enter the well and find yourself back in the cave.
Cave: After climbing down the ladder, turn
left and pick up more rocks. Then go forward, turn right and pick up more
rocks. See 2 panels on the ground separated by a crevasse. Turn left and
look at the ground for the clue to this puzzle.

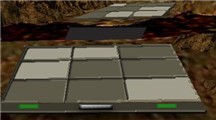
Panel puzzle
– Based on the clue, what is done on the closer panel
should be done to the other panel but in an opposite way.
Click on the squares of the closer
panel to resemble the clue seen on the ground at left side. The left red light
changes to green.
Throw rocks at the far panel to light
up the squares in a pattern that is mirror copy of the panel just done closer
to you. The right red light should change to green. Then, press the bottom
middle button and a panel slides out to bridge the
crevasse.
Red
Building: Cross the crevasse and turn left. Go
forward to the red building. Look through the keyhole of the yellow door. See
Vance inside. Open the door and go to the red coffee mug. Place the sleeping
pills on the coffee mug and then exit the building. Look through the keyhole
again and watch Vance drink the coffee and falls down.
Enter the building and see Vance asleep
on the chair. Take the set of keys from his belt. Turn right to the
cabinet on the wall and use the keys on the lock. Open the cabinet and take
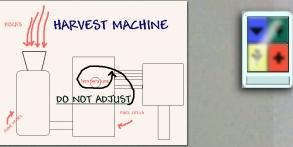
new fuse. Turn around and look close at Harvest Machine graphic on the
wall.
Harvest Machine room entry
puzzle – Look close at the colored panel with icons on
the right. The door to the harvest machine room will not open when the bottom
rectangular button is pressed. Enter the green icons that were previously
entered on the radios in the different colored rooms in the house. Blue room –
cross, green room – green triangular shape on top with knobbed base, red
room – inverted triangle and yellow kitchen – inverted triangle on top with
leaves. Then press the rectangular button. The door to the harvest machine
room opens.
If you have not programmed
the radios before, you have to go back to the house to adjust the radios. Turn
to the right 2xs and open the white door. Go back to the house, pass the cell,
elevator to level 1 and to the corridor-door maze. Go through blue, blue, pink,
N, pink, pink, blue, gray, blue, blue doors. Now change the radio icons to the
icons that are green colored. Blue room – cross, green room – green
triangular shape on top with knobbed base, red room – inverted triangle and
yellow kitchen – inverted triangle on top with leaves. Go back to harvest
machine building. Now enter the same pattern done on the radios in the house on
the panel (see above) and then press the rectangular button. The door to the
harvest machine room opens.
Harvest Machine
Room: Enter and see the room shown on the
television in the house.
Go forward and look at the center rock
processing machine. Based on the book at the library the temperature should be
at least 1250 degrees. Vance is making poisoned water. Use red knob from
inventory on hole. Then adjust the temperature to a little over 1200 degrees by
clicking the clockwise or counterclockwise arrow just outside the red knob.
The flashing lights goes out, the
machine blew a fuse. Look close at left rock crusher machine. Click on upper
right to open the panel. Replace the burned fuse with the new fuse in inventory.
Go to water collection machine on the
right and see the panel says recalibrate. Turn left to the right side wall of
the center rock processing machine and open the panel. Recalibrate the machine
by doing a memory puzzle.
Recalibration memory puzzle
– The object of the memory puzzle is to turn on a color one
at a time on each side of the frame. The color lights will flash before the
puzzle starts. The selected color will light up on the top bar. Try to
remember where a particular color is located on the other 3 sides. If a set of
one color gets lit up, another color will appear on the top bar. Click the
locations of that color on the other 3 sides and to the next color, etc.
If the colored light you’re working on gets turned on automatically before
clicking on a dark square, click on them anyway to turn the next light on.
Click at the center and a blue light
appear on the top bar. Click on the locations of the other blue lights. Then a
green light will come on at top bar. Click on the locations of the green
lights. Continue until all lights are lit.
When done, Vance will creep up on you
and hits you again. He decides to kill you but was stopped by the ghost of his
father. You find yourself outside the harvest machine room unable to do
anything. Hear them argue. The ghost of John Webb asks you to rush to the living
room and to get a letter in the cabinet by the fireplace.
Turn to the right 2xs and open the
white door. Go forward, pass the cell, elevator to level 1 and to the
corridor-door maze. Go through blue, blue, pink, N, pink, pink, blue, gray,
blue, blue doors.
Go to the TV cabinet, click on the top
cabinet and watch Vance destroys the machine causing an explosion. Use the set
of keys on the lock at center of cabinet. Click to open the bottom left cabinet
door. Take and read the letter about Susan, John’s wife’s death. Her death was
an accident. Try to go back to give the letter to John but the fire is now at
the blue room. John’s ghost tells you to save yourself.
Go to the foyer. Use the set of keys on
the lock of the elevator panel. Use the key card on slot. Enter elevator, press
the up button and go out to the park. Watch the house gets engulfed by
fire.
The End
This document may not
be distributed without express written permission of the author and the content
may not be altered in any way.
For Questions or
Comments on this Walkthrough,
Please write to: MaGtRo
Copyright ©
12/2002 MaGtRo
View this guide raw, exactly as the archive holds it