Faust: The Seven Games of the Soul Walkthrough, variant 1
about 39 minutes to read
I exaggerate? Think what you will. Well, have a look, and admire
how I decided to grant him his deepest wish…
Q:
Where should I begin?
A: Step
into the tent and start to browse around all the items there.
There are a bunch of pictures on the wall. Each will tell you
about his opinion on his friends.
Q:
How could I solve the roulette puzzle ?
A: Look
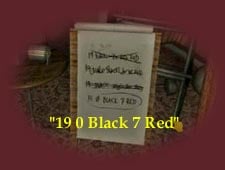
at the instruction on the easel. It says: "19 0 black 7
red". Pick up the roulette cylinder on the grandfather
clock beside the easel. Put it on the roulette table. Now look
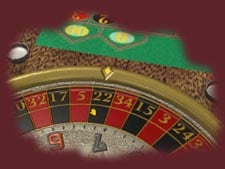
closely on it. Move the wheel until the diamond marker is in
the middle of red 19 (because there is no black 19 on the wheel)
and click the button. Move the wheel again until the marker
is in middle of the 0 (light blue background) and click the
button. Now you need to click both black and red 7. Move the
wheel again until the marker is in the middle of black 22 (you’ll
see the black 7 below it) then click the button. Then move the
wheel until the red 7 shows and click the marker. Finally reset
the position so red 19 is on the marker and click the button
again. It will open a secret compartment on the table. Pick
up the reel and the whip (the Fifth
Evidence) . You need to access
this compartment from the left side of the table (facing the
exit).
Q:
Where can I play the reel?
A: The
player is inside the secret safe behind Hannibal’s picture above
the bed. You need to find the key to open the safe.
Q:
Where is the key?
A: Open
the bar near the exit. You’ll see three bottle on the top right
shelf. They have purple, black, and red caps. You need to click
the caps according to the clue on the easel again. Yup…. "19
0 Black 7 Red". Remember how you solve the roulette
puzzle? You need to click 19 one more time. Now, look at the
roulette table and see the color of those numbers. They are red, light blue, black, red, and red. Make sure
when you click the caps, they go down. It will open the hidden
compartment. You’ll see a cut scene that shows how Hannibal
bullies Tod the short guy. Pick up the key on bottom left shelf.
Move Hannibal’s picture. Use the key to unlock the safe.
Q:
The player doesn’t work. What should I do?
A: You
need to get some electric power to turn it on. Get the mouse
on the bed (facing the bed from the liquor cabinet’s direction).
Look on the small table beside the bed. Pick up and connect
the wire on its place (you need to hold the mouse button while
picking the wire). Put the mouse inside the wheel. When it stops,
whips it with your whip. Go back to the safe and play the reel.
You’ll see a clue on dealing with tiger: 1 whip for directional
jumping and 2 whips for random jumping.
Note:
Sometime you won’t see the cut scene that
shows the mouse. In this case, you could also get the power
by turning the wheel with you own hand. You need to whip the
wheel to make it run.
Q:
What does the lever in the trunk do?
A: Go
to the corner near the exit (to the left it). Insert the lever
in its holder. Now push the lever. You’ll see targets with pictures
on them.
Q:
How can I solve this lever puzzle?
A: Look
at the big mirror. You’ll see the order of the pictures to be
whipped. Now go back again to the corner and pull the lever.
Use your whip on the targets. Ignore the third target. You’ll
end up in front of Merry-Go-Round.
Q:
What should I do with this attraction?
A: Go
inside the booth and you’ll find panel with two slots on it.
One is occupied and the other is empty. If you turn the lever
then the Merry-Go-Round will start to move but it will stop
at some point. You need something to fill the second slot so
that the attraction will keep on moving.
Q:
Where could I find the item to fill the second slot?
A: Go
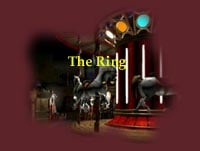
to starting point and turn right. Examine closely the horse
with orange circle above it. Look at the image above. Pick up
the ring on its mouth. Use this ring to connect the plus and
minus terminal on the second slot. It will open a secret door
on the middle of the Merry-Go-Round. Climb down and you’ll arrive
in an underground cage. You’ll find the Lily’s necklace on the
skull. My God, Jody fed the tiger with her sister’s meat. She’s
truly an evil. After the cut scene you’ll end up inside the
tiger’s cage.
Q:
What should I do with the tigers?
A: You
need to make them both sitting on the middle podium. There’re
lots of way to make them sit on the middle podium. Use the combination
of double whips and single whip. You’ll see the podium goes
down if you do it right. The easiest way is to make both tiger
stand on each corner first.
Q:
What should I find below?
A: You’ll
find the another piece of agreement between Mephisto and Hannibal.
It’s written on a piece of paper on Lily’s skeleton. You’ll
be back to the amusement park one more time. Go to the counter
and pick up the lottery ticket. Enter the cinema.
Q:
What should I do here?
A: Pick
up the reel on the shelf and play it. Get out from the room
and face the ultimate truth on Hannibal…… That’s what happen
to the bullies ……. What goes around comes around.
From Theodore Rolodex:
I had no illusions when I took Hannibal
on. I would even say that his clumsy pleading amused me. He
promised he would change, that he wouldn’t be so violent again.
(…)
The vet told me the tiger had died of a broken heart, caused
by his master’s disappearance. It’s a bit difficult to believe
but I like that story. Unfortunately, I don’t think that the
pain Hannibal caused human beings all his life can be forgiven
by his love for a tiger.
The
Story
After a small scale Don Juan, you are
expecting the worst, and you are wrong. There is Tod. A dwarf
law enforcer at the service of orphans. Our law enforcer learnt
his lessons during prohibition in the ranks of the “Family”,
alongside Frank Nitty, another acquaintance.
Money
has no smell, not even that of alcohol. If this money serves
to help young orphans. It will almost make me cry…. Yeah,
rumor said that Tod use the orphans to produce alcohol. You
need to judge by yourself if he’s a Robin Hood or just another
pathetic man that has a chance to control someone.
The
Caravan
Q: How can I enter Tod’s small caravan?
A: This
one is a little bit tricky. Face the strength meter. Try to
hit the target. Hmm… doesn’t work. Try to kick it …. doesn’t
work either. Ok .. you ask for it. Use your sidekick, Homunculus.
Maybe he has better luck. Hey .. that’s not fair, he just turn
the arrow around. The caravan door will open.
Q:
I’m not quick enough. It’s closed before I reach it. What can
I do ?
A: Send
your sidekick one more time to the door. He’ll block the door.
Now you could enter the caravan.
Q:
What should I find here?
A: Search
the drawers to get the Ring and the St. Christopher medallion
(the Sixth Evidence).
Read the newspaper in the second drawer, look at the poster
on the wall, turn the faucet (hmmm…. liquor.. why is this
liquor doesn’t flow fluently?), and the small box beside the
fireplace. Those will explain who Tod really is.
Q:
Where he keep all of his booze?
A: There’s
a secret room below the caravan. The entrance is located under
the bed. Operate the bike then look closely on the rear wheel.
Click on the rear wheel to fix it then ride the bike one more
time. It will lift the bed. You’ll see a door with combination
lock on it.
Q:
What is the combination number?
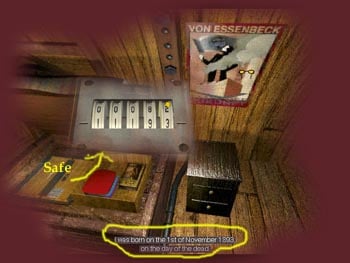
A: Pay
attention on the poster of the wall, especially when he tells
you about his special birthday. November 1, 1893. Use his birthday
to unlock the door. It is 11193. Climb down to ……
The Underground Booze Factory
Q: What should I do here?
A: You’ll
see one big heater where he made the whiskey, two boxes of empty
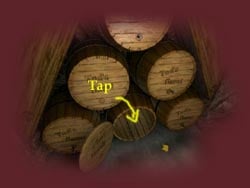
beer bottles, a well, and the kegs on the left wall. Move the
taps on the middle left keg and put it on the bottom middle
keg. Click on the tap. It will open another secret door to the
bedroom. Crawl in.
Q:
Whose bedroom is this?
A: Pick
up the bat on the floor to your left, look at the dishes on
the right, and go straight to the bathroom. Look at the mirror.
You’ll see a reflection of Tod. Open the medical cabinet there
and examine the medicine bottle. Those will explain how he used
the children but still protecting them. A phone will ring ….
Q:
Where is the phone?
A: It’s
in the bedroom. Move to the aisle between the right bunk beds
from the bathroom’s direction. You’ll see a phone on the wall.
Pick it up. It’s Frank Nitty, the gangster. He wants to set
a deal with you. Crawl back to the cellar. Mephisto will play
his game again with you … He changes you into Tod …Go straight
up to the caravan. Frank (or we could say Mephisto) is waiting
for you. He wants a drink.
Note:
Actually the only this you need to do
is to lock at the medical cabinet and the medicine bottle. This
will trigger the phone even though you didn’t do the other things
inside the bedroom and the bathroom.
Frank Nitty
Q: Where can I get the drink?
A: Don’t
worry about this one. Even if you couldn’t make it on time,
you’ll get a second try. You need to produce the whiskey. But
first, you need to make the heater works.
Q:
How can I start the heater?
A: Pick
up the wooden log from the fireplace. If the wooden log not
there, use the ring on the ornament above the fireplace. It
will raise up the logs pile. Go back to the cellar and pick
up the old newspaper in the bucket on the floor. Put these wooden
log and the old newspaper in the bottom tray of the heater.
You’ll use them as a feeder. Now go around the well and pick
up the small bucket. Fill it up with the booze from the kegs
through the top tray. This is your gasoline. Then lit the log
and the newspaper with your matches.
Note:
You can just simply use the bottle to
get the gasoline and forget about the bucket. There’s another
way to lift the log piles up beside using the ring. There’s
a red button down here (behind the well) that will move the
log piles to and from the fireplace.
Q:
How can I get the drink?
A: Pick
up the empty bottle beer from the box. Go back up the caravan.
Turn the faucet. Now the beer flow normally. Use the bottle
to get the whiskey. Fill the glass on the table with the whiskey
bottle. Be ready to play poker….
Q:
How many times should I beat him in the poker game?
A: You
only need to beat him twice. Believe me, it’s not hard to do
that… Watch the story unfold …..
From Theodore Rolodex:
By way of notes on Tod, I have decided
to leave this draft letter found among his
papers after his death.
“Dear Mr. Ness, (…)
I know that my business is not very popular in this new America.
Mr. Mac Carthy and his cronies would certainly label me a Communist.
It’s a new sickness that I am too old to suffer from and too
close to death to fear. (…)
I leave you to judge the price of a dwarf’s gratitude. With
a friend’s best wishes, Tod Von Essenbeck, last of his name.
“
The
Story
Giselle is this obese young girl, encumbered by her body, whom
you meet in the street and who moves you, after all let’s be
honest, who arouses pity in you. Mephisto has become her Guardian
Angel in a special way. He protects her from all of those people
who have look down on her. Again…. there’s no such thing of
free gift after all …..
Giselle’s Story
Q: Where should I begin?
A: Step
into the house directly. You could look to all of those pictures
on the board. It will tell you about the freaks in these amusement
park. You need to find a secret door to her room.
Q:
Where is the secret door ?
A: It’s her
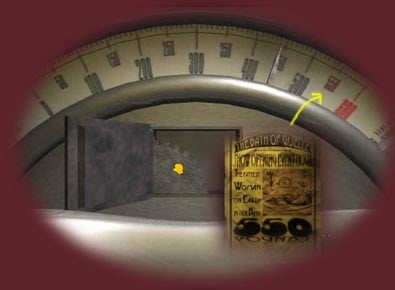
bathtub. Look at Giselle’s poster for the clue. Pay attention
to her weight. Look closely on the bathtub. You’ll find a key.
Use the key to unlock the panel above the bathtub (on the wall).
You’ll see a gear inside. Turn it so the meter point at 550.
The bathtub will go down with you.
Notes:
You’ll see several items to help you understand
her character. There are several photos on the desk, the bed,
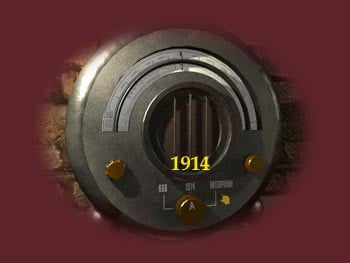
the radio (there are 3 channels that you could listen to), and
also the newspaper in the drawer. You could hear her parents
voice through channel 1914.
Q:
Where is the key to unlock the fridge?
A: The
key is with her dolls. You could find the doll on the shelf
above the bed. Look at her pocket, you’ll find the key there.
You’ll find a frozen letter inside the freezer.
Q:
How can I read the letter?
A: Use
the stove to melt the ice. Put the frozen paper inside the pan.
Turn on the stove and lit it with your matches. You’ll find
out that Mephisto has made an agreement with her and given her
the magic spoon (The Seventh
Evidence).
Q:
Where is the magic spoon?
A: Search
the pillow on the bed. You’ll find the spoon there. Open the
fridge and use it on the empty space below the freezer. You’ll
see a dream food there.
Q:
I see a hook above the fridge. What it is used for?
A: You
need to lift the fridge to reveal a hidden passage behind it.
Q:
How can I lift the fridge?
A: You
need a help from a toy. Above the hook, you’ll see a rail that
goes to a some kind of device on the other end. This device
has a crank. You need to somehow connect the hook to the rail
and turn the crank to lift it. There’s a chain hidden in the
fridge.
Q:
Where is the chain?
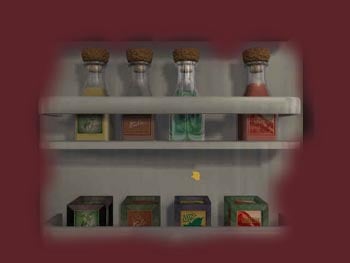
A: Pick
up the small boxes beside the doll where you found the key.
You need to rearrange the boxes on a shelf below the bottles
in the fridge. This shelf is on the inner side of the fridge
door. Look at the picture below to help you. Don’t be fool with
the colors. Check the labels and match them. This act will give
you an access to the small compartment above the bottle. You’ll
find a chain inside. Connect the hook with the rail by using
the chain.
Q:
I can’t turn the crank. It’s jammed. What should I do?
A: Get
the teddy bear beside the bed (on the floor). Put it on the
crank and turn its key (you could see it on its back) to move
it. It will lift the fridge and reveal a hidden passage behind
it.
Q:
Which path should I take?
A: It
doesn’t matter which path you took. You’ll end up in Frank’s
secret hideout (remember the man with the mask?). Yes, Frank
tried to burn himself in episode 3 but he failed.
Frank, The Man with The Mask
Q: What does Frank do here?
A: Look
behind one of the pictures on the right wall. You will find
a torn newspaper about the stolen painting. Frank is trying
to make a fake imitation of the painting. Remember on what he
said about his greatest work.
Q: Where is his work?
A: It’s
hidden in a small compartment on the small box on the table.
Open the compartment and pick up the torn paper.
Q: What does this paper looks like?
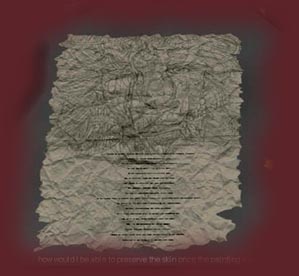
A: Look
at this picture below to help you. From top to bottom left to
right in pairs: Piece one and four, Piece two and five, then
Piece six and three. Read the paper.
You’ll
end up standing in front of Mephistopheles. Faust turn out to
be Angelito, the guardian angel. Walk to the Ferris Wheel after
the conversation.
The Final Choice
Q: How could I solve this postcard puzzle?
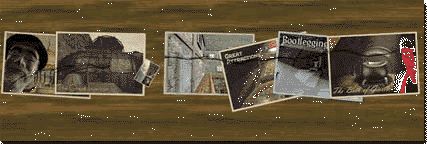
A: Get
the postcards on the booth. Put them on the booth table. Arrange
it from left to right according to the order of the episode: Love Island, The Great Inventor, Visit Us, The Enchanted
Island, Great Attractions!, Bootlegging and The Bath of Giselle.
Q: What should I do with the contract?
A: I
leave the decision to you. It’s up to you whether you want to
change the theme park or leave it like it used to be. If you
want to change Dream Land then put the pen on the lawyer’s empty
hand. If you want the keep it the way it is, sign the contract
with your pen. Both choices will lead to totally different ending…..
From Theodore Rolodex:
Her apartment stunk of misery and she
was fed with gruel. They treated her like an animal for two
whole years. I think that without Tod’s support and affection,
she wouldn’t have survived that time.
Then
we worked out her number together and that’s when she had the
idea for the bathtub and the soap juggling.. I pointed out that
she was a real artist. She said to me, “Since I was 15, people
have treated me like a Martian, so I’m obviously used to having
an audience.”
When
she died, she was no longer the little girl who I so pitied
but a resolute, confident (…) woman.