Delaware St. John: Volume 3 – The Seacliff Tragedy
Delaware St. John volume 3: The Seacliff
Tragedy
by Big Times Games
Walkthrough by MaGtRo June 2007
Gameplay: This is a point and click first
person adventure game. The main menu has the tutorial, new game, load game,
options and exit.
The tutorial shows the different manipulations in the
game. The use of the VIC, voice imagery communicator has the Connect to call
Simon at the office, the Camera to take pictures of supernatural appearances and
Recorder to record any sounds. The pictures and the sounds recorded will be
analyzed at the office by Simon.
The options menu has the music, voice and subtitle
selections.
The in game menu is accessed by the ESC key. The in
game menu has the continue game, save game, options and exit.
Delaware has not had his dreams for a few weeks. Kelly
and Simon can not find a lead about Delaware’s parents.
One February morning after exiting the bakery, the
scenery changed for Delaware. Delaware sees an amusement park. Shaking, screams
are felt and heard. Kelly recognizes the scenery; it is the Amusement Park that
was closed 4 years ago. There were 100 people killed in an accident.
Story 1: Everyone Loves a Clown
As Delaware:
Simon talks to Delaware about the history of the park.
Theodore Krandall hanged himself in his house the day after the accident.
Look around the park. Go forward and Delaware realizes
he left his flashlight in the truck. Turn around and go back to the truck.
Delaware finds Kelly at the truck bed. She will do her own investigation.
Go forward and take a look at the map of the park at
right.
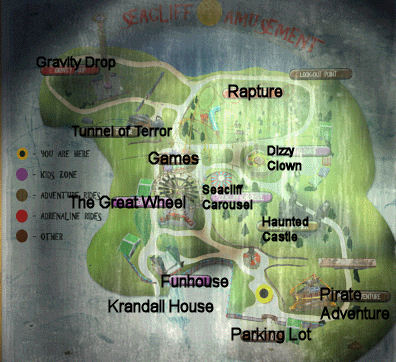
Go right, forward and see that the steps lead to a
road blocked by a grilled gate.
Turn around and go forward once. Look at the bulletin
board and see notes of missing children that disappeared one year of each other.
Back up and go right. Go forward and see the Ferris
wheel (Great Wheel) ahead.
Great Wheel -Ferris wheel – Go forward and
turn right at the Great Wheel. Enter and go forward slightly to the right.Go left and see a ladder. Take the lopsided rung
of the metal ladder.Turn around, right, forward to exit the Ferris wheel
area.
Look at the map and see that you are at the bottom
left side path of the park.
Pull back and go left. Go right and up the elevated
sitting area. Go forward to the wall and right to the funhouse.
Check the funhouse and see that it is boarded up. Go
up the elevated sitting area and down towards the Ferris wheel again or click at
top right off the funhouse and then go forward to the green aluminum building.
Krandall House: Go forward pass the Ferris
wheel and see a clown.
Go left and forward towards the green aluminum
building on the right. To the left is the back of the funhouse.
Delaware meets a shadow person. Delaware’s flashlight
scared it off.
Go forward towards the left side of the wall. See a
gate. Go through the gate and be at the Krandall house.
Ghost people – Simon calls Delaware. Shadow
people are not human; they are demons. They drain energy to the point of
unconsciousness. They are afraid of light and that is one tool against them.Enter the house – Go right and see a shed
that is locked. Go left and see a chained cellar door.Use the metal rung taken from the Ferris wheel on
the chains. Enter through the opened cellar door.Basement – Enter the door on the left and see
it to be the furnace room. Exit and go forward.Meet another shadow people, use the flashlight on
it.Go forward to the other end of the basement.
Look close at the old TV. Take the newspaper
clipping about the death of Margaret Krandall in an accident at the funhouse
in the park. Use the hand cursor to take the newspaper clipping.Go left and check the light switch right of the
door.Open the door and climb the stairs.
First floor closed door – Talk to Theodore
Krandall who is behind the closed door. He won’t open the door until his wife
comes back.Use the newspaper clipping of the Margaret Krandall
on the bottom of the door. Theodore now realizes that Maggie is gone.The door clicks open. Open the door by clicking on
the handle.Kitchen – Look around and see the
refrigerator on the left.Dining room – Turn around from the
refrigerator and enter the dining room.Meet another shadow people. Use the flashlight on
it.Turn right and look at the picture on the table. It
is the Krandall family: mom, dad and son.Family room – Go back to the kitchen and left
to the family room. Look around at the family room. Climb the stairs.Second floor – Check the door on the left top
of stairs, right of stairs and at left back of stairs. They are all locked.Go to the door at right at back of the stairwell.
Use the door handle. Talk to Theodore again. He talks about the loss of Robert
also.Go back down the stairs. Hear a sound while on top
of stairs. Go down to the family room.Safe – See a hidden safe revealed by the
painting that fell off the wall.Look close and see the markings etched on the
safe: X-I, III-I and V-II.Hmm. Looks like Roman Numerals: X-I=9, III-I=2 and
V-II=3.Click on the safe dial and see numbers on top of
the screen.Try the different combinations of 9, 2 and 3.
The one that works is 9 2 3.
See a picture of the family. Wait, there’s another
boy in the picture.Take the family picture on the top shelf.
Adam – Go back upstairs to Theodore. Use the
family picture on the door handle of the door behind the stairwell.Adam vanished less than year after Margaret died.
Then after that Robert disappeared also.The door is now opened.
Master Bedroom – Enter the master bedroom.
Look around.Go left to the walk-in closet left of the table with
the chess board. Meet another shadow people.Use the doorknob of the door at the end and talk to
Theodore. Hmm. He doesn’t want to talk about the hooded person in black.Enter the bathroom and then through the other door
to the next bedroom.Adam’s bedroom – Look around and at the clown
drawing on the wall.Exit through the door and see that you are out to
the stairwell area.Restricted Area door – Talk to Theodore and
learn about imaginary friend of Adam; the hooded person in black.Robert’s bedroom – Enter and look around.
Look close at the picture of Adam with a clown.
Back to truck: Go down the stairs, meet and
dispose a shadow people. Exit through the basement and out of the house. Go
forward between the green building and the back of the funhouse. Go right left
of the funhouse. Go forward, left, forward, right and forward to the truck. If
you meet more shadow people – click the flashlight on them.
Delaware updates Kelly. Kelly takes over.
As Kelly:
Ticket office: Turn right to the green
building. Check and see that the yellow door is locked.
Go forward and Kelly notes that EMF reads high. Turn
right and check the employee’s door.
Pirate Adventure (Ship): Turn around and go
up the pirate ship at right steps. Look around.
Pick up the can of liquid grease on floor of
right bench behind the right cannon. Go back down and continue forward.
Go forward and meet a shadow people. Go forward and
talk to Simon. Go through the spiked gate pass the clown. To the left is the
door to the Haunted Castle.
Go forward and see that the path to the right is
blocked. Go forward and see the path ahead that is right of the Carousel is
blocked also.
Rapture Super Coaster-Roller coaster: Turn
right and forward towards the roller coaster.
See a woman in black enter the roller coaster area.
Let’s follow her.The path is blocked by a red fence. Look ahead and
Kelly says she’s going up the hill and that there should be an easier way up.Go left and enter the roller coaster. You are now at
the other side. Turn right and see a pink-yellow building that controls the
roller coaster.No way here. Turn right and go to the other side of
the roller coaster. Exit and go to the entryway of the roller coaster area.
Meshed gate: Time to look for another way to
get to that lady.
Turn left as soon as out of the roller coaster gate.
Go forward and then turn left to a clown seen ahead.
Kelly talks to Simon about Delaware being the protector.Go forward and see a meshed gate (Restricted Area)
that is padlocked.Move the cursor right and down to the ground. See a
hacksaw on the other side of the fence. We need to get that.Turn left and forward back the way we came through.
Turn left twice by the brick wall and forward under the overhead rail area
held by yellow posts.Booths: Look at the booth ahead. Take the
spool of string on the shelf of the red and white booth.Roller Coaster shed: Turn left and see the
shed where the roller coaster chairs starts.Look close at the door and see that the door is
stuck.Use the can of liquid grease on the door hinge at
top left. Open the door and enter.Look at the roller coaster chairs. Turn right and go
behind the roller coaster chairs.Turn around and see the shelf beside the fan on the
wall.Use the string on the circular magnet on the shelf
to get a magnet on a string.Exit the shed. Go forward, right, right again and
forward to the meshed gate.Meshed gate lock – Look close at the
hacksaw and use the magnet on a string on it. The hacksaw is now in
inventory.Look close at the padlock of the meshed gate. Use
the hacksaw on the padlock.Go through the gate. Go forward and Kelly talks to
Miss Rose. Learn what she is doing here and about Adam and other missing
children.
Go back through the gate, right and you might see
another shadow people.
Clowns: Go back to where Delaware is
located by going forward twice, left in front of the roller coaster gate,
forward twice and left by carousel.
Go forward pass the spiked gate. Turn around and see
that the clown statue by the spiked gate is gone. Turn around again and right by
the short clown.
Escape from the clowns – Go forward until
blocked by clown statues.Turn around and hear them follow Kelly.
Go forward and see that the spiked gate is blocked
by 2 more clown statues.Turn around right and realize that you are
surrounded.On the ground in front of the 2 clown statues is a
sewer cover.Click the sewer cover to enter. If you take too
long, you have a second chance to redo this scene from the spiked gate.
Sewer: Look around here at the sewer.
Pan left and see a closed sewer door with #1 above
it.Turn around and see a map on the left and a wheel to
the right.Look close at the map and see that the sewer access
is labeled A and the map we are looking at is labeled M.We need to get to the other exit A at bottom left of
the map.Go to the wheel at right. See that it is labeled #1.
Turn the wheel. Turn around and see that the #1 sewer gate is now opened.Sewer maze – Enter and go left to #2. Forward
and go through the opened #2.Go left, forward, face a closed gate and then turn
right.See 3 wheels: #3, #2 and #4. Turn #2 and #4. Don’t
touch #3. If you turned it, turn it close again.Turn right and forward to go back. Go left, forward
and then right.Forward through #3 and right again. Forward, forward
and right to #2.Go through #2 and forward.
See 2 more wheels at right wall. Turn #6 only. Do
not turn #5 or access to a path later will be closed off.Go forward pass the wheels. Turn left, forward and
left again.Forward, pass through #6, forward, forward, forward,
left, forward towards #5.Go through #5. Turn right and see wheel #7. Turn #7
wheel.Turn right, forward, forward, right, forward and
then left to #7.Pass through #7; turn right, forward until the metal
ladder.Climb the ladder and Delaware is there to help
Kelly.
As Delaware:
Missing children: Go forward back to the
center of the park.
By the tree, turn left and look again at the missing
children bulletin board.See a vision of the funhouse and skeleton. Let’s
find a way to get in there.
Get in the funhouse: Turn right, forward and
left. Go forward to the funhouse. It activates for a short time and voice
invites you to enter. Look close again and see no way to get inside.
Turn right, forward and right. See a blocked gate
ahead and then left. Go pass the Ferris wheel towards the wall with the clown
statue. Turn right and go through to the other walled in area of the park. (Or
move the cursor right of the funhouse, forward to the green building and turn
right to go through the walled in area of the park.)Go forward and see a man by the Games stand. He
invites you to play the ‘hit the cans’ game.Toss n Win-Hit the can – Get a ball and try
to hit the cans. It goes left. Try repeatedly and with no success. Take a
ball.Pull back and turn right. Go forward and see the
Carousel ahead. Turn right and see Adam at the sandbox.Adam leaves his red shovel. Look close at the red
shovel. Use the ball on the red shovel.The ball is weighted evenly now.
Pull back, turn right and forward and right to the
lit Games stand.Now use the weighted ball on the ‘hit the can’ game.
There you go.Talk to Carl and learn about Robert.
Take the crowbar from behind the toppled
cans.
Funhouse – Go back to the funhouse with
Delaware’s ‘key’ (crowbar).
Turn around and go through the wall opening.
Forward pass the clown and left after the elevated
eating area at left (with the green building at right).Go forward and turn right to see the funhouse.
Look close at the boarded door. Use the crowbar on
the boards.Enter and go forward. The voice is back. Go forward
until the end of the ramp. Go left.Meet a shadow people. Click the flashlight on it.
Turn left, then go right and forward to the stairs.
See a ‘confused yet?’ on the wall.Climb the stairs and the voice mentions the maze.
Maze – Go forward and see pictures inside
circles on the wall. There are 3 pictures right of a Roman numeral.Take note of the pictures and the sequence shown by
the Roman Numerals. You will need it in the maze.Go left and enter the red door of the maze.
Each room has 3 doors with the circles and one exit.
The exit door brings you back to the clue on the
wall. You have to start over if you go back here.I. Turn right and enter the door with: red apple,
green pine tree and yellow clown.II. Turn left and enter the door with: green
pine tree, orange balloon, red heart.III. Turn left and enter the door with: green
clown, red pine tree, blue balloon.IV. Turn right and enter the door with: yellow
balloon, faded greenish white apple, yellow heart.V. Enter the middle (ahead) door with: blue
clown, yellow heart, green tree.VI. Enter the middle (ahead) door with: red
clown, yellow balloon, green heart.You are now outside the maze. Go left as the sign
says (not the arrow).Maggie Krandall – Go forward and hear a woman
call. Talk to Mrs. Krandall and learn that she was not alone during her
‘accident’ and that she didn’t fall off the railing.Wall -After the cutscene, go forward and turn
right to the wall she was working on.Look close at wall and use the crowbar to open the
wall. See the skeleton of the vision.Turn right and go down the stairs. Turn left and
exit the funhouse.
Turn around and move cursor to right of fun house. Go
forward to green building. Go left to go to Krandall House.
Krandall House: Talk to Theodore Krandall at
the basement. He is happy about having Maggie again and says that Robert was
last seen at the roller coaster area.
Exit the house gate and go forward. Meet a girl with a
prior engagement.
Go right to go back to the truck since the roller
coaster is on the other side of the park.
Talk to Kelly.
Story 2: The Protector
To start Story 2, go back to main menu and select new
game. Then click on Story 2 at bottom of screen.
As Kelly:
Roller Coaster: Go forward
towards the roller coaster area. Dispose of any shadow people on the way.
Turn towards the roller coaster and meet Miss Rose.
She shows Kelly a symbol.Simon says that it is the symbol to break barrier
spells. Put that symbol of the energy barrier.Tell Delaware to trust his instincts it will be put
into question.Go forward inside the roller coaster area. Kelly had
a talk with Simon.After the talk, the EMF reading is raised and heard.
Go forward towards the roller coaster ahead and
Kelly finds an entrance.
Cave – Eek! The hunter is here. Kelly drops
into a cave.
Go forward, forward and left.
See a bricked up wall with a hole at the center.
Look close and see that the bricks are loose.Back up, go left, forward, left and pick up the
brick.Turn left, forward, left and look close at the brick
wall with hole.Use the brick on the brick wall. Enter and hear the
Hunter following.
Employee Building by the Ticket booth:
Watch Kelly block the entrance with a cabinet.
Look at top of the crate left of the moved cabinet.
Take a blue fuse (15A).Turn left and open the door. At the tunnel, go left,
forward and right. See another door. It’s stuck.Turn left, forward until the door at the end of the
passage.Open and enter the room. Pan right and see a
staircase on the left and a door ahead.Try the door and Kelly says that Delaware should
know what’s going on first.Turn around and right. Climb the spiral staircase
and face a door.Turn left first and get another fuse (yellow
20A) on top of the crate left of the staircase.Go out the door and see that this is employee
building across the Pirate Ship.Kelly talks to Delaware about the Hunter. Simon
joins in the conversation and adds more info about the Destroyer and the
Hunter.Kelly is back at the employee building.
Go down the stairs. Turn around and enter the door.
Dispose of any shadow people met.Go forward until the boulders blocking the way. Turn
left and enter through the door.
Locker room:
Open the rightmost locker and see a note.
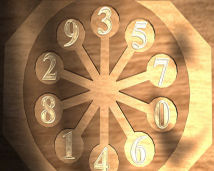
Note to self: across, three clockwise, always start with one less than one!Back up and see a briefcase that needs 4 numbers to
unlock.
Briefcase – Look on top of the briefcase and
see circular set of numbers.Always start with one less than one – is
zero.across – across zero is 2.
three clockwise from 2 – is 5.
across from 5 – is 1.
three clockwise from 1 – is 9.
across from 9 – is 6.
three clockwise from 6 – is 8.
across from 8 – is 7.
three clockwise from 7 – is 4.
Enter 5 9 8 4 on the briefcase lock. Take the
tube of face paint.
Tunnel: Exit the locker room.
Turn right and forward till the end. Exit through the door on the left.
Go forward and left through the door to get back to
the first tunnel entered.Let’s check the locked door at the end. Go forward 4
times and turn left.Try the door and Kelly says it’s stuck.
Use the tube of face paint on the door. Kelly paints
the anti barrier symbol on the door.Enter and look around. Turn left and take the red 30
A fuse from the shelf at right.Look at the top of the desk and see children’s
pictures. One of them shows the hunter and a boy at the roller coaster. Take
the painting.Turn right and look behind the stacked boxes. See
another skeleton of a child.Go back out and up to Delaware. He should know about
this. Exit the room, forward until the door, enter and go up the spiral
staircase and out.Kelly talks to Delaware about the hunter, Adam and
another kid behind the roller coaster.
Roller Coaster power shed: Go
back to the roller coaster area. Upon entering go left and forward until the
cars.
Enter the cars and turn right to the roller coaster
shed.Look at the door and Kelly says that she needs power
to get inside the building.Power and fuses – Pull back and look at the
metal box on the right. Flip the switch to on – nothing.Top left box – Open the top left cabinet.
See that there’s a fuse missing.Note the colors present on each row: red, green,
blue, yellow.See that the missing color on the third row is
red.Place the red fuse on the empty slot. Close the
cabinet door.Top right box – Open the top right cabinet.
See there is also a fuse missing.Note the colors present on each row: red green,
yellow, blue:See that the missing color on the last row is
yellow.Place the yellow fuse on the empty slot. Close the
cabinet door.Bottom left box – Open the bottom left
cabinet door.By default, place the blue fuse on the empty slot.
Shed – Flip the switch to the on position.
There we go, Power is on.Enter the roller coaster power shed.
Look around. Turn left from the control panel.
Open the rightmost locker. See another skeleton.
Go back out and enter the roller coaster to go to the
other side.
Eeek! The clown pushes Kelly on the roller coaster
seat and the bar holds her down.
Watch as Delaware saves them both from an Atlantic
Ocean plunge.
As Delaware:
Let’s go to the walled area still not explored. Go
forward pass the Ferris wheel, turn right and go through to the Game area.
Turn right before the Game area and forward towards
the Carousel. .
Carousel: Enter the Carousel
and Adam wants Delaware to turn the Carousel on.
Look left at the control box at left wall. Open the
box and note that it needs an access code.Exit and go back towards the wall.
Simon calls. Simon tells Delaware that Protectors
are passed through the bloodlines.Go forward to the wall and Delaware gets a vision of
a soda pop and a token.Token – Let’s look for that token. Go back to
the big tree close to the entrance of the park.Go right to the ramp and the closed gate. See the
soda pop can and the token. Take the game token.Games area – Go back to the Games
area. Go forward until you see a dead bush and yellow pillar.Go right and enter the Skiball stall. See clown toys
and one machine is missing a ball.Exit and enter the dark stall left of the Skiball
stall.Horse race – See a horse race. Use the
token on the slot at left.See that in order of position, horses 6 2 9 1 got to
the end.Go back to the Carousel.
Open the panel on left wall and enter: 6 2 9 1.
The Carousel starts and Adam enjoys his ride. After
the ride, Adam tells Delaware to look for locker 16.
Map hunt:
Locker 16 – Go back to the entrance of the
park by the truck. There are lockers at right of the entrance.Open the bottom right locker. Take the map with an X
on the Gravity Drop ride. Click on the X on the map.Gravity Drop – Go back to the Games area. Go
forward pass the Tunnel of Terror on the left.Enter the Gravity Drop area. Look close at the map
stand.For a brief moment there was an X mark on the Ferris
wheel area.Ferris wheel – Turn around and exit through
the gate.Go right and then place the cursor to the left of
the lamp post.Go forward and be at the path towards the Ferris
wheel.Go forward until out of the walled area’s gate.
Look close at the map across the Ferris wheel area.
Click on the map.A brief X marked the area close to the Carousel.
Carousel – Go to the Carousel area. There are
2 map stands by the Carousel.Face the Carousel, turn right and see a map stand
with the Ferris wheel as the back drop. Click on the map.Look close and see a brief red X on the Tunnel of
Terror.Tunnel of Terror – Turn right and go to the
wall.Turn right and forward until you see the gate to the
Gravity Drop gate ahead.Turn left and see the entrance to the Tunnel of
Terror. Click on the map.See a red question mark on the Tunnel of Terror map.
Tunnel of Terror – Enter the Tunnel and go
forward. Dispose any shadow people.
At the train ramp, Delaware says: …Wait for the
train?Train arrives and Delaware gets on. The mouth of the
Tunnel closes.The train stops. Turn around and go forward. Dispose
of any shadow people met.Go pass the mummy, skewered bodies.
Cindy – The path is blocked. Enter the
cemetery on the right. Talk to white haired Cindy.Continue to the left, forward and look at the coffin
on the right. See 2 more skeletons inside the coffin.Go forward and pass the spider on the right.
Enter the passage right of the green box. This is
the dressing room.Look left at the mirror of Rachel, Madison and Jim.
Turn right, forward and left to look close at
Cindy’s table.Read the letter from Cindy’s mom. There is a
bracelet sent.Delaware gets a vision of the bracelet beside a
small clown doll.Where did see clown dolls? At the Skiball booth.
Carl’s errands:
Storage building – Go forward to the hallway
right of the table. You will now be at a storage area. There is an elevator
left of the door. The elevator is not working.
Bracelet – Go
through the door and be outside.Go forward and then right. Enter the skiball booth.
Look close at the shelf where the clown dolls are
located.Look at the top shelf. Take the bracelet.
Meet Carl again. He doesn’t want you to take the
prizes. He wants Delaware to ‘spruce up’ the booths, starting on the dart
game.Dart Game – Pull back from the Skiball booth
and look at the dark booth right of the Skiball.Look inside and Carl says the dart board is missing
a dart.Delaware gets a vision of a clown with a dart in one
eye.Pull back from the Games area, turn right and
forward.Go left to the Tunnel of Terror. Look right before
the entrance and look close at the clown statue.Take the dart and the clown collapses. It
reveals another skeleton.Turn right and go to the entrance of the Gravity
Drop. Turn around and forward left of the lamp.Forward and left to look close at the Dart Game
booth. Place the dart on the dartboard.Skiball – Enter the skiball booth. Carl wants
a missing ball for one of the machines.Delaware gets a vision of a ball on a bench.
Back out of the games area. Turn left and go towards
the Ferris wheel area.After passing through the gate, look right at the
left bench.Take the ball from the bench.
Go back to the Skiball booth and place the ball on
the second from right lit machine.Exit the skiball booth and go to the Carousel.
Bean Bags – Look close at the Bean Bags booth
left of the Carousel.Carl wants a bean bag for this booth.
Delaware gets a vision of a bean bag at the foot of
a white wrapped foot statue. It’s the mummy at the Tunnel of Terror.Go back to the wall and left to the green building.
Enter the green building.Go forward until you get inside the Tunnel.
Go left and forward. Enter and exit the cemetery. Go
forward to the mummy.Take the bean bag from the foot of the mummy.
Go back to the dressing room and out of the other
storage area.Go right to the carousel. Place the bean bag in the
counter of the Bean Bags booth.Carl says that all booths are back to what they
were.Take the bracelet from the Skiball booth
shelf.Return to the green building and go forward until
the cemetery in the tunnel.Give the bracelet to Cindy. She gives Delaware a
key.
Find where this key fits.
Go back to the storage area beyond the dressing room
and exit.Go back to the Krandall house.
Go to the shed and use the key on the padlock.
Look at the makeshift altar. Click on the paper and
Delaware says it’s a spell sheet used to summon the hunter.Delaware is looking for something to destroy it when
the paper blows away.Simon calls Delaware.
Search for Robert: Exit the
Krandall House area and go forward to the park.
See the laughing clown. It went inside the green
building on the left.Click the fist on the door of the green building.
Look around. Open the big box right of the ladder
and see another skeleton.Elevator key – Turn left and look close at
the keys on the key holder.Pull back and read the paper on top of the box on
the left of the panel.We need the elevator T key. The chart states
Elevator T – Green 2.The note at the bottom of the paper states an
error is made on the printing.
The chart was printed with numbers halved and
swapped colors red with blue and yellow with green.So if the Elevator T key is Green 2; it really
should be yellow 4.Take the yellow 4 key from the key holder.
Tunnel – Go back to the green building at the
other side of the wall.Use the key on the elevator. Press the green down
button to the tunnel.Delaware gets a vision of a key on the base of a
door frame.There’s a tunnel ahead and another to the left.
Go left and see a closed door on the right. Go
forward and left to another closed door.Go right and forward to the end. ‘The eight will
show the way’ appeared on the brick wall at the end of the tunnel. There are 7
hand prints on the wall.Go back to the other end, left and forward to the
other tunnel.Get the key – Go forward to the end by the
boulder blockage. Turn left and see that that the door is locked. Place the
down cursor on the top part of the door and click. See the key under the
door.Go left back to the elevator at the end. Turn
right. Go forward once and then turn right to another locked door.Go left, forward and left to another locked door.
Use the fist icon to force the door open.Enter, look left and take the hanger from
the coat rack.Go back to the locked door at the other tunnel
Look down to the base of the door by clicking the down arrow placed on the
top part of the door.Use the hanger to get the key.
Look for the 8th skeleton – Use the key on
this door. No, it doesn’t belong here.Go to the other tunnel and use the key on the door
on the right.Enter and look around. Look close at the pile of
wood shelving ahead. See another skeleton.How many skeletons have been found now? 8.
Exit the room and go right to the end of the tunnel.
See the words on the wall vanish now that the 8th
skeleton was found.The wall vanishes also.
Robert: Go forward, right,
forward and meet Robert.
Robert throws a knife at Delaware. Go forward until
the end of the tunnel, left, turn around and enter the elevator.Exit the building through the door on the left. Go
right and forward to the Krandall house.The hunter joins the chase. Go to the basement and
confronts Adam and Robert.Watch what happens.
The hunter:
Delaware talks to Kelly and the hunter appears.
It attacks Delaware, the last of the bloodline.
The mystery lady, Katherine throws something at the
hunter and it disappears into smoke.Meet Katherine, the Protector.
This
document may not be distributed without express written permission of the author
and the content may not be altered in any way.
For
Questions or Comments on this Walkthrough,
Please write to:
MaGtRo
Copyright © 6/2007
MaGtRo