Dark Side of the Moon: A Sci-Fi Adventure Walkthrough, variant 5
about 9 minutes to read
The unaltered guide: no contents list, no checkboxes, no page breaks. This is what the archive holds.
Back to the reading view
Crash Production Copyright @1999
All images are the property of Southpeak
Interactive
E-mail for comments
Ore
Processing
Q : Where is Whistler
?
A : You’ll find him
automatically once you get the safety
belt and the key (it’s the second intersection,
turn left, then follow until the end of path). They are on the
crate in one of the corner in the room. You’ll see someone
kill him and Kit Farris will run away from the scene. What is
she doing here ? This sounds bad. Everybody is chasing you now.
Q : How could
I escape from this guard ?
A : First, lock all the
doors to the room. There are 2 locking mechanism in this room,
one at the south door and the other at the north door. Then
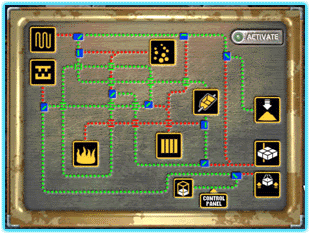
head to the panel at the middle of the room (the first intersection
from the south entrance, turn left). Look at it and set all
the lever according to this picture. Push ‘activate’
and use the key to unlock the gate next to it. Save your game
here before you ride the cart.
Q : I always dying
here even though I set the panels correctly. Did I do something
wrong ?
A : You forget to wear
your safety belt. If you don’t wear it, you’ll be
falling down at section 2. To wear it just use the belt on the
human figure on the left side of your screen.
The Mine
Q : What should
I do outside this mine ?
A : Turn around until
you see 2 different ore stones on the ground. They are Huartz
and Salabar. Pick them up. Go
outside the gate and turn right. Behind that locked gate is
the way to your freedom.
Q : How could
I unlock the gate ?
A : You need 3 things
to unlock the gate, your personal ID, proof of claim, and your
security ID. Use them on the censor just to the right of the
gate. Quickly slide in once it opens. You need to do this quickly
or someone will come and shoot you. You arrive in an area called
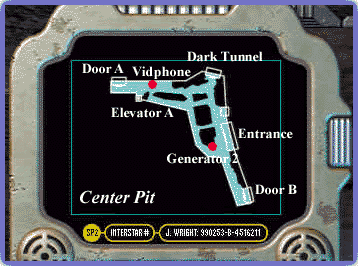
Center Pit.
You’ll meet Londie inside and he’ll
tell you about the Path of Lights. He’ll give you a strange
rock called Itacha.
This rock is the means to access the Path of Lights. DON’T eat
it yet because it only last for temporary. Use it wisely later
on.
Q : Where should
I go first ?
A : Find several tools
to help you first. See this map below to help you. Go to Dark
Tunnel entrance. Some barrels block your way. Move these barrels
and you’ll find an interesting stone
called Founeme. Pick it up for later
use. The Dark Tunnel will leads to the Cepeids Lair. If you
open the door and step in, you’ll see a sentence written
with blood. It says "Free". It’s too
dark to go through the path now. You’ll need helping tools
to do this. For now just turn to left and then turn around.
You’ll see a part of
tool there. Pick it up. The other part
is on the lower floor. Use Elevator A to go to the lower floor.
Push the red button, get in, and push another red button below
the elevator panel inside. Get the second
part of the tool on the edge. Combine those
parts to make a tongs. Go back to Center
Pit.
Q : Where could
I find a clue for Uncle Jack ?
A : Enter Door B. Go straight
to the elevator with ‘Level A’ label on it.
Use the elevator to go to Level C. Head straight to the end
of the tunnel. You’ll see a trailer here. Go inside. Take
the bloody cloth and a body
lamp there. Get out. You’ll find your
uncle belongings inside a crack near the other tunnel entrance
at the back wall after you fix your body lamp.
Note:
If you haven’t purchase the Air
Gun canister, you’ll see one lying
on the ground inside this trailer.
Q : The light
bulb of the body lamp is broken. Where could I get a replacement
?
A : Remember Gilly, the
old woman you meet earlier. She’s a miner. She should have
one. You could find her on level B behind the door labeled B1.
Go there and ask her about the light bulb. She’ll give
you two light bulbs. She’ll also tell you about the story
of the ‘Free’ word in the Dark Tunnel on
Center Pit (if you have entered first). Go back to level C and
get Uncle Jack’s CD and
another Itacha stone from the crack.
You’ll see a movie. Uncle Jack is your real father.
Note:
This is strange but it happens twice with me. If you haven’t
use the Itacha from Londie, you won’t see the second Itacha
inside the crack. But don’t worry about it. The Itacha from
Londie will be enough until you reach Cepheid Lair (if you don’t
use the Path of Light too often). The other trick is: leave
this crack section until you really need another Itacha to use.
Q : What should
I do now ?
A : You need to find more
proof to figure out what really happen to your father. Administrative
Office is the right place to start.
Q : How could
I go to the office ? I couldn’t go through the elevator.
They will catch me.
A : This is the right
time to use the Path of Light. Go back to Center Pit on Level
A. Enter Door B. Eat the Itacha stone. You’ll see a shining
path just in front of the elevator. Hop in and travel to Level
2. Hey this is the same place where Londie disappeared early
on.
Q : I couldn’t
go through the regular pathway. There is a guard block my way.
Where should I go ?
A : Use the ventilation
system. Before doing that, take the elevator to the Casino.
Find a drunk man inside the casino (it’s to the right of the
bar). Get the Air Gun
behind his back. There is a ladder going up just to the left
of the broken path (it’s just straight from your exit way
of the Path of Light). Climb the ladder, turn around. Use the
safety belt on the cable. Turn around. Fill up the air gun with
the canister. Use that on the pipe in front of you. This will
push you back againts the wall and travel to the big lamp on
the center of the room. Turn left and walk forward. Use the
same way to travel to the fence on the other side. Use the green
magnet to open the ventilation grate. Get inside the ventilation
path.
Notes:
While you’re in the Casino, take the Sonic
Tuner also. It’s on the broken synthesizer
at the right part of the Casino.
Janous Office
Q : Where is the
administration office ?
A : Go straight. Turn
left at the middle of the path. Continue straight until you
see a grate. Open it with your green magnet. Climb out. You’re
inside the office now.
Q : What should
I find here ?
A : You’ll find several
interesting things here. Get Janous
ID on the desk. (later on in this game,
you could use his ID along with his fingerprint to purchase
unlimited tools). Now it’s time to visit Grice office.
Open the drawer just to the left of the sink. You’ll see two
documents inside. One about the Miner’s Death, and the other
about Grice. Scan them.
Q : How could
I reach Grice office ?
A : Go back to the ventilation
path and this time head to the left. When you reach a big fan,
turn left. Turn left again in the middle way. Open the grate
with the green magnet. You’re in Grice office now.
Grice Office
Q : What should
I find here ?
A : There are 2 documents
inside his desk drawer. One of the document said that Rich has
a recipe to create a solution to deal with the monster in the
mines. She kept her recipe inside her computer at the Terminal.
As we know earlier, you need her fingerprints to go back to
the Terminal. Look at the monitor on the wall. You’ll see Cepheid
victim. Poor guy ….
Q
: Where could I get her fingerprints ?
A : All of the fingerprints
are kept inside the computer in Gryce office.
Q : What
is the code to access Gryce computer ?
A : The code is
written on the picture behind the counter at the front
desk. Go there and examine one of the photo. The code
is MIRU.
Note:
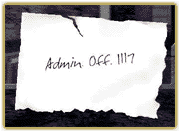
You could get the new code to access Administration Office by
clicking on the books on the counter. The code is 1117. You
will not be able to enter the Administration Office from the
front door unless you see this note first (even though you use
the correct code).
Q : How could
I get the fingerprints ?
A : You need to purchase
the Syn-Skin gloves first at the
General Outfitter. Buy 2 pairs of them to get Janous fingerprint
also. Use the smelter to burn the gloves. Find Rich and Janous
files. Use the laser pen scanner to scan them. Print it on the
gloves. Do this for each fingerprint.
Q : I don’t have
enough money to buy tools. What should I do ?
A : There are 2 ways to
get money. First, call Hunter. Dial 44. Make a deal with him.
Then you could sell the ore stones you found to him. The only
videophone that could be used to sell the ores is located on
the Center Pit on level A. See the Center Pit map above. The
other way is easier. Use Janous card to buy stuff. Wear the
gloves that has his fingerprint. Touch the fingerprint scanner
when it appears. Now you could spend all his money to buy things.
Q : How could
I open the cell door inside Grice office ?
A : The key is kept on
the key hanger behind the counter.
Q : What should
I do inside ? There is nothing there.
A : You will make an experiment
here. Get the handcuff key from the cabinet next to the counter.
The key is on the back of the cabinet door. Use the key on the
handcuffs. My God, it melts them. Remember this thing.
Dark Tunnel
Q : Where should
I go now ?
A : Remember, Londie told
you to meet him somewhere in the mining area. It’s time
to check out the Dark Tunnel again. Wear your body lamp and
enter the tunnel. Change the bulb when it breaks. By the end
of the tunnel you’ll see an elevator.
Q : How to operate
this elevator ?
A : Get the wire
from Elevator A panel. Use the SITO key to open the panel. Use
the wire cutter to cut the wire. Go back to the Dark Tunnel
and enter the elevator. Open the elevator panel with SITO key
and attach the wire inside. Take the elevator to the lower ground.
Notes:
Inside this Dark Tunnel you could find another type of ore called Monasoa.
Get it.
Q : How could
I kill the crystal wolf ?
A : Use the sonic tuner
to break it. After you kill the wolf, move forward and meet
Londie.
Author comments:
After this conversation, you’ll learn that the Cepheid has been
forced to work in the mines. The high oxygen level weaks them.
The only way to free them is to break the oxygen tanks. Hold
your breath because you’ll enter the mysterious but fascinating
Cepheid Lair ……..