|

By XXv
Productions and Jonathan Boakes
Walkthrough by
MaGtRo July, 2002
Revised: August,
2003
Game Play:
For 2002 released games – On early released games, place the CD gold tinted side down on the CD drive. On
newly released games, play the game using the black side down. Right click and explore the CD drive in My
Computer and read about the hints/tips/tricks/making of… The game needs to be
played in 640×480 screen area setting and at 32 bit True Color. There is no installation of
the game and runs directly from the CD. Just open or double click (if auto-run
is off on the computer) the DarkFall.exe. The Load, Save and Quit buttons are found in
the top right corner of the screen. I recommend making a new folder with Dark
Fall Saves as label on either the desktop or at ‘My Documents’. Open it and
place the saved games in it. There is no save or load available during the introductory
or end sequences.
For 2003 released games – The
installation is the usual procedure. There is a large file that is installed
midway the process that might seem to stop the installing process. Wait a while
and the installation process proceeds normally after that large file. After
installation, CD in the drive is not needed to play the game.
The game is point and click manipulation. Subtitles can be
launched using F1 and must be pressed whenever the game is launched. To talk to
the ghosts a “SAY” button will appear at the bottom right corner of the screen.
Type in your questions or statements. This is required at the end of the game to
read an incantation. There are several gadgets necessary in the game: Lantern,
Tracker (finds electromagnetic source), Goggles (use when the tracker shows
peak activity), CCTV (found in Room 2D and used to view several rooms in the
hotel) and the Thermocamera.
Some of the atmosphere described
such as phone calls, energy orbs floating, ambient sounds happens at random and
may or may not experience them as I did at the time you visit a certain place.
Listen to a message from your
brother Pete Crowhurst. Something is wrong, very wrong… I am in
Dorset…. with 2 students from Weymouth University – Polly and Nigel, ghost
hunters….. I need you to come here! Whatever they have been hunting
has found them, found me too… Take the train from Paddington to
Weymouth and then take a cab to Dowerton station…. I really need your
help on this….
I can
hear it…. It’s right outside the door…whispering… whispering
my name…. it knows my name.. I have to open the door… got to open the
door..
Tunnel: You take the train, falls asleep and wake up
in a tunnel. A voice talks to you – a young boy. I have a lot to tell
you! Turn and he says You can’t see me, you’ll understand
later but I can see you. Go forward, turn right and read the newspaper
on the ground. Came from London in ’41, had breathing problems.
The Dorchester Messenger dated May 16, 1947 wrote about 6 people that vanish
from hotel. The police believed that the owner, Mr. George Crabtree is
directly involved. I can see others. I can help you. The others are
hoping that you can help them. One of them knows you, your brother. He
just arrived and is still confused… I am Timothy Pike. I am always at the
footbridge… likes to watch the train… Turn left, place the
pointer at the middle railway tile, click and exit the tunnel.
I can’t
remember much not even the way home, perhaps you can help me with that.
2003 – Turn, turn
back facing the railcar with barrels. Go forward and read newspaper on
ground. Go forward and exit tunnel.
Right Train
Platform: Turn right and climb to the platform. Go
forward, turn right and open the door. Turn on the light bulb at the left
of the screen. Open the metal cabinet and flip the 2 switches that give
power to the signals, platforms, foyer/waiting room, hotel and toilet.
Pull back, turn left and see a sign – Dorsetshire Electric Company, est.
1913. Exit the shed. I can help you when you’re stuck. I am always at
the wooden footbridge…. It doesn’t know that I’m talking to you, but it
will soon. Tim leaves.
Ladies’ toilet – Look around and note the writing on the wall – And to him
was given the key to the bottomless pit. Turn around and see drawings
between the mirrors – a circle with a club ended X.
Men’s toilet – Look in the stall and see a peephole to the outside
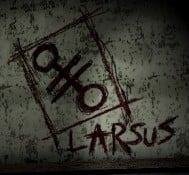
urinals focused on Larsus on the wall. Look at the drawings and writings – BP + TT.
Go left back to the platform,
turn right and enter the first door on the right.
Dowerton Train station office:
Look around and enter the room on the left – Waiting room.
Waiting Room – Check the red cell phone on the floor. Turn to right and
check the table. Look at the picture of the Station Hotel here at Dowerton. Look at the postcard sent by your brother to his office –
Crowhurst Superior Architecture.
PDA –
Check the PDA, turn it on by pressing the
bottom right button Check the magnifying glass icon to see the map of the
area. Click the note icon and see blank page with numbers. Click on each
number to read the notes taken by Pete. It started on 4/17/02 until the
night he called you – 4/29/02. He arrived at Dowerton and stayed at the
Crabtree Manor. Pete set up an office at the old waiting room. He met
Nigel and Polly, paranormal students that have superior hardware
with their own power source. He continues to survey the area for
presentation to his client, Jonathan Crabtree. He heard a kid in the
tunnel. On the 24th, his theodolite went
haywire at a setting of 271 x 632. His plans are to make a club at the hotel reception area and bar.
A name for the club just came into his mind – KARS. The students have
several cameras to monitor other rooms. On the 27th, he started to hear
whistling coming from the platform. On the 29th, the whistler is back…
Read your letter on the file cabinet icon. Press quit, exit and go to the
ticket office across the lobby.
Ticket office – Check the room. On the table, read the thoughts of the
stationmaster about the closing of the train stop in Dowerton. Turn to the
right. Read the GWR memo tacked on the wall about the closing of the
station on Easter Sunday and about the events in the Station Hotel. Take
the lantern on top of the mail pigeon holes (inventory is at top
left of the screen). Read all the memos in the pigeon holes written by the
stationmaster – vandalism at Points 001-005 on the 13th, Edith Penfold who
runs the hotel is a goldmine of information, disappearance of Tim Pike,
age 11 and a peeping Tom in the platform toilets. Turn around and see
first class tickets. Exit the room.
Main Lobby – Look close at the ticket vending machine by the stairs. Turn
the lever and take coins. Turn left, forward and left to phone
booth. Look close at phone booth. Take the receiver off the hook, click on
coin and it will automatically go in the slot. Wait and listen – saw that… Huh! Is someone
there? I’m Nigel, me and my colleague Polly were working on the hotel…
not much time… he probably knows I’m talking to you… get to my room….. find the key…
left it in a silver teapot. Climb the stairs by the door.
Footbridge:
Read the note left by Tim instructing you that when you get stuck to go to
the place where you are stuck, concentrate, come straight back here, he’ll
read your mind and maybe he knows the answer or the others do. Go forward,
turn right and look out the window and see the hotel. Continue out of the
footbridge.
Theodolite:
Go forward and look around. Look close at Pete’s theodolite. Press the
green and white button and click the +y close to 271 and the -x close to
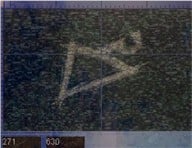
632. See static activity and a symbol. The theodolite is pointed to the
door of the buffet across the rails. Remember what Pete wants to call his
club – Kars. Turn the theodolite off to pull back.
Kars
Barn:
Turn around from the theodolite. Forward into the
opening in the fence on the left side of the last bench before the stairs. Forward, turn left, forward and enter the
barn. Use-click the lantern. Forward, turn right, right and climb the ladder. Turn
right and look at the small box on a crate. Take the screwdriver. Go
down, forward behind the car, left and see a trap door on the floor going to a
cave.
Cave of Song: Enter, forward, left and see a cave.
Hear a song. Forward and look at the stones with
engravings on them. Move the cursor to the right of the screen and place the
lantern on the stone pedestal. Look at the pedestal with zigzag lines connecting
circles. Look close at each circle and a lyric is seen. Note it down. Look close
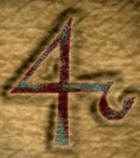
on the other stone and see a creature like shape surrounded by circles with 4
lines. Exit barn, go to the
station platform, turn left and climb to the hotel.
Station Hotel:
First Floor Rooms:
First floor hall – Look close at the picture on the left
wall of Henry V.
First floor
Storage room – Enter the door on the left. Look at the advertisement for
cameras on the chair. Exit, turn right and enter the bathroom.
First floor
Bathroom – Look close at the sink and turn the taps. Turn to the left and see paintings by Arther Johnson for sale. Exit and go down the hallway. Turn to
first door on the left.
Room 1F – Look at the
camera on the table and open the drawer to see a thermosayer
reading the room temperature at 14 deg C. Close the drawer. Hear 3 knocks.
Room 1E (Miss Grable’s room) – Hear Get out of my room!
Look close at the picture on the wall that can be manipulated. Use the lantern on picture.
This room
is ghastly why did I ever come here. There is a switch by the door.
Room 1D – Look
close at the table. It has cards, ashtray and empty bottles. Look at the
card of the female Greek statue and it will flip to a joker. Read the
letter to Betty from Thomas. Hear 3 knocks. There is a fallen rainbow lamp
on the floor.
Room 1C – It is
empty except for chairs, bed and cabinet.
Room 1B – There are
some drawings and writings on the wall – EM EVAEL ENOLA
– Leave me alone! There is an open box that has a can in it.
Hear the 3 knocks again.
Room 1A – The door
is ajar. Look through the window at the station platform and hear
whistling.
Exit the room and see stairs in front that goes to the second floor and
one to the right to the lobby. To access the stairs to the
second floor or the third floor from the flight below the back must be on
room A and facing room B.
Hotel Lobby: If the
phone rings, go to the office behind the reception area if you want to answer it.
The phone will ring every once in a while and hear messages from beyond.
Reception counter – Turn around and read the letter
to Betty asking about George. Turn right and look at the business cards.
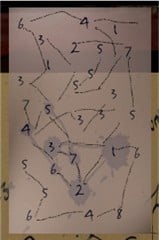
Desk pad puzzle – Look at the doodling on the desk
pad on the counter. Click-hold a paper from the left and drop it at the center
of the desk pad. Click on the pen beside it and see lines and numbers
appear. Move
the tracings a bit higher to fit the lines and numbers on the ink blots. Hear a voice about wasting paper. Look at the tracing (picture
at room 2C description below).
Turn to the mail slots on the right. Read the
letters on the slots – noises on second flight of stairs, Room 1E is Miss
Grable, appointment with Miss Grable for 7 PM at the restaurant from MF,
Room 2A is Miss Fly, note to Edith from George about not meeting her and
to tell Verney about drinks at midnight.
Reception office – Go to the room behind the mails
slots. If the phone rings, turn left and pick up the phone. Hear a woman ask for Frank
and gives a warning to leave this place or some other message. Look at the orders on the desk to
the butcher. Open the drawer and look behind the flour ad at the Fortis
company code for the safe. Read the ad for flood insurance. Read the
letter (front and back) inside the ad to Mrs. Penfold from Constable
Harold Perch about the hotel being safe but not the barn – garage from
flooding, also suspicions about the owner of the car in the barn and
attending the party to check on that guest. Look at the calendar on the
wall – April 2 is delivery and April 29 is music night.
Turn to the left wall and look at the wall
switches.
Safe – Go out of the office, turn around to get a
better position to see the safe and look close on the safe. Move
the knob by clicking on left, top,
middle, extreme bottom and then right. Turn the knob. Get the
bar key.
Buffet – Enter the door by the stairs. Turn to the right and pick up the
tracker at the bottom shelf. It detects electromagnetic activities. Turn
left, forward and realize that this is the room that is at the end of
the platform from the train office. This is also the room that showed
activity with the theodolite. Turn left and see a candle and holder on the
table. Turn back and see another candle, holder and matches (Lucifer) on
the left table by the lantern. Exit through the hotel door.
Bar – Click on bar key and the door will open. Look around and see a beer tap for The
Dow beer. Go to next room and read The Ballad of Tom Oliver. There
is a leaflet about the Music Night presented by Edith and Betty Penfold at
the end of the bar. Exit the bar. The phone might ring at the reception
office. Pick up the phone and hear – Help us. Find us.
Take the
hallway by the bar.
Ladies’ room – See the mirror turn smoky for a second. There’s a working
light switch at the opposite wall. Look in the toilet and back out and –
Did I just see a shape of a man in the toilet room?
Gent’s room – One of the student’s
camera is at the sink. Look in the
toilet and flush the toilet. Exit and see that the back door is locked
Kitchen – Go forward from the reception desk, pass the stairs on the left
side, turn left and open the door. The tracker shows activity. Turn right
and try to close the dripping faucet. Turn around and look at the desk.
Look at the picture of Edith by Arther and the cookbooks. Check the table
by the window. Read the recipe for brawns and pig’s trotters. Look in the
box and see a funnel. Look in the cupboard to the right of the window.
Read the note from Betty’s mum – Edith and turn it over to read about the complaint’s
book. The bottom of the cupboard has a bottle. Look close at the top of
the stove and at the bottom left ash drawer of the stove that has part of the
actress’ complaint note – Monday, 24th, draft from doors on table 1 and
lamp flickering on table 3. Open the bottom right ash drawer and the complaint
note continues – actress moved to table 4 where Mr. Verney was. Hear a
voice singing ‘As Time Goes By’. Enter the door to the restaurant.
Restaurant – Look around, see the tipped lamp under table 3 and the
ad
on table across table 4. The student’s monitor is on the table at the
right of the stained glass double door. Stand by the restaurant’s stained
glass double door and face the window for 15 seconds. See a ghost train
pass beyond the window and enter the tunnel.
Exit
through the stained glass door and find yourself in a room 2A. This is bug
in the earliest 2002 games released. It is now fixed on later released games. On
later games, exit restaurant through the kitchen door and go up to the
second floor. (Thanks, Jonathan!)
Second Floor
Rooms:
Look at the hallway and the
lights goes out and rustling sounds are heard.
Room 2A – See a scissor on the wall. Look at the
table and read the announcement for the restaurant designed by Arther
Johnson, an order slip and bible.
Room 2B (Miss Fly’s room) – Look at the table. Read the letter and a female voice reprimands
you for being nosy. It is written by the actress seen on the pictures. Crabtree gave her a piece of paper
and it should be hidden for her safety. She then hears someone at the door.
Clock puzzle – Look close at
the clock and the female voice makes a comment about the buttons on it.
Click on the buttons and hear 2 different sounds. Click from L- R:
1, 2, 3(low tone) and then 4. Then click 3 again, 1, 2 and 4 – the sound
should all be the same. To reset the puzzle – pull back and wait for
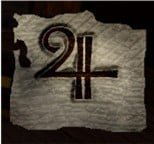
Miss Fly to talk again. Look at the lyric in the secret drawer that came
out.
Morcana
Look at the side table and see leaflets about
Matilda Fly’s performance. Look at the Hastings Beach photos on the wall by George Crabtree, 1935 – the town and a boat. Open the drawer
on the side table and read about the disappearance of Miss Fly from the
performance, bad reviews and about the Slyfox, female bank robber that
robbed
the bank in Ludgate.
Room 2C – Note the hat at the side table. Look in the cabinet and see a box with
lines and circles – reminiscent of the tracing on the reception counter.
Click the circles and little buttons from 1 – 7 as shown by the tracing. Look at the
lyric and read the
letter – Lussa. Close the cabinet and exit the room.
 |
|
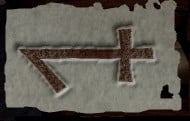
Lussa
|
2D is locked.
Room 2E (Mr. Verney’s room) – Look at the boxes on the
floor. Open the book by Andrew Verney. Hear Mr. Verney ask if you are
interested in astronomy too? He is also known for his puzzle boxes and
board games.
Cryptogram – Look in the other box and arrange the
pieces of paper by click-hold to move them around. This paper is for
information only and no distinct sound to show completion of the puzzle.
It is a clue to the cryptogram letter. R is obviously I, so I = R, so D =
W?
Look on the side table, note the puzzle
box and read a cryptogram letter from GC.
H = S, L = O, T = G, F = U, V= E, G = T, S =
H, D = W, O = L, M = N, etc.
Andrew, Guard the skin with your life! I know I sound like a madman.
Edith is feeling inclined to phone the police… You must trust me. There
is a great evil with us here in the hotel. My research is going well. I
just need time. Your trusting friend, G. C. P.S. Do not open your
door this night to anyone…
Box puzzle
–
Open the drawers. Read the
blue book about Mr. Verney finding a new constellation. He also mentions
that George Crabtree inserted a coded note and a piece of old skin under
the door. Look in the closet and read Verney’s note similar to the locked
puzzle box on the table. Look at the star maps. There are boxes on top of
the cabinet. Exit the room and turn left to the end and see the telescope
on the left of the hall.
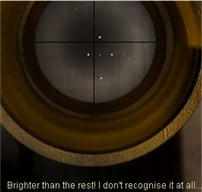
Look through Mr. Verney’s telescope. Move the pointer,
center the constellation and Mr. Verney
will make comments. Take note of the constellation when he says,
Brighter than the rest, I don’t recognize it at all.
Go back to the
Room 2E and look at the biggest star map in the closet. It looks like
‘raka’ at the lower left quadrant. The star map beside it also has the
constellation on the upper left side. Look at the blue book in the drawer and
see the notation for Raka is 12/534/76. Look at the box on top of the
stand. Using the note in the closet 00 000 00, 12 345 67 and the
Raka
notation of 12 534 76 – Click (L-R) on first button, second, fifth, third,
fourth, seventh and sixth buttons. Look at the lyric.
Room 2F – Look at the pictures and check the drawers. Pick up the Zcam.
Press the green button and look at the pictures taken using the arrows.
Storage room – Go to the end of the
hallway and enter the room at the right. Look close at the broken slot
machine. Pull the lever and read the card – Good things, when short, are
twice as good. Baltazar Gracian 1601-1658. Pull the lever again as often
as you like and get
different cards with different sayings. In 2003 version, there are no
cards seen.
Second Floor Bathroom – Look at the taps. Open the
box of soap at the basin stand and click on the cut picture with the
words, sandstone (L) and wood (R) on runes on the lid of the box. Note the
placements, size and tint of the runes around the bowl.
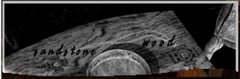
Open the water heater’s grilled door by the bathtub. Read the burned
letter about delivery of package to Miss Fly, about a piece of skin given
by the hotel owner and is hidden literally beneath the writer G. G.
Third Floor
Rooms:
Go to the third floor and
heard thumping noise. Go forward. Enter door on the right.
George
Crabtree’s room –
Look at the books on the shelf above the hangers. Read the History of
Alchemy and Pagan Power and Earth Forces that explains about water, chalk, bronze, wood,
sandstone and mercury. Note the photographic award on the wall. Go to the
table beside the bed. Read the letter sent by the experts as an answer to
a request by George tuck in ‘A Warning to the Curious’. It explains about
the symbols meaning and dating of the cave to 3rd Century BC.
Box puzzle – Look close at the box in the cabinet
below the books. The pictures are of Henry the eight, Henry the fifth,
Elizabeth the first. Click VIII, V and I on the gold knobs. Read George’s
note and look at the picture behind it. It looks familiar.
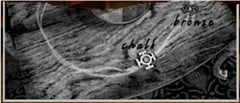
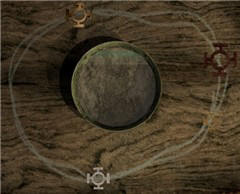
Bowl puzzle – Look close at table by award wall
and see water bowl. Remember the half picture in the second floor bathroom and
the other half just seen at the drawer box. Click-hold drop the correct symbols
on points of contact of the 2 lines around
the water bowl, at the positions shown by the photos. To help in placement, look
close at the lines inside the circle part of the symbols and try to
duplicate that placement on the table.
The smallest is bronze, white is
chalk, medium size is sandstone and the largest is wood. Words are seen in
the water bowl – One of the lyrics is missing.. Nemesis.. will not work.
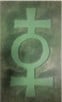
Olkas
Look close at the bottom right
gold knob on the bed frame. George has all 12 lyrical names and symbols
and has a hidden letter in case of failure. Go to the room across the
hall.
Arther’s Studio – Look at picture of George on easel by window. Look close on book at window sill
under the candles stick and a
picture of table 4 of the
restaurant is seen. Turn right and look at the picture on the easel. It changes. Look at the
table and move the picture on a tile. A picture of a bird is in inventory.
Stove –
Look at the stove by the door and
open the cabinet below. The makings of invisible ink are present. Another cryptogram is seen.
Arther, I think it would be wise to write our records and drawings using your
invisible ink. I do not want the others to know of our plans just yet…. Yours,
George. Close cabinet. Turn the knob to open the gas line on the right side of the
cabinet. Flip the switch on the left of the stove and then press the knob to
light
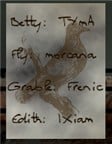
a gas fire on. Place the bird drawing in front of the fire and read the lyric
names held by 4 of the missing people. Betty – Tyma, Fly –
morcana, Grable – Frenic
and Edith – Ixiam. Now we know the names of some of the
symbols we found and some to look for.
Betty’s room – Open the hall door and enter the door on the right with your back on
the hall door. Turn right and look at the music sheets of Glorious Beer and
Memories (O’ Happy Day and Memories of Scunthorpe). Wind the clock and it will strike 12 – tracker activity is increased.
Look in the drawers. Look at music sheets on the other wall of ‘Alf a Pint of
Ale and ‘I do like to be beside the Seaside’ (Good ‘ol Dow Ale and On Hastings
Pier). Check the dressing table. Click the
metronome and letters will appear. Read Betty’s letter to Thomas. Turn the
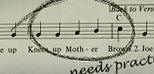
trumpet on the floor on the left side of the dressing table and see a note stuck
on it. There are 5 notes that need practice.
Sitting room – Enter the room opposite Betty’s room and read the story of Tom
Oliver and his disappearance in the old Dowerton Inn, the foundation
of the present Hotel. Read the newspaper clipping of the search for Tim
Pike. Adjust the radio using the left and right arrowhead to move the band
line up and down.
Edith’s room – Enter the room adjacent to the
lounge. Look close at the dressing table and open the music box.
Read the note from Betty about the clock in 2B. Open the drawer and look
at the photo album. Note the last holiday together of Edith and Frank was
in Hastings, 1940.They played their tune at the Castle Hotel. Click on the top picture
of 2 women on the wall and Edith talks to you – There are 12 symbols –
She, Betty and the guests each have one. Some are lost, destroyed or
taken. Edith’s symbol is in her room. You’ll find it if you have a song in
your heart…………
Gramophone
– Look at the record on
the top shelf of the closet. Turn it over and see a list of the songs –
look at #2 – ‘As time Goes By’ (2002 version)- the music heard in the kitchen
or #2 ‘On Hastings Pier’ (2003 version). Look at the gramophone by
the bed. Wind the lever on the side. Flip the left switch to turn it on.
The right switch is volume, play the record loud –
place the lever to the end. Click on the record at any place to place the
needle and play the record. Click the record to play #2 second music. Leave the gramophone playing and then see
the picture on the wall falls. If not look around. The right bottom picture on the wall
will eventually falls off. Look close at the
picture on the bed. Read the letter from George to Edith. Pick up the
lyric – IXIAM. The picture goes back on the wall
when you pull away from the bed. Look at the framed newspaper clipping on
the wall by the door.
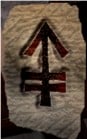
IXIAM
George’s study – Exit and see that the room
across Edith’s is locked. Look down on the door frame and insert the paper
bird
underneath. Look at keyhole and then insert the screwdriver on keyhole.
Take the paper with bird on it and pick up key. Click-use key on keyhole.
Enter and look around. Look at
the picture of Arther as a soldier on the wall above the desk. Read the
letter at the back of the frame about his going to the frontline and
hoping to be back to help George on their ‘miscreation’. Look at the books
that show George’s interest. Look at the desk. Open the drawer and read
the letter behind the postcards from Archeological Society about a cave
network or ancient site under the hotel. Note the envelope to Mortimer and
Partners, Solicitors and to Edith. Read George’s notes about Miss Grable.
Read the newspaper clipping about the Slyfox robber and Edith’s note about
the ‘suspicious’ guest – Miss Grable.
George’s Journal
– Read George’s blue journal. The adventure started with them looking for
Tom Oliver’s resting place, to finding an antechamber dated 1318, finding
and releasing Darkness, study of the enemy, Arther’s finding of the 12
runes – an incantation and Arther’s joining the war and ultimately, death in December
of 1944. He writes about a bedcover Edith made with a key to the first
trial hidden in its weaving. “I saw Eternity the other
night, like a great Ring of pure and endless light, All calm as it was
bright” – Henry Vaughan 1622-1695.
Turn around and look at the work
table. Look at the picture and drawing of the stones in the Cave of Song. He
noted the possible order of the lyrics in the monolith. Study the slide index of
the slides in the box and look at the projector.
Projector
– Open the box. Flip the switch on the projector base. Light is projected
on the wall. Click on each slide in the box one at a time to view it on
the wall. Click the inserted slide to remove it from the projector and
select another. Look close at the
slide taken from the top right slot of the box (#5). Click on the man
and note the
paper he carries at bottom left of the projection. Look at the slide index and
note that #5 slide is labeled – mortym.
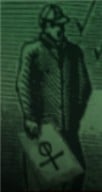
mortym
Turn around and look close at
the trash can by the door. Pick up the torn letter and put them together.
I never imagined I would have to put these words
down on paper. I wish I did not have to write this note… but something
must be said in the way of an explanation. Oh what have I done… it’s too
late for sympathy. I nleased, it tricked me…. I promise, I had no
intentions to let it loose, why would I. Its here now. I foolishly thought
that perhaps… well… perhaps it would bring Arther back. It would
whisper at my door, it would creep and hide in the dark shadows of the
hotel, it would conjure up the dead for its pleasures, and feeding, but
all the time I thought that I had some power over it. The ancient runes
hold the key to its bondage, if only……
Stereoscope – Go
to the corner of the room and run the stereoscope. Flip the switch on the table
to turn it on. Click a tube of film and it will automatically go in the machine.
Turn the lever and look in the lit eyepieces. Watch possible haunting of light
sprites in the bathroom and cellar. A study of trees. Trial 2 – elements –
fire, lightning, wind and water. Exit the room.
Third floor bathroom – Enter the room on the left of
Henry VIII. Look around and turn to the vanity table by the door. Click on
the left edge of the mirror to move it to reflect a purple lamp. Turn to
the left and see a reflected writing on the wall.
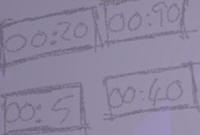
Stock room – Go to the end of the hallway and enter the
room to the right of Henry VIII. Turn left. Read the stock list, dealer cards
and Betty’s letter to Edith pinned on the wall. Look down and see boxes
of pictures and lamps. Hear Edith hum – As time goes by. Look close at
the storage shelves, especially the one at the very back. Look at the silver
teapot. Pick up key.
Attic – Loft: Go forward
towards the door and turn left. Climb the ladder.
Boiler –
Go forward and right. Turn the wheel of the boiler and see flames on the glass window on the
right of the screen. Go to the front of the boiler, see the lights are on,
flip switch and turn the left wheel for the 1st floor bathroom. Note the
black line moves to the right on first gauge.
Suitcase – Turn
around, forward, right, forward, right and look close at the locked
suitcase. Insert the screwdriver on the lock of the suitcase – click on
right side, left side, top or below of the screwdriver when hand icon appears
to wriggle the lock. Click L, R, L, R and below –
the suitcase opens. Pick up the book, The War of the Worlds and read
George’s note tuck inside. George writes to you knowing that he has
failed. He tells of It feeding on souls and to read his journal for
further understanding of Nemesis. A lyric is seen – Oliviak.
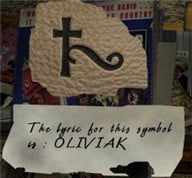
Quija board
– Turn around, forward and look around at pictures. Turn to the
left and see a light sprite light a candle on a Quija board. Click on the
planchette, type the question you want to ask and click on ‘say’ at
bottom right of screen. Who are you? Thomas. Is Betty with you?
Yes. How old are you? 19. What do you want? You must do the trials. What trials?
Darkness. Are you dead? Yes. How did you die? Darkness.
Can you help me? Yes. Goodbye! Yes.
Climb down and exit the storage room. Did you see that!!! A flying sprite opened the
hall door!
Go
back down to the first floor bathroom.
First Floor
Bathroom – Remember we turned on the boiler in the attic to get hot
water here. Turn
the right faucet on and steam rises to make a symbol in the mirror.
Malus.
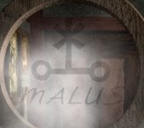
Go back to the locked Room 2D.
Room 2D
(Nigel’s and Polly’s work room):
Insert the key found on
the silver teapot at the storage room on the lock. Look at the items
tacked on the bulletin board. Study the map of the area by the Hotel
(ruin). Listen to the tape recorder on the table by pressing the middle or
top button on
the side – Polly is upset because Nigel disappeared. She wrote information
on her journal. The thermoscanner picked something up and the settings are
hidden in the bathroom upstairs. Look at take outs on the table. Turn left and look at the equipment table. Look at the usable cell phone
beside the pizza box.
Computer information – Click on the left monitor, click on journal entries at the note icon on
the left of the screen to get Polly’s journal. Read and learn that Edward
Tully, a local man also disappeared leaving a diary. The ladies hotel
bathroom had an apparition of a young woman placing something in the sink
or beneath it. Cam #5 is in the restaurant where darkness is sighted.
Cam #7’s sighting is exciting. Temperature drops in room 1F. Nancy Drew
style to open the locked 3F. There is a locked metallic door in the
cellar. Pure energy outside the door. Record player upstairs playing ‘As
time goes by’.
Listen to the sound recordings.
Sound 1 recorded in cellar by the locked door – press noisegate, freq –
until a clear recording is heard, hear a bleeding man fearing that his
spilled blood might bring them here. Wants rags – maybe Tom Oliver. Sound
2 recorded in kitchen area – press noisegate and hear chanting. Sound 3 is
recorded in loft near the windows – press Freq + and hear ‘Leave me’.
Press ‘reverse’ and hear more voices.
Click on Image cleaner and see
images. Click at the pictures at the bottom of the page to place them on
the bigger frames. Click-hold to move the frame on the top left and see
the magnified areas on the right frame. See a floating chair in the buffet
room, floating Henry VIII, light sprites outside the window by Elizabeth I
portrait, apparition and light sprites in 1B and cellar.
Click on green book icon – case
0014 personals to access the background of the people that disappeared.
Click on green book to browse
websites. Click on any of the four recent files at the top bar of the frame
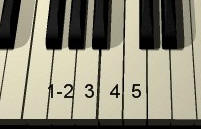
accessed by Polly. Look at the piano scale to play the piano. Read Polly’s Quija
tips under Ghost Hunters UK, then click on In Focus, then on the Quija Tips –
Keep questions simple, keep notes and say goodbye at the end. Under Mysteries of
the 20th Century – read about Where is Matilda Fly?
Right Monitor – Click on the other monitor and see that it needs a password.
Turn right and look at the notes and pictures at the board. The pictures taken
by Cam 7 shows a darkness coming out of the corner and gets bigger.
Password puzzle
– In the
bottom right note – Nigel says that the password is obvious and is the only
thing he likes on the menu. Look back at the 3 takeout menus on the other tack
board. Note the 3 phone numbers. Use the cell phone and dial all 3 numbers. The
pizza place cannot be replied to, the Tandoori take away place is upset about
payments and the automated Chinese delivery recognizes the phone #. It asks if
the standing order is to be delivered. The standing order is #15. Look at the
Dragon Inn menu and see #15 is Chicky chow. Go back to the right monitor. Click
monitor and type in Chicky chow as password.
Watch Cameras – Click on the pictures on the top to reset and look
what is viewed by the cameras at the different location. The platform
camera showed a light come out of the hotel wall, grow larger and enter
the train tunnel under the hotel. The station office and bar showed light
sprites flying around. Room 1F had a fast glimpse of a floating chair. The dining room camera picks up a light on table
and 2 chairs at the center of the room. Room 1C and 2D show the state of
the rooms from the past.
Thermoscanner
settings – The cam in the cellar has to be adjusted
for depth. As shown by the third floor bathroom reflection on the wall,
adjust the alpha to 00.20, beta to 00.90, particle to 00.5 (not 00.50) and
the density at 00.40. A cavity is detected beyond initial surface are.
Manual inspection recommended. Cavity size: unknown. Return to main and
then quit (upper right red x).
Goggles – Turn to the left and look close at the boxes on
the floor. Look at delivery slip. Look at the right side of the large box on top
of another box and get an active cursor. Pick up the goggles that is behind the boxes.
Goggle Usage:
When a voice is heard that
sounds like ‘Here’ and when the
tracker shows activity, use the goggles. Click on goggles in inventory and move
the cursor around the screen. The cursor produces a green aura and the past is
seen.
2D – Use goggles and see on the wall
the words The InNoCents mean Well.. useless pieces.. UseLess Pawns with Electric
gifts.. they think theY KnoW.. Useless piEces ThrowN Away..
A rocker and
paintings are seen on the wall.
Edith’s room – Use the goggles and look at the wall beside the dressing
table and see the words to As time goes by.
1A – Use goggles and see pictures on the wall,
chair, table with lamp and a made bed. Look close at the bedcover that
Edith made for Trial 1 that George’s journal talked about. Top left –
green, top right – blue, bottom left – purple and bottom right – brown or
orange.
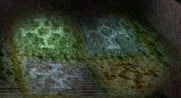
1C – Use goggles and see pictures on the wall, chair, table with lamp and
2made beds.
1E – Turn right, use goggles and see light
sprites rise from the floor and the whole room glows green. You can type a question at bottom right
and Miss Grable might answer. Try asking her what her true name is or if she
is the Slyfox. Look at the floor and click on a board. The board is removed to reveal
the stolen money, a lyric and a letter from George.
Put the board back and exit the room.
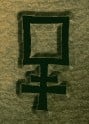
Frenic
Restaurant – Go to the table with the menu
by the window, use the goggles and hear Miss Grable being blackmailed by Miss Fly
about her activities as Slyfox.
Bar
– Hear music and singing. Turn right, forward and hear the voice say ‘Here’. Use
goggles and see the words – Tyma… Tick & Tock & tick & tock.
Over the Ballad of Tom Oliver – One Of Many… Tick.. One Too
Many..
Piano puzzle – Look close at the piano and play the notes
from the trumpet in Betty’s room. Betty needs to practice this part. Play G, G,
A, B and C. The G and A notes are between the keys that have a bigger space
between keys. A compartment on the piano opens. Click on it and
Tyma lyric is
seen.
Go out to the front part of the bar and use the goggles while
facing the booth and when a voice is heard. Hear Mr. Verney ask for George
and has something to celebrate.
Reception desk – Use the goggles on the wall and read IGNore The Telephone…
Itis Trying to Distract You.. Confuse you.. Ignore Ignorance…
Gent’s Bathroom – Go to the toilet stall and use the goggles. Read the words –
SET in StoNE… STONE MEDUSA… USELESS ARMS… Frozen..
Cellar:
Enter the cellar by clicking the right frame of the door under the stairs at the
hotel lobby. Turn left, forward and try the metal door. It’s locked. Look down
and see an axe stuck on a log.
Darkroom –
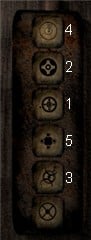
Facing the metal door, turn right, forward and then turn around. Look at the
keypads on the beam with strange markings similar to the designs on the tables of
the restaurant. Press them in the order of the table numbers at the restaurant.
Be sure to try to open the metal door first, then press the buttons – ( top to
bottom) press the third button, second button, fifth, first and fourth button.
The metal door makes a sound, enter.
Read Nigel’s note on the table.
Look at the developed pictures and the photographic equipments and reagents.
Developing –
Look close at the right side of the worktable. There are 2 negatives that are
not developed yet. Click the small button on the control box beside the
negatives at the bottom left side. The main lights are turned off. Click on the
enlarger, the big black box and a tray comes out on the table. Click on a
negative and it will automatically be placed on the negative tray. Click on the
negative tray and it will automatically be placed in the enlarger. Click-place a
photographic paper on the table. Click the large button on the control box by
the negatives. The enlarger places an image on the photographic paper. Click the
paper and it will automatically be placed in the left chemical bath, the
developer. Quickly, click on the paper when an image appears and it will be
placed on the right chemical bath, the fixer to stop the process. Click on the
paper to remove it from the fixer and to look at. Click the small button again
to get the main lights on.
Turn left and open the bottom drawer of the cabinet with the bottles and get the piston key.
Exit the room.
Hear a voice and then use the
goggles. Tom Oliver asks Be that
you Will Thomas? Where you been? If you do not answer and move the cursor, he will say
– Why are you looking at me like that? Say – I am not Will.
There is evil in these walls. What evil? If thou know best, you better
leave this place. I don’t like this place, we should never have come down
here…Too late maybe, you better leave right now.
Place of the Ancients:
Secret Antechamber – After leaving the darkroom,
go
forward to the other end of the room. Turn left and see the cam and thermoscanner.
Move the corrugated sheets to get into another room. Enter and use the lantern. Look close
at a brick with 1318 written on it. Use piston key on pipe. Turn the piston key.
A block moves up and a crawlspace is seen. Crawl in.
Stone Chamber – Hear Polly say – Nigel,
what have you done. Oh God, what have we done. Turn around to each
wall and see inscriptions appear on the walls. No exit! Go forward.
Trial 1 – A
colored transparent wall blocks the way. Click on the colors and the voices say
a word in an ancient language. Based on Edith’s bedcover, click on green, blue, purple and then orange. The
wall disappears. Go forward and look at the symbols at the walls again.
Trial 2 – Go
forward and another colored transparent wall blocks the way. Click on the colors
and hear sounds of the elements. Based on the stereoscope film sequence, click on top – fire, left – lightning, right –
wind and bottom – water. The wall disappears.
Trial 3 – Go
forward and look at the walls again. Musical sounds are heard from the right and
left wall. Click on the left wall and copy the sounds made to the colored
transparent wall. Click on top, bottom, lower right, middle and ‘left.
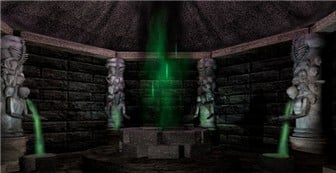
End Game – Enter the inner chamber. There are
statues with upraised begging arms spewing green plasma into bowls on the floor.
At the center is a green plasma, shaped as in the monolith in the cave. It
shoots green lights up and out of the opening in the domed ceiling. It is
Dark Fall. Turn left and look at the
bowl of the statue on the left and then look at the statue on the right. Hear
the voices of the souls asking ‘Help Us’.
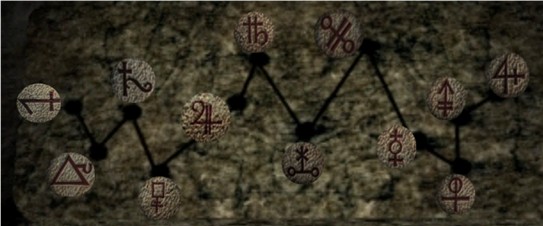
Type in the lyric name one at a
time, then click ‘Say’, hear the name chanted and see the lyric symbol light up
on the far wall. – lussa, kars, oliviak, frenic, morcana, tyma,
malus, larsus, olkas, mortym, ixiam, raka.
Dark Fall expands, then coalesces
into a small ball and disappears into the wall. The statues stop spewing green
plasma, their uplifted arms go down and the statues disappear. Light sprites
flow around the room and you can hear happy voices. The lights fly out to the
opening at the center of the dome except for one – Tim Pike.
You did it!!! I knew you
could. I can go home now, well, you know what I mean. My Dad is dead and
buried…. …. perhaps he will be waiting for me, with me Mum as well. You
stopped the Dark Fall spreading. It is trapped again. Where it belongs. You may
as well leave too, there is nothing here for you now. Time you had a rest I
think. One last thing though, things don’t have to turn out as they did, you
will find out what I mean soon…. …bye….
Listen
to a message from your brother, Pete. I have something
important to tell you. I have to tell you soon… I have completely forgotten…
must not be important…. I will be home in 2 days… The hotel development for
the Crabtree Estates is going better than planned, no surprises. I’ll see you
and have a drink or two…
The End
This document may not be distributed without express written permission of
the author and the content may not be altered in any way.
For
Questions or Comments on this Walkthrough,
Please write to:
MaGtRo
Copyright
© 7/2002
MaGtRo
|