Clue Chronicles: Fatal Illusion
Clue Chronicles: Fatal Illusion
by HASBRO Interactive
Walkthrough by MaGtRo
July, 2003
Gameplay: After
installing the game, download and install the patch from
Atari
Fatal Illusion Support. The patch fixes graphic glitches while talking to
professor Plum, requests for Disc 3 that is already in the drive, slowdown
during loading or gameplay or Fatal Access Violation Error. Once the patch is
installed any old saved game prior to patch installment cannot be played
anymore. This game was played on WinXP
with Win98 compatibility selected. Installation is at CD1 and gameplay after the introduction starts on
CD2.
Placing the cursor
on top of the page shows New Game, Load Game, Save Game, Preference, Descriptions of the Suspects
and Quit. Preference has the music and voice volume, subtitles and animation
detail. Placing the cursor at bottom of screen shows the notebook with your
notes after interviewing the guests. Left click of mouse on inventory picks it
up and right click of inventory shows a close up view of the inventory. There are only 12
slots for save games. When talking to suspects, ask about everything on the
selection in the notebook.
In Egypt at the Valley of the Kings, a man typing in a tent is slain by a
backstabbing assassin. CD2
Rhine Valley, Germany: New Years Eve, 1938
The inventory shows the invitation to Ian Masque’s party on New Year’s
Eve and newspaper clipping about the mountain top Chateau and the ship.
Read about all the suspects on top bar.
Meeting all the suspect-guests aboard
Masque’s ship
Deck of Rhine Maiden: Miss
Scarlet inquires why Ian Masque, our hosts wants from all the guests. She wants a
drink from the bar downstairs. Click the magnifier cursor on Scarlet and a
notebook comes up. Click on a selection from the notebook and then click on the
dialogue to talk to her. Ask about everything. You’re a PI. Turn left and talk
to Mr. Green, the man in green suit about everything.
Upper
Deck Cabin: Go inside the
cabin. Talk to Mrs. Peacock. Look at the things on the
table. Talk to Mrs. White. She was the nanny of the son of Sir Alexander Boddy
who formerly owned the bric-a-bracs in the yacht. Go to the Display case
of puzzle boxes across the room.
Lounge: Go down the stairs, check
the locked double doors, turn around and talk to Dr. Julia Kell. She drops a hint about traveling outside Germany before 1939 (start of
WWII). Popov has ESP? Talk to Professor Plum and learn about the artifacts of
the Death Cult of Egypt. All the artifacts here came from Sir Alexander Boddy,
whose son apparently vanished. Turn around and see Marina Popov playing the
piano. Sabata, the painter will tell you not to disturb him while he is creating
one of his clairvoyant paintings. Go to the bar and talk to Martin Urfe.
He tells you that Masque wants the puzzle box from the display case upstairs.
Urfe gives a key to the display case. There’s a secret in the puzzle box.
Talk to Colonel Mustard who is acting as bartender. Get the drink for
Miss Scarlet.
Go back to the Deck and give the drink to Miss Scarlet. Talk to her again.
Then talk to Green also.
Go back inside and use the key on the lock of the display case. Pick up the
Chinese puzzle box on top shelf. This will trigger the appearance of Ian Masque
from the locked door
and he greets his guest.
Puzzle Box, Masque and ESP
Lounge: Go down and talk to Masque. Give the puzzle box to Masque. Masque opens
the Puzzle Box of Death. He falls down dead. Try to pick up the box but
Dr. Kell stops you. Move forward and see Green pick up Masque and takes him
behind the double doors. Talk to all the guests again about everything.
Marina Popov tests your ESP prowess and gives you the ESP cards
afterwards. Sabata wants you to show him something magical in exchange for a
painting of the future. Urfe will teach you a key card trick. He gives the
magic cards. Colonel Mustard advises to pick up the puzzle box.
Now that you
know a magic trick, go to Sabata and do the key card magic trick. Choose the
card to the right of the upcard shown while doing the trick. Sabata gives a
sketch of Mrs. White dropping a vase. Be sure to ask every guest to take the ESP
test.
Go upstairs and talk to Mrs. White. She drops the vase as depicted in
Sabata’s sketch. Look down at the broken vase. Pick up 2 tack-like
artifacts under a piece of the vase. Go outside and talk to Scarlet. After
testing Scarlet for ESP and her passing the test, she mentions about 3 numbers –
today’s date. New Year’s Eve, so today is 12-31-38.
Go back
down and through the lounge double doors. Turn right to the door with a combination
lock.
Combination lock puzzle – Look close at the combination lock. Use Scarlet’s numbers. Clockwise to 12, counterclockwise to 31 (passing 12 again)
and then clockwise to 38. Then click the handle while in close up view. To reset
the puzzle, pull away from close up view.
Inside the
combination locked door: Go forward to the shelf and pick up the
gloves. There’s a wrench behind the cobwebs at bottom shelf that
is not used in the game. Turn right and look at chest. Green creeps up to
say that he left Masque’s body in his room. Open the chest and take the gear
from chest. Exit the room and go out to the puzzle box on the lounge’s floor.
Chinese Puzzle Box: Look down and
use the glove on the puzzle box. At the same time the
box is picked up, an artifact from Masque is also taken.
Puzzle
Box puzzle – In inventory, take the artifact from Masque and click it on puzzle box.
The puzzle box will be in close up view.Take artifact from Masque again from inventory and click it on gold round
metal in front of box. This opens the top panel of the box.
Take the note from puzzle box. The note shows glyphs and their meaning.Take larger artifact from vase from inventory and while in close up view,
click it on round holed metal on left of top panel. This will open the end panel.Take the remaining artifact from vase and click it on round metal of the
opened end panel of box. Take the crank from puzzle box. Use side
arrow to get out of close view of puzzle box.
Door
to Bridge: Enter the double door again. Go forward, up the stairs and
face a door with a weird lock mechanism and a wheel on the front of the door –
looks familiar. Take the crank from puzzle box from inventory and use it on the
gear at far right of the weird lock mechanism. The door opens.
Bridge-wheelhouse:
See that the captain is a broken robot; sparks are coming out of his left leg. Now what? Click on the
captain and see that he’s missing a piece. To fix him, we must turn off the
power. Turn right and zoom in on the generator control. Open the panel and click
on the power button to turn the power off. Go back to the broken captain. Click
the gear taken from the chest in the combination locked room on him and see it
inserted in his left leg. Go back to the generator panel. Now to bring back the
power: Click on Power button (yellow light comes on), blow downs, then
valve, then cross conn and feed valves. Scarlet comes in. CD1
Masque’s Mountain Cable Car
Watch the ship arrive at the pier and guest disembarks. There
is only the newspaper clipping and note from puzzle box in inventory.
Cable Car Shed: Green cannot get the cable
car to run. Talk to Green. We have to find the instructions to get the engine
started. Turn left and enter the shed.
Upon entering, see the cable car ahead. Turn right and note
that the fuel tank is empty. To the right of the cable car is the control for
the cable car. To the left of the cable car is a desk.
Go to the desk, look at
the log and note that Mrs. White was here a week ago. Hmmm. Open the doors of the
desk. Take the kerosene can, flashlight and spout.
Go inside the cable car and look around. It’s too dark to see.
Use the flashlight on the benches. Click on paper under the bench at the end of
the cable car.
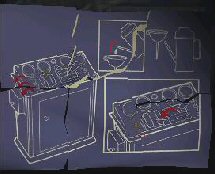
Instruction puzzle – Pieces of a diagram is seen on close up. Assemble the diagram,
by rotating (click-hold-rotate) and moving (click to hold- move the paper –
click to release paper).
Go out of
cable car to the fuel tank at left of door by going close to the
door and turn left. Place spout on fuel tank and then click kerosene on spout.
Go to the control panel stand right of the cable car. Look at the mended
instructions in inventory and follow the drawing of the control panel.
To start
the cable car – 1. Flip up the 3 switches on the left.2. Flip the large lever on the right to go right. The
suspects, I mean guests enter the cable car. Automatically enter the cable
car and face the control panel inside the cable car.3. Flip the left lever
(to start) and then the right lever (to go forward). The cable car
moves upwards the line but encounters ice on the line.4. To break the ice, pull
right lever down to go reverse and then
push lever up to go forward. Do this 2xs with Mustard’s encouragement. The cable
car breaks the ice but catches fire. Upon reaching the cable car shed at top of
mountain, the guests quickly disembark and the cable car is sent outside. CD3
The Mansion
Dining Room:
The guests enter the mansion and gather in the dining room.
Green states that there’s a riddle for each guest to be solved and that there a
jewel to be found. The host, Masque will appear if all the riddles are solved. Urfe exits to get his Escape from Death act ready before
midnight. Only the colored name guests have a riddle.
Solving the Riddles
Green’s Riddle:
Talk to Green.
Green’s
riddle is Take the cold of night, in a box that is sealed
tight. On a shelf dotted with glistening ice, find the jewel that makes you
look twice.
Turn right and open the hutch. Take the Quija board.
Turn right, go forward to the fireplace and take the photo from fireplace
(Man (Masque?) with a snake tattoo).
Exit the dining room, then forward by stairs and left to the
kitchen (where else will we find ice except from outside).
Kitchen – Look around, see that there’s no meal prepared and
Mrs. White is here. Talk to Mrs. White about everything and her dream. Go
forward to cold room.
Cold Room
– Find Masque’s body here and an icebox. Click on
Masque’s body to find out that he has a tattoo like the burned picture in the
fireplace. Open the icebox (Take the cold of night, in a
box that is sealed tight). Take an ice tray – third from the bottom
(On a shelf dotted with glistening ice, find the jewel
that makes you look twice.). Exit the
cold room and go to the stoves on the left of the room. Place ice tray in pot.
Turn the top knob behind the pot. The ice melts and look if there’s a jewel
there if not go back and get another ice tray. Take the green jewel
from the pot.
Mrs. White’s Dream:
Who best can explain a dream? A psychiatrist or a psychic.
Exit the kitchen and go up the stairs. Note the locked door at the landing’s
right. Enter the first room on the left at the hallway. Look
around. See a locked suitcase on bed and a table with a set of drawers with
skull knobs on the wall across the bed. Talk to Dr. Kell. She explains Mrs.
White’s dream. The red hallway means the future and that the dreamer feels it
is fated. Red might mean death, pain or murder. Snakes mean the people around
the dreamer keeping him from moving. The animal coming from behind is something
deadly from dreamers past.
Go Back to
Mrs. White in the kitchen to the right at bottom of stairs. Talk to Mrs. White
about her dream.
Mrs.
White’s Riddle – Inside a room, inside a drawer, the death
head waits, hungry for more. It’s teeth glisten, a silvery hue. The
one that opens last is the one for you.
Go back to Dr. Kell’s
room (Inside a room) where we saw the skull
drawers. Look close at skull drawers (the death head waits,
hungry for more. It’s teeth glisten, a silvery hue).
Skull
drawers puzzle – The aim of the puzzle is to open the bottom large drawer by
opening all the small drawers. The several small drawers are opened by one
drawer. To reset the puzzle, move out of zoom view.Click on
top row – second from left.Click on
second row – fourth drawer from left.Click on
third row – first drawer from left.Click
fourth row – third drawer from left.Click on
large bottom drawer and take the white jewel (the
one that opens last is the one for you.).
So who
next? Exit the room and turn around back to the hallway, go forward once down
the hallway and enter the door on the left.
Scarlet’s riddle:
Talk to Scarlet. From what Scarlet say about the actor with a tattoo and the dead tattooed
body in cold room – I wonder…
Scarlet’s riddle –
Make this cat blind in the
brightest light. Make its legs twist to the right. Make all scent for it
disappear. The jewel will reveal, when at last, the black cat can no longer
hear.
Now to look for a cat. Exit the room, go down the stairs,
forward to the main hallway and enter the door at the end of the hallway.
Artifacts room: Go forward to the lion at right side of
the room.
Lion
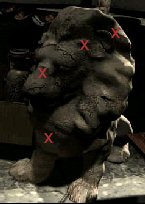
Puzzle –Click on the eyes
(cat blind in the
brightest light) to make the eyes fall off.Click on the lion’s right leg
(legs twist to the right).Click on nose
(scent for it disappear).Click on ears
(the black cat can no longer hear).A laser beam shoots out
aimed at bust by the door. Take the red jewel from the bust.
Professor Plum’s riddle:
Talk to
Professor Plum. Plum’s riddle is blocked from his mind. Now, how do to unblock his
mind. Exit the artifact room, forward once, turn left and enter
the room.
Show
room: See Urfe preparing his Escape from Death Act. Turn to the
right and see a game table.
Turn left, go forward towards the
large power box at corner of giant spider, turn right and talk to Marina Popov at the
side hall. She needs a Quija board for a séance and a pendant to teach you
hypnotism.
Turn left and talk to Urfe especially about learning another
trick.
To do the trick show calendar, ask for the lowest number on a 3×3
square. To get the total of the 3×3 square chosen – to the lowest number given by
the spectator, add 8 to that lowest number and multiply by 9. Urfe gives you the
1938 December calendar (was 1939 before).
Artifact
room: Go back to Plum at the artifact room. Turn to the left of Plum
and take the pendant from the bust (trigger to get the pendant is for
Marina Popov to ask for a pendant to teach hypnotism.
Go back to Marina and give her the pendant.
To hypnotize: Take
pendant, move it back and forth to start it swinging. Bring close to person
face. When suspect feels sleepy, you can ask question.
Go back to
Plum. Talk to him about pendant.
Hypnotize Plum – Move the mouse to start the pendant
swinging. When the pendant swings wide back and forth, place the pendant in
front of Plum’s face (covering his face). He will say he’s sleepy and start
talking.
Plum’s
riddle:
Must this lady’s embrace always kill, as she holds her victim
against his will? From those deadly spikes you cannot hide, Now take the single
blood red jewel inside.
Iron
Maiden at Hallway: Go outside of the room and turn left to the iron maiden.
Iron
Maiden Puzzle – To
open the iron maiden, click on the buttons in a certain order to get all the
wedges to show up. To reset the puzzle, click at center spiral.Click on top left, top right, bottom center, bottom left, bottom
right, top left. A skeletal hand
will hand you a purple jewel.
Colonel Mustard’s riddle:
Go to the alcove across the
show room where Urfe and Marina are.
Talk to Colonel Mustard. He was not given a riddle but a rebus. Mustard can
describe to someone who could draw.
Sabata
trick: We better sweet talk Sabata to make a drawing for us. Go to Sabata by the stairs. Talk to Sabata.
He wants a trick. He chooses 12 as the lowest number (might be different for
other gamers). 12 + 8 = 20 x 9 = 180. Once you did the
magic trick correctly, Sabata agrees to draw a picture.
Colonel
Mustard arrives to describe the rebus. Now, look at the picture in inventory to
decipher it.
Rebus
interpretation – The beaker is half full, clock means time and the apple
core looks like an eight = half past eight on a clock. Where did we see a clock?
Turn to the right and go to the clock in the middle of the lions.Clock
Puzzle – Click-hold the minute hand and turn the hand to 8:30. Click on
the clock face, the clock face turns and then take the yellow jewel. The clock
turns now and chimes.
Mrs. Peacock’s riddle:
Enter the Dining room and talk to Mrs. Peacock.
Mrs. Peacock’s
riddle – Start on the left, where the upstairs go down. Follow them to the
dark hole that spirals around. Guide the black stone through an impossible hall
until you possess the shining ball.
Where did we see balls in a game table? Go
to where Urfe is setting his act.
Show
Room: Go to the right corner by the door where the game
table is located.
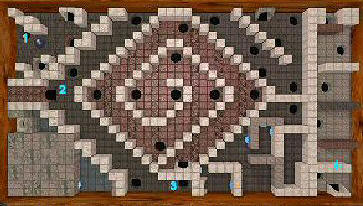
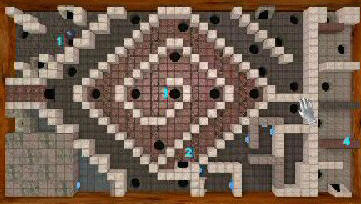
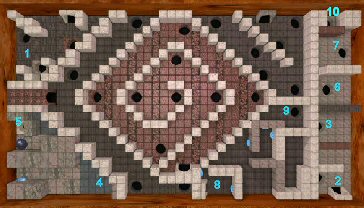
Mrs. Peacock’s Game table Puzzle
– The aim of the game is to get the ball found at top left to
the hole at top right behind the walls. To do so, the walls blocking the right
side should be lowered. The ball can be guided by click hold the ball to where
you want it to go. To reset the puzzle, pull back from the game table. The game
can not be saved while doing this puzzle.
Start on the left, where the upstairs go down.
1. At the start place at upper left, drop the ball into dark gray hole on the left.2. You will
come out to the stairs like arrangement of the white walls.3. Guide
the ball to the right bottom hole.4. Note
that the lower white wall on right side goes down.
Follow them to the dark hole that spirals around.
1. At the start area again, guide the ball down the pink hole.2. The ball
will come out at the center spiral area.3. Now
guide the ball to go around the spiral and down the center hole of the spiral.
If you drop the ball in the wrong hole, the ball comes out the start area. Just
start over by dropping the ball on the pink hole.4. When
successful, the pink wall on the right side wall goes down.
Guide the black stone through an impossible hall until
you possess the shining ball.1. At the start area again, go down the white hole.
2. The ball comes out at hole at bottom right.
3. Guide the ball down the hole above the lowered pink wall.
4. The ball
comes out of lower left area with blue buttons.5. Hit the
blue buttons to lower all the walls to get to the white hole within that area.
Once down the white hole, the third dark wall on the right goes down.6. The ball
comes out to the start area; guide the ball down the white hole again. Out at
bottom right hole, then drop ball at top hole above the lowered dark wall. This
lowered the top white wall.7.
Come out at start area. Guide the ball down the white hole again. Out at bottom
right hole, then drop ball at top hole above the lowered white wall.8. The ball
comes out the walls with blue buttons, this time at right side.9. Hit the
blue button to lower the walls to get to hole at middle right. This lowers the
last wall on the right blocking the end hole.10. Guide the ball down the white hole again. Out at
bottom right hole, guide it to the middle of the tiles to drop ball at top end
hole.
The center tile opens and a blue jewel is
automatically placed in inventory.
All jewels collected and Show starts
Go to all the guests and give them their jewel: Yellow
jewel to Colonel Mustard just outside the room. Purple jewel to Professor Plum
at the Artifacts Room. Green jewel to Mr. Green and blue jewel to Mrs. Peacock at
Dining room. White jewel to Mrs. White in the kitchen. Red jewel to Scarlet in
her bedroom.
Show
room: Remember that Masque was supposed to show up when all the
riddles are solved. Go to Urfe to watch the show – Escape from Death. The guests
gather and Urfe performs his act with the help of Mrs. Peacock and Dr. Kell.
Another death….
All the guests disappeared from the room. Talk to Marina Popov
at the side hall of the room. If you have not gotten the Quija board from the
cabinet in the dining room, go there and take it. Talk to all the guests about Urfe’s death. Then give the Quija board to Marina to start the
séance.
Séance:
Go to the dining room.
Quija
board – Marina Popov wants you to spell the
name of all the guests in the room on the Quija board.Click-hold the planchette
to move it around. Center the letter in the circle and look at bottom to see if
the letter is highlighted when the mouse is released. If done correctly, Marina
Popov will say the name.Green,
Mustard, Scarlet, Peacock, White, Plum and Popov.The host
appears and asks them to place the jewels on the table. He takes them and
disappears after wanting to know who murdered him.
Finding the Murderer:
Scarlet’s bedroom:
Go to Scarlet’s room and find her dead with a gun in her hand.
Talk to all the guests again about Scarlet’s murder. Plum states that
he got a note from Scarlet – I have found something. Go back to search Scarlet’s
body in her bedroom.
Green attacks you but an
alive Scarlet
hits him on the head. Talk to Scarlet. Scarlet hands over a key she
found.
Exit the room and go to the landing at top of the stairs, turn
around and use the key on locked door facing the stairwell. CD1.
Game Room:
Go forward towards the unused fireplace. Click on fireplace
tool stand. See the wall move. Hmm. Enter the door on the right and enter a
similar game room like the one you left. (If you go through the doors, you will
continuously see similar game rooms). In this second Game room, go to the unused
fireplace and click on the fireplace tools and the fireplace wall will reveal a
secret passage.
Secret Room:
Enter the passage and go through the panel to the secret room.
Go right to the desk. Open the left drawer and pick up all the jewels taken from
the dining room after the séance. Look at the things on top of the desk. Read
the diary. Click to turn the pages. Learn about a son searching for his father’s
secret. The Isis sarcophagus is hidden in a maze locked by 6 stones. The reason for
the guests and the riddles is now revealed. Go through the door by the bed and go down the
spiral stairs to the catacombs.
Maze:
Enter the door at the end of the hall and automatically pick up a lantern.
Open the
doors – left, left, right, right, right, left, left to get to the sarcophagus of
Isis.
Look down at the sarcophagus and see 6
hanging glyph inscribed pans similar to a weigh scale. The glyphs are similar to
that on the note from puzzle box. Study the note in inventory. Place the jewels
on the scale by clicking it on the pan.
Glyph-jewel puzzle:
| Left pans |
Glyphs |
Jewel |
Right pans |
Glyph |
Jewel |
|
| top |
Des |
Green |
top |
Menet |
Blue |
|
| middle |
Nefer |
Red |
middle |
Bow |
Purple |
|
| bottom |
Was |
Yellow |
bottom |
Shen |
White |
The sarcophagus opens and shows a skeleton. Take the dagger
and then try to pickup the parchment. Scarlet enters.
Watch the story of Sir Alexander Boddy and Lost Books of the
dead.
Xavier Boddy and Green enter. Xavier-Masque takes the
parchment.
You and
Scarlet are trap by door with bars.
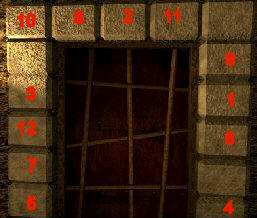
Barred
door puzzle – Click on stones framing the barred door to release the bars.
The stones must stay down when the next stone is clicked.Click on
(Left to right on top stones, Top to bottom on side stones):3 Right, 3
Top – bar removed.3 Left, 6
Right – bar removed.6 Left, 4
Right – bar removed.5 Left, 2
Top – bar removed.2 Right, 1
Left – bar removed.4 Top, 4
Left – last bar removed.Go through
the door.
Go now through doors
and go through the maze again in reverse order – right, right, left, left, left,
right. The last right door has sticks of dynamite on it.
Dynamite
puzzle – Disarm the dynamite by cutting the wires with the dagger. Place the
tip of the dagger on the wire and then click.Cut the
wires in the order of the colors of the rainbow: red, orange, yellow, green, blue,
(top wire) indigo and
(bottom wire) violet.
Go up the stairs and watch the ending.
In the ending credits,
the inferred events are seen. Masque meeting the actor by
the fireplace while holding his picture that was burned. Urfe holding a bottle
of poisonous gas (puzzle box poison).
Green dragging actor’s body while Masque watches. White tearing the instructions to
cable car. Green behind the machine that killed Urfe. Scarlet shooting her bed.
This
document may not be distributed without express written permission of the author
and the content may not be altered in any way.
For
Questions or Comments on this Walkthrough,
Please write to:
MaGtRo
Copyright ©
7/2003
MaGtRo
View this guide raw, exactly as the archive holds it