China: The Forbidden City – Index
First of all, I assume you
are familiar with the interface of the game. Especially with the mapping
and compass devices. I won’t point out every directions in terms of steps
to be taken left, right or forward. I do know that it’s sometime hard to
find the right spot. Therefore I’ve included small maps to point out locations.
Hope that will help you avoid some annoying disturbance (which I felt as
making the game less nice at some points).
Second, I find the ‘leap’ function
very neat; go to or near the location you want to go and find a spot where
the cursor changes into a pointing finger. Click and you will leap to this
location. I included this because my Dutch manual isn’t too clear about
this great and time saving possibility.
Third, I have to tell you I’ve played
the Dutch version of this game. As I’ve experienced in other Cryo games,
as Egypt and Atlantis, names of characters or places might differ between
different language versions. Therefore, I am almost certain that the names
of the locations in this game (who comes up with names like that?) and
maybe even of the characters aren’t all written down correctly. If so,
please let me know because these translations are based upon my own view.
If you tell me the right (English) name of the character or location, I
can correct this in my walkthrough to get less confusion for other people.
Thanks in advance!

The
China game is not a story divided into chapters. It’s an ongoing investigations
with several puzzles and problems you’ll encounter whilst playing. Therefore,
a chapter kind of index is impossible. Underneath, I’ve put hyperlinks
to certain points in the game. Click on them to get to a solution or, when
you have a problem with general progress, click on the last thing you’ve
solved or accomplished and read from that point on.
hyperlinks:
2. get admittance for the
garden
6. the archives of the
emperor
8. the secret message on
clue number two
15. Jin’s paper/ the flame
puzzle
18. the zodiac/ penjing
puzzle
21. the emperor’s chair
puzzle
 After
After
Wang being killed on the steps, you are in charge of the investigation.
You start at a gate with guards. Ask them something by clicking on their
faces (the cursor will turn into the mouth symbol). They’ll tell you Wang’s
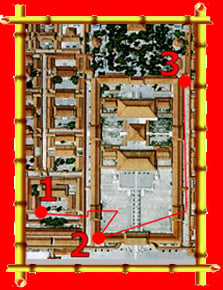
office is at the end of the square (see number 1 on the following map).
Turn left and walk forward. Turn right and click on the door. You enter
and meet head Eunuch Ma and eunuch Chou. Click on Ma to talk to him. Repeat
this with Chou.
They tell you
to talk to the Enlightened Grandmother but you will have to get admittance.
Go to the Bureau of Internal Requests to get another mandate. Look at the
map to find out about the Bureau’s location (number 2). Of course, you
can also use the ‘leap’ to go there.
Go to this place through the gate
you see in front of you (on the map, that is, in the game it’s a bit to
your left past the doors). Turn right and move forward. Now turn around
and look to the left to see a door that is slightly open. Go through it
to enter the office. Step forward and turn right to face the chief. talk
to him and you get a second mandate which allows you to move around in
the garden.
Follow the
red line on the map on to number 3 which is the garden entrance. Give the
second mandate to the eunuch guarding the entrance. Go through the door
and meet the Chinese Enlighten Grandmother. She will tell you about Wang’s
testament and give you a letter and a key. Read the letter. Turn around
and move forward twice to leave the garden.
Go back to
Wang’s office. Talk to Ma. Then talk to him again to ask about the Buddha
statue. Go to the small closet to the right and open it. Open the upper
drawer to get the hammer. The middle drawer contains a screw driver and
a chisel. The lower drawer is locked so you need to use the key you got
in the garden to open it. In here you will find the statue.
Now you need the clue from the
letter the Emperess-Widow gave you; “five in front, red after blue”. This
means you should click the two blue balls first, then the three red ones.
Of course, of the five in the middle, marked by the crack in the stone.
By the way, I clicked on the balls from left to right, which worked appropriately.
In the statue, there’s two documents.
the first is Wang’s first confession. Don’t try to remember or write it
down; use the parchment roll/ document symbol in your inventory to read
it all. The second document is a clue to the next confession.
Use the clue on
Ma and learn that the man on the clue is probably Wei, the master of education.
The game is a Go game. Wei is in the Hall of the Study of Princes. Go there
by taking a leap.
 Find
Find
Wei and prince Yong. Talk to Wei and give him the clue. He confirms the
game is a Go game. wang made those games and he has one of his own. Turn
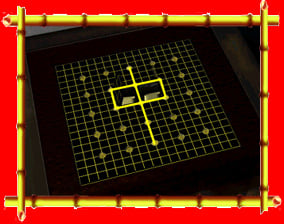
left and step forward. take a look at the game. The solution is in the
clue; the dot marked board is the game itself. The Chinese symbol is the
solution itself; you should click on the dots to make this symbol. Take
a look at the pic. Inside the Go game there’s another two documents.
These documents
are confession number two and another clue to the next confession. Again,
details are in the document from your inventory. Show the new clue to Wei
and he’ll tell you about the archives in the imperial house.
Go to the Bureau of Internal Requests.
Show the second confession to the chief and he’ll inform the Emperor. Now
you have access to the archives.
Go to the Emperor’s house and talk
to the man inside the house. Show him the documents and ask him about the
archives. Then go to the other room. Get the ruyi from the small table
and look at the archives cabinet. Pick out the 4 books containing the movements
of goods during all 4 seasons of the year 39. In here, there’s confirmation
of Wang’s confession about the goods send to the First Concubine on the
6th day of the 11th month of that year.
Go to
the Bureau of Internal Requests to get a permit to the concubine’s quarters.
Talk to the chief and get your 3rd mandate. Go to the concubine’s quarters
and show the mandate to the guard. She leaves and you can hear the concubines
talk about the reason of your visit. Finally you can enter.
Go around the wall and go to the
main and central building. Talk to the guard and give the list when you
are asked for the items. Three concubines will come to you and each is
carrying a gift. Open the left one and see that there’s a hidden compartment.
Use the screwdriver to open it and get the three documents. These are the
originals Wang spoke of. In your inventory these items are represented
by with a scroll.
Go to the Bureau
of Internal Requests and use the scroll on the chief. He’ll inform the
Emperor. Then go to Wei and talk to him. He tells you that you can use
his equipment. use the scroll on the table. Pick up a brush, dip it in
the water bowl and then use it on the document to the right. The message
will be revealed. The next clue can be found at the Gate of Heavenly Clearness.
Leave the scroll for examination.
Go to the Gate
with a leap from the map. Take one step forward and look at the door. Look
again just left of the left door knob. Use the chisel on the fourth gold
ball from the left on the lower row. Use the hammer on the chisel and a
secret hiding place will be revealed. Click on one of the three slots to
get some characters. Click on each character to get three same characters
in a row; 3 characters that look like a P. It opens to reveal another confession
and another clue.
When you want to leave, you meet
Yu who seems kinda curious about your progress. Watch that guy!
Now go to the garden to talk to
the Emperess-Widow. Wang was one of her eunuchs before he started working
for the Emperor. That’s why he gave his last will to her.
Go to the Bureau
of Internal Requests and show the chief the third confession. He tells
you to find Ma for questioning. Then go to Wei. Show him confession and
clue number three. He also tells you to find Ma and that you should hurry;
he might commit suicide to avoid his punishment.
 Go
Go
to Wang’s office and talk to eunuch Chou. Ask him where Ma is. But he doesn’t
know. He’s working for Ma for only 3 months, before that he worked somewhere
else.
Leave the building and talk to
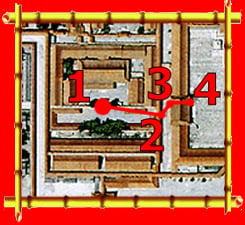
the guards at the gate (see map to the right, number 1). They’ve seen ma
leave the palace. Go to the red door on the right and go through it. Turn
around and talk to the guards (number 2). They’ve seen Ma enter the nearby
gate (number 3). Ask those guards again. Through the gate, turn around
and ask those guards (number 4) if they know where Ma went. They don’t
but they’ve seen him go into the Tiger Cave.
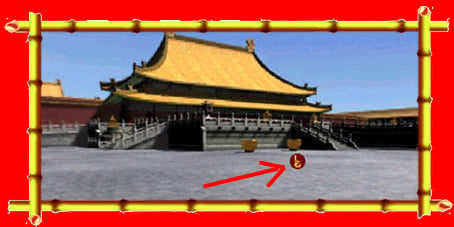 Go
Go
down the stairs and turn about 45 degrees to the left. Put the cursor beneath
the right of the two fire extinguisher bowls. See the picture to the left
for the exact position. Click and you’ll walk into the Tiger Cave.
Inside you’ll find Ma’s dead body.
He’s carrying the seal tablet. You will go automatically to the Bureau
of Internal Request. Hand the seal tablet to the chief and your new order
will be to go to the hall of Unity and investigate the matter. You’ll receive
mandate number 4.
Look up this location on the map
and go there by walking down the alley left of your current position. Turn
right when you’re at the gate of your destination. Give the guard the fourth
mandate and he’ll let you in. Walk forward till you face the door, turn
right and step forward. Turn left and step forward. Turn left again and
step forward once more to enter.
Meet two people
and talk to the one on the right. His name is Wen. Talk about the false
seals and show the seal tablet to the other guy. He’ll show you the original
seals/ stamps. Examine the right seal and get the wax from underneath it.
Click on all the stamps to check their bottoms. Then click on them till
you can move them.
Move each stamp on the red square
(the ink) and then put them in one of the empty squares at the bottom.
This is the solution:
Gold stamp on the right square.
White stamp on the left square.
Black stamp on the middle square.
Go back to the Bureau of Internal
Requests and meet Li’s replacement. Give him the wax. You get an order
to arrest Wen who’s probably part of the scam.
Go back to the Hall of Unity (as
you’ve been there, you can leap from the map!). Wen’s gone… Ask the eunuch
where he lives and he’ll point it out to you. Leave the room and go to
the back of the building. Go down the steps and turn left. Click on the
living quarters and enter Wen’s home. Click on the chest twice and use
the chisel on the floor tile underneath. Here’s where Wen stored a lot
of money? His piece of the cake?
Leave the room and Wen will enter,
dying in your arms. His last words will point out Li as the killer!
Go back to the Bureau of Internal
requests. Talk to the chief. You gotta find Li! Talk to him again and he’ll
tell you to ask the guards about Li’s whereabouts.
Go to the guards
at the nearby gate. Li went to the other side of the square! Go there and
go through the opposite gate. Turn around and ask the guards. They saw
Li go to the garden. Go to the garden, too.
In the garden, step forward twice
towards the rock tower. You will see a eunuch enter and come out screaming
seconds later. Inside, Li’s corpse is on the floor. He’s carrying a list
with the names of four people; Wang, Ma, Wen and Jin Caou. The first three
names are marked with a red line… and they’re dead!!! Who’s Jin Caou?
When the servants
leave, look at the window and open it by using the screw driver on the
four corners. Click on the box and another puzzle is in your hands.
This puzzle is more difficult
then the ones you’ve had to solve so far. The solution is in the information
database attached to the game.
Start up this database from the
menu. At the bottom, to the right, there’s a sun like symbol. Click on
it and a list of subjects appears. Find the part with the subject “wind
directions” (Mind you, the exact description in your game might differ,
so look also for an equivalent of this word!). In here you’ll learn about
the combination of colors, animals and directions.
The solution is the right combination
of position, wind direction, animal and color. This is it:
Up: North – Turtle – Black
, Right: East – Dragon – Green,
Down: South – Bird – Red, Left: West – Tiger – White.
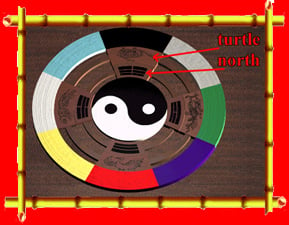 Place
Place
all rings in the right position and the puzzle will freeze. But it’s not
solved yet! There’s four colored parts left: yellow, gray, purple and blue.
The clue number three speaks of “sun, moon, sea and sky”. With a little
imagination the colors can be attached to the symbols: sun = yellow, moon
= gray, sea = purple (dark blue, as you wish) and sky = blue (or light
blue). Now we’ve established this solution, you only need to click the
colors in the order given in the clue; sun, moon, sea and sky meaning to
click yellow, gray, purple and blue. The ying-yang symbol will open and
reveal another confession and another clue.
Leave the cave and meet a servant.
Go to Fu and talk to her. Then speak to the servant (the one with the hat)
again. Ask him/ her who Jin Caou is. He’ll tell you she’s the head eunuch
of Chou.
Go to the palace of the concubines
and ask the guard at the gate about Jin. The guard will look for her. When
the guard returns, enter the palace. Turn right, take a step forward and
talk to another guard. Ask her where Jin is. She talks to Chouxiu but she’s
not being very cooperative. You do learn that Jin’s been called for in
the imperial house.
Leap to the imperial house and
find Jin. She’s stabbed in the back but can mumble you the name of Hua
Boa and the word “flame” before she passes away. She also speaks of the
lady when asked about the conspiracy.
From here you’ll be transferred
to the Bureau of Internal Request automatically.
From there,
go to the Palace of the Concubines. Talk to the guard. Hua Boa is the court
lady of Chiouxiu. Enter the palace, turn right and walk forward. Talk to
the other guard and ask for Hua Bao. When she’s been inside, enter the
building behind her. Meet Hua Boa and talk to her. She’ll tell you she
got a blank piece of paper from Jin and that she was told a riddle about
warmth and light. Remember Jin talking about a flame?
Turn a bit to the right and see
the long candle. Put the blank paper on it and click. A hidden picture
will be revealed.
Put the picture
in your inventory and leave the building. Cross the square inside the palace
and take a look at the tree and the water bowl. These are the ones on Jin’s
paper. Look at the bowl and see a small compartment at the bottom. Get
it and hear a sound. Now use the chisel on the small piece (might take
a few clicks or just one on the right position… keep trying). It opens
and you can get the key from inside.
Cross the square again and examine
the other tree, especially it’s bottom. Inside the pot, there’s another
hidden compartment. Open it with the key and get the fake stamps!
This stamp
puzzle is exactly the same as the first one. Click on a stamp to look at
the bottom. Click it twice again to move it. Move it over the ink and place
the print in the empty squares beneath. The solution is:
Gold stamp = right square
White stamp = left square
Black stamp = middle square
Go to the Bureau of Internal Requests.
Give the fake seals to the chief and you’ll be given orders to search Chiouxiu’s
quarters.
Go to the palace of the Concubines
and speak to the guard. Ask for Shiouxiu. She will see you now. Enter,
turn left and step into the room. Talk to the lady (is she bitchy!) and
tell her about the conspiracy. Turn around and take a look at the table.
See some bamboo sticks in a pot. This is a penjing puzzle. Click on one
of the animal pictures and see it move.
Go back to the hall and talk to
Hua Bao about the puzzle. She tells you about the animals that move and
the zodiac signs. The movements you already met, the zodiac signs can be
found in the database. Look at the ‘astronomy’ sections to find out the
12 animals.
The animals
on the bamboo sticks are not all in the Chinese zodiac. Click on each part
till you’ve got an animal from the zodiac. Look at the picture and the
list below for the corresponding animal:
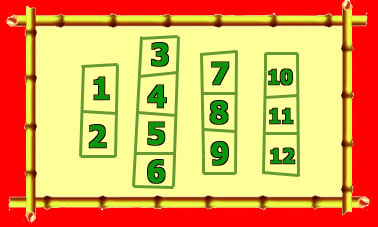 1.
1.
snake
2. cock
3. tiger
4. dog
5. horse
6. pig/ boar
7. hare
8. buffalo/ ox
9. ape/ monkey
10. rat
11. dragon
12. goat
Note: Again, the names of
the animals might be different in other language versions. If so, I would
be very pleased if you could let me know the right description of the animal.
A secret compartment will open
and you can get a document. The lady suddenly starts to cry. She will not
cooperate, though. With some convincing language she finally does and she
tells Da was her accomplice. Revenge?
You go automatically to the Bureau
of Internal Requests. Tomorrow, is what you tell the chief, after the ceremony,
the plan is to assassinate the emperor. Your orders are to go to Da. You’ll
find him in the emperor’s house, searching for something.
Before entering
the room, select the ruyi from your inventory. Enter the room and when
he turned around to attack you, put the ruyi on his head and click to throw.
He will be knocked down and will admit his guilt although he doesn’t confess
the whole thing. The guards will take him away.
Look at the
desk and examine the blue and gold statue with the message about the 58th
year, the 9th month and the 7th day. Now go to the table to your left.
Examine the clock. There’s three clockworks on it. The idea is to put the
‘time’ from the statue on the clock.
To do so, put the big pointer on
the big clock (with the “wings”) on the 5 and the small pointer on the
5 to make 58. The small clock on the left is the day; put the pointer on
7. The small clock to the right is the month; put the pointer on 9. Confession
and clue number 5 can be taken from the clock.
Go to the Bureau
of Internal Requests and show the drawing from the clock to the chief.
Then go to the Hall of Highest Harmony. Enter the building and step forward.
“Get” the podium and chair to examine it closely. Then get the seat and
finally “use” the mechanism inside.
Note: when you now click
the needle, you’re dead meat!
To avoid being killed and to proceed
with the game, do the following:
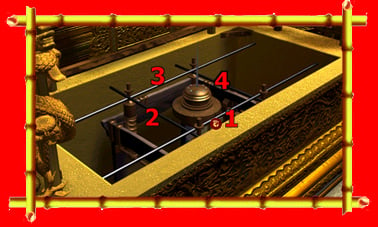
1. Click the iron bar in front
of you, marked by number 1.
2. Click the bar to the left,
marked by number 2.
3. Click the bar to the back,
marked by number 3.
4. Click the bar to the right,
marked by number 4.
5. Click the needle in the middle
for close examination.
Now you managed to not get killed
immediately, you still need to disable the poisoning device. Again, another
sequence of actions has to be taken. Act like the following list where
the numbers in front of the description correspond with the numbers in
the picture.
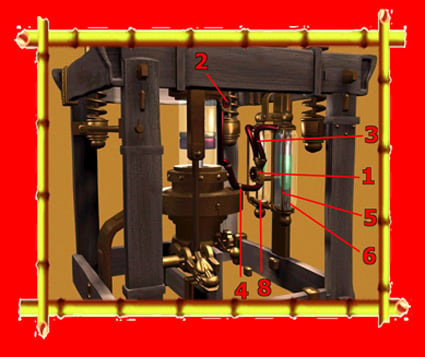 1.
1.
Click the wheel near the poison.
2. Click the wheel at the top
of the machine.
3. Use the screw driver on the
double hose to remove one hose. Repeat this twice to remove both hoses.
4. Use the screw driver on the
hose or the copper ring on the hose to remove it.
5. Use the screw driver on the
little copper rim of the right poison canister. This is a close call! Might
take several attempts to find the right position.
6. Get the glass canister to the
right.
7. Repeat actions 5 and 6 with
the right poison canister.
8. Click on the empty can holder
(don’t use any inventory item!).
When you’ve completed this, the
emperor will call for you to show you his gratitude. Take a moment to watch
the complete end sequence; at the end you will see what becomes of the
characters you’ve met through the game.
THE END
View this guide raw, exactly as the archive holds it
Parts of this guide
One guide by Marc Kappers, in 2 parts. They read in order, and the part you are on is marked.
- Fugazi
- Index