Just Adventure original
Aztec: The Curse in the Heart of the City of Gold Walkthrough by Dan Kennedy
Introduction
The Sacred Amulet,
a game originally released in Europe as Aztec: A Curse in the Heart
of the City of Gold, is a pretty standard historical adventure
title from Cryo. You got your great graphics, your dizzying Omni-3D
game engine, your encyclopedia feature, your strangely translated
dialogue – its all here. The story concerns Little Serpent, a young
man unjustly accused of murdering a nobleman. Little Serpent must
prove his innocence, save his parents, discover the treachery at the
heart of the Aztec empire, and protect everyone from sickness.
It is possible to die in
the game at a few spots, but if you immediately choose to resume your
game, you will begin again just prior to the circumstances that caused
your demise.
The game opens with a short
movie showing the founding of the Aztec empire. We then switch to
our hero Little Serpent heading off into the forest to hunt for birds.
He accidentally stumbles upon a group of warriors murdering a nobleman.
The nobleman passes Little Serpent a necklace and asks him to deliver
it to a poet named Tlatli who lives in the capital city. The warriors
return to the scene of the crime, and pursue Little Serpent through
the forest.
The Village People
You arrive back at your
village a few days later – and are immediately accosted by the shrunken
village doctor Quilaztli. He tells you that your parents have been
taken away by the warriors, who have accused you of killing the nobleman.
The doctor believes that you are not the killer, and instructs you
to collect any cocoa beans you can find at your house and return to
visit him at his yellow-pillared home. If you’ve made it this far,
you’ve learned how to conduct conversations (i.e. click on your choice
of conversation path at the bottom of the screen to further the exchange).
Now pan to your left, and
proceed straight towards the house with the red door frame (forward
movement is accomplished by clicking on the pointing hand cursor).
Approach your house and enter. The covered section of the house contains
a sleeping area to the left, and the food preparation area to the
right. Move to your right, and click on the item that resembles a
wooden cage on your left. One click opens the cage, and another picks
up the cocoa beans present inside.
The beans are placed in
your bean pouch, which remains in your hand. A right click opens your
inventory at the bottom of the screen. Place the bag over one of the
inventory slots, and click again to place it here. Another right click
closes the inventory bar. Note the other buttons on the inventory
bar: the one on the bottom left returns you to the main game page
(to save, load, quit, etc.); the eye above it gives a close-up of
selected inventory items (you must grasp them first); the map to the
right brings up a large scale map of the area;, and the bottom right
symbol allows access to the encyclopedia pages.
Have a look around the
open area at the back of the house to get a flavour for some traditional
Aztec living, and then leave the house again via the front door. The
doctor’s house is located off to the left a bit – pan that way, and
move towards the house with the blue-looking door frame (I thought
it was supposed to be yellow!).
Enter the doorway (now
the door frame is blue AND yellow!) and spot the sick gentleman laid
out on a mat to your left. Find Quilaztli by entering the open area
in the back – he’s standing in one of the corners to the left. The
doctor asks you to retrieve some incense from one of the statues in
the opposite corner of the yard. Approach the statues, and examine
the one to the left to find a small door in the belly of the figure.
Open the door, grab the container inside, and place it into your inventory.
Now approach Quilaztli
again and click on him with the container in your hands. The doctor
speaks of the evil sent by the gods that is killing the Aztec people.
He suggests that you speak to the poet Tlatli as instructed by the
dying nobleman. Exit the doctor’s house to find the big burly warrior
that was present at the killing standing in front of you. Mountain
Head (or as I like to call him, Paddle Boy) is going to take you away
to face your crimes. Instead, let’s make a run for it.
Dig Dugout
Pan to your right and run.
Keep going forward (Paddle Boy is right behind you) through the village
until you approach the shoreline (if you try to move in a direction
away from the water, your character tells you how stupid that would
be). Click on the dugout canoe to your right to climb in, and move
forward in the canoe two clicks. Look behind to see Mountain Head
in hot pursuit, but don’t be too concerned – navigating your way through
the water channels is more of a navigational challenge than it is
a pursuit.
The way straight ahead
is blocked by another warrior, so turn to your right (note the shack
here) and go forward. Moving ahead one more click, and note the dock
located to your left – you’ll need to come back here later. Instead
of tying up and going ashore (there is another warrior on the other
side of the shack who blocks your way), avoid the warrior straight
ahead by turning to your right and going forward. Follow the channel
by turning to the left two times in succession.
Another warrior blocks
your path straight ahead, so turn to the left once more, and move
towards the narrow waterway by the big willow tree. Move forward another
spot, and you now find yourself by the same docking point for the
shack. This time, hop out onto shore (to your right), follow the path
left past the shack, and hop into another canoe located in the water
here. Out on the water, another warrior to your right blocks your
way, so move in the opposite direction (left) – two clicks forward,
and you are free.
The game shows you a "map"
icon when a move will take you away from your present location – the
game screen switches to a map of the Aztec empire. Find the "Merchant’s
Quarter" of the City of Tlatelolco on the map, and click to go
there.
The Cost of Confession
Since you really only have
one clue to go on – find the poet Tlatli – you might as well look
for him. Head off to the left of the small building located in the
center of your view. Go straight again, and turn to your left to see
a house with a yellow coloured doorframe. Step inside, and walk through
the house (go right, then left) into the open area at the back.
You spot a priest standing
over a prone figure – it appears that we have arrived a little too
late to speak with the poet. The priest needs to be paid for his sin-eating
services, so grab some beans and do it. The priest, believing you
are close to the murdered poet, gives you a jewel that Tlatli had
given him before the poet’s death.
As the priest departs,
take this opportunity to look around. Facing directly away from the
dead poet, move the straw mat on the ground here to reveal another
hidden jewel shaped like a gaudy earring. You can examine the jewel
(or any other important inventory item) more closely by grabbing it
and clicking on the eye-shaped icon on the left side of the inventory
bar.
Moving farther into the
backyard, you will find a blood-stained parchment lying on a mat against
one of the walls. The parchment contains some pictorial symbols that
are meaningless to us right now. Note the back entrance to the house’s
yard overlooks a watercourse. Turn to your right, and move into the
partly hidden alcove here. Inside you’ll find Tototl, Tlatli’s well-spoken
servant. That voice could shred cheese. The servant indicates that
his master’s last instruction was to find turquoise in the Craftsman’s
Quarter of the City – a good clue to follow up on.
Leave the servant and return
to the front door of the house. The way forward is blocked by guards,
who are undoubtedly searching for you. Return to the back entrance
to the yard, and move forward by using a passing canoe (click just
as a canoe passes in front of you and jump to the far bank).
Skipping Quarters
Orient yourself a bit to
the left, and go straight ahead (if you go right, you’ll end up standing
in front of a drunk playing some sort of Parcheesi-like game). Turn
around and check out the front of a rather gaudy-looking palace, and
an ugly guard blocking the way. Speak to the guard and you’ll learn
that this is the home of a Lord Three Rabbit.
Turn completely around,
and move off to the right of the house with the yellow door-frame.
Move forward twice, cross the wood bridge, and go straight ahead once
more. This puts you back where you originally entered the Merchant’s
Quarter. Turn to your right, and click on the map icon to return to
the map view. The Craftsman’s Quarter is located on the lower-left
corner of the big temple on the map.
Perhaps the woman working
to your left will know where to find turquoise. Approach her and ask
– she rudely replies that this is the feather dresser’s district,
and there is no turquoise here. Now try the gent standing in the middle
of the area by a well located off to your right. Be friendly with
this guy, and ask about the temple behind him. He eventually identifies
himself as Chimalli, and agrees that something funny seems to be going
on with the poet, and the death of his parents.
Chimalli offers to help
us in any way he can, and lets us know that there is a woman named
Turquoise somewhere nearby. Pan around, and move towards the man standing
in front of the wood fence. Don’t bother stopping and talking to him,
since he’s only interested people that want to buy wood. Go left,
and speak with the woman standing in front of you.
Turquoise needs proof that
Tlatli is dead, so show her the jewel that you found under the mat
in Tlatli’s home (the one shaped like an earring). Turquoise accepts
the proof, and then relates some information about Tlatli’s political
connections. She suggests that we go see a feather dresser who lives
nearby, but invites us to spend the night at her home. [Insert suggestive
joke here.]
Strike a Deal
The next day begins at
the start of the Craftsmen’s Quarter. Approach the rude women visible
to the left and ask her where to find the local feather dresser Chacoatl.
She tells you that Chacoatl lives to the right of the temple visible
over your shoulder. Pan to the right, and move towards the right side
of the temple. Turn to the right, and enter the dark doorway.
Inside the house, a slave
stands to the left. Ask him about Chacoatl, and he demands payment
of two beans to let you into the backyard. You don’t really have a
choice, so pay the bribe, and walk past the slave into the yard beyond.
Chacoatl is standing in
one of the back corners. He initially doesn’t believe the connection
between Tlatli’s death and the sickness, but the bloodstained parchment
convinces him otherwise. He is getting ready to travel on a long journey,
but will look into the origins of the necklace if you will finish
his feathered shield. Delivery of the shield will allow you to gain
an audience with Woman Serpent, the emperor’s right-hand man.
The feathered shield lies
in the opposite corner – approach and click on it to have a closer
look. We’ve already got both small and large white feathers to use,
but finishing the shield will require you to purchase some dyes from
the market in the Merchant’s Quarter. Examine the colours of the shield
to determine what colours you’ll need – yellow, red, dark blue, light
blue and green. Now back away, and leave Chacoatl’s house. Move off
to the left, click on the map icon to bring up the story map, and
go to the Merchant’s Quarter.
To Market, To Market
Move off to the right of
the small building in the center of the screen. You will find the
entrance to the market on your right. Enter, and have a look at the
wares of the woman kneeling in front of you – they are located on
the mat to her left. She sells both light blue and yellow dye. Speak
to the woman, and tell her you will buy something. Click on each of
the two dyes to complete the purchase.
Pan to the right, and approach
the next merchant – the man standing beside several draped carpets.
Examine his wares on the ground – cotton and ears of corn – nope,
nothing for us. Again, pan to the right, and walk towards the wall
to visit the next merchant, who is hiding out of the sun. His wares
include both red and dark blue dye. Purchase a container of both dyes.
Now turn to the right, and walk towards the big stone pillar to visit
the last merchant. Her wares include Octli alcohol and jade pearls.
We haven’t found any green
dye, but there aren’t any more merchants to buy from, so exit the
market, and return to the Craftsmen’s Quarter through the story map
(go left once you are out of the market). Return to Chacoatl’s house
(located to the right of the big temple), and click on the feathered
shield in the back corner. Grab each of the four dyes from your inventory,
and place each in the dye holder in the bottom corner of the view.
Dyed and Feathered
We will begin with the
surface of the shield. There are 27 empty spots on the shield that
need to be filled with small feathers freshly dyes in one of three
colours: red, dark blue or yellow. The object here is to complete
the pattern on the shield in the following manner:

The circles above represent
the empty spaces on the shield’s surface. To proceed, grab a small
white feather, click on the appropriate colour to dye it, and place
it in its proper position on the shield.
To complete the shield,
we must now finish the pattern of long feathers along the bottom.
Grab a large feather, dip it in red, and place it just to the left
of the light blue feather on the shield. Grab another feather, dye
it light blue, and place it to the right of the red feather. How do
we complete the shield without green dye? You can try to dye a feather
in both the yellow and blue dyes, but the green comes out the wrong
shade.
If you thought that the
object in the top left corner of the screen was a plant, think again
– it’s a container of green feathers. Take one and place it in the
proper location on the shield. The shield should now be complete.
Take the completed shield
to Chacoatl, and show it to him. He tells you to take it to the Square
of Tenochtitlan and try to gain entry to the palace to deliver it
to Woman Serpent. As you leave the house, your new friend Chimalli
approaches with news of a big conspiracy. After he is finished, move
to the left, click on the map icon, and go to the large temple building
on the story map.
A Taxing Problem
You enter the Square of
Tenochtitlan with the Emperor’s palace on your right. Walk forward
twice, and be prepared to be accosted by a beggar looking for spare
change. Offer what little you have, and the beggar takes pity on you
(ha!), giving you a gold bracelet. Walk past the beggar, and turn
to the right to the front steps of the palace.
Ask the guard nicely to
let you pass into the palace, but without authorization papers you
get nowhere. Turn around to your right, and walk back the way you
came. Once you get near the canal, click over to the left. You should
now be standing in front of a small staircase leading to a man standing
in a canoe. He demands 2 cocoa beans to take you to the taxes landing.
Give him his money, and enjoy the ride.
Step out of the canoe,
and find yourself on what looks to be a loading dock. A man stands
off in the distance – we have no choice to walk towards him. He thinks
we have come to help him with his tax problem. He needs to divide
a bunch of jaguar pelts, bales of cotton and bags of shells into piles
of 50%, 25% and 25%. After he has finished his description, pan to
the right and click on the pile of goods.
We have a total of 7 pelts,
9 bales and 5 bags. With pelts = 100, bales = 20 and bags = 1, that
gives us a total of (7*100)+(9*20)+(5*1) = 885. Since 50% must go
to Tenochtitlan, half of the total (442 or 443) goes in the top square.
Place 4 pelts, 2 bales and 2 bags in the top square. The rest should
be divided into the two lower squares, with 221 going into each. Place
2 pelts, 1 bale and 1 bag into one square; and 1 pelt, 6 bales and
1 bag into the other. One bag will be left over.
The tax collector is so
ecstatic that you were able to help him, he gives you the extra bag
of shells, which yields more cocoa beans. You now have a clear path
into the palace – pan to the left and head for the corner of the landing.
Once there, click on the left doorway to enter the palace.
Scent of a Woman
Move forward three times
through the empty room to reach an inner courtyard of the palace.
Turn to your left, and go forward three times into the interior garden.
Around the corner, you meet a wandering poet who doesn’t know where
Woman Serpent is. Complement him on his bad poetry, turn to the right,
and move forward. Turn to your left and ask the guard about the location
of Woman Serpent. He tells you to look near the courtyard. Walk into
the courtyard, and approach the two men talking in the far corner.
Click on the ear-shaped icon that appears when your cursor is between
them to eavesdrop on their conversation.
Lord Three Rabbit speaks
to a Jaguar Knight about a priestess who has prophesized that the
gods are angry with the Emperor. Once ended, approach the guard located
to the right of the talking noblemen. He isn’t much help either, so
pan to the right and move towards the door located in the wall opposite
the noblemen. The guard here won’t let us enter until we show him
the feathered shield.
Once inside, turn to your
left and walk to Woman Serpent. He appreciates the shield, but when
you try to tell him of the conspiracy and the mysterious deaths, he
shouts for the guards, and has you arrested.
Pinching a Jaguar
You awake inside a wooden
cage (I guess they knocked you out). Spin around and face the side
of the cage that is up against the wall without a window. You should
find a knife on the floor of the cage here, hidden in the straw. Turn
around and, facing the door to the cage, cut the straps along the
left side the door, and the bottom left corner of the door.
Exit the cage and walk
towards the guards blocking the doorway. No way out here, so walk
back towards your cage. Turn to your left, and find your parents!
Your father tells you of a treasure buried at the base of a statue
in the family’s backyard. They indicate that they are to be sacrificed
at a festival in a few days. Since the knife will not cut through
the bars of their prison, they tell you to escape while one of the
guards is gone.
Approach the guards again,
and note that the one standing by the caged Jaguar has left.
Take out your blow gun, aim it at the jaguar (a small red target allows
you to aim) and click to give the cat a little snooze. Once the guard
moves away from the other doorway, make a break across the open space
towards the staircase at the far corner. Go up the stairs and move
forward.
A man stands in front of
you – this is Woman Serpent’s scribe, who planted the knife inside
your cage. He gives you a magic rattle that will allow you access
to Woman Serpent when shown to the right people. Turn to your right,
move forward, and re-enter the palace through the left entrance. Walk
forward three times, turn to your right, and approach the door to
Woman Serpent’s room. You can show the guard here the rattle, but
he does not recognize it.
There must be another way
into Woman Serpent’s room. Turn to your right, and move forward a
step. Now turn to your left, and go up the back corridor. Turn left
again, and click on the curtain to proceed through. A Jaguar Knight
blocks your path – show him the rattle, and he lets you through. Click
to go by him, and enter Woman Serpent’s room. Turn to your left and
approach Woman Serpent again. He is aware of the evil that is brewing,
the prophecies that have been made, and the treachery of those close
to the emperor. He offers you a bargain – find the cause of all this
evil, and the lives of you and your parents will be spared. Accept
his offer (do your really have a choice?) and leave. Woman Serpent
tells you that you can gain access to the palace again by showing
the rattle at the Between Two Serpents entrance.
Sparking the Search
Make your way back to the
Craftsmen’s Quarter to check in with Chimalli, who is still standing
by the well. He has learned that both the murdered nobleman and the
poet Tlatli had been cast out of court when the current emperor came
to power. Could this be a plot to exact revenge?
Walk over to Chacoatl’s
house to the right of the temple, and walk into the backyard. Speak
to his servant, who informs you that Chacoatl has left on his journey,
but has left a message for you: "Green Serpent, Seven Flint".
Return outside, and walk to the other side of the quarter to ask Turquoise
about the message (pass Chimalli, and go left by the man standing
by the fence). She believes that "green serpent" refers
to the necklace, while "Seven Flint" is the name of a craftsman
who lives just beyond the wooden bridge in front of you.
Proceed forward twice and
speak with the jeweller who is busy trying to keep his fire going.
In fact, he is too busy with this task to speak to you – he needs
wood. Return across the bridge, walk to the left of the house before
you, and speak to the man standing by the fence. Turns out he’s a
wood seller (which you already know if you stopped to talk with him
already).
Purchase a bundle of wood
from the man, and return to Seen Flint across the bridge. Give the
wood to the jeweller, who will now entertain questions – except that
he knows little about the necklace. He does know another "Seven
Flint" who lives in the Merchant’s Quarter. Make your way back
through the Craftsmen’s Quarter, access the story map and go to the
Merchant’s Quarter.
You need a bit more direction
as to how to find Mr. Seven Flint #2. Go to the right of the small
house, past the entrance to the market, and speak to the man selling
wood here. Ask him for some information, and then the location of
Mr. Flint. He directs you across the bridge, and past the steam bath
to a dead end. Follow his directions until you reach the Lord Three
Rabbit’s Palace, and then proceed off to the left. A man standing
nearby asks us if we need any help – he seems friendly, and he doesn’t
trust the soldiers. He directs you down the dead end alley to the
house with the white doorframe. Turn around, go right of the steam
bath, and find the house to your left.
Meet the Flint’s Stones
Don’t be shy, just go
right in, and proceed into the backyard. As our friend mentioned,
there doesn’t seem to be anyone about. Peek through Seven Flint’s
stuff (and check out the pot o’ snakes), and go into the back storage
shed. Walk into the back corner, and turn to face the wall with the
small pelts hanging from a strung line. There is a loose stone in
the wall located below and to the left of the pelts (about the level
of the top of the wall’s horizontal blue and red strip). Use your
knife to pry it loose and see the familiar necklace hidden behind.
Try to grab it, and the
master of the house surprises you. Explain to him that you aren’t
robbing him, but conducting an investigation. He ends the conversation
by offering to tell us who purchased the 5 necklaces if we pay him
a large sum of money. Since we don’t have it, exit the storage shed,
and leave the house.
We do however know where
a treasure can be found. Walk to the start of the Quarter, and using
the story map, journey back to your village, located in the bottom
left corner of the map. Once there, walk straight ahead until you
reach the front door of your family’s house. Grab the digging stick
leaning up against the house to the right of the door, and go in.
Walk into the backyard,
and proceed over to the front of the steam bath. There is a small
statue in the side of the bath to the left of the door. Standing directly
in front of it, use the stick (several times) to dig up your treasure
(a jewelled mask) from the ground. Take the mask, go back outside,
and walk straight back to the entrance to your village (three steps
forward, and off to the left).
Back in the Merchant’s
Quarter, make your way back to Seven Flint’s house. Go into the back
storage shed, and into the back corner again. Give the treasure to
Seven Flint, and he tells you that the 5 necklaces were purchased
by Lord Three Rabbit. As you walk out again, you hear the voice of
our enemy Mountain Head. Walk outside – Paddle Boy is waiting for
us. Click on the pot of snakes to scare the thug, and make a break
for it.
Drinking Games
Back at the story map,
choose the Merchant’s Quarter again – our inner voice tells us that
we must find the Lord Three Rabbit. Turn left, cross the bridge, and
take a left at the Lord’s palace to speak to our mysterious friend
standing by the canal. He tells you that a servant in the ally to
the right of the palace may know where the Lord Bunny is. Walk over
to the alley and speak with the servant, who’s tanked up and needs
a bit more to let his tongue wag.
Proceed back to the marketplace
to buy some booze for the sod. Go into the market, and over to the
woman set up on the right as you enter, who’s a little overly friendly.
Buy some Octli alcohol from her, and make your way back to the drunken
servant by the palace alley-way. But the ex-servant has a change of
heart – he wants to play Patolli, and will only spill the "beans"
if we can win two games from him. Agree to do it , since you don’t
have a choice.
Essentially, Patolli is
like a home-made version of Sorry. Move your 4 tokens up and back
down your track by rolling the bean dice (click on the beans over
to the right to get a value of between 0 and 4). You can have more
than one token on the board, but only one can be moved during any
single turn – mouse over your 4 red tokens to see which ones can be
moved after any given roll. The spaces that overlap those of your
competitor are dangerous; as in Sorry, if your opponent lands directly
on top of one of your pieces, it goes back to the beginning. You need
to roll a 2 or more to get your piece on the board, at least a two
to get it back off the board at the end, and a three to get it around
the bend at the far end.
There aren’t really any
tricks here – just play smartly and hope to win. Keep away from the
center squares, but try to keep your pieces available to knock off
those of your opponent when he places them in your path. If you’ve
won at least one of the first three games you play, and you’ve made
a passing effort during all three games, the drunk takes pity on you
and tells you his secrets. The servant tells you Lord Bunny’s favourite
expression "my eyes, my nose, my mouth" (his plastic surgery
wish-list?), and his hang-out de jour, the Temple of Tezcatlipoca
and its Annex at the Center of Ceremonies (near the big pyramid).
Left (out) of Center
Make your way back to the
start of the Quarter, and using the story map, go to the Square. The
entrance to the Center of Ceremonies lies straight ahead in the distance.
Four clicks should get you to the gorilla-faced guard, who naturally
denies your entry. Pan to the right, and walk over to the stone construction
site. Engage the foreman in conversation; his workers are sick, but
you cannot help him.
Let’s check in with Woman
Serpent – walk back to the Center of Ceremonies entrance, and 3 clicks
back towards our starting point. Proceed over to the left (where we
met he canoe last time), and circle around to see a staircase leading
up onto an elevated walkway. Walk over to the stairs, scale them,
turn to your left, and proceed over to the wooden doorway. The way
is blocked, so turn to your left, grab your knife, and cut the rope
on the wall. The door swings down, revealing an Eagle Knight guarding
a serpent-decorated door.
Show your rattle to gain
entry, and walk down the hall until you reach the interior garden
of the palace. Walk into the courtyard to Woman Serpent’s door, turn
right, and access the back hallway to his rooms. Show your rattle
to get past the guard, enter the room, and approach Woman Serpent.
Apparently the necklace story is not enough proof, so he sends you
away to investigate further.
Leave via his front door,
and walking forward, listen in on another conversation between Lord
Bunny and the Jag Knight. Looks like our enemy is gaining friends.
Walk back to the entrance hallway, take it, and walk past the Eagle
Knight to go back outside. Proceed over to the start of the square,
and use the story map to go to the Craftsmen’s Quarter.
Drumming Up Support
Check in with Chimalli
standing by the well again. He has learned that a Lord Black Flower
is in town, a man who also has a beef with the Emperor. Chimalli suggests
getting help from Turquoise, who is over by the Calmecac in the Merchant’s
Quarter.
Use the map to get to the
Merchant’s Quarter, and walk to your right – you should see Turquoise
standing here. Speak to her about all you’ve learned, and she will
give you a sacred drum to gain entry to the Center of Ceremonies.
She suggests visiting with her friend Cuicani, "Flower of Stone",
who hangs out at the Cuicacalco, the "House of Song".
Use the story map to transport
over to the Square, and head directly to the gates of the Center of
Ceremonies (4 clicks). Show the drum to the guard, and he lets you
inside. Use the following map to make your way over to the House of
Song. Guards (and even Paddle Boy!) may be stationed at any of the
red star positions, but be patient – there will always be at least
one way through. The Priestess Papatzin will stop you by the Great
Temple – be sure not to mention Lord Three Rabbit, or the guards will
get you.
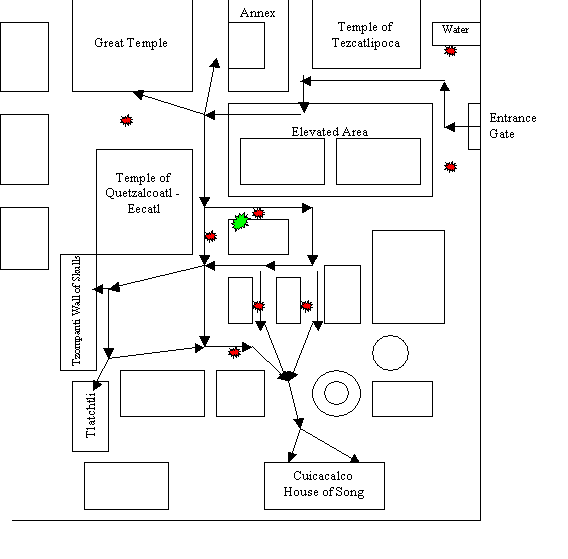
There are also several
priests standing about who you can ask for directions. Be sure to
note the ladder lying up against the wall of a small temple where
the green star is situated on the map.
Approach the House of Song
and enter via either the left or right door. If you choose the right
door, you’ll have to show the drum to the guard to pass into the House.
You will see Flower of Stone ahead of you across a flower bed – go
right, and speak to her. If you choose the left door, walk in, immediately
turn right and go forward through a short passage into another room.
Turn to your left and approach Flower of Stone.
Give her the drum that
Turquoise sent, and then show her the parchment that Tlatli had given
Turquoise before his death. She needs to study it further, and asks
you to come back later. Turn back to the flower bed, and click to
go forward. Proceed up the stairs and out of the House of Song.
Into the Warren
Let’s go find Lord Bunny,
and see what he’s up to. Using the map, make your way back to the
open area in front of the Great Temple. The Temple of Tezxatlipoca’s
Annex is a C-shaped building located just to the right of the Great
Temple. Approach the Annex and speak to the guard outside. You need
to show him something that will get you inside to meet with the other
baddies. Show the guard the dead nobleman’s necklace as a symbol of
the bad guys, and he lets you pass into the temple.
Once inside look a bit
to the right, and move forward. Now turn to your left and speak to
the guard that blocks your path. He has some riddles for you to answer
before you can proceed. Tell him to ask away – and remember what the
drunk servant mentioned was Lord Three Rabbit’s favourite expression:
"My eyes, my nose, my mouth". The answers to the riddles
are: (1) eye, (2) nose, and (3) mouth. Walk past the guard and descend
the stairs.
At the bottom, pan to the
right – you will spot two figures speaking in earnest. Don’t walk
towards them, or you’ll be dead in a moment. Instead, pan back to
the left, and proceed around the corner to the right. Pan around again
until you can see the speakers, and click on the ear icon to listen.
The Priestess Papatzin and the Lord Three Rabbit are plotting something
involving poisoning the city’s water – obviously the source of the
people’s sickness – and blaming the Emperor for the misfortune.
Both leave, and we must
hurry to find what they’ve hidden by the statue along the far wall.
Walk over to the raised platform, and first pick up the small mirror
lying to the left of the statue. Next, pick up the fancy-looking box
to the right of the statue. Put the box down on the floor directly
in front of the statue, and then click on the statue to move it forward
onto the upended box. Grab the poison hidden in the recess under the
statue’s original position.
Time to scram! Proceed
back over to the stairs, and go up. It isn’t safe to proceed outside,
since the plotters are still talking by the entrance. Grab the small
obsidian mirror and click on the left had side of the doorway ahead
of you – an image of the two plotters speaking will be reflected.
Repeat this action several times until the two speakers are no longer
visible in the mirror. It is now safe to proceed outside again.
From Poet to Poet
Go back to the House of
Song via one of the paths on the map. Use the left entrance to go
inside, since the guard won’t let you in without the drum. [Remember,
turn to the right, go forward along the short passageway, and turn
to see Flower of Stone.] She still cannot decipher the parchment,
but knows someone in the Emperor’s Palace who may be able to help
– a poet named Ayocuan. We must present him with a white Yucca Elefantis
flower, which grows in the palace’s interior garden.
Return all the way back
to the Center of Ceremonies gate and exit the complex. Walk back towards
our special entry into the Palace. On our way we are hailed by Chimalli,
who has discovered that the Priestess Papatzin has not been drinking
water from the main supply. We must report this to Woman Serpent,
but Chimalli tells us that he has left the City on a military campaign.
Bid Chimalli farewell, and continue to the Palace entrance. Go towards
the canal to the left, up the short stairs, over the wooden walkway,
and show the rattle to the Eagle Knight.
Proceed down the passage
into the interior garden, and walk forward straight towards the guard
on the other side. Now turn to the right, and walk one step towards
the courtyard. Again turn to your right and look down – there should
be a wood box on the floor here. Pick it up, turn to the right and
go forward. Now turn to the left and walk forward – you should now
be looking down the passageway that leads back to the Eagle Knight.
Turn to your right and
move one step forward. Now turn towards the plants on your right,
and look way up – your character gasps when you see the correct flower
to pick. Now look down at the low stone wall below. Place the wood
box on the hot-spot, and climb up to grab the blossom. Turn around
and proceed back down to the floor. Now turn to your right, go forward,
walk around the corner and approach the poet we met earlier in the
game.
Give the poet the white
blossom, and Ayocuan recognizes you as a friend of Flower of Stone.
He gives you a parchment that Tlatli had given him before his death.
The parchment shows both the Wall of Skulls, and a ladder, indicating
that we must return to the Center of Ceremonies. Exit the palace via
the passageway, and return to the Square.
Go With the Flow
Walk directly to the entry
gate to the Center of Ceremonies, but don’t be surprised when the
guard will not let you in. Instead, turn to your right, and walk to
the now-empty construction site. There is a torch lying on the ground
to the right of the pot of coals – pick it up, and light it by placing
it into the coals. Now pan to the left, and, with the lit torch in
your hand, click on the spot where the water flow disappears into
the wall.
You now find yourself wading
along the water channel under the wall. Continue forward three steps,
and click on the grating – no , can’t get out that way. Turn completely
around and walk back up the channel one step – you should see the
faint outline of a platform off to your right. Climb onto the platform,
turn to your right, and move forward.
Now that you are staring
at the wall, turn around (to the right) and spot the small opening
on the portion of the wall that juts out. Click on the opening to
take a wild ride that ends inside the Center of Ceremonies by the
water pool.
As you make your way towards
the Tzompanti, you are stopped by some self-important priest who demands
you show proof that you belong here. The only item even close to official-looking
is the magic rattle – he lets you continue, but confiscates the rattle
for his own use.
Skullduggery
Continue through the open
area by the Great Temple, and proceed to the location of the wooden
ladder, which is marked on the map with the green star. Pick up the
ladder and place it in your inventory. Now make your way over to the
right side of the Tzompanti (Wall of Skulls). Place the ladder up
against the wall, and climb up.
A series of nine (9) poles
with skulls impaled on them line the top of the wall. Note the parchment
partially concealed beneath the bottom skull on the nine (far right)
pole. You’ve got to move the skulls around in order to access the
parchment.
The trick here is to move
the skulls around so that the pattern that is present on the three
"completed" poles to the left is repeated on each of the
poles numbered 4 through 8. The ninth should be empty so that you
can grab the parchment. Follow the set of moves below to free the
parchment:
|
Steps 1-17 |
Steps 18-34 |
| Move the top skull on the 4th pole to the 9th pole. Move the top skull on the 4th pole to the 5th pole. Move the top skull on the 4th pole to the 9th pole. Move the top skull on the 5th pole to the 4th pole. Move the top skull on the 6th pole to the 4th pole. Move the top skull on the 8th pole to the 4th pole. Move the top skull on the 9th pole to the 4th pole. Move the top skull on the 5th pole to the 9th pole. Move the top skull on the 5th pole to the 6th pole. Move the top skull on the 5th pole to the 8th pole. Move the top skull on the 9th pole to the 5th pole. Move the top skull on the 8th pole to the 5th pole. Move the top skull on the 7th pole to the 5th pole. Move the top skull on the 8th pole to the 5th pole. Move the top skull on the 6th pole to the 8th pole. Move the top skull on the 6th pole to the 8th pole. Move the top skull on the 7th pole to the 9th pole. |
Move the top skull on the 6th pole to the 7th pole. Move the top skull on the 6th pole to the 7th pole. Move the top skull on the 9th pole to the 6th pole. Move the top skull on the 8th pole to the 6th pole. Move the top skull on the 7th pole to the 6th pole. Move the top skull on the 7th pole to the 6th pole. Move the top skull on the 7th pole to the 8th pole. Move the top skull on the 9th pole to the 7th pole. Move the top skull on the 9th pole to the 7th pole. Move the top skull on the 8th pole to the 7th pole. Move the top skull on the 8th pole to the 9th pole. Move the top skull on the 8th pole to the 9th pole. Move the top skull on the 7th pole to the 9th pole. Move the top skull on the 8th pole to the 7th pole. Move the top skull on the 9th pole to the 8th pole. Move the top skull on the 9th pole to the 8th pole. Move the top skull on the 9th pole to the 8th pole. |
Now grab the parchment,
and climb down to the ground. Proceed back to the House of Song, enter
via the left door, and go down the hallway to the right to speak with
Flower of Stone. Show her the second parchment – she can’t make heads
or tails of it, and gives both pieces back to you.
Time to take matters into
our own hands. Grab the fist (left side) parchment, and click on the
eye icon on the inventory bar to get a close up. With the first parchment
still in view, now grab the second from your inventory to examine
them together. They look quite similar, but are out of alignment.
Click and hold the left mouse button down to move the pieces around.
You want to align the two yellow rectangles with the small red circles
inside (this puts the right parchment at a higher position than its
left counterpart).
With the pieces connected,
click on the "flat" hand cursor icon which you get at the
bottom of the page to back away from the now-connected parchment.
Then, grab the parchment from your inventory, and give it to Flower
of Stone. She suggests going over to the Tlatchtli pitch (which is
pictured in the center of the parchment) for another clue.
High Stakes Hoops
Leave the House of Song,
and make your way over to the Tlatchtli pitch, located near the Wall
of Skulls. Walk onto the playing field, and approach the Lord practising
his game. He’s naturally cheesed that you would interrupt his pitch-booking,
but agrees to test us with our game ability. We have 6 shots to attempt
to get the ball through the sideways hoop – do it, and we walk free;
miss it and we become his slave forever. What a great guy.
Turn around, pick up the
ball lying on the ground behind you, and take a step towards the hoop.
Holding the ball, position it where you think it will go in, and click
the mouse. You watch Little Serpent either make or miss the shot.
I found the best place to position the ball is directly even with
the sides of the hole, and a little below center You do have six shots,
so play around with it if you don’t get immediate success. The guards
will come for you after missing six shots, but a resumed game provides
the opportunity to try another set of six shots.
After a successful attempt,
you will see the shining Great Star of Quetzalcoatl through the hoop
– your important clue. Exit the pitch, and return once more to the
House of Song. Return to Flower of Stone, and discuss the finding
with her. She asks you to enter the calendar room, and check the entries
for "3 House" and "5 Serpent". Proceed over to
the Calendar room via the short hallway.
The calendar entries are
located along the walls in numerical order starting from the back-left
corner from you position upon entering the room. Find the entries
for "3 House" and "5 Serpent" – simply approach
the illustration on the wall, and your voice intones the name of the
god associated with that entry. 3 House yields "Tepeyolloltli
– Heart of the Mountain", while 5 Serpent gives "Chalchiuhtlicue
– Goddess of Water".
Return to Flower of Stone
in the other room, and relay the information you collected. She puts
it all together: the names of the gods indicate a spring in the mountains,
and the star from the Tlachtli pitch indicate a westerly direction.
This identifies the location of the poisoning – the spring Chapultepec.
You will have to make another journey, but first spend the night in
the House of Song (keep your hands to yourself, this is a family game).
They Shoot Birds, Don’t
They?
Welcome to the mountains!
Proceed to the right of the bushy tree before you, turn to the right
once more, and move forward towards the rock cliff. Now turn to the
left, and walk toward the guards in order to bluff your way in. Don’t
mention anything about the Lord Three Rabbit’s plot – simply explain
you are one of his hunters. The guard demand you show your hunting
prowess by shooting two birds in the trees behind you.
Turn around and walk forward
a step, then turn to your right and walk forward. You should see a
bushy tree to your right, and you will probably spot a fluttery black
bird on the right hand side of the tree, about half-way up. [Another
bird can be found on the left side of the bushy tree to your left,
but you must walk forward a step and turn around to spot it.] Take
out your blow-pipe, position the target (like the hoop at the pitch,
I found the best strategy was to place the target a little below center),
and shoot. Now move forward, and look on the ground for the bird’s
body.
Keep checking out these
two trees for the birds – they should keep re-appearing in the same
spots if you keep missing them. Make sure you check carefully for
the bird’s bodies on the ground after each shot (it may look like
the bird flew away, but the body may be lying on the ground on the
other side of the tree). After you have two dead birds in your inventory,
return to the guard and show them to him. He will allow you to proceed
to the spring itself.
Don’t Drink the Water
Pan a little bit to the
left and move forward, and then turn a bit to the right and take another
step. Watch the workers carry large stone jugs into a guarded shed.
Afterward, turn a bit to your left and walk to the spring itself.
Not much to see here, so turn around and walk towards the guarded
shed. Speak to the guard – he indicates that you need to be lugging
a big jar of poison to get inside.
Proceed to the right of
the shed door and look around – you should see a bunch of empty jars,
and a parrot in a cage hanging from the shed’s overhang. Pick up the
jar on the far right, and place it into your inventory. Now pick up
the bag of Amaranth, and give it to the parrot – it will blurt out
the password needed to get past the guard: "Topco Petlacalco".
Give the parrot anything else, and it calls for the guards.
Walk back to the front
of the shed, and speak to the guard again. Give him the proper password,
and enter the storage shed. The shed leads into a cave in the rock.
Walk forward, and turn to the right when you reach the stored jars.
Walk forward one step, and then turn to your left – you should spot
a stick lying up against two logs. Grab the stick, turn back towards
the right, and move forward once more. Using the stick, click on the
jars to smash a few open – the dark poison oozes out of the cracked
pots.
You now have all the proof
you need to bust this ring of treachery wide open. Turn around and
walk back towards the bend in the tunnel. Turn to the left once you
hit the wall, and take several steps forward to reach the tunnel entrance.
Okay, Now You Can Drink
the Water!
The evil Mountain Head
warrior is waiting for you just outside the entrance to the shed.
All of a sudden, our friend Chimalli bops him on the head, and shouts
at you to run. Your only move is forward (off to the right a bit),
and then directly towards the spring itself (the guards have you penned
in). Turn to the right for a face-to-face with the Lord Black Flower.
He admits to you that his
only beef is with the Emperor, and offers you a deal – poison the
spring for him and he’ll let you join the dark side, or drink the
poison and die now. Your morality should tell you to sacrifice yourself
(plus your common sense should tell you that they’ll kill you anyhow).
Choose to drink the poison.
Everything starts to go
blurry, but you still have a few seconds to turn around and click
on the spring’s pool. If you wait too long, you expire from the poison.
Click on the pool, and Little Serpent makes a last ditch effort to
jump into the pool and ride the river to safety. What follows is a
hazy dream sequence – our hero is obviously delirious with the poison
flowing through his system.
Finding Herb
You wake up with Quilaztli,
the scrunched-up doctor from your village standing over you. Apparently
Chimalli found you unconscious somewhere downstream of the spring,
and carried you back to your village. The doctor has nursed you back
to life. Get up, walk over to the doorway of the doctor’s house, and
speak to Quilaztli. He needs you to find some herbs in the swamps
outside the village (near the shack) for his antidote for the poison.
Leave the doctor’s house,
turn to your right, and follow the path down to the shoreline. Get
into the canoe on your right, and move ahead two steps. Turn to your
right, and move ahead another two steps. You should be able to get
out of the canoe to your left. Back on shore, turn to your left, and
move forward one step. The herbs are to your right – click on the
green leaves of the plant with the orange flower to collect them.
Now head back to the canoe,
get in, turn to your right, go ahead two steps, turn to your left,
and go forward three steps. Once you are back in the village, follow
the path back to the doctor’s home (the house with the blue and yellow
door frame). Give the herbs to Quilaztli, who is standing in the back
corner of his backyard.
The doctor tells you to
take the antidote to Woman Serpent, who has become ill with the sickness.
If Woman Serpent dies, all is lost for you, your family, and the empire.
Walk back into the old guy’s front room, and find the gourd of antidote
on the floor (it’s near the door). Leave the doctor’s house and walk
straight ahead, and then to the left. Using the story map, travel
to the main Square.
Damsel in Distress
Forget about getting past
the guards at the front door, or the Eagle Knight since you’ve lost
the rattle. Approach the stairwell leading down to the canal just
to the right of your starting point. Our friend with the canoe is
there again, ready to take us to the tax dock for a couple of beans.
Back on the docks, approach the figure standing straight ahead – it
is Woman Serpent’s scribe, who fears it is almost too late.
Move off to the left, and
enter the palace through the left entrance. Walk straight ahead through
the empty rooms until you are almost out into the palace courtyard.
But a guard blocks our path – we’ll have to find another way. Return
to the empty room you just came through, and turn to your right. Find
the part of the wall that looks like a separate dark brown coloured
panel, and cut it open using the knife in your inventory.
Walk through the hole you
have created, turn to your right, and walk into the interior garden
of the palace. You won’t get past the Jaguar Knight (no rattle), and
the doctor is the only one getting through to see Woman Serpent now,
so you will need some help if you want to administer the antidote
to Woman Serpent.
Turn to your right, and
walk around the corner to speak to the poet Ayocuan. Be sure to mention
that the Lord Black Flower is involved with the plot – the poet does
not like him, and will do anything to prevent him returning to the
palace. He agrees to distract the guard at Woman Serpent’s door, while
you slip into the room. Turn to your left, and walk into the palace
courtyard. Approach Woman Serpent’s door (off to the right), and walk
in (you will see the poet engaging the guard in a conversation to
your right as you enter).
A Final Sacrifice
Walk into Woman’s Serpent’s
room, turn to your right and walk forward. Now turn to your left and
walk to his prone figure lying at the back of the room. Take the antidote
out and click on him to offer the life-saving medicine. Just as he
takes a sip, the Lord Three Rabbit busts in and grabs you.
The final movie shows us
lying on the sacrificial altar with the treacherous cohorts standing
around. At the last second, the Emperor sees the gold bracelet that
we wear on our arm – the bracelet that we got from a beggar just outside
the palace walls near the beginning of the game. The Emperor explains
that he like to occasionally walk among his people as a beggar, and
gives this bracelet to people who unselfishly help him.
Just then Woman Serpent
pipes in and identifies us as his saviour, and the plotters as the
real baddies. As a reward, we are made a Lord, and the evil-doers
are captured.
Screenshots

View this guide raw, exactly as the archive holds it