Aura 2: The Sacred Rings
The Sacred Rings (Aura II)
by Streko Graphics
Walkthrough by MaGtRo
March 2007
Gameplay: The game is in 4
CDs and can be played without any CD in the drive. The main menu has
New game, Save game, Load game, Options, Video, Credits and Exit. The Options
menu has subtitle, sound, music, environment and video selections-adjustments.
The Video menu has cutscenes already seen during gameplay.
Press ESC key to access the main menu.
Right click to open the inventory bar. The journal
where all the important documents are recorded is at right of the inventory bar.
Right click to get out of the inventory mode.
There are 8 saved game slots. Click on an empty frame
to save a new one or an old saved game picture to overwrite that save. Then
click on save at bottom of the frames. The load screen has scroll arrows on the side to
access other saved games. Click on the ‘load’ at bottom of the picture.
Pressing the space bar skips the cutscenes.
Thanks, Becky!
The Keepers clan knows that to combine the Sacred Rings with the Tetrahedron will grant the
holder unlimited power and immortality. Durad wanted to acquire the Sacred Rings and with the help of Gugon
instigated a Keepers rebellion using Gugon’s power to control men. Arakon acquired the aid
of Umang to collect the Sacred Rings and the Tetrahedron of Dragast and Na-Tiexu.
Umang traveled the worlds of Ademika, Dragast and Na-Tiexu to collect the artifacts.
Bargul, the leader of the Shadow Legion watches the
arrival of Umang to this world. He praises his magician, Gugon in the use of
Durad. He orders his guards to find this Umang and throws the amulet to
guide them. Bargul’s ultimate plan is to invade the new world of the Keepers.
The last time we saw Umang was when he was being
chased at the Island of Unity by the rival clan led by Durad. Unbeknownst to
Umang, an amulet was added to his inventory by a thief he released from prison
at the Temple at Dragast. Umang goes through the latest gate found by the
Clan Leaders. The Sacred Rings must be returned to the
Keepers, the only ones who will be able to watch over them.
Umang drops from the sky and lies unconscious on the
ground close to a house. Nikifor
comes out from the house and approaches the unconscious Umang.
Nikifor’s House
Bedroom:
Umang wakes up and meets Nikifor. Nikifor was emphatic
that this is his house and that Umang should help do odd jobs. The first one
is to find a way to open that big iron door. Nikifor takes a nap.
Umang has the amulet and tetrahedron
(Sacred Rings) in inventory. Right click to access the inventory below the
screen. At right is the journal that has all the documents seen during gameplay.
Check the journal frequently for clues.
Go to the cabinet at the corner and open
it. Read the book that has different animals and nature descriptions and
their corresponding symbolisms.
Time to check where we are. Exit the
bedroom and see a corridor.
Go left, turn left before the double
doors and check the door.
It is locked. Look at the white symbol above the door. We will check the double
doors later.
Turn left, forward, go through the doors and
see a balcony and stairs to the first level of the house. Go to the left on the
balcony and enter the door on the left.
Study: Look
around Nikifor’s library.
Bookcase – Go to the bookcase
and see a locked cabinet. Pan right and forward left of the ladder. Click on the scroll. Take the cabinet key. Go back and use the
cabinet key on the locked cabinet. Read the paper. Where have we seen these
words before? These are the symbolisms of animals and nature seen in the book
in the bedroom cabinet.Go back to the bedroom cabinet and
check the book to know which animals have these quotes.
I depend
only on myself – elephant.
Decisiveness
is more important than eloquence – owl.
It
belongs to the grazer instead of the reaper – wheat.Globe – Go to the globe right
of the empty bird cage.Look close and study the pictures.
They are pictures of animals and nature. The deciphered paper in the cabinet gives us
3 of these: elephant, owl and wheat.Turn the rings of the globe to show
one of the deciphered animal-nature seen on the paper.Arrange from top to bottom:
wheat, ?, owl, and elephant. Turn the second from top row until it
opens. The second from top is crocodile.Take the 4 generator door keys.
Desk – Turn around and look close at the
desk.Diary – Read the Captain’s diary. Today
we visited the Manula Valley where we found a strange looking portal. I
believe it belonged to the Keepers. It seems that neither war nor time have
had any effect on it. I wonder where it leads to, and if it still works? (That’s where we need to go – the keepers! They can take care of the Sacred
Rings.) See a sketch of the portal.I have finally derived a complete set of
coordinates from the Manula Valley to the “land of the forgotten.” This is
going to be my last journey. The path from Manula S S W W S W N W S. See
a topographic map.Nikifor arrives. Manula is a valley. The house is
a huge vehicle.Roll top cabinet – Click on the roll top
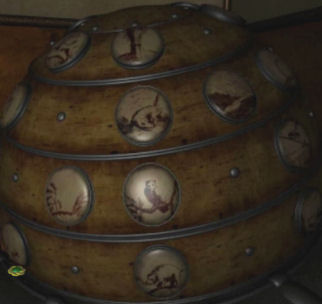
cabinet to the above right of the diary. The vehicle needs crystals to get
going. The generator directs the power from battery crystal to all
mechanical devices on the ship. See the picture of the generator.Each mechanical device
requires a different number of crystals to run. See a picture of a
crystal.The crystal can found in blotted out.
Read all the pages and they will be entered in the
journal right of the inventory bar. Study them well because they are clues
to puzzles later.
Search for battery crystals and turn
on the power to different machines
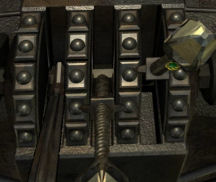
Security Box – Crystal code stand – Go forward to the door.
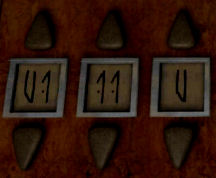
Turn left and go forward to the stand.Activate stand – Review the journal right
of the inventory bar and study the similar icons in the drawing of the
security box – VI II V.The left panel has arrows that turn the panel to
show icons. Use the arrows to show the icons in the drawing.
Crystal codes – When correctly done the
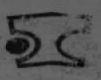
button on the right panel is activated.Click on the buttons to see the number of crystals
associated to an icon seen above the stand. Take note that the white symbol
associated with one crystal is similar to the symbol above the locked door
beside the bedroom.The places on the graph seen below the crystals are identified during gameplay.
|
Icon seen |
|
|
|
|
|
|
| Needed to power |
1 crystal | 3 crystals | 4 crystals | 2 crystals | 5 crystals | 6 crystals |
| What is activated as seen during gameplay |
Door of storage room |
Telescope room |
Bridge area |
Access to secret room. |
Transport engine at roof |
Access to secret room and self destruct mechanism. |
Exit the study and go down the stairs. Go outside,
look around and then go back inside.
Generator room: Go to the
door left of the stairs.
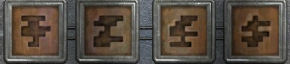
Door keys – Insert the keys taken from the
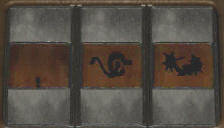
globe in the slots below the arrows.The keys can be placed in any order. Turn the keys
to produce the symbols seen below in any order.The easiest way is to place the left key in
inventory on the left keyhole and continue from left to right slots-keys.If you do this arrangement of keys, click each of
the top buttons once to turn each key once. Umang says ‘success’.
Enter and go down. Before we check the panel at
the other end, turn right and enter the door.
Pump room
– Look around.Table – Go to the shelves left of the door and take
the wrench from the table. Look and remember the drawing on the paper
on the wall.Turn around and go down to the pump machine.
Activate the pump machine – Umang will note
that there’s a lever missing on the left. Insert the wrench on the left.Following the clue from the drawing on the wall;
click the wrench (left to the lowest dot), middle one above the left and the
right lever to one above the middle. The pump machine is activated.
Stand – Go to the stand right of the door. Click the third icon (circle with
top and bottom half circles) to move the handle to that icon. See a cutscene
that shows the yellow circle with similar icon on a panel is now activated.
Exit the room.Engine –
Crystal room –Stand -Turn right from the pump room door
and see a stand. Click the green wedge of the circle
to move the handle to the green wedge and see a cutscene of an active line
from right button to an activated green circle with an icon on a still
unseen panel. We now activated 2 stands.Engine & Crystals – Go forward and open the panel at
end of the room. See that there are 2 crystals (round plugs) already in place.Open the locked room upstairs – Based on
the white symbol above the locked room upstairs, it needs one
crystal to be activated.Click one crystal to light it up and then click on
top left white button also to light it up on the wall above the panel.Nikifor comes down and talks to Umang. Obviously,
Nikifor does not know his ‘own’ house.Exit this area, go up, out and climb back to the
second level.
Storage room: Now that the
white button from the crystal room is activated, enter the locked room
beside the bedroom. Look around.
Take the rope right of the door. Take the
waterlamp sitting atop the barrel at the corner.
Go to the large cabinet across the room and open the
second from top cabinet. Take the oil can and the crystal capsule.
Turn to the window hatch and open it. Pan down and
left to the hook and metal pipes. Attach the rope on the pipes and
then climb out the window.
Go forward and look around. Look back at the house and
it looks more like an insect than a house. Go back to the hanging rope. Pan
left and down to pick up a crowbar. Climb up and exit the storage room.
Turn left and enter through the double doors.
Bridge: Enter one of the 2
side doors on the opposite wall. Look around. See the panel on the right wall
that shows the colored icons activated by the 2 stands done at the Engine room.
See another stand by the wheel.
Secret room: Go down to the
main floor and go to the bookcase. Click on the button at the middle of the
bookcase. It’s locked!Go down to the Engine room and the crystal panel.
Click to light up both crystals. Press the top right black button.Go back up to the bridge and down to the bookcase. Click on the button and see Umang enter the
secret door.Desk by the corpse – This corpse must be the
real owner of this mobile house. Take note of the black
icon on the wall similar to the one pressed at the engine room. Go to the desk and take
the spyglass.Trunk – Go to the other side of the room. Take
the crystal on top of the trunk. Open the trunk and take a drawing. It
will be placed in the journal.Cabinet – Pan left of the trunk and see a
closed cabinet that has the red sunburst icon on the front.Go back to the desk and press the button revealed by
the removal of the spyglass. See the cabinet at the corner open.Look close at the opened cabinet and see that it is still inactive since we
learn from the security box that activation needs 6 crystals. The picture is
seen in the journal. Exit the secret room and the bridge.
Elevator: Turn to face the
alcove across the double doors.
Access the elevator – Pan right and see a
handle on the right of the alcove. Pull down the handle and see that the hatch
on the ceiling opens a bit but is stuck.Pan right and exit the door to go outside. Look
around. Turn to the door and click to close it.Pan up and click on the roof or sky. On top of the house,
note the target like icon on the left of an engine. Based on the security box
crystal code, this needs 5 crystals to
activate.Pan right and see a rock blocking the gear. Use the
crowbar on the rock. See Umang remove the rock.
Go back down and go back inside. Pull the handle now
and see the elevator go down. Enter the elevator and press the wall button to go up.
Telescope room:
Go to right of the elevator. See a stand
with the yellow icon. Click and see that it doesn’t have power. Remember that this icon needs
3 crystals.Activate the Telescope room – Go back down to the lower
level engine-crystal room. Go to the panel. In inventory, take the crystal
capsule and click it on the middle left empty slot. The crystal capsule will
automatically have the crystals in it to be placed on the hole. It inserted
the crystal taken from the secret room. Click to activate this third crystal so that
3 crystals are now lit. Then click on the yellow button at middle left above the stand. That should
power the Telescope room machines. Go back up to telescope room.Spaceship stand – Look at the stand right of
the elevator and see that it is now active. See a picture of a spaceship cut
into 4 wedges.The object of the puzzle is to get the wedges
recessed on the side. There are 3 layers of the wedges.Click on the wedge in correct order until they are
all recessed.Click on: top, bottom, right and then left.
Click on: right, bottom, top and then left (as seen
in journal clue).Click on bottom, right, top and left (as seen in
journal clue).Take the telescope key.
Stand
– Go to the left and see the stand with the colored wedges with icons. If
still not on the second from left wedge – click
the second from left wedge of the circle to move the handle to the wedge with
the icon that needs 3 crystals and see the panel at the bridge. The third
stand is now activated.Telescope control – Go to right of stand and forward to the roll top cabinet. Click on
flap cover
on the front of the machine and insert the telescope key.See machine activated and the telescope move into position. Click on the
lens to look through the telescope.Watch a cutscene of the Shadow Legion riding
towards the house.
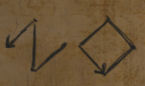
Umang alerts Nikifor. After the discussions, Umang
decides to wait to wait for nightfall to steal crystals from the Shadow
Legion.
Steal Crystals
Wake up at night and alone at the bedroom. Exit and
see that house is dark and some doors are locked.
Storage room: Let us see if
we can go outside. Storage room
is locked.
Go down to the engine crystal room. Go to the panel,
click on two crystals to turn it off and push the white button on the wall.
Go back up to the storage room. Click the rope on the
metal bar and exit through the window.
Outside: Go forward twice and you
can go right or left. Go left and forward to see the sleepy guards by the fire. If you
continue forward, you will get caught. Turn around and go back.
Go forward to the front side of the house. Click on
the waterlamp when the path gets too dark. Walk around to the other side of the
house as shown by the lit waterlamp. When Umang says to be more careful, place the waterlamp (right click)
back in inventory. Save game here.
Guard’s tricycles: Go forward
and see 2 tricycles. Go close and click on one of them for a close up a cover-lid and Umang will say it is rusty. Use the
oil can on the rusty cover. Use the crystal
capsule to take the tricycle’s crystal power. Do this to the other
tricycle (oil can and crystal capsule) to get another crystal.
Go back to the house by way around the house, using
the waterlamp at the correct time. Climb up the rope.
Nikifor says that he closed all the doors and they will continue the plan
tomorrow.
Set the destination
Crystal room – Go downstairs to the engine crystal
room panel. Place the 2 stolen crystals on the holes using the crystal capsule.
Activate the bridge – Click
the crystals to have 4 lit crystals. Then click on the third left bottom button.Double check the stand by the stairs to see if it is activated
to the green wedge.Go back upstairs and then to the bridge.
Bridge:
Stand – Go to the left of the steering wheel and see the stand with the colored wedges
with icons. Click the first left wedge of the circle to move the handle to
the wedge with the icon that needs 4 crystals. See a cutscene of the panel on
the right wall.
Steering wheel – Look close at the icons on the steering wheel. This is
the destination entry panels. The icons are the codes of the destination. This
is the code where the house transport is now.
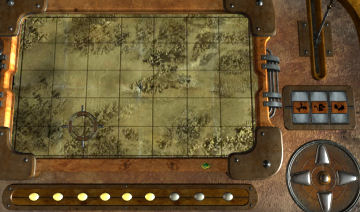
Open map table – Go down to the floor and go to the table right by
the bookcases.Now that there is power, click on it to show the map frame. See icons used as
code to open the map table.Look at the journal for the clue. Enter the icons on the panel to those seen on
the journal.
Find our location in the map – A map is seen. ‘I need the exact
coordinates’.Show our location in the map by placing the icons seen on the steering wheel on
the right. The first icon will not change or matter at this time. Note the circle moved on the lower part of the map.
Find Manula Valley – Manula Valley is the place of the keepers as stated
by the Captain’s diary –
Today
we visited the Manula Valley where we found a strange looking portal.
I believe it belonged to the Keepers.
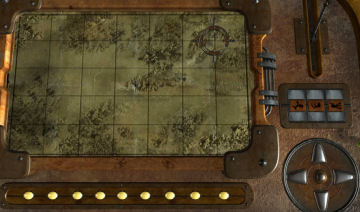
Use the lever at top right 3 times until the topography that
is seen in the Captain’s diary is in the map. Look at top right of
the map above. The first icon on the code will change.
Manula Valley destination code – Now that we have our local code and have
the Manula Valley in the map, we need the directions to get there and obtain the destination code.Using the path in the map in the Captain’s Diary and the words he wrote – I have finally derived a complete set of
coordinates from the Manula Valley to the “land of the forgotten,” The path
from Manula S S W W S W N W S. We
can now derive the path from here to Manula Valley. But take note of what the Captain’s path is. It is
from Manula Valley to this location. So reverse the path seen on the map.Using the arrows at bottom right, click the top for N,
right for E, bottom for S and left for W: click on N E S E N E E N N. Got it!
Excellent! Now we have the coordinates!The circle is now at top right at the Manula Valley
area. Take note of the destination icons at right panels.

Time to move on
Activate the transport engine – Go down to the
crystal room. Click to light up 5 crystals. Press the middle right button. This
will activate the engine on the roof.
Bridge – Go back up to the bridge. Go to the
steering wheel.
Enter the Manula Valley Destination Code –
Go back to the steering wheel and enter the code we just now derived from the
map.
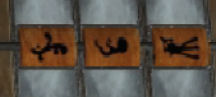
Now that we have entered the Manula destination code
and activated the stand on the left, click on the lever on the floor left of the
steering wheel.
See the transformation of the house into a walking
transport. The guards try to give chase but are hindered by absence of power
crystals on their tricycles.
After a while, the transport house gets stuck in
a narrow canyon. Umang is not a good driver. The guards will surely follow. It is time for another tactic,
block the canyon.
Block the canyon
Pump room – Go down to the pump room. Go to
the left of the table and see the crystal that powers the pump. Use the
crystal capsule to take the crystal.
Crystal room – Go to the crystal panel and
place the 6th crystal using the crystal capsule. Light all 6 crystals. Click on the bottom right
red button to activate the self destruct mechanism.
Secret room: Go to the
secret room accessed through the bookcase at the bridge.
Open the self destruct cabinet – If you
haven’t yet, press the
button on the desk now that we have activated it with 6 crystals.Self destruct time – Go back to the cabinet
in
the secret room. ‘I don’t have any choice.’Based on the clue (taken from the picture in the
chest) in the journal, the red band of
all 6 tubes should be on the top.When a tube is clicked, it moves 3 or more tubes
including self. Study the pattern and deduce the sequence of tubes clicked to
get the red bands on top.Tube 1 affects tubes 1 2 6. Tube 2 affects tubes 2 3 5. Tube 3
affects tubes 1 3 4. Tube 4 affects tubes 2 4 5. Tube 5 affects tubes 3 5 6. Tube 6 affects
tubes 1 3
4 6.From left to right: click on tubes 2 5 6 3.
RUN!
Manula Valley
Nikifor leaves in disgust. Turn around and look at the
destroyed transport house that blocked the canyon. Pan right from the
destroyed transport and take the iron bar.
Continue down the canyon path and turn right at the
crater. The path to the left is blocked by a fallen tree. Go forward. On the left, see a
ferry on the center island. Continue on the path until you reach the ruined
building with statues.
Keepers Portal Ruins:
Look at the circles on the ground, the statues and
the stand above connected by a pipe to the floor below.
Go back the path, forward 3 times and look left to
climb up the stairs. Go the statue at the center. Look at the statue, the
stand and the floor below.
Talk to Michael, the supervisor of the Keepers portal. He has been waiting for Umang,
the Chosen One. He tells the story of what happened; of how the Keepers with
use of the Sacred Rings and tetrahedron opened different worlds. One of them
was the world of the warlike Shadow Legion. Umang must destroy the Shadow
Legion. Umang must go to the Keepers Palace,
now the lair of the Shadow Legion. The portal must be opened. Michael disappears.
Open the portal – Study the ring control
stand. See 3 rings on the left and the clue pattern on the right.Click on middle and inner rings and see the same happens on the
rings below on the ground. Note that the inner ring moves by itself and the middle ring move both
middle and outside rings at the same time. This makes it
impossible to copy the lines on the right.Pull back resets the puzzle.
Go down to the rings on the ground. Look down and
see a hole on the outer ring. Insert the iron bar on the hole to stop the
outer ring from turning. Go back up and work the ring control stand again.Click the middle ring 5 times and the inner ring 4
times. Watch what happens. The portal’s power fizzles out.
Michael appears again. He says to look for another
source of energy for the portal – ‘ask the sky’. Also Umang would need the
Legion’s sign. He gives
the ferry key. He disappears again.
Ferry: Go down the stairs
and go left back to the ferry. Open the ferry box, insert the ferry key in the box and then
turn the wheel. Stand on the platform and click-turn the handle. Go forward and ride the
railcar.
The there are 4 buttons with destination icons. The 5th at the base is the button for the crater valley.
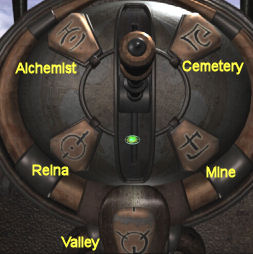
Mine in Green world:
Click on the button at bottom right and then pull the central lever.
Exit to see a nice green area.
Go forward and talk to the man sitting by a hut. Umang asks about the sign of the
Shadow Legion. Climb up
the stairs of the hut and go forward. Talk to the sick woman. Exit the hut.
Go down and continue to walk the path.
Reach an abandoned mine. At the end is a well and hanging bells. Be sure to
ring at least one of the bells.
Go back and talk to the man, Nafal. Learn the story of Fird
the Shadow Legion’s ex-executioner, Fird’s son Rizan and his love affair with Mila,
a concubine of Bargul. After being betrayed by Trey, Fird was placed under
magical charms by Gugon to behead Rizan. Fird was let go and given his son’s ashes. Mina
was walled in
alive. Sarah, his wife
brings food to Fird.
Go up to the hut and talk to Sarah, the sick wife, to learn how to get down the mine to Fird. She needs
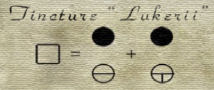
her headache medicine – Tincture of Lukerii.
Go to the table left of the door. Take the bottle
(flask). Exit the hut and go back to the rail car.
Alchemist at the Ice World: Click on the top
left button and then pull the lever. Arrive at an ice world above the clouds. Exit the rail car and go forward until
the door.
Gain entrance – Pull the rope on the right of
door and see the box on the left comes out.It seems that it wants a ‘donation’ before entry is
given. Place the amulet (the only item accepted to unlock the door) in the
box.Click on the door and gain entrance.
Talk to Himus, the alchemist. He finally agrees to
help you BUT it will be self-service type of help. 2 4 7 is now the record of
Umang’s debt. Himus leaves.
Lukerii formula – Go forward and then
right to be at the alchemy preparation area.Look close at the books on the left. Read the
formula book, flip the pages and see the formula for Tincture Lukerii.
Tincture Lukerii is
made up of one part Cure Oil and one part of Moon Elixir.Prepare elixir – Now that we know the
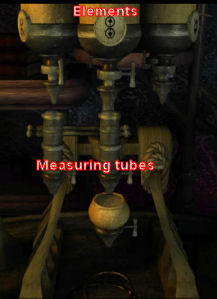
formula to use, go to the right and look close at the reagent dispenser on
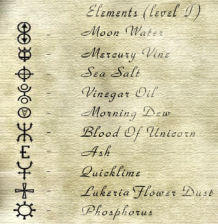
the lab bench.The elements are in tubes on the top. Click to turn
the tubes. The tubes are labeled with the icons of the reagents.The middle part of the dispenser has 2 empty
measuring tubes that are graded by rings that measures 1/4 of the whole tube.Under the measuring tubes is a cup that can combine
the elements mixtures.Below the cup is the place for a container for the
finished mixture.Add the elements exactly in the sequence noted in
the formula or else it will not work.Measure the elements using one click on the stopcock
to dispense 1/4 and 2 clicks on the stopcock for 1/2 to one of the measuring
tubes.Use the icons to identify the elements.
Use the other measuring tube for the other mixture.
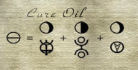
First measure Cure Oil in one tube; measuring
the elements in correct order seen in the graphic.
1/4
(one click) Mercury Vine1/2
(2 clicks) Vinegar Oil1/4
(one click) Morning Dew
Then open the stopcock to place it first in the cup
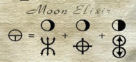
below.Then measure Moon Elixir in the other tube following
the formula in the same order shown.
1/4
(one click) Blood of Unicorn1/4
(one click) Sea Salt1/2
(2 clicks) Moon Water
Click on the stopcock to combine them in the cup. Place the bottle under the cup. Click the stopcock
of the cup to get the mixture. Pick up bottle.If an error is made, see a cutscene of Umang picking
up the bottle and it sparks. If correct, the bottle with Elixir is in
inventory.
Exit the building and go back to the railcar.
Mine at a Green world:
Click on the button at bottom right and then pull the lever. Go forward and go up the hut. Give the
bottle with
elixir to Sarah, the wife. She gives a musical sphere.
Bells puzzle – Go to the abandoned mine. Place the
musical sphere in the middle cup below the
bells.Click on the musical sphere to hear the 5 tones
needed to call the mine elevator. Click on each bell to find out their tones.Hint: The way I did this is to click the musical
sphere and when the first tone is heard – immediately click on a bell to see
if they match. When the first tone is matched, play the sphere to the second
tone and click an unmatched bell. Continue until identified. Do this to all
the 6 tones made by the musical sphere.From left to right: click on bell 4 5 4 2 5 1. The
musical sphere disappears and the elevator rises.
Go stand on the elevator; watch Umang go down the elevator and Fird’s
reaction.
Go back to Sarah at the hut to see if she can help.
She is furious because it was not the medicine she wants. Ooops.
Go to the table left of the ladder or exit and take
the bottle of elixir.
Go back to the rail car.
Reina, fairy
at a Rainy world: Click on
bottom left button and pull lever. Arrive at a rainy, dreary world. Go forward and see a
bridge with a gate blocked by a force field.
Pass through gate – Go to the stand right of the bridge.
See 4 different colored buttons. Press each one and
see 4 different force fields that block the gate: fire (purple), ice (blue), smoke (gray) and electricity (yellow).When the blue second from the left button
is clicked; hear Umang say the clue.Click on the second from left button, go to the
force field and use the crowbar to break this ice-glass force field.
Go through the gate and forward to the house.
Gain access to the house – Study the
depiction on the door. The clue is there – 3 rays.Enter the door and go out to the same place. Umang
says ‘strange’. Turn around and enter through the door again. Do
this one more time and you will be inside.
Go left and enter the door to meet Reina. Talk to Reina, the
fairy three times. She needs the ashes of Fird’s son. She also wants Himus’ Book of
Alchemy. The Butterfly on glade can help you; it is the key to the book.
After the talk, look
around. Take the phosphorus on the book shelf. Also read the spell book
to learn how to change the weather to fog, rain or lightning using the mood
statues and spells.
Exit the room and go
forward. Climb the ladder and be on the roof top. This must be where she does
the spell for the change in weather. Look at the mood statue and 3 pans. Go down, go forward and left to the exit
door.
Butterfly in glade
– Go forward and before stepping on the stone bridge, turn left. Go forward to
the end and see
a butterfly right of the path.Click on the butterfly. Watch the change in
color of the butterfly: white at rest, yellow, green, blue, pink, green and
red in flight; and white again at rest.
Go back to railcar and
leave the area.
Alchemist at the Ice World: Click on the top
left button and pull lever. Exit the rail car and go forward until
the door.
Get Himus’ Book of Alchemy – Enter and take
the Himus book on the table. This is not the book Reina asked for.Go forward and go through the open doorway. Climb up
the stairs and enter a room with panels that has symbols. On the floor is a
metal box protected by a moving field.Turn right and down and take the magic wand. See
colored balls of lights with tails flying in the air.Based on the clue given by the butterfly in flight,
click the wide part of the wand on the following colors: yellow, green, blue, pink,
green and red.A sound is heard when a colored ball of light has been clicked on. To
the left are 6 dots to show which colors have been clicked on.Pull back to reset the puzzle. Patience is needed.
Wait for the correct color to come out. Use the tip or the wide end of the
wand to click the head of the colored ball of light.When correctly done,
the metal box at the center of the room rises.Take Book of Alchemy and Elixir Lukerii information is added to the journal.
Read the journal to learn about the Keeper’s portal’s energy need and Sarah’s
medicine.
Try to exit the room. The door is locked.
Exit the magic room – If you haven’t taken
Himus book from his desk, place the Book of Alchemy back on the pedestal. Now click open the door, go down and take
Himus’
book from the desk.Go back up and take the Book of Alchemy from the
pedestal. Place Himus book on the empty pedestal.Exit the room and go to the rail car.
Reina at a Rainy world: Click
on bottom left button and pull the lever. See a flower bloom in the glade upon
arriving at the rainy world.
Go across the stone bridge and go right to the glade. Take the
Lukeria flower.
If you haven’t taken the bottle with elixir from Sarah’s hut, go to the mine
world and pick it up.
Alchemist at the Ice World:
Click on the top left button.
Elixir of Lukerii – Go to the bookcase and to the grinder on the shelf.
Place the elixir bottle at the base of the grinder. Open the lid of the grinder. Place the Lukeria
flower.Click on handle, see a flash and automatically take the Bottle with
Lukerii
Elixir.
Mine at the green world:
Click on the button at bottom right and pull lever. Go up the hut and give the
Bottle with Lukerii Elixir
to Sarah. She wants you to go away.
Visit other places before you come back here to
check if the elixir worked.
Cemetery: Click on top
right button of the rail car and pull lever. Go forward to the side gate and
click on the gate. Talk to Salan, the
grave digger. Go to railcar.
Reina at a Rainy world: Click
on bottom left button and pull lever. Go to the house and give the Book of
Alchemy to Reina. Go to
railcar.
Mine at a Green world:
Click on the button at bottom right and pull lever. Talk to the husband about the
gravedigger. Learn that Salan only leaves the cemetery when someone has died. This gives Umang an idea.
Check if Sarah is feeling better inside the hut. Go to railcar.
Cemetery: Click on top
right button of the rail car and pull lever. Go forward to the side gate and click on it. See
a cutscene of Umang and Salan talking at main gate. That is a nasty trick.
Mausoleum 1 – Go forward until the rotunda with the statue at the center. Go forward to the other side and continue
until an arch is seen.Go left and enter the mausoleum. Pan right and click
on the written plaque on the wall – language of the Keepers.
A dumb person wrote these letters. A blind person read them. A mute person repeated them.This is the clue to the puzzle below.
Open the tomb door – Look down and see tiles.
A tile is on the handle.Take the tile off the handle. Pull the handle down.
The door to the tomb opens. Push the tomb lid off.
Take the staff. Exit the mausoleum.Mausoleum 2 – Go back to the rotunda.
Take the path to the right. Go forward until the mausoleum on the right.Candle puzzle – See 25 niches that have
candles.Pull back from the study of the candles and look
down on the active area on the floor.Look down and click the phosphorus taken from
Reina’s room on the ground.Umang hides at the side of the mausoleum to wait
for Fird. See Fird arrives and departs.See Bargul demanding Umang’s capture. Gugon
reports that Durad is having difficulty keeping his position of power within
the Keepers clan.The aim of the puzzle is to have all the candles
lit. Click on a candle to light it. Then click on another candle to see if the
first candle stays lit. Continue on until you can get the correct sequence of
candles that keeps all the candles lit.Take note that color of the flame shows where the
next candle will be located:Red flame shows that next candle is somewhere
above.Yellow flame’s next candle will be somewhere to
the left.Green flame’s next candle will be somewhere to the
right.Blue flame’s next candle will be somewhere below.
The size of the candle shows how far the next candle
will be to the one that is lit:Short candle is one space away.
Medium candle is 2 spaces away.
Tall candle is 3 spaces away.
The aim of the puzzle is to have all the candles
lit. Click on a candle to light it. Then click on another
candle to see if the first candle stays lit. Continue on until you can get the
correct sequence of candles that keeps all the candles lit.
The solution can be started at any candle.
Click the next candle in the sequence and if #25 is
reached; continue to #1 until all candles are lit.The door opens. Now enter the mausoleum. At the bottom of the steps,
pan left and click on the candle stand. It is now dark. Turn and look down on
the floor and see where the
phosphorescent footsteps lead to.Click on the candle stand again to get light. Go to the second from the right niche and take the
urn.
Exit the cemetery through the side gate. Go forward
and see Salan coming back. Hide – pan right and hide behind the tall stones just
across the side gate. Go to the rail car.
Reina at a Rainy world: Click
on bottom left button and pull lever. Go to the house and give the urn to Reina. She says to
go back to Fird. Go to railcar.
Watch Reina do magic with the urn. Rizan appears to
Fird.
Mine at a Green world:
Click on the button at bottom right and pull lever. Go and talk to Sarah
preparing a meal. She is well now.
She gives another musical sphere.
Fird – Go to the abandoned mine.
Place the musical sphere on the cup and click the
bells from left to right: 4 5 4 2 5 1.Stand on elevator platform. Go forward and talk to
Fird.He apologizes. Umang asks for the Shadow Legion sign. The
Shadow Legion sign can only get Umang undetected for a short time and will be
not be removed. Umang agreed to
set Mila’s soul that was kept by Gugon magic free. Fird gives Mila’s amulet.
Fird lays his hand on Umang’s head to give him the sign of the Shadow Legion.Go to the table on the left and pick up a piece of
paper. Check the drawing that is now in the journal.Exit and go back to the rail car
Reina at a Rainy world: Click
on bottom left button and pull lever. Go to the house and talk to Reina. She will make
lightning for you if you prepare upstairs. Review what the spell book at the
bookcase stated.
Mood statues puzzle – This puzzle is a tower
of Hanoi
puzzle. There are 5 statues stacked inside on another on the left pan.The aim of the puzzle is to move all of them to the
right pan. You can only place a larger statue over a smaller statue.For ease, the statues are labeled 1 -5; 1 being the
largest and 5 the smallest. Move the statue (from pan) to stated pan.
|
Move 2 1 3 1 2 1 4 1 2 1 3 |
1 2 1 5 —— 1 2 1 3 1 2 from right to left pan 1 from middle to left pan |
4 —— 1 2 1 3 —— 1 2 —– 1 |
When finished no sound or action to know that it is done correctly is
noted. Go down and talk to Reina. If she is impressed, then
puzzle is done right. She will call lightning once you are ready.
Portal: Go to the railcar
and push the bottom middle button; pull lever.
Go to the Portal ruins. Go up the stairs. Place the
staff on the statue behind the ring stand.
Go back to Reina. Click on Reina. An
automatic scene is seen of Reina calling the lightning down to hit the staff.
Umang is at the portal. The portal appears. Michael tells Umang about the
mountain
caves and that one door opens many passages. It is up to Umang to choose who
takes which passage.
Keepers Palace – Shadow Legion’s Lair
Portal: Umang arrives at
the Keepers portal. Look around and see a carved face on the cliff.
Way to palace: Go forward
and further down, see that it is not safe. Go back and after passing the
second arch,
pan right and go around the portal (forward twice). To the right are vines. Climb up and
walk the cliff side, over a stone bridge and forward passing a second bridge on the
left. Look down and see a guard below.
Find the cave – Cross the stone bridge just
passed and go
left on the cliff side. The path is blocked by a rockslide. Pan right and see a space between
the rocks. Use the spyglass and study the palace. Umang sees the cave Michael
told him about.Guard – Go back and stand behind the
statue above the guard. Save game here! Use the crowbar on the base of the statue
not the top
part. If the top part is pushed using the crowbar, it alerts the guard – game ends. The statue falls on the guard.
Go back, across the 2 bridges and down via the vines close to the portal.
Go forward to where the guard is crushed by the statue.
Cave search: Go forward and
pick up the sword on the ground where the guard was before. Go
pass the arch and see the palace. Pan left and see a hanging skeleton. Now
that you know where the cave is located, you can access the next area.
Go forward to the rocks (now active after using the
spyglass earlier) and forward until end of the path blocked by dead trees.Go right, up, left, right (split path here), and go left
(seems like dead end).
Pan left to see
rock ledge. Go there.Turn around to the cliff. Go
to that cliff side ledge
Climb up using the sword. Turn around and take the
sword back. Turn around and go forward-up.Go forward-up again, go left and right to see vines blocking the
way. Use sword to remove the vines.Go forward, forward and hear water.
Pan right and see
an active spot and Umang will say ‘too high’.Use sword on active spot.
Pan
right and go to that protruding ledge.Pan right to see waterfall. Go down.
Pan right and use-fill
the waterlamp.Turn right to go up, go left, and pan left (do not
go up
the path).Pan down to the ground and see an entrance below. Go
forward there.
Go left, forward, forward (a bit left), left and
forward to bat cave.Enter the cave.
Go forward
(4xs) until the end, pan
left and go up.
Entering the Lair: Go forward
and when it gets dark, use the waterlamp. Go forward and you will be walking
the ramp on the ceiling above the marching soldiers.
Go right and look down and see a guard by the door. Go right to
the wall and enter the hole on the wall.
Go forward. Look through the window on the left and see Bargul
on his throne saying to Gugon the sorcerer that time is short in getting
to the Keepers world. He inquires about the Keepers’ lab. Umang makes a noise
and Bargul notices. Umang backs up and falls down the hatch to the dungeon.
Torture room: Look around at the
different torture machines. Note that the guillotine is functional.
Maiden sarcophagus – Go to the iron maiden
(without nails) on the back wall.Pan down at the base and see that the lock is similar to the drawing taken
from Fird’s table. Study drawing in the journal.Move the buttons (left to right and top to bottom):
1 3 4 dots.The door opens. Meet Trey, the betrayer. He is
the one that snitched on the lovers. He hopes to get rest when Mila forgives
him. Trey promises to help Umang anyway he can. He last saw Mila being taken to the vault.
He disappears.Pick up the paper on the base of the sarcophagus.
Exit door: See that the lock
here is also similar to that of the iron maiden. Study the now complete paper in the journal.Move the buttons (left to right and top to bottom):
1 3 4 4 2 5 1 dots.
Prison: Exit and be in a hallway
with 3 locked cages. The 2 doors flanking the torture room can not be opened.
Go left to the end of the corridor and click on the 2 side levers.
The
middle is broken. This opens the 2 end cages.
Go to the left opened cage and
take the shackle beside the skeleton.
Go to the third cage and study the paper on the
floor. It states that Mila knows a way out of the labyrinth.
Tumbler room: Go down the stairs at
far end of the corridor and enter through the door at right. See a hole on the floor.
Tumbler – Pan right and look at the
roll up cabinet on the wall.See that there are 4 tumblers. The end
tumblers are movable but the 2 middle ones are not. We need to find a way to
move the middle tumblers also.Chain – Go back to the torture room and use the shackle on the
guillotine.Place the shackle on the table. Turn the wheel on
top right to cut the clasp off. Get a shackle.Turn the wheel again and place the shackle on the
table again. Turn the wheel again to get chain. Go back to tumbler
room.Tumbler puzzle – The object of the puzzle is
to get the red bars of the 4 tumblers to even up. Pull back resets the puzzle.1. Turn the right end so that the handle evens up
with the one beside it.Click the chain on the third from left handle. The
chain connects the third and last tumblers.Turn the last tumbler twice. Click on third tumbler
to take the chain. Place chain in inventory.2. Turn the first-left tumbler so that the handle
evens up with the one on its right.Click the chain on the second from left handle. The
chain connects the first and second tumblers.Turn the first tumbler twice. The third tumbler also
moved. Take the chain from the second tumbler and place it inventory.3. Turn the right end so that the handle evens up
with the one beside it.Click the chain on the third from left handle. The
chain connects the third and last tumblers.Turn the last tumbler until you see the first three
tumblers have the red bar evened up.Take the chain from the third tumbler and place it
in inventory.4. Turn the last tumbler until the fourth red bar evens
up with the rest.
The elevator rises. Umang goes down and talks to
Trey. Trey says that there’s no living person here and Umang has to find something (not someone)
that will show the way.
Maze: Save game here. If
you go through any entrance, you will be caught and need to go back to a saved
game.
Remember what Trey and the paper in the prison
cell stated.Take Mila’s amulet from
inventory and pan around until it lights up. Use it as a guide to which
entrance you need to go through. Do this 4 times.
Chapel: Go forward and see
a door at the end and one on the right. Enter the one on the right.
Trey says that Mila is somewhere nearby.
Use amulet, look
around and go close to walls. See that the amulet is active on the right wall. Use crowbar on the
wall and see Mila’s skeleton.While in close up, use the amulet on the
skeleton. Talk to Mila. She asks how Umang can release her soul from Gugon’s
curse. She says that Gugon’s curse uses a magical orb and the orb is kept behind the
door with the spider sign.
Pick up the
stone on the bench right of Mila’s wall. Exit the room.
Watchtower stairs: Enter through the
door at end of hallway. Turn left, climb up the tower stairs and see a gate barring the
rest of the stairs.
There’s a door on the left. Enter and see that it
goes to the prison cells. Go back to the watchtower stairs and the gate.
Remove the bars – Click on the wheel on the
right side of the floor and see that the bars go up. It immediately drops
down.Use the stone on the wheel and then click to raise
the bar. The bar stays up. Go up the stairs.
Access to adjoining building:
Enter the next door on the left. Go forward passing gargoyles on the wall of
the balcony.
Spider door: Enter through
the door and see a formerly majestic now destroyed spiral staircase at the
center of chamber. The door to the right is locked. It is the spider door that
Mila said has Gugon’s magical orb.
Tower: Go through the other
door at end of the chamber.
See an elevator at the center with a lever on the
floor, a door and stairs going down.
The stairs that goes up ends in a locked door on top
of a tower. The door has a cross keyhole.
Remove the guard – Go down the stairs and see
the elevator on this floor. Pull the lever on the floor and the elevator goes
down.A guard is alerted and comes to check. As soon as
you have control of Umang, pan right and click to go upstairs.Automatically, Umang will be on the top level
elevator lever.Watch the guard enter the elevator to check.
Immediately, use the sword on the rope holding the elevator. ‘I’m sorry’.Now, you are free to check downstairs.
Guard house: Go down and
enter the hallway to the right. Go forward and be at the guard house.
There are 4 doors. 2 cannot be opened. Save game.
Open the first door on the left and see that it has 2 guards. You’re caught.
Replay and open the far right door. Look around and
take the spear at right side of room. Exit the room.
Library: Enter through the
door at end of the hallway. See that it is the library.
Librarian bug – Look at the contraption at
the center that looks like a bug. Click on the base and see that it should
hold a library card.Go behind the contraption and click on the base and
see 11 keys and one key missing.
Go up the stairs right of the door and go to the
windows. Take the library card off the window shelf. We’ll come back
here later.
Go back to the watchtower stairs via guard house, tower,
chamber and balcony.
Climb up and click on the door on the left. Through
the keyhole see a guard on watch. Uhmm…
Climb up to the top of the stairs and enter through
the door.
Watchtower: Look around.
Go to the right and see the control panel of the
ballista: wheel to turn sideways and a directional arrow to position up-down
the ballista. It is not functional yet since we don’t know what direction to
move it to.Climb the steps at left. Look across the parapet and
see a lit tower on the left. That’s the top of the tower we checked earlier. Look
up and see a rope hanging down.Go back to the door and climb the ladder left of
door.
Pyre parapet: Look around.
Go left and see a winch that has a rope hanging at the
end.
Access Gugon’s spell room
Locate Gugon – Click the spyglass on the lit window of the tower. Umang sees Gugon through the spyglass and Umang
would say – the mage’s room.Look close at the winch. Click on the handle of the
wheel (left) to lower the rope.Adjust the rope one up from its lowest point – 2
turns of the handle if it’s the first time the handle is turned.Go down to the ladder to the lower floor.
Adjust Ballista – Go to the control panel of the ballista to the
right.Now that we know where Gugon is located, turn the directional arrow on
the left big wheel control to the very left of the orange ruled metal. This
should turn the ballista to the left.Place cursor at top of the handle of the right
wheel. Turn the top right wheel so that the gauge also shows that it is to the
very left. This should lower the ballista.Gugon’s tower – Go to the left side of the parapet and see that the
hanging rope’s end has a metal ring. If you don’t see this metal, go back
up and adjust the winch.Take the metal ring and see that the cursor changes
to the rope and metal. Turn around and click ring on the front of the ballista.Go left and around the parapet. Click on the back of
the ballista. See that the rope is shot to the roof of the mage’s tower.Go to the right parapet and lookup. See the rope
stretching from here to the tower.Click the spear on rope. Umang slides to the
tower.
Gugon’s spell room: Look
through the window and see a guard tell Gugon that he is needed by Bargul.
Gugon leaves the room. Enter and walk to the right.
Stone spell – See the spell book on the podium.
Click through
until Umang sees the spell to make any spell change a person to stone.Study the drawing on the book on how the spell
works.
|
Book 1 |
Take note of the heavy lines on the left page. We
This book is the circle on top of the drawing
Go to the next book by standing at
To make the line connections, the symbol on
Turn the pages of the books to show |
|
| Position of the books in the room | ||
|
|
|
|
| Book 2: Left stand of the row right of the dais |
Book 3: Middle stand of the row left of the dais | Book 4: Right stand of the row right of the dais |
|
|
|
|
| Book 5: Middle stand of the row right of the dais |
Book 6: Left stand of the row left of |
Book 7: Right stand of the row left of the dais does not need to be changed. Success! |
Save
game here. Go to the
dais. Hear Gugon
coming. Immediately, hide behind the post right of the dais. Gugon enters the room and casts a
spell. The stone spell works.
Go to the door and take the spider
key.
Spider room:
Exit and go down the stairs. Go through the door at other side of the room pass
the elevator hole.
Go forward
and go to the door left of the destroyed spiral staircase. Use the spider key on
door.
Check the bed on the right. Check the
desk on the left and take the library card and valve key.
Find the
curse orbs – Check the mirror and bookcases. Hmm… What’s with the big mirror?Click on
the left side of the mirror to slide it to the right. Study the mirror now that it is on the
right side. Pan around to see the windows.See
something on the mirror that is not on the wall between the 2 windows. Click on
the discrepancy on the mirror. A sound
is heard.

Go to that
brick on the wall and see that it is now active. Click on the active spot and the bookcase at far right goes down.Go there,
look close and see
magical orbs.Which one is Mila’s
curse orb?
Move the mirror by clicking on the left side to face the glass balls. Look at
mirror.Click on the blue glow and hear a
sound. Face the glass balls and take the bottom right ball to get Mila’s
soul-curse.
Mila: Go down to the chapel
at the bottom level of the watchtower.
Exit the spider room and take the door on the
left of the broken spiral staircase. Be at the balcony with gargoyles. Exit, be
at the watchtower and go down the stairs until the door at the bottom level.
Exit and take the first door on the left.
Look close and click the Mila’s curse ball on Mila’s
skeleton. She wants you to use wind to dispel Mila’s curse.
Go to the top of the
watchtower where the ballista is located. Climb the ladder and watch Umang
fulfill his promise to Fird.
Mila says to find the place where the Sacred Rings
were created and to use the
tetrahedron to trick the Shadow Legion. Go back to the library.
Sacred Rings Laboratory
Library:
From the watchtower, go to the balcony, tower, down the
stairs and forward to the library.
Valve key puzzle – Use the
library cards on the front of the insect like librarian and see that there’s no
power yet.Go to the back of the librarian and
look down. Open the panel at the bottom.Place the valve key on the hole.
Turn the keys so that they are all horizontal.
Turn valves: 4, 11, 9, 6
See
the librarian powered up.
Information
about the Keepers Worlds & Sacred Rings Laboratory – Go to the
front of the librarian and insert the library card on the right in inventory.
Take the book and see the picture of the Sacred Rings Laboratory. Look at the
next page. The pictures are placed in the journal.Use the
other library card and see pictures of all the worlds accessed by the Sacred
Rings. Look at all the pages in the book. All the pictures are placed in the
journal.
Where is
the Sacred Rings Laboratory? It must be the place that is guarded.
Torture room:
Go to the watchtower stairs and go down until the next door on the right.
Enter the
next door to go to the torture room. Enter the middle door and click on the
‘maiden’ where Trey was held prison.

Trey will
help distract the guard on watch at the upstairs door below the entrance to
the watchtower. Watch Trey scare the guard.
Exit
the torture room and then the prison through the first hallway door on the left.
Climb up the
stairs. Enter the second from the top door where the guard was seen earlier.
Sacred Rings Laboratory:
Go left of the large chamber. Enter the door and see the ‘place
where the tetrahedrons were created’.
Power up the Sacred Rings – Go
around the path that surrounds the Sacred Rings. See 4 stands with buttons on
inner balconies.At the
front of the Sacred Rings, there are 2 stairs that goes up to a platform. Climb
the stairs and see a lever.Go down the
stairs across from the door and see a metal case at the base of the Sacred
Rings.Using the
library book pictures entered in the journal as guide to power up the sacred rings.Go around the Sacred Rings and
program the stands based on the stand pictures. Press the buttons that are shown
by the shaded circles. The circles in the drawing are as you see the circles on
the stand facing you.
Go to the center
stairs going to the base of the Sacred Rings across from the door.Click open the metal cover
(some kind of strange mechanism) at the base of the Sacred Rings.Insert the
tetrahedron in the cavity.Climb up one of the side
stairs, go to the platform and pull the lever. The Sacred Rings are now
powered up.If it doesn’t one or more of the button stands are not
done correctly.Enter destination
– Go to the center stairs going to the base across from the door. Click open the metal cover
at the base of the Sacred Rings.With the
tetrahedron in the cavity, see a selection of destination. Identify the
locations based on the pictures seen in the library book. Review them using
the journal.So this place of the Keepers Palace is Dangan. Umang knows Ademika
Valley, Dragast, Na-Teixu and the Island of Unity. The Bazzard Desert must
be where the Shadow Legion came from.What should I choose? Save game here for
different endings.Click on a destination and it is entered on the
Sacred Rings.Remember what Mila advised before she left – use
the tetrahedron to trick the Shadow Legion.Send the Shadow Legion to the place
they came from – Bazzard Desert.The tetrahedron is taken back in inventory.
Portal: Exit the
laboratory and go left. Enter the big double doors and climb up to see the
portal.
Power up the portal – Go around to the back
of the central ring. See a stand. Place the tetrahedron on the stand.If you entered the wrong destination, watch what
happens.If correct destination was entered, turn around
and go to the end of the platform. Watch Umang hide.Bargul presuming that Umang went to the Keepers
world sends his men to the opened portal. He follows.Click on the tetrahedron from the stand and
see what Umang does.
Replay to see the other endings.
This
document may not be distributed without express written permission of the
author and the content may not be altered in any way.For
Questions or Comments on this Walkthrough,
Please write to:
MaGtRoCopyright
© 3/2007MaGtRo